Page is loading ...

1
© Copyright 2007 Printed
Before You Start
Your ABS Canopy Top is exclusively designed for your
Land Pride Treker. Please read these installation
instructions and your Treker Operator’s Manual
thoroughlybeforebeginning.Especiallyreadinformation
relating to safety concerns. Also included in the
Operator’sManualisimportantinformation onoperation,
adjustment, troubleshooting, and maintenance for this
attachment (some manual sections do not apply to all
accessories).
A separate Parts Manual for replacement parts can be
purchasedfrom yourdealer oravailable freeof charge at
www.landpride.com. Have model and serial numbers
handy when placing an order.
Manual Part Numbers:
4220ST & 4420ST
•Operator’s Manual . . . . . . . . . . . . . . . . 700-504M
•Parts Manual . . . . . . . . . . . . . . . . . . . . . 700-504P
General Information
These assembly instructions apply to the following ABS
Canopy Top Accessory listed below:
701-174A TOP, BLACK ABS CANOPY
Tools required:
•Safety glasses
•Work gloves
•Phillips screwdriver
•1/2" box end or open end wrench
•Phillips screw driver
When you see this symbol, the subsequent
instructions and warnings are serious - follow
without exception. Your life and the lives of
others depend on it!
!
IMPORTANT: Before you begin, read these
instructions and check to be sure all parts and tools
are accounted for. Please retain these installation
instructions for future reference and parts ordering
information.
Further Assistance
Your dealer wants you to be satisfied with your new ABS
CanopyTop.If foranyreason youdonot understandany
part of this manual or are not satisfied with the service
received, the following actions are suggested:
1. Discuss the matter with your dealership service
manager making sure he is aware of any problems
you may have and that he has had the opportunity to
assist you.
2. If you are still not satisfied, seek out the owner or
general manager of the dealership, explain the
problem and request assistance.
3. For further assistance write to:
Land Pride Service Department
1525 East North Street
P.O. Box 5060
Salina, Ks. 67402-5060
E-mail address
lpser[email protected]
Assembly Instructions
Adetailed listing ofparts for theaccessory kit isprovided
on page 2. Use the list as a checklist to inventory parts
received.Please contact yourlocal Land Pride dealer for
any missing hardware.
Initial Preparations
Before installing canopy top, the following procedure
must be met to secure vehicle:
1. Park vehicle on a level surface. Don’t work under or
around a vehicle parked on an incline.
2. Set shift selector in Park, turn ignition switch off and
remove switch key.
3. Chock front and back of a wheel to prevent vehicle
from rolling.
4. If purchased, front windshield 701-172A should be
installed first. Use assembly instructions 701-173M
to install front windshield.
Trekers, 4220ST and 4420ST
ABS Canopy Top
Assembly Instructions
2/23/07
Manual No. 701-175M

2 Manual No. 701-175M 2/23/07
Land Pride
Assembly Instructions
■
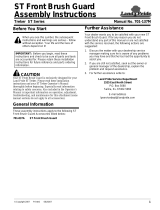
Canopy Installation
Refer to Figure 1:
1. Remove backing from sponge rubber strips (#8) and
attach to cross members by starting at weld line and
extending up toward center of frame as shown.
2. Orient neoprene flat washers (#5) with metal side up
and insert 5/16"-18 x 1 1/2" phillips pan head
machine screws (#2) into the washers. Make sure
metal side of washers are against the pan heads.
Neoprene side seats against canopy top.
3. With straight leg of rubber coated tube clamps (#1)
facing up, slip clamps over left and right accessory
bars between cross members as shown.
4. Orient and place canopy top on four post accessory
frame as shown.
5. Insert Phillips pan head machine screws (#2) with
neopreneflat washers(#5)intothe canopymounting
holes, rubber spacers (#6), tube clamps (#1) and flat
washers (#4) as shown. Secure with 5/16" nylock
nuts (#3). Do not tighten nuts.
6. Position canopy top as follows:
Without Front Windshield:
•Center canopy top over accessory frame to suit.
With Front Windshield:
•From behind, pull back until tight against front
windshield seal.
7. Tighten Phillips pan head machine screws (#2) to 11
ft-lbs. of torque. Figure 1
Corporate Office: P.O. Box 5060
Salina, Kansas 67402-5060 USA
www.landpride.com
Item Qty. Part No. Part Description
1 701-175M MANUAL, ABS CANOPY TOP
1 4 800-371C CLAMP, COATED 2" ID, 5/16 BOLT
2 4 801-194C PAN HD 5/16-18 x 1 1/2" LG PHILLPS
3 4 803-084C NUT HEX NYLOCK 5/16"-18 PLT
4 4 804-084C WASHER FLAT 5/16" HARD ASTMF436
5 4 804-135C WASHER FLAT 5/16" NEOPRENE PLT
6 4 816-572C SPACER, 1" OD x .375" ID x .625" RUBBER
7 1 817-691C CANOPY, BLACK ABS MOLDED
8 4 990-235R SPONGE RUBBER, 1/4" x 3/4" W/PSA (10" strips)
Kit No. 701-174A ABS Canopy Top, Black
For 4220ST & 4420ST Trekers
/