Page is loading ...

1
© Copyright 2005 Printed
Before You Start
Your Land Pride Retro Fit Gearbox Mount is exclusively
designed for Land Pride 4400NT & 4400ST Trekers.
Please read these installation instructions and the
vehicle Operator’s Manual thoroughly before beginning.
Especially read information relating to safety concerns.
Also included in the Operator’s Manual is important
information on operation, adjustment, troubleshooting,
and maintenance for this attachment (some manual
sections do not apply to all accessories).
A separate Parts Manual for replacement parts can be
purchased from your dealer or downloaded free of
charge from our web site at www.landpride.com. Have
model and serial numbers handy when placing an order.
Manual Part Numbers:
• Operator’s Manual . . . . . . . . . . . . . . . . 700-108M
• Parts Manual . . . . . . . . . . . . . . . . . . . . 700-108P
General Information
These assembly instructions apply to the following Retro
Fit Gearbox Mounting Kits listed below:
700-373A NT Retro Fit Gearbox Mount
700-374A ST Retro Fit Gearbox Mount
Tools required:
•
Safety Glasses
• Work Gloves
• Center Punch
• Hammer
• Drill with 1/8" & 11/32" Drill Bits
• Torque wrench with required sockets listed below
• 7/16" Socket and box end or open end wrench
• 1/2" Socket and box end or open end wrench
• 9/16" Socket and box end or open end wrench
• M22 Socket and box end or open end wrench
• 3/16" Hex socket wrench
When you see this symbol, the subsequent
instructions and warnings are serious - follow
without exception. Your life and the lives of
others depend on it!
!
IMPORTANT: Before you begin, read these
instructions and check to be sure all parts and tools
are accounted for. Please retain these installation
instructions for future reference and parts ordering
information.
Assembly Instructions
A detailed listing of parts for each accessory kit is
provided on page 5. Use the list that is for your Treker as
a checklist to inventory parts received. Please contact
your local Land Pride dealer for any missing hardware.
Initial Preparations
1. Parkvehicleonaflatsurface,movegearshift leverto
forward, set park brake, lock the cargo box in the up
position, turn off engine and remove ignition key.
2. Chock front and back of front tires to prevent the
vehicle from rolling.
3. See Operator’s Manual 700-108M for proper jacking
procedures. Follow all safety precautions in the
manual. Jack the back of the vehicle up to remove
pressure on the back right shock.
Refer to Figure 1:
4. Remove M14 hex nut and hex head cap screw (#1).
Description
Figure 1
Refer to Figure 2:
5. Rotate shock back to access gearbox components.
Description
Figure 2
1
23676
23677
Treker 4400NT & 4400ST Series
Retro Fit Gearbox Mount
Assembly Instructions
6/14/05
Manual No. 700-372M

2
Manual No. 700-372M 6/14/05
Land Pride
Assembly Instructions
■
Gearbox Removal
Refer to Figure 3:
1. Remove 3/8" x 4 1/4" lg. upper shock bolt (#6), three
3/8" flat washers (#10), two fender washers (#18),
one H style motor mounts (# 16), gearbox mounting
spacer (#1) and 3/8" hex nut (#9). Discard all
removed parts.
2. Remove two 5/16" x 3/4" lg. hex head bolt (#5), lock
washer (#12) and flat washer (#11). Discard all
removed parts.
3. Remove Transfer case mount (#2) and discard.
4. Loosen 3/8" x 1" hex head cap screw (#7) at the
gearbox drive shaft connection (#13).
5. Loosen the two 1/4" hex socket cap screws (#8)
securing the gearbox coupling (#17) to the right
angle gearbox (#14).
6. Remove right angle gearbox (#14) from the vehicle.
Be careful not to loose keys (#3) and (#4).
Gearbox Removal
Figure 3
23678

3
6/14/05
Manual No. 700-372M
Assembly Instructions
Land Pride
■
Preparations for new Gearbox Mount
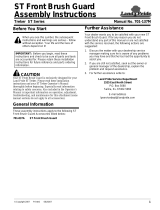
Refer to figure 4:
1. Clamp template plate (#1) to vehicle by aligning the
front edge of template with the front edge of the
engine mounting plate.
2. Drill two 1/8" pilot holes in engine plate using holes
provided in the template.
Template Set-up
figure 4
1
Front Edge of Template
& Engine mounting Plate
Clamping
Device
Drill 1/8"
Pilot Holes
23683
Refer to Figure 5:
3. Remove template and redrill pilot holes to 11/32"
diameter.
Pilot Holes Redrilled to 11/32" Diameter
Figure 5
Refer to Figure 6:
4. Assembly23/4"lg. mountingbracket(#2)togearbox
mounting plate (#1) with two 5/16"-18 x 3/4" lg. GR5
hex head cap screw(#4), 5/16" flat washers (#6) and
hex nylock nut (#5) as shown. Do not tighten.
5. Assembly37/8"lg. mountingbracket(#3)togearbox
mounting plate (#1) with two 5/16"-18 x 3/4" lg. GR5
hex head cap screw(#4), 5/16" flat washers (#6) and
hex nylock nut (#5) as shown. Do not tighten.
1/8" Pilot Holes
Drilled to 11/32"
23682
Gearbox Mounting Plate Assembly
Figure 6
23679

4
Manual No. 700-372M 6/14/05
Land Pride
Assembly Instructions
■
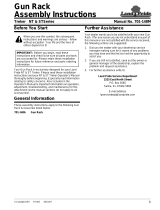
Gearbox Assembly
Refer to Figure 7 on page 4:
1. Assemble right angle gearbox (#12) to mounting
bracket (#2) with four 5/16"-18 x 3/4" lg. GR5 hex
head cap screws (#5) and lock washers (#10).
Tighten cap screws to 17 ft. lbs. of torque.
2. Attach gearbox mounting bracket (#2) to the newly
drilled 11/32"holesintheengine mounting plate(#1)
withtwo5/16"-18x3/4"lg.GR5hexheadcapscrews
(#5A), flat washers (#9A) and hex head nylock nuts
(#8A). Do not tighten.
3. Reassemble front drive shaft (#11) and 3/16" x 7/8"
key (#3) to the gearbox. Do not tighten 3/8" hex
head cap screw (#6).
4. Reassemble gearbox (#12) and 3/16" sq. key (#4) to
gearbox coupler (#14). Torque 1/4"-28 coupler cap
screws (#7) to 10 ft. lbs.
5. Torque 3/8" hex head cap screw (#6) to 49 ft. lbs.
6. Torque the two hex nylock nuts (#8A) to 17 ft. lbs.
7. While holding gearbox mounting bracket (#13) tight
against the transmission support bracket (#16),
tighten the four 5/16"-18 hex head cap screws (#5D)
to 17 ft. lbs. of torque.
8. Center punch the center of the two slots in mounting
bracket (#13).
9. Drill 1/8" pilot holes in the transmission support
bracket (#16) at the center punch marks. Be careful
not to drill through the transmission housing.
10. Redrill the pilot holes to 11/32" diameter. Be careful
not to drill through the transmission housing.
11. Attach bracket (#13) to transmission support (#16):
• NT Trekers:
a. Install two 5/16" x 3/4" lg. hex head cap screws
(#5B & 5C), flat washers (#9B) and hex head
nylock nuts (#8B). Torque nuts to 17 ft. lbs.
• ST Trekers:
a. Install 5/16"-18 x 3/4" lg. GR5 hexhead cap screw
(#5B), flat washer (#9B) and hex head nylock nut
(#8B). Do not tighten.
b. Remove 5/16"mufflermountinghardware(#17,18
& 19) on the left side of vehicle only. Discard bolt
#17.
c. Attach support bracket (#15) to the under side of
transmissionsupport(#16)withnew5/16"-18x1"
lg. GR5 hex head cap screw (#20) and existing
5/16" flat washer #18 & nylock nut (#19). Do not
tighten.
d. Insert 5/16"-18 x 1" lg. GR5 hex head cap screw
(#20), flat washer (#9B) and hex head nut (#8B).
e. Tighten nuts (#8B & #19) to 17 ft. lbs. of torque.
Refer to Figure 1 & Figure 2 on page 1:
12. Reinstall existing shock with M14-2.00 hex nut and
cap screw. Torque nut to 105 ft. lbs.
13. Lower vehicle to the ground and remove wheel
chocks.
Gearbox Removal (Muffler Not shown For Clarity)
Figure 7
23681

6/14/05
Manual No. 700-372M
5
Qty. Part No. Part Description
Land Pride
Listing of Parts
■
Kit No. 700-373A ........................NT RETRO FIT GEARBOX MOUNT
1 700-372M MANUAL 4X4 GEARBOX MOUNT
1 700-408D GEAR BOX MNT PLATE
1 700-448D MOUNT BRACKET GEARBOX FRONT
1 700-455D MOUNT BRACKET GEARBOX NT
1 700-457D GEARBOX MOUNT TEMPLATE
12 802-735C HHCS 5/16-18X3/4 GR5 YELLOW DI
8 803-084C NUT HEX NYLOCK 5/16-18 PLT
8 804-084C WASHER FLAT 5/16 HARD ASTMF436
4 804-201C WASHER LOCK SPRING 5/16 YELLOW
Kit No. 700-374A ........................ST RETRO FIT GEARBOX MOUNT
1 700-372M MANUAL 4X4 GEARBOX MOUNT
1 700-408D GEAR BOX MNT PLATE
1 700-416D GEAR BOX SUPPORT BRACKET
1 700-447D MOUNT BRACKET GEARBOX REAR
1 700-448D MOUNT BRACKET GEARBOX FRONT
1 700-457D GEARBOX MOUNT TEMPLATE
11 802-735C HHCS 5/16-18X3/4 GR5 YELLOW DI
1 802-738C HHCS 5/16-18X1 GR5 YELLOW DIE
8 803-084C NUT HEX NYLOCK 5/16-18 PLT
9 804-084C WASHER FLAT 5/16 HARD ASTMF436
4 804-201C WASHER LOCK SPRING 5/16 YELLOW

Corporate Office: P.O. Box 5060
Salina, Kansas 67402-5060 USA
www.landpride.com
/