Page is loading ...

E100
AM/FM/Shortwave Radio
OWNER’S MANUAL


DO YOU NEED HELP?
We want you to thoroughly enjoy the use of your E100 radio. If you
need help while learning its operation, please contact us, using the
methods below.
Monday-Friday, 8:30 a.m. - 4:00 p.m.,
North American Pacic Time.
1-800-872-2228 from the U.S.
1-800-637-1648 from Canada
1-650-903-3866, worldwide
FAX: 650-903-3867
customersvc@etoncorp.com
www.etoncorp.com
Mailing Address:
Etón Corporation
1015 Corporation Way
Palo Alto, CA 94303
USA
1
E100 OWNER’S MANUAL

TABLE OF CONTENTS
2
E100 OWNER’S MANUAL
INTRODUCTION................................................................................................................................
FEATURES............................................................................................................................................
DIAGRAMS...........................................................................................................................................
GETTING STARTED........................................................................................................................
• WHAT THE E100 INCLUDES...............................................................................................
• INSTALLING BATTERIES........................................................................................................
• SELECTING AND USING AN AC ADAPTOR...............................................................
• SIGNAL STRENGTH AND BATTERY STRENGTH INDICATOR.....................
BASIC RADIO OPERATION........................................................................................................
• IMPORTANT INITIAL SET-UP...............................................................................................
• TURNING THE E100 ON AND OFF................................................................................
• VOLUME AND TONE CONTROLS.....................................................................................
• SELECTING THE FM, AM OR SHORTWAVE..............................................................
• SETTING UP AM AND FM OUTSIDE OF NORTH AMERICA..........................
• TUNING IN STATIONS...........................................................................................................
CLOCK AND ALARM FEATURES........................................................................................
WORKING WITH MEMORY.....................................................................................................
SYSTEM SET CODES AND THE SYSTEM SET CODE TABLE.........................
OTHER E100 INFORMATION.............................................................................................
TROUBLESHOOTING................................................................................................................
LISTENING TO SHORTWAVE STATIONS.....................................................................
SHORTWAVE LISTENING GUIDE......................................................................................
WARRANTY REGISTRATION...............................................................................................
LIMITED WARRANTY TO THE ORIGINAL CUSTOMER..................................
SERVICE INFORMATION........................................................................................................
1
2
3
4
5
6
7
8
9
10
11
12
13
14
15
3
4
5
7
7
7
7
8
8
8
8
9
9
9
10
11
13
18
21
22
24
28
34
35
37

3
E100 OWNER’S MANUAL
E100 OWNER’S MANUAL
1 INTRODUCTION
Thank you for purchasing the E100 AM/FM/Shortwave Radio. This
radio has been designed and manufactured to high quality
standards, and will provide reliable operation for many years. Please
carefully read the Owner’s Manual in order to take advantage of
the many interesting features of the E100.

2 FEATURES
4
MAJOR FEATURES OF THE E100
• SHORTWAVE: 1711 - 29.995 KHz
• FM 87.0 - 108.0MHz; MW 520 - 1710
• Manual and Auto-Scan Tuning
• Direct Keypad Frequency Entry
• Manual/Auto Scan to scan the preset stations
• Fine-Tuning Control Knob
• 200 Random Programmable Memories
• Memory Page Customizing
• 9/10KHz step size selector for correct worldwide
Medium Wave (AM) reception
• FM-Stereo/Signal Strength/Power Level Indicators
• Digital Clock
• Selectable 12/24 hour clock display format
• Simultaneous display of frequency and clock
• Favorite Station Wake-Up
• Programmable Alarm
• Programmable Sleep Timer (10 - 90min.) functions
• LCD display light
• Built in antennas for AM, FM and SW reception
• Earphone socket (earbud style earphones included)
• AC adaptor socket (adaptor not included)
• Includes carrying pouch
E100 OWNER’S MANUAL

5
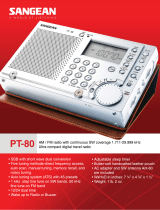
3 DIAGRAMS
Telescopic Antenna
LCD Display
POWER/SLEEP
Fine Tuning Control
Up/Hour
Down/Min.
Memory Scan/Page Button
FM ST.
Alarm Button
Light Snooze Button
FM-MW-SW Band Button
SW Meter Band Button
Enter/Sys. Set
E100 OWNER’S MANUAL
E100 OWNER’S MANUAL
1
2
3
4
5
6
7
8
9
10
11
12
13
FRONT
LEFT SIDE RIGHT SIDE
Memory & Edit/Time Set
Numeric Keypad
15
14
Stand
Tone Control
Volume Control
Lock Switch
Battery Compartment Cover
21
22
23
24
25
Hand Carry Belt
ANT. GAIN H/M/L
DC Jack
Reset Button
16
17
18
19
20
Earphone Socket

6
3 DIAGRAMS continued
E100 OWNER’S MANUAL
RADIO OFF DISPLAY RADIO ON DISPLAY
MEMORY DISPLAY
SHORTWAVE METER
BAND DISPLAY
26
27
28
33
32
34
31
30
29
33
37
26
27
28
36
34
31
35
38
39
42
41
40
Refers only to the display’s upper right corner.
MEMORY DISPLAY
Refers only to the display’s upper right corner.
Refers only to the display’s upper right corner.
Battery Symbol
Antenna Symbol
1-5 Scale
Alarm AM/PM Indicator
Triangle Pointer
Time AM/PM
Indicator
Clock Digits
Alarm
Activation
Symbol
Alarm
Clock
Digits
Battery Symbol
Antenna Symbol
1-5 Scale
Clock Digits
Triangle
Pointer
FM, MW,
Shortwave
Indicators
Frequency
Digits
Sleep Timer
Symbol
Alarm
Activation
Symbol
Delete Indicator
Memory Display
Shortwave
Meter Band
Display

7
4 GETTING STARTED
E100 OWNER’S MANUAL
E100 OWNER’S MANUAL
WHAT THE E100 INCLUDES
• Earbud style earphones
• Batteries
• Carrying pouch
Note: In the instructions below, numbers in parenthesis ( ),
refer to the diagrams.
INSTALLING BATTERIES
Install 2 AA alkaline batteries into the battery compartment (25),
observing the battery polarity diagram on the back of the radio.
To remove the battery compartment cover, apply thumb pressure
and slide it towards the bottom of the radio.
SELECTING AND USING AN AC ADAPTOR
(main adaptor) - (not included)
Visit our web site, www.etoncorp.com, or Contact Etón Corporation
for information regarding selection of a proper AC adaptor.
SIGNAL STRENGTH AND BATTERY
STRENGTH INDICATOR
When the radio is turned off, the upper left corner of the display
(2) shows battery strength on the 1–5 scale (28), with the triangle
pointer (33) under the battery symbol (26) on the far left side of the
scale. When the radio is turned on, the pointer is under the antenna
symbol (27) and the 1-5 scale shows relative signal strength.

8
5 BASIC RADIO OPERATION
E100 OWNER’S MANUAL
IMPORTANT INITIAL SET-UP
1. Assure that the radio is unlocked, using the LOCK switch (24) on
right side of the radio by pushing it down, to the OFF position. This
switch can be used to lock the radio when it is not in use or when
traveling. (Note that this does not deactivate the alarm feature).
2. Assure that the antenna gain switch (17), on the left side of the
radio is in the high-gain, H, position.
TURNING THE E100 ON AND OFF
The E100 can be turned on by the two methods shown below. To
turn it off, press the POWER/SLEEP button (3).
1. Battery Saver/Timer Method
Perform a quick, short press of the POWER/SLEEP button (3). This
turns the radio on with 120 in the display and causes the radio to
shut off automatically after 120 minutes. The sleep timer symbol,
(35), also appears in the display. To change the automatic
shut off time from 120 minutes to a time of your preference, use
the Up/Hour or Down/Min. buttons (5,6) immediately after turning
on the radio. This allows selection of 1 – 120 minutes of playtime
before automatic shut-off occurs. The number of minutes that
you last set are also used the next time the radio is turned on.
2. Timer-Defeat Method
This method defeats the automatic 120 minute timer and causes
the radio to stay on until deliberately turned off, until the batter-
ies drain or indenitely if used with an AC adaptor. Hold down the
POWER button for about 3 seconds, then release. Note that ‘120’
and the sleep timer symbol do not appear when this method is
used.

9
5 BASIC RADIO OPERATION continued
E100 OWNER’S MANUAL
E100 OWNER’S MANUAL
VOLUME AND TONE CONTROLS
• The volume control (23), labeled VOLUME, is located on the right
side of the radio. To change the volume, rotate the volume control
knob.
• The tone control (22), on the right side of the radio is labeled
LOW/HIGH. Use the position that you like best.
SELECTING FM, AM or SHORTWAVE
After turning on the E100, pressing the button labeled ‘FM/MW/SW
Band’ (11), allows selection of FM, AM and SW. Note that when the
AM band is selected, the display shows MW, not AM. The frequency
digits (36) appear in the lower portion of the display.. The local sta-
tions of the area that you are currently in will be heard on AM and FM.
Shortwave stations from around the world will be heard on SW.
SETTING UP AM AND FM OUTSIDE OF NORTH AMERICA
You can skip this section if you are in North America and just
purchased the E100. It is already set-up in the factory for use in
North America. If you travel to other world regions, make the changes
below as necessary.
Outside of North America, AM stations (MW in the E100’s display)
are spaced in 9 KHz tuning steps. The FM frequency range may be
different from that used in North America, e.g. like that used in Japan,
76-108MHz. To make these changes please see the instructions
titled SYSTEM SET CODE TABLE, on pages 21-22.

5 BASIC RADIO OPERATION continued
10
TUNING IN STATIONS
Four Ways to Tune in Stations
Below, four ways to tune stations are described. They are Regular
Tuning, Auto-scan Tuning, Direct Frequency Entry and Fine Tuning.
1. REGULAR TUNING (also called manual tuning)
Quick, short presses of the Up/Hour-Down/Min. buttons (5,6)
enables tuning up or down frequency.
2. AUTO-SCAN TUNING
Pressing the Up/Hour or Down/Min. buttons (5,6) for just over 1
second enables automatic scan-tuning. The radio will then auto-
matically stop on the next station encountered. Use the Up/Hour
button to auto-scan upward in frequency and the Down/Min.
button to auto-scan downward in frequency.
3. DIRECT FREQUENCY ENTRY
When the desired frequency is known, it can be entered via the
numeric keypad (14) and the ‘Enter’ button (13). First, make sure
that the correct band is selected - AM, FM or SW.
Most AM and Shortwave frequencies are designated in kilohertz
(KHz), e.g. 810 KHz or 9475 KHz. All FM frequencies are designat-
ed in megahertz (MHz), e.g. 102.9 MHz. To enter such frequencies:
1. Press/release the ‘Enter’ (13) button.
2. Enter the frequency using the numeric keypad.
Sometimes Shortwave frequencies are designated in megahertz
(MHz). If you encounter such a shortwave frequency and it has
less than three digits after the decimal point (e.g. 15.10 MHz or
6.92 MHz), then use the following method to enter it. However, if
there are three digits after the decimal point (e.g. 15110 MHz or
E100 OWNER’S MANUAL

11
5 BASIC RADIO OPERATION continued
5.975 MHz), use the method described previously.
1. Press/release the ‘Enter’ (13) button.
2. Enter the frequency using the numeric keypad.
3. Press/release the ‘Enter’ button again.
4. FINE TUNING
The FINE TUNING control (4) is located on the right side of the
radio. It tunes in 1 Kilohertz steps in AM and Shortwave and .05
Megahertz steps in FM. Use it to ‘ne-tune’ stations to your liking,
or use it as you would a tuning knob.
SETTING THE CLOCK
The factory has set the clock to function as a 24-hour format clock.
If you prefer a 12 hour, AM/PM clock format, see the section titled
CHANGING THE CLOCK FROM 24 TO 12 HOUR FORMAT, on page 22.
To set the clock:
1. Turn the radio off. The clock digits appear in the lower part of the
display (43).
2. Press/release the button labeled ‘Time Set’ (15). The clock’s digits
ash in the display.
3. Within 5 seconds, set the hour using the Up/Hour button and the
minutes using the Down/Min. button. Make sure that AM or PM
(32) appear in the display, to the left of the time, if your clock is
set up in the 12 hr. AM/PM format.
4. Within 5 seconds of nishing, press/release the ‘Time Set’ button
6 CLOCK AND ALARM FEATURES
E100 OWNER’S MANUAL
E100 OWNER’S MANUAL

12
6 CLOCK AND ALARM FEATURES continued
twice or just wait until the clock digits stop ashing.
SETTING THE ALARM
Set the alarm with the instructions below. Note that the alarm must
be activated to function. After setting the alarm time, be sure to read
the next section titled ACTIVATING AND DEACTIVATING THE ALARM.
The alarm will wake you to the last radio station tuned, unless set for
Favorite Station Wake-Up (Use system set code 01. See page 21).
When the alarm activates, it turns the radio on and the alarm activa-
tion symbol (31) appears ashing in the display. The radio will play for
30 minutes, until you turn it off or until you press the SNOOZE/LIGHT
button (see USING THE SNOOZE FEATURE, below).
To set the alarm:
1. Turn the radio off. The alarm clock digits (30) appear in the upper
right corner of the display.
2. Press/release the button labeled ‘Time Set’ twice. The alarm clock’s
digits ash in the display.
3. Within 5 seconds, set the hour using the Up/Hour button and the
minutes using the – button. Make sure that AM or PM (29) appear
in the display if your clock is set up in the 12 hr. AM/PM format.
4. Within 5 seconds of nishing, press the ‘Time Set’ button once or
just wait until the alarm digits stop ashing.
USING THE SNOOZE FEATURE
When the alarm activates and turns the radio on, the alarm activation
E100 OWNER’S MANUAL

13
6 CLOCK AND ALARM FEATURES continued
symbol (31) appears ashing in the display. While it is ashing, press/
release the SNOOZE/LIGHT button (10). The radio will turn off and
then turn on again in 10 minutes. This process can be repeated
3 times.
ACTIVATING AND DEACTIVATING THE ALARM
The alarm is activated and deactivated by pressing the button
labeled ‘Alarm’ (9). When it is activated, the alarm activation symbol
(31) appears in the display. When this symbol is not in the display,
it is deactivated. Note that once the alarm turns the radio on, with
the alarm symbol ashing, except for the SNOOZE/LIGHT button, the
radio’s controls will not function until the ON/OFF-TIMER button is
pressed.
7 WORKING WITH MEMORY
At the factory, the E100 is set up with 8 pages of memory, each
page holding 25 frequencies. This enables storing of 200 frequen-
cies into memory. This factory setting can be changed and tailored
to your personal needs or can be left as-is. When rst learning to
store stations into memory, we suggest using the factory setting. To
change the factory setting, see the section CUSTOMIZING MEMORY
PAGES on page 20. Otherwise, follow the instructions below to store
your favorite frequencies into memory using this original factory
memory set-up.
STORING STATIONS INTO MEMORY
The instructions below show you how to store stations (frequencies)
into the currently selected memory page.
1. Turn on the radio.
E100 OWNER’S MANUAL
E100 OWNER’S MANUAL

14
7 WORKING WITH MEMORY continued
E100 OWNER’S MANUAL
2. Tune to the desired station.
3. Press/release the Mem.&Edit button (15). Note that the
memory number digits (38) ash in the upper right corner of the
display. The memory page number, P#, also appears, but does not
ash.
4. Within 5 seconds use the numeric keypad to enter the memory
number that you wish to store the station into (In the factory’s
original memory setting, there are 25 memories per page. You
would therefore enter a number between 01 and 25).
5. Within 5 seconds press the Mem.&Edit button, or wait 5 seconds.
After a few seconds, the upper right corner’s display returns to the
clock.
SELECTING/CHANGING MEMORY PAGES
If you are not interested in changing memory pages and wish to keep
the original factory memory page setting, skip this section.
At the factory, the E100 is set up to access memory page 1 when
storing a frequency. You can leave this as-is or change to a differ-
ent memory page. We suggest learning rst to store stations into
memory page 1 before changing to other pages. To do this, go to the
previous section, STORING STATIONS INTO MEMORY. To change to
the memory page, follow the directions below.
1. Press/hold the M.Scan/Page button (7) for about 3 seconds. Then
release it. Note that the memory page (38) is ashing in the upper
right corner of the display.
2. Within 5 seconds select the desired page with the Up/Hour and

15
7 WORKING WITH MEMORY continued
E100 OWNER’S MANUAL
E100 OWNER’S MANUAL
Down/Min. buttons (5,6). You will see the memory page change
with each press. When the page of your choice is reached, stop
pressing.
3. When nished, either press/release the M.Scan/Page button, or
wait about 3 seconds, causing the memory page to be entered.
The clock (34) will reappear in the display’s upper right corner.
ACCESSING WHAT IS STORED INTO MEMORY
There are three ways to access what has been stored into memory:
Direct Memory Access, Memory Search and Memory Auto-scan.
These three methods are described below. When the memory page
and memory preset numbers appear in the upper right corner of the
display, as it will in the descriptions below, the radio is in MEMORY
ACCESS MODE. This mode can be exited any time with a press/re-
lease of the M.Scan/Page button (7).
Direct Memory Access
If you are already on the desired memory page, simply key- in the
memory number with the numeric keypad. For example, if the desired
radio station is in memory number 01, just press ‘0’, then ‘1’, and it
will go to memory 01.
If you rst need to change memory pages, see the previous section,
SELECTING/CHANGING MEMORY PAGES.
Memory Search
Memory Search enables manual searching through the memories
within a memory page, as shown below:
1. Press/release the M.Scan/Page button.
2. Use quick, short presses on the Up/Hour or Down/Min. buttons to
search through the memories.

16
7 WORKING WITH MEMORY continued
E100 OWNER’S MANUAL
Memory Auto-Scan
Memory Auto-scan enables scanning through the memories within
the selected memory page. Each lled memory is accessed for about
5 seconds, after which the scan move on to the next used memory
automatically, staying on it for about 5 seconds. This continues
indenitely on the selected page until deliberately stopped. Unused
memories are not accessed.
1. Press/release the M.Scan/Page button.
2. Press/hold either the Up/Hour or Down/Min. button for about 3
seconds. Then release it. Note that the memory number in the
upper right corner of the display ashes and the preset being
scanned remains for about 5 seconds. It then moves on to the
next memory preset for another 5 seconds.
To stop memory preset auto-scan, press/release either the Up/Hour
or Down/Min. button.
MOVING A STORED FREQUENCY
If desired, a frequency that has been stored into a memory can be
moved to a different memory on the same page, or a different page.
1. Turn on the radio.
2. Press/hold the M.Scan/Page button (7) for about 3 seconds and
release it.
3. Use the Up/Hour or Down/Min. button (5,6) to select the required
memory page.
4. Press/release the M.Scan/Page button twice.

17
7 WORKING WITH MEMORY continued
E100 OWNER’S MANUAL
E100 OWNER’S MANUAL
5. Press/release the Mem.&Edit button (15).
6. Within 5 seconds use the numeric keypad to enter the memory
number that you wish to store the station into.
7. Within 5 seconds press/release the Mem.&Edit button.
DELETING A FREQUENCY STORED IN MEMORY
1. Press/release the M.Scan/Page button (7).
2. Use the Up/Hour or Down/Min. button (5,6) to select the memory
preset location of the frequency that you wish to delete.
3. Press/hold the Mem.&Edit button (15) for about 2 seconds and
then release it. ‘DeL’ appears ashing in the display.
4. Within 2 seconds, press/release the Mem.&Edit button.
DELETING ALL MEMORY CONTENTS OF A PAGE
1. Press/release the M.Scan/Page button (7).
2. Press/hold the Mem.&Edit button (15) for 4 seconds and then
release it. ‘Del’ (39) appears ashing in the display.
3. Within 2 seconds, press/release the Mem.&Edit button.
CUSTOMIZING MEMORY PAGES
The E100 is congured at the factory with 8 memory pages, each

18
7 WORKING WITH MEMORY continued
CODE
NO.
DESCRIPTION
8 SYSTEM SET CODES AND THE SYSTEM SET
CODE TABLE
E100 OWNER’S MANUAL
page having 25 memories, for a total of 200 memories. You can
change this set-up. The number of memory pages can be set to
your choice of 4, 5, 8 or 20. This changes the number of frequencies
stored per page, but in all cases, 200 total frequencies can be stored.
To see the details of these changes and to make these changes
please see the instructions titled SYSTEM SET CODE TABLE, on
Pages 21-23.
Please review the System Set Code Table, below. System Set Codes
allow the radio to be tailored to your needs by changing certain
programmable functions. These functions and their descriptions are
noted in the table.
SHOWN IN
DISPLAY
Alarm uses radio station on page 1, Mem 1 AL. 1
Alarm uses last radio station tuned AL. 2
Divide the memories into 4 pages with P4: 50
50 locations
Divide the memories into 5 pages with 40 locations P5: 40
Divide the memories into 8 pages with 25 locations P8: 25
Divide the memories into 20 pages with 10 locations P20: 10
Set the tuning steps for MW (AM) to 9KHz 9KHz
Set the tuning steps for MW (AM) to 10KHz 10KHz
Set the clock system to 12Hr 12H
Set the clock system to 24H 24H
Check all the segments on LCD display and model no. All LCD
segments show
Rechargeable battery to be used 1.2
01*
02*
04
05
08
20
09*
10*
12*
24*
22
28*
/