Page is loading ...

R113 SP Disc Header
R1 SP MOTOR SERVICE KIT (MD #257149)
INSTALLATION INSTRUCTIONS
214700 Revision A Page 1 of 5
This document explains how to install the R1 SP Motor Service kit (MD #257149) on an R113 SP Disc Header. A list
of parts included in the kit is provided.
NOTE: Keep your MacDon publications up-to-date. The most current version of this instruction can be downloaded
from our Dealer-only site (https://portal.macdon.com) (login required).
NOTE: This document is currently available in English only.
Installation Time
This kit will take approximately 1 hour to install.
Conventions
The following conventions are used in this document:
• Right and left are determined from the operator’s position, facing forward with the windrower in cab-
forward position.
• Unless otherwise noted, use the standard torque values provided in the disc header operator’s
manual and technical manual.
Table of Contents
Parts List .................................................................................................................................................................... 2
Installation Instructions ............................................................................................................................................. 3
Removing Existing Motor from Header ................................................................................................................ 3
Preparing the New Motor .................................................................................................................................... 4
Installing the New Motor ..................................................................................................................................... 5

R113 SP Disc Header
R1 SP MOTOR SERVICE KIT (MD #257149)
INSTALLATION INSTRUCTIONS
214700 Revision A Page 2 of 5
Parts List
This kit includes the following parts:
Ref
Part
Number
Description Qty
1
136258
FITTING – TEE HYD 1
2
135790 FITTING
–
ADAPTER
1
3
236634 MANIFOLD
–
RELIEF
1
4
198610 MOTOR
–
BOSCH
1
A
136354 SCR
–
HEX SOC HD ISO 4762 M10
4
B
136108 SCR
–
HEX SOC HD M10 X 1.5 X 80
–
12.9-BO
4
C
30632 WASHER
–
LOCK SPRING M10
4

R113 SP Disc Header
R1 SP MOTOR SERVICE KIT (MD #257149)
INSTALLATION INSTRUCTIONS
214700 Revision A Page 3 of 5
Installation Instructions
To install the R1 SP Motor Service kit, follow these steps:
DANGER
To avoid bodily injury or death from unexpected startup of the machine, always stop engine and remove key
from the ignition before leaving the operator’s seat for any reason.
1. Lower disc header to the ground. For instructions, refer to the disc header operator’s manual.
2. Stop engine, and remove key.
Removing Existing Motor from Header
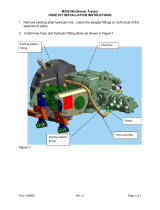
1. Disconnect the following on the existing motor:
a. Pressure hose from male fitting (A)
b. Return hose from adapter fitting (B)
c. Case drain hose from elbow fitting (C)
d. Electrical harness from the windrower
electrical harness (D)
IMPORTANT: To prevent motor contamination and
spillage of excess fluid, install caps and plugs on
open fittings and hoses.
2. Remove and retain elbow fitting (A), drain hose with
hydraulic fitting (B), and relief valve with adapter
fitting (C).
3. Remove and discard four bolts and washers (D).
4. Remove and retain two half-split flanges (E) and
male fitting (F).
Figure 1: Existing Motor on Disc Header
Figure 2: Fittings on Existing Motor

R113 SP Disc Header
R1 SP MOTOR SERVICE KIT (MD #257149)
INSTALLATION INSTRUCTIONS
214700 Revision A Page 4 of 5
5. Attach one end of a sling to motor and the other end
to lifting device.
IMPORTANT: Do NOT lift the motor with
hydraulic lines.
6. Remove and retain four bolts (A) securing motor (B)
to gearbox (C).
7. Using a lifting device, slowly lift the motor and
remove from gearbox. Discard motor.
8. Cover gearbox opening (A) with a rag or plastic.
Preparing the New Motor
1. Remove caps from motor ports.
2. Install new tee fitting (A) (MD #136258) on the new
motor (B) (MD #198610) as shown.
3. Position new relief manifold (C) (MD #236634) on
the new motor as shown, and secure with four
bolts (D) (MD #136108). Torque bolts to 50 Nm
(37 lbf·ft).
4. Position male fitting (E), and secure with two half-
split flanges (F), and four washers (MD #30632) and
bolts (G) (MD #136354) on the relief manifold.
Torque bolts to 50 Nm (37 lbf·ft).
Figure 3: Existing Motor on Header
Figure 4: Gearbox
Figure 5: New Motor Assembly

R113 SP Disc Header
R1 SP MOTOR SERVICE KIT (MD #257149)
INSTALLATION INSTRUCTIONS
214700 Revision A Page 5 of 5
5. Install new adapter fitting (A) (MD #135790) on the
relief manifold (B).
6. Install elbow fitting (C) on the receptacle of the
motor (D).
7. Install relief valve with adapter fitting (E) onto tee
fitting (F) as shown.
8. Attach drain hose with hydraulic fitting (G) on the
top of the relief manifold (B), and attach other end
onto the tee fitting (F) as shown.
9. Attach one end of a sling to motor and the other end
to a lifting device.
IMPORTANT: Do NOT lift the motor with
hydraulic lines.
Installing the New Motor
1. Lower the new motor assembly (A) on gearbox
opening.
2. Secure the motor on the gearbox (B) using four
bolts (C). Torque bolts to 140 Nm (103 lbf·ft).
3. Remove sling from motor.
4. Connect the following on the newly installed motor:
a. Pressure hose (A) to the male fitting (B)
b. Return hose (C) to the adapter fitting (D)
c. Case drain hose (E) to the elbow fitting (F)
d. Electrical harness (G) to the windrower
electrical harness (H)
Figure 6: New Motor Assembly
Figure 7: New Motor Assembly
Figure 8: New Motor Installed
/