Page is loading ...


4
PFAFF
63
Light-Weight
Portable
Electric
Sewing
Machine
(Central
Bobbin
Machine)
For
Straight-Away
Stitching
INSTRUCTION
BOOK
•1

1.
What
Belongs
to
Your
Machine?
1
package
of
assorted
needles,
System
705
R
I
tape
measure
5
bobbins
No.
2030
1
shuttle
screw
driver
No.
29070
1
screw
driver
No.
29002,
short
1
screw
driver
No.
29007,
long
1
hinged
presser
foot
No.
43729
1
guide
No.
25820
1
guide
fastening
screw
No.
112
1
edge
stitcher
with
quilting
guide
No.2555
3
1
hemmer,
2.5
mm,
No.
25576
1
hemmer,
4.0
mm,
No.
25579
1
folder
No.
25594
1
feed
cover
plate
No.
25997
1
darning
hook
No
46128
1
oil
can
No.
29168,
flat
1
bottle
of
oil
No.
29180
1
instruction
booklet
I
Foreword
Youarenowthe
proud
ownerof
a
Portable
Electric
PFAFP
63.
The
material
of
which
is
made
and
the
workmanship
it
embodies
ore
of
the
same
high
standards
as
used
n
today’s
High
Speed
Sewers
for
industrial
purposes.
t’ou
can
use
your
PFAFF
everywhere
at
will.
It
can
be
set
up
and
put
away
after
the
ewing
quickly,
is
easy
to
operate,
and
requires
little
attention
and
service.
lust
follow
these
smple
instructions
and
sewing
will
become
a
lasting
pleasure.
G.M.PFAFF
AG
2
3
Photo
1

Li
j
2.
Do
You
Know
Your
Machine?
1.
Full-length
arm
cover,
removable
2.
Thread
take-up
3.
Upper
thread
guide
4.
Collapsible
spool
pins
5.
Winder
spindle
6.
Winder
engaging
lever
7,
Balance
wheel
8.
Milled
screw
for
engaging
the
sewing
mechanism
9,
Stitch
length
limiting
lever
10.
Stitch
length
lever
11.
Motor
support
12.
Spool
pins
13.
Pin
cushion
14.
Sewing
machine
base
15.
Accessory
receptacle
cover
plate
16.
Push
button
for
sew
light
17.
Feed
lowering
button
18.
Sewing
machine
arm
19.
Sew
light
lowering
lever
20.
Needle
clamp
screw
21.
Needle
plate
22.
Presser
foot
23.
Fold
away
support
for
bed
plate
ex
tension
24.
Bed
plate
extension
25.
Bed
plate
slide
26.
Needle
threader
27.
Lower
face
plate
thread
eyelet
28.
Upper
thread
tension
29.
Upper
face
plate
thread
eyelet
30.
Face
plate
45
N
25
Photo
2
56
22
16
15
I

1.
Full-length
arm
cover,
removable
2.
Thread
take-up
3.
Upper
thread
guide
4.
Collapsible
spool
pins
5.
Winder
spindle
6.
Winder
engaging
lever
7.
Balance
wheel
14.
Sewing
machine
base
17.
Feed
lowering
button
2L
Needle
plate
23.
Fold-away
support
for
bed
plate
extension
24.
Bed
plate
extension
25.
Bed
plate
slide
26.
Needle
threader
30.
Face
plate
31.
Winder
thread
tension
32.
Needle
threader
lever
33.
Presser
bar
lever
34.
Hinge
for
case
top
35.
Bed
plate
36.
Swivel
support
for
tilting
the
head
37.
Plug
for
motor
cable
38,
Electric
motor,
Type
KU
52
39.
Belt
guard
—
I
J
Do
You
Know
Your
Machine?
L.
hoto
3
67
r—---

Li
3.
Setting
Up
the
Machine
Place
the
sewing
machine
case
on
table
and
unlock
it.
Pull
the
flap
lighti
and
the
snap
bow
will
release
the cas
top.
Lift
the
top
and
remove
it,
holding
th
cable
bag
in
your
left
hand.
Take
pedal
starter
from
top
cover
on
unpack
cable.
Photo
4
Place
pedal
starter
under
the
table
and
plug
the
cable
into
the
motor
socket.
Attention
Dont
plug
your
machine
into
the
line
unless
you
have
made
sure
that
the
line
voltage
corresponds
to
the
voltage
given
on
the
motor plate
of
your
machine
(check
the
cur
rent
meter to make
sure of
the
line
voltage).
Place
the
pedal starter
within
convenient
reach.
A
sliqht
pressure
exerted
with
the
foot
cuts
in
the
machine
and
it
commences
swina
The
farther
you
depress
the
starter,
the
faster
will
the
machine
sew.
9

I
Type
of
Material:
Very
fine
linen,
Shirting,
ccmbrcs,
muH
Net,
finest
s
k
Foulard
silk
Fine
linen,
cambric
Crêpe
de
Chine
Crêpe
Marocain
Crêpe
Satin,
Nylon,
Perlon
Muslin,
fine
taffeta
Fine
sheets,
table
cloths
Silk
cloths
Linen,
calico,
quilts
with
Silk
covers
Cotton,
kid
leather,
etc.
Fine
cloth
Heavy
silk
and
linen,
inlets
Clothing,
general
Fine
leather
Heavy
woollens
and
linen
silk
100-120
00-
0
80-100
60-
70
/
-D
0
0
C),
o_
:-‘
i5•-
D
D
Q
.
C
•
CD
CD
(0
-,
-.
CD
CD
:3-n
-,-CD
0(0
(D
—
0
—
m
D
a
CD
0
‘,,
—-0-
0
<CD
0
—
:c•
;•
•-
0
D
0(0
D3
CD
3
0
a
=
CD
,
w
C
5.
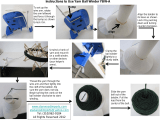
Relative
Sizes
of
Needles
and
Threads
—
—
Needle
Size
Type
of
Thread:
Size:
60
(6)
cotton
120-150
silk
COO-
00
schappe
silk
100-150
embroidery
yarn
60-
80
70
(7)
cotton
silk
schappe
silk
embroidery
yarn
80
(8)
cotton
S
•55
SS
r-rt----
—
80-100
00-
0
(100/3)
schappe
silk
70-80
embroidery
yarn
50-70
90
(9)
cotton
silk
schappe
silk
embroidery
yarn
100
(10)
cotton
thread
silk
I
60-80
A-B
70
30-40
40-60
B-C
Cloth,
calico,
etc.
110
(11)
schappe
silk
60

1.
Disengage
the
sew
ing
mechanism.
2.
Place
cotton
reel
on
the
right
reel
pin.
3.
Pass
the
thread
from
cotton
reel
1,
around
tension
2,
crossing
the
theod.
4.
Thread
end
of
thread
inside—out
through
the
bobbin
slot.
5.
Place
bobbin
3
on
spindle
4.
6.
Press
lever
5
against
bobbin.
The
winder
will
throw
off
automatically
when
bobbin
is
filled.
I
6.
Changing
the
Needle
Loosen
needle
clamp
screw.
7.
Winding
the
Bobbin
Thread
Insert
needle
into
the
opening
of
the
needle
bar
as
far
as
it
will
go,
taking
care
that
the
flattened
side
of
the
shank
faces
to
the
right.
Tighten
needle
clamp
screw.
Photo
7
Photo
6
12
13
I

Pull
out
bobbin
case,
holding
the
latch.
it
While
the
latch
remains
open,
bobbin
cannot
fall
out.
the
N
8.
Taking
Out
Bobbin
Case
Raise
needle.
9.
Inserting
the
Bobbin
into
the
bobbin
case.
by
Hold
bobbin
as
shown
in
the
photo;
the
thread
unwinding
toward
the
operator.
Photo
8
14
15
Photo
9
I

Draw
thread
through
slot,
as
illustrated.
Photo
10
16
Hold
bobbin
in
bobbin case
and
draw
thread
beneath
the
tension spring
so
that
it
comes
out
from
underneath
its
end.
17
Photo
11
I

Hold
bobbin
case
with
thumb
and
midd
le
finger
of
your
left
hand.
While
the
index
finger
holds
the
latch
open,
the
bobbin
cannot
fall
out.
Photo
12
18
Place
bobbin
case
on
the
center
stud
of
the
shuttle
and
release
latch.
Turn
bobbin
case
with
thumb
and
index
finger
so
that
bobbin
case
retainer
H
engages
in
the
recess.
Push
the
bobbin
in
farther
until
it
clicks
with
an
audible
sound.
19
Photo
1
3
4L

V
0
0
C
-
0
o
0
-
C
C
CD
(9cQ
•-‘
CD
‘
-
0
CD
0
D
—
CD
CD
CD
C
;c-
0
-+,
C
CD
CD
-‘
<
—‘CD
CD
Z
-
3
0
-
(0
—
L1
CD
co
-
CD
CD
CD
•
CD
—
—
—
CD
-
Cl)
D
0
c0
0
0’
o
S.
C
0
D
;;
D
C)
CD
‘
,$)
.!‘
(D
CD
0
D
-,
(0
—
CD
c
—
-
-
D
C
CD
z
<
c2_
CD
CD
0
CD
2D
CD
—
D
CD
CD
D

I
•
.
.
holding
it
loosely
over
the
protrud
ing
prong
3,
making
sure
Ihatthread
lies
properly
in
the
lop
of
the
prong.
Photo
17
4.
Release
lever
1
4
Photo
16
The
thread
is
pulled
through
the
needle
eye
by
the
reversing
prong
3.
22
23
Photo
18

0
0
‘0
n
0
3
CD
CD
0
0
CD
n
CD
t
—
—0
CD
<
CD
-
o
:r
0
CD
0
0
0
0
n
C
C
0
CD
CD
-
0
ö-CD
o
—
a
<
3.
C
Cr1
=
-,
C
—
CD
D
0
CD
D_.
CDCD
C
—(‘-C
CD
C3
CD
o
CD
-
-
CD
0
-4
C
C
D
0
a
C
(
CD
D
CD
CD
C
C
C
CD
CD
0
CD
C
a
In
0
0.
C-
CD
CD
C
0
0
-$,
C-
CD
C
CD
-I
C
-I
CD
a
FL
-v
(0
C
0
0
U-
-I
0
0
0
-4
CD
—
C
CD
—
C
C
Ifl
C
CD
--‘
—
C
C
CO
CD
-,
Q_
-,,
CD
a
0
-
VI
CD
o
C
C
(D
-
G
o
—
VI
(0
C
(0
C
C
3
Oo
—
CD
?‘
CD
I,
0
—
—
=0
C
2:
CD
0
-In
e
C
0
CDQ
(00
a-
-‘
z
VI
C
C
9
0
()
CD
C
a
-‘
C”C
—
.
0
0
0C
0
-
-CD
o
—.
(0
<
•<
—
0.
a
0
U)
C-
3
0
—.
0
—
-.
0
a
—.
V
C
0
0
k)
cD

14.
Adjusting
the
Bobbin
Thread
Tension
For
Lighter
tension,
turn
tension screw
left
—((,
using
the
small
screw
driver.
Turning
the
screw
right
will
in
crease
the
tension.
Photo
22
Perfect
stitch
Photo
24
Photo
21
Upper
tension
too
weak
or
lower
tension
too
tight
26
27
15.
Correct
Tension
Regulation
with
perfect
interlocking
of
upper
and
lower
threads
in
the
center
of
the
ma
terial
results
in
neat
and
elastic
seams.
Photo
23
Upper
tension
to
Pght
or
lower
tension
too
weak
w
1

16.
Setting
the
Stitch
Length
17.
Removing
the
Top
Cover
1.
Set
stitch
length
limiting
lever
B
at
With
all
oil
points
covered
up,
there
is
the
desired
stitch
length
indicated
on
no
soiling
of
the
material!
the
scale.
The
full-length
top
cover
can
be
easily
2.
Push
stitch
length
lever
A
to
its
right
taken
off
with
both
hands.
stop
to
obtain
a
forward
stitch
of
the
length
of
stitch
set.
3.
For
reverse
stitching,
turn
lever
A
to
its
left
stop.
Photo
25
Photo
26
28
29

18.
Correct
Regulation
of
the
19.
Taking
off
the
Face
Plate
Pressure
on
the
Material
is
only
necessary
when
the
presser
bar
assures
uniformity
of
the
stitch
length
has
to
be
turned
for
the
proper
fasten-
and
prevents
injury
of
the
material
by
ing
of
attachments.
the
feed
dog.
1.
Remove
screw
k,
let
face
plate
slide
Turning
screw
V
left
cE(
will
ease
the
downwards,
and
take
it
off.
pressure
for
thin
and
flimsy
fabrics;
2.
When
replacing
it
make
sure
that
flap
turning
it
right
will
increase
the
L
engages
in
the
slot
N
and
stud
S
pressure
for
heavy
materials.
in
the
notch
K.
\V[ien
inserting
the
face
plate,
see
that
stud
F
catches
in
hole
H
fir
si,
then
push
face
plate
up
in
position.
Photo
27
Photo
28
30
31

-
20.
For
Taking
off
the
Balance
When
replacing
the
dog
ring,
make
Wheel
sure
that
its
bent-up
prongs
face
outside.
to
remove
odd
thread
between
balance
If
the
large
milled
screw
should
not
wheel
and
arm
shaft
bushing,
tighten
firmly,
turn
dog
ring
180°.
1.
Loosen
screw
a.
2.
Loosen
milled
screw
b,
turning
it
to
Photo
29
the
left.
3.
Remove
dog
ring
1
(photo
30),take
off
balance
wheel,
and
remove
thread.
Photo
30
32
33

A
Photo
31
Photo
32
21.
Servicing
and
Maintenance.
The
oiling
points
underneath
the
carriage.
Regular
and
proper
oiling
serves
to
increase
the
life
of
your
machine,
Apply
oil
only
at
the
points
marked
by
arrows.
Brush
off
regularly
lint
and
fluff
between
needle
plate,
feed
dog,
and
bobbin!
Do
not
forget
to
oil
the
rear
arm
shaft
bushing,
half
covered
by
the
winder
wheel
34
35

Apply
a
drop
of
oil
from
time to time
22.
Removing
the
Shuttle
in
the
shuttle
race.
becomes
necessary
when
thread
has
A
dry
race
will
wear
off
rapidly.
entered
into
the
race.
1.
Loosen
wing
screw
a
and
push
gib
b
downwards.
Photo
33
Photo
34
36
37
/