Page is loading ...

Operating instructions
MONSUN Screw Compressors
Type
Serial number Date
Rev
.E 104482 05
/2019


EC Declaration of Conformity
according to EC directive 2006/42/EC on machinery
(Annex II A)
Name and address of the manufacturer
BlitzRotary GmbH
Hüfinger Str.55
78199 Bräunlingen, Germany
This declaration relates exclusively to the machinery in the state in which it was placed on the market, and excludes
components which are added and/or operations carried out subsequently by the final user. The declaration is no more
valid, if the product is modified without agreement.
Herewith we declare, that the machinery described below
product denomination Screw Compressor oilinjected
model / type
MONSUN MONSUN Pro; MONSUN Pro Navicon; MONSUN Pro Eco
MONSUN Pro S; MONSUN Pro Eco S
MONSUN; MONSUN Eco
MONSUN S; MONSUN Eco S
machinery- / serial number .............................................
Year of manufacture .............................................
is complying with all essential requirements of the Machinery Directive 2006/42/EC.
In addition the partly completed machinery is in conformity with the EC Directives 2014/30/EU relating to
electromagnetic compatibility and 2014/35/EU relating to electrical equipment (Protection objectives have been met in
accordance with Annex I No. 1.5.1 of the Machinery Directive 2006/42/EC)
In addition the partly completed machinery is in conformity with the EC Directives 2014/29/EU relating to simple
pressure vessels directive.
Harmonised Standards used
Compressors and vacuum pumps - Safety requirements
Safety of machinery - Electrical equipment of machines
EN 1012-1:2011-02
EN 60204-1:2014-10
EN ISO 12100:2011-03 Safety of machinery - Basic concepts
Other technical standards and specifications used:
The person authorised to compile the relevant technical documentation:
BlitzRotary GmbH; Hüfinger Str. 55, 78199 Bräunlingen
Place : Bräunlingen
Date : 01.05.2019
______________________
Doris Wochner-McVey
Managing Director
Hier Typenschild einkleben
Typ
Baujahr
Seriennummer

Operating instructions
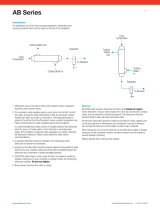
Component overview
2
3
4 5
6 18
11
12
9 17
13 10
141516 1819
20 2221
7
23
24 25
27 2628
Fig. 1: Component overview
1 Compressor 15
Oil and condensation water drain valve
2 Compressed air / oil reservoir
16 Pressure reservoir name plate
3 Oil high-precision separator cartridge
17 Oil gauge
4 Electric motor
18 Oil filler neck
5 Fan
19 V-belt tensioning roller
6 PROCON control 20
Suction stop valve
7 Proportional controller (optional) 21
Control valve
8 Name plate 22
Relief valve
9 Drain line 23
Suction filter
10 Pressure detector 24
Oil filter
11 Safety valve 25
Compressed-air outlet with cut-off valve (op-
tional)
12 Switch box 26
Compressed-air aftercooler
13 Oil thermostat 27
Oil cooler
14 Temperature sensor 28
Super sound proofing hood
104482 • 05/2019

Operating instructions
PROCON control
104482 • 05/2019
1
°C
bar
20
.
00
8 9 10 11 12 13 14
31 25 64 7
Fig. 2: Operating elements
1 Power
switch
2 Circuit-breaking key
3 Emergency stop
4 In the menu: One line up
Edit mode: Increase value
5 In the menu: One line down
Edit mode: Selection of the menu
6 In the menu:
Call up information
Edit mode:
Cancel value input
7 In the menu: Selection of the menu
Edit mode: Apply value
8 Permanent yellow: Base load sequencer operating mode
9 Permanent yellow: Remote operation
10 Permanent yellow: Automatic restart
11 Permanent green: Motor is running
Green flashing:
Standby, motor can start automatically at any time
12 Blinking yellow:
Maintenance
13 Blinking yellow:
Warning
14 Red flashing:
Type of malfunction


Operating instructions
PROCON control
104482 • 05/2019
1
Table of contents
Component overview
PROCON control
1 Fundamental safety instructions ....... 2
1.1 Designated use ........................................ 2
1.2 Fundamental measures .......................... 2
1.3 Description of symbols and notes ........ 2
2 Transport and storage ......................... 2
2.1 Transport .................................................. 2
2.2 Storage ...................................................... 2
3 Mounting ................................................ 3
3.1 Mounting conditions ............................... 3
3.2 Compressed-air port ............................... 4
3.3 Electrical connection .............................. 4
3.4 Checking the rotating direction ............ 5
4 Operation ................................................ 7
4.1 Safety instructions .................................. 7
4.2 Switching the unit on ............................. 7
4.3 Start-up after an extended idle time. .... 7
4.4 Weekly check ........................................... 7
4.5 Switching the unit off ............................. 7
4.6 Remote control ........................................ 8
4.7 Original BLITZ accessories .................... 8
5 PROCON control
.................................. 9
5.1 Operating elements ................................ 9
5.2 Display features ....................................... 9
5.3 Input of parameters................................. 9
6 Inspection and servicing ................... 13
6.1 Safety instructions ................................ 13
6.2 Checking and topping up the oil level 13
6.3 Changing the oil .................................... 14
6.4 Changing oil filter .................................. 14
6.5 Draining the condensation water ....... 15
6.6 Cleaning the oil cooler and the
compressed-air afterco
oler. ................. 15
6.7 Checking safety valve ........................... 15
6.8 Changing oil high-precision separator
cartridge .................................................. 15
6.9 Checking a
nd changing the suction
filter cartridge
........................................ 15
6.10 Clean proportional controller nozzle. . 16
6.11 Cleaning drain restrictor ...................... 16
6.12 Checking and adjusting the V-belt ..... 16
6.13 Notes on systems equipped with water
cooling system ....................................... 17
6.14 Tighten the screw connections. .......... 17
6.15 Checking electric terminals ................. 17
6.16 Relubricating / replacing motor
mounting ................................................ 17
7 Maintenance schedule ....................... 18
8 Trouble shooting ................................ 20
8.1 Malfunction, compressor generally .... 20
8.2 Malfunction, PROCON control ............ 24
8.3 Warnings, PROCON control ................ 25
Technical annex
Table of contents

Operating instructions
Fundamental safety instructions
2
104482 • 05/2019
1 Fundamental safety instruc-
tions
1.1 Designated use
The compressor system is intended exclusive-
ly for the generation of compressed air. Any
other use shall be considered an undesignat-
ed use.
1.2 Fundamental measures
• Never point compressed air at persons.
• Observe these operating instructions.
• Keep these operating instructions availa-
ble at the location of use at all times.
• Please observe the regular maintenance
intervals (refer to chapter 7 “Maintenance
schedule”).
• Use original BLITZ parts and approved op-
erating material only.
• Do not use compressed air for breathing
without corresponding treatment.
• Do not modify the system.
• Use mounting parts and devices down-
stream from the compressor which have
been designed for the maximum operating
overpressure of the compressor.
• In your capacity as proprietor, please en-
sure that all safety regulations are ob-
served by the operating staff.
• Do not use the compressor as a climbing
aid.
1.3 Description of symbols and
notes
Danger
Mortal danger and risk of injury.
Caution
Damage to property.
Information and tips.
2 Transport and storage
2.1 Transport
Danger
Mortal danger caused by incorrect
transport.
• Do not hold the compressor at its
cladding elements as you lift it.
• Only use suitable lifting gear with the
corresponding weight-bearing capacity
(for data on weight, please refer to
chapter “Technical annex”).
• Fasten and secure the system with
belts at the corresponding points.
• Secure swivelling and loose parts.
• Transport the compressor by means of
crane hooks, fork-lift truck and elevat-
ing truck only.
• Never remain under suspended loads.
• Depressurise the compressor prior to
any transport.
2.2 Storage
Store the compressor in a dry location pro-
tected against weather influence. Ambient
temperature: -10°C to +50°C.
Please order the BLITZ conservation instruc-
tions in case of storage of over six months.
For information on recommissioning
after an extended idle time, please re-
fer to chapter 4.3.

Operating instructions
Mounting
3
104482 • 05/2019
3 Mounting
3.1 Mounting conditions
Î
Check the compressor for damage during
transport.
Ambient conditions
Danger
Mortal danger and explosion hazard
when caustic, inflammable or poison-
ous gases are drawn in.
• Do not operate the compressor in ex-
plosive surroundings or in the vicinity
of open flames and flying sparks.
Caution
Wrong mounting will cause damage to
the compressor.
• Ensure sufficient ventilation of the
compressor room.
• Do not operate the compressor in the
open.
• Systems with a capacity exceeding 40
kW must be installed in such a way
that no combustible objects or materi-
als are in the immediate proximity.
• Systems with a capacity exceeding 100
kW should be installed in a separate
room.
The space between the compressor and the
wall has to be at least 60 cm (cf. Fig. 3: Loca-
tion). The compressor has to be easily acces-
sible from all sides. The ambient temperature
has to be between 3°C and 40°C.
> 60 cm
+3°C - +40 °C
Fig. 3: Location
Cooling and exhaust air
Danger
Mortal danger and explosion hazard
during suction.
• Ensure that the compressor takes in
only clean air which is free from nox-
ious constituents. Noxious substances
are liable to accumulate in the lubricat-
ing oil of the compressor. They may
cause explosions in the system and
heavy damages.
• Do not allow objects or pieces of cloth-
ing of persons going past to be sucked
in by the intake air flow.
1
2
B
A
A
A
E
C
D
Fig. 4: Room ventilation
1 Intake air
2 Exhaust air
A Air inlet
B Air outlet
C Ventilation duct
D Exhaust fan
E Elastic connecting piece

Operating instructions
Mounting
4
104482 • 05/2019
The overall length of all air intake and exhaust
ducts must not exceed 4m; one baffle is per-
missible. In case of conduits exceeding this
length or in case of several baffles, a booster
fan must be installed. In this case, please con-
tact your technical adviser.
For further information on the required venti-
lation cross sections, please refer to the
Technical Annex.
Ground
Î
Place the compressor on a horizontal and
plane surface.
The ground has to have a suitable load-
bearing capacity. BLITZ offers special solu-
tions for inclined surfaces.
In order to reduce vibrations, BLITZ recom-
mends rubber-metal connections.
3.2 Compressed-air port
The connection to the compressed-air duct-
work system may be carried out only by
trained experts or by staff members of BLITZ
Company.
Danger
Danger of injury by pressure in the
pipes.
• Vent the pipes to which the compres-
sor is connected.
Use a flexible hose to connect the
compressor to the supply network.
Thus, stress cracks and sound bridges
are prevented.
• Compressed-air lines, filters, after coolers
and vessels must at their lowest spots be
equipped with an outlet for the condensa-
tion water accumulated. These outlets
must allow to observe the draining con-
densation water. Condensation water may
contain oil! In draining the condensation
water, all applicable regulations on the
disposal of waste water must be complied
with.
• Remove all securing devices before you
start to install the conduits.
• Use only suitable connecting lines and
couplings which are designed for the in-
tended working pressure. Do not use any
defect component.
• Supply lines must not be subjected to
stress or tension.
Observe the technical data for the connection
of compressed air (cf. chapter “Technical an-
nex”).
3.3 Electrical connection
The connection to the electrical power system
may be carried out only by adequately trained
expert.
Danger
Mortal danger caused by electric volt-
age but also by rotating wheels, V-
belts, and fan blades.
• Test runs are permissible only if all
parts of the casing are closed (excep-
tion: check of the rotating direction).
Compressor systems have to be fitted with a
power switch or a plug connection to interrupt
the power supply. Compressor systems with a
motor capacity of more than 3 kW or 16 Amps
have to be fitted with a lockable power switch
and upstream fuses.
In this respect, please refer to the cir-
cuit diagram in the chapter titled
“Technical annex” or in the switch cab-
inet as well as to the following connec-
tion conditions.
Check and retighten where appropriate
all electric terminals before first com-
missioning.

Operating instructions
Mounting
5
104482 • 05/2019
3.4 Checking the rotating direction
Caution
Fire hazard and damage to compressor
in case of wrong polarisation of the
motor (5 revolutions maximum in the
wrong direction of rotation!).
• Carry out the check of the rotating di-
rection as described below:
Î
Open side cladding of the compressor.
Î
Please refer to chapter 4.2 titled “Switch-
ing the unit on”.
Î
Press the power switch, and immediately
after this the emergency stop (see fig. 2:
Operating elements). The correct rotating
direction of the fan has been marked by an
arrow on the fan cover.
Î
Change the poles of the electric connec-
tion of the motor in case of a wrong rotat-
ing direction.

Operating instructions
Mounting
6
104482 • 05/2019
Electrical connection conditions
The connection to the electrical power system
may be carried out only by adequately trained
expert.
Caution
Overvoltages and undervoltages must not exceed the 10% mark.
This unit is intended for operation on a power supply network with a maximum system
impedance Z
max
at the interconnection point (house service line), which is listed in the
table below in dependence of the performance. The user shall have to ensure that the
unit is operated only on a power supply network which meets these requirements. If and
when necessary, the local power supply company can provide information on the system
impedance.
400V-50Hz 3 ph 230V-50Hz 1 ph
Motor
per-
formance
Motor
rated cur-
rent
Protection
– star-
delta
starting
Protec-
tion – di-
rect start-
ing
Motor
per-
formance
Motor
rated cur-
rent
Protection
– star-
delta
starting
Protec-
tion – di-
rect start-
ing
kW A A A kW A A A
1.1 2.6 6 1.1 2.6 6
1.5 3.5/4.1 10 1.5 3.5/4.1 10
2.2 5.0/6.0 16 2.2 5.0/6.0 16
3.0 6.6/8.1 16 3.0 6.6/8.1 16
4.0 8.5 16 20 4.0 8.5 16 20
5.5 11.5 20 5.5 11.5 20
7.5 15.5 25 7.5 15.5 25
11.0 22.5 35 11.0 22.5 35
15.0 30.0 50 15.0 30.0 50
18.5 36.0 50 18.5 36.0 50
22.0 43.0 63 22.0 43.0 63
30.0 58.0 80 30.0 58.0 80
37.0 68 80 37.0 68 80
45.0 81 100 45.0 81 100
55.0 99 125 55.0 99 125
75.0 134 160 75.0 134 160
Tab. 1: Characteristic value for the electrical connection
The supply line cross sections provided are recommended values for a maximum 50m line
length at 30°C. For fuse protection, use “slow-to-blow” or “gL” fuses.
• 220/240 V systems require a three-core 1P/N/PE cable.
• 380/400 V systems require a four-core 3P/PE cable for direct start.
• 380/400 V systems require for star-delta starting a five-core supply line 3P/N/PE.

Operating instructions
Operation
7
104482 • 05/2019
4 Operation
4.1 Safety instructions
Danger
Mortal danger caused by sudden start-
up of the system.
• Systems which are in the standby op-
erating mode are liable to start auto-
matically at any time.
• All parts installed behind the check valve
(e. g. aftercooler, pressure switch) are not
released automatically from pressure.
• Not all transmission lines are de-energised
when the system is switched off!
• Before commissioning, ensure that no
person can be injured by the starting
compressor.
• Never point compressed air at persons.
• Do not use compressed air for breathing
without corresponding treatment.
• Use mounting parts and devices down-
stream from the compressor which have
been designed for the maximum operating
pressure of the compressor.
• Do not reach into the rotating wheels
when the compressor is operational.
• Touch the compressor system at the on
and off switch only during and shortly af-
ter operation. Hot surface can cause se-
vere injuries.
• Switch the compressor off immediately in
case of faults.
• Keep combustible materials away from
the compressor system.
• Operate the compressor only with suction
filter and if all parts of the casing are
closed.
• Operate the compressor only at the per-
missible operating pressure of the pres-
sure reservoir.
• Tighten the screw connections of the
pressure pipes.
• Wear tight-fitting work cloths when han-
dling the compressor.
• Wear goggles and ear muffs when working
with compressed air.
• Wear a hair net to protect long hair and
remove any lose jewellery.
• Check the cables for damage in regular
intervals.
• Keep domestic animals and children away
from the compressor system.
• Switch the compressor off when not need-
ed.
4.2 Switching the unit on
Î
Check oil level through oil gauge and top
up the oil if and when necessary (refer to
chapter 6.2 “Checking and topping up the
oil level”).
Î
Switch on the power switch.
Î
Press power switch (see fig. 2: operating
elements).
Î
Signal lamp indicates readiness for opera-
tion.
Î
Compressor starts and after approx. 10sec.
starts load operation.
Î
Open ball valve.
In case of faults, please refer to chapter 8 ti-
tled “Trouble shooting” for more help.
4.3 Start-up after an extended idle
time.
During an extended idle time, the complete oil
content flows into the compressed air / oil
reservoir. If this has happened, the screw
compressor is not any more lubricated.
Î
Dismount intake regulator.
Î
Fill approx. 1 litre compressor oil into the
air intake fitting.
Î
Mount intake regulator.
Do not mix different types of oil. In
choosing the oil you want to use, refer
to the corresponding BLITZ specifica-
tions (refer to chapter 6.2 “Checking
and topping up the oil level“).
4.4 Weekly check
• Check oil level of the compressor (refer to
chapter 6.2 “Checking and topping up the
oil level“).
4.5 Switching the unit off
Î
Press circuit-breaking key “0” (see fig. 2:
operating elements).
Î
Switch off power switch.

Operating instructions
Operation
8
104482 • 05/2019
4.6 Remote control
All systems which are equipped with remote
control must bear a clearly visible label read-
ing as follows: “Warning! This system is re-
motely controlled and is liable to start at any
time." In addition, persons operating remotely
controlled systems must ensure that the sys-
tem is not started during maintenance or re-
pair work. For this, a corresponding infor-
mation sign must be affixed to the remote
control unit.
Î
Open ball valve.
Î
Press power switch (see fig. 2: operating
elements).
Î
Signal lamp indicates readiness for opera-
tion.
Î
System is now ready to be operated via
remote control.
4.7 Original BLITZ accessories
BLITZ offers you the following accessories:
For more information, please refer to the
BLITZ price list or directly to BlitzRotary
GmbH.
Compressed-air filter
To clean the compressed air for special appli-
cations.
Refrigeration or adsorption dryer
To prevent faults of the compressed air duct-
work system, compressed-air tools, instru-
ments and controls caused by humid air.
Automatic condensation water drain
To spare you the daily draining of condensa-
tion water.
Oil and water separator
Is fitted downstream of the condensation wa-
ter drain. The separated water can be re-
moved directly into the sewer system.
Rubber-metal connection
To reduce vibrations.
Top sound insulation
To reduce noise emissions.
Base load sequencer
Intelligent higher-order control system to con-
trol several compressors depending on the
actual compressed air consumption.
Speed regulator
Adapts speed and thus also energy consump-
tion of the screw compressor to the actual
compressed air consumption.
Water-cooling system
For application conditions under which the
standard fan cooling is not sufficient.
Heat exchanger
Free of charge energy derived from heat pro-
duced by the compressor during operation
which is then available to other consumers.
For more information on these and
other pneumatic accessories, please
refer to BLITZ. Our address is on the
last page of these operating instruc-
tions.

Operating instructions
PROCON control
9
104482 • 05/2019
5 PROCON control
5.1 Operating el
ements
See fig. 2 PROCON control
5.2 Display features
Basic display
During normal operation, the display indi-
cates both network pressure and final com-
pression temperature as three-digit figures.
In the event of pressure or temperature meas-
urement failure, the corresponding field
shows “- - -”. The load operation of the system
is indicated through a dot following the net-
work pressure value.
In the event of malfunction reports or warn-
ings occurring, these will alternate with the
analogue quantities in the pressure display
every three seconds. Malfunction reports in
the display start with an “E” followed by a
two-digit malfunction code (refer to chapter
8.2 “Malfunction, PROCON control” and chap-
ter 8.3 “Warnings, PROCON control”) whereas
warnings start with an “A”. In addition, in
case of malfunction a malfunction LED will
light up; in case of a warning a warning LED
will light up.
Information menu
Î
To call up the first line of the information
menu, keep key 6 (→) pressed for one se-
cond.
Î
The keys 4 and 5 (↑/↓) allow you to navi-
gate within the menu structure.
Î
Press key 6 (→) to exit the menu; alterna-
tively, the menu is also exited if no key has
been pressed for 3 minutes.
• Line 1:
System pressure indicator. The system
pressure is displayed in place of the net-
work pressure. “P2” will appear on the left
side of the display. This line will appear
only in case the system pressure input is
activated in the option menu. In case an
incorrect system pressure value has been
obtained, the display will show “- - -”.
• Line 2:
Hours of operation. Hours of operation are
indicated as five-digit figures. “R.“ will ap-
pear on the left side of the display (e. g.
“R.23 456“ for 23456h).
• Line 3:
Load operation hours. Load operation
hours are indicated as five-digit figures.
“L.“ will appear on the left side of the dis-
play (e. g. “ L.12 345“ for 12345h).
• Line 4:
Air filter operating life. In the display “F1”
alternates with the corresponding operat-
ing life value. In addition, the maintenance
LED flashes.
• Line 5:
Oil filter operating life. In the display “F2”
alternates with the corresponding operat-
ing life value. In addition, the maintenance
LED flashes.
• Line 6:
Oil separator operating life. In the display
“F3” alternates with the corresponding op-
erating life value. In addition, the mainte-
nance LED flashes.
• Line 7:
Oil operating life. In the display “OIL” al-
ternates with the corresponding operating
life value. In addition, the maintenance
LED flashes.
• Line 8:
V-belt operating life. In the display “BE.”
alternates with the corresponding operat-
ing life value. This line will appear only in
case the V-belt is activated in the option
menu. In addition, the maintenance LED
flashes.
• Line 9:
Software version, e. g. “PRO 1.00“ for Ver-
sion 1.00.
5.3 Input of parameters
Selection menu
Î
In order to enter parameters, keep key 7
(↵) pressed for three seconds. “COD.000”
will appear in the display.
Î
Enter the code for the desired menu using
the keys 4 and 5 (↑/↓).
Î
Confirm by pressing key 7 (↵), and the first
parameter of the selected menu is dis-
played.
Î
In case an invalid code has been entered,
or key 6 (→) has been pressed, the routine
returns to the initial display.
Selection of parameters within a
menu
Î
The keys 4 and 5 (↑/↓) allow you to navi-
gate within the menu structure in the dis-
play modus.

Operating instructions
PROCON control
10
104482 • 05/2019
Î
Press key 6 (→) to exit the menu; alterna-
tively, the menu is also exited if no key has
been pressed for 5 minutes.
Editing parameters within a menu
Î
Press key 7 (↵) to modify parameters. You
are then in the edit mode. This is indicated
by the corresponding parameter value
flashing.
Î
The keys 4 and 5 (↑/↓) allow you now to
modify the value.
Î
Press key 6 (→) to return to the display
mode, and retain the previous value.
Î
Press key 7 (↵) to save the current value
and to enter the next value that can be
modified.
In the event values have been modified
within one menu, storage of the new
values is signalled through a horizontal
bar (for one second).
Pressure control menu (Code 010)
Name Message Setting
range
Factory
setting
Minimum
network
pressure
A1. ##.# Between
5.0 bar
and max-
imum
network
pressure
8.5 bar
Maxi-
mum
network
pressure
A2. ##.# Between
mini-
mum
network
pressure
and sys-
tem
pressure
10.0
bar
Tab. 2: Pressure control menu
Maintenance menu (Code 020)
Name Message Setting
range
Factory
setting
Air filter
operating
life
C1.# ### 0-9999h 2000
Oil filter
operating
life
C2.# ### 0-9999h 500*
Oil sepa-
rator op-
erating
life
C3.# ### 0-9999h 2000
Oil oper-
ating life
C4.# ### 0-9999h 500*
V-belt op-
erating
life
C5.# ### 0-9999h 0 (in-
ac-
tive)
Shutdown
mainte-
nance
C6. # 0=No
1=Yes
No
Tab. 3: Maintenance menu
* only first maintenance interval; the re-
maining intervals are 2000h
The maintenance intervals can be specified
between 0-9999h while the input „0“ means
that this interval should not be edited. In this
place only the target values of the mainte-
nance intervals are indicated; please infer the
actual count from the information provided in
the initial display (refer to initial display in
chapter 5.2 “Display features”).
After a maintenance interval has been modi-
fied, the corresponding count is reset while
the new set value is being applied. Thus the
respective interval can start again, for in-
stance after maintenance work has been
completed.
Use the “C6” parameter to decide whether the
compressor should be shut down after the
maintenance interval has been exceeded by
more than 100h. After the compressor has
been shut down this way, the operator can
acknowledge this error message and start the
compressor for another 100h.

Operating instructions
PROCON control
11
104482 • 05/2019
Operating parameter menu (Code
030)
Name Message Setting
range
Factory
setting
Base load
sequencer
operating
mode
B1. # 0=No
1=Yes
No
Conti-
nuous
operation
B2. # 0=No
1=Yes
No
Remote
operation
B3. # 0=No
1=Yes
No
Re-starts
automa-
tically af-
ter power
failure
B4. # 0=No
1=Yes
No
Power
failure
time
B5. ## 0-60s 1s
Re-start
delay
B6. ## 0-60s 0s
Tab. 4: Operating parameter menu
The pressure control is effected via an exter-
nal contact during programmed operation of
the base load sequencer.
In case the remote control is activated the
start-up is effected via an external contact.
The control system reacts only to the positive
signal edge for start-up of the device. If there
is no input signal this means that the com-
pressor is switched off. In this case you can-
not use the keyboard to switch on or off the
device.
The “continuous operation” parameter allows
to operate the compressor in the no-load op-
eration mode and thus to prevent it from be-
ing switched off.
You can specify two periods if the automatic
restart after voltage breakdown has been acti-
vated. The power failure time specifies the
maximum allowable period of voltage break-
down after which it is permitted to restart the
device. If this value is set to “0”, the device
can be restarted at any time. The re-start de-
lay allows to prevent the compressor from re-
starting immediately after voltage recovery.
This may be necessary to prevent several
compressors connected to the mains network
from starting simultaneously.

Operating instructions
PROCON control
12
104482 • 05/2019
Menu structure, customer menu
°C
bar
cod 010
a1.
.
90
A2.
.
.
.
.
.
.
100
°C
bar
COD
c11
c2
c31
C4
C5
C6
020
500
500
500
500
0
0
°C
bar
Cod
b1
b2
b3
b4
b5
b6
.
.
.
.
.
.
.
.
.
.
.
.
030
0
0
0
0
1
0
F1 999
be 999
3s 3s3s
°C
bar
p2
.
00
r23 456
L12 345
F2 999
F3 999
oil 999
pro 100
.
3s
Information
Pressure control Maintenance intervals Operating parameter
System pressure (Option)
Cut-in pressure
Shut-off pressure
Air filter operating life
Oil filter operating life
Oil separator operating life
Oil operating life
V-belt operating life
Disable maintenance
Base load sequencer
operation
Continuous operation
Remote operation
Automatic restart
Power failure time
Re-start delay
Hours of operation
Load operation hours
Air filter operating life
Oil filter operating life
Oil separator operating life
Oil operating life
V-belt operating life
Software version
Edit mode
Increase values
Decrease values
Edit:
Apply value
Cancel:
Return to the basic mode
without retaining all previous values
M
Fi
g
. 1: Menu structure, customer menu

Operating instructions
Inspection and servicing
13
104482 • 05/2019
6 Inspection and servicing
6.1 Safety instructions
The inspection and servicing may be carried
out by experts or trained persons only.
• Switch the compressor off for all servicing
work, and protect the unit against uninten-
tional operation.
• Prior to any servicing work set the power
switch to off or remove the mains plug.
• Use original BLITZ parts and approved op-
erating material only.
• After having completed the servicing work
tighten all screws again.
• Depressurise the compressor prior to any
servicing work.
• Touch the compressor system at the on
and off switch only during and shortly af-
ter operation. Permit the compressor to
cool down prior to any servicing work. Hot
surfaces can cause severe injuries.
Before commencement of work, the following
steps must always be carried out.
Î
Close cut-off valve at compressed air out-
let 25 (see fig. 1: component overview).
Î
Shut down the system.
Î
Switch off power switch.
Î
Open slowly the screw plug of the com-
pressed air aftercooler 26 to release air
pressure.
Î
Wait until no more air exits the post-
cooler, and tighten the screw plug.
Î
Wait until the remaining system is re-
leased from pressure and has cooled
down.
Î
Unscrew oil filler neck 18 by approx. 1 turn
to check whether pressure has been re-
leased completely.
Î
Wait until no more air exits the oil filler
neck 18, and tighten again oil plug.
6.2 Checking and topping up the oil
level
Danger
Scalding hazard by draining hot oil.
• Slowly open the oil filler neck.
• Avoid skin contact with hot oil
2
1
Fig. 5: Oil level indication
1 min. mark
2 max. mark
Checking the oil level
Î
Switch the compressor off and depressur-
ise.
Î
Drain off the condensation water before
you check the oil level (refer to chapter 6.5
“Draining the condensation water”).
Î
Unscrew oil filler neck 18 (see fig. 1: Com-
ponent overview) by approx. 1 turn to
check whether pressure has been released
completely.
Î
Check oil level through oil gauge 17 (see
fig. 1: component overview).
Î
The oil level has to be within the min. /
max. level.
Î
Check whether the oil has a milky discol-
oration or contains water drops (for
measures, please refer to chapter 8 titled
“Trouble shooting / Milky colour of the oil,
water drops in the oil”).

Operating instructions
Inspection and servicing
14
104482 • 05/2019
Topping up oil
Do not mix different types of oil. Exclu-
sively use types of oil specified by
BLITZ.
Î
Switch the compressor off and depressur-
ise.
Î
Carry out the above steps as described in
the “Checking oil level” section.
Î
Remove oil filler neck 18.
Î
Slowly fill in the oil until the oil level as
indicated by the oil gauge 17 is within the
min. / max. range.
Î
Screw on the oil filler neck.
Types of oil
On account of the high stress the lubricating
oil is exposed to in screw compressors with
oil injection cooling, we recommend to use
BLITZ special purpose oils with AFS (anti
foam system) additives showing an extremely
good aging and water-repellent behaviour;
these oils do not foam, and they are anticorro-
sive.
The degree of viscosity of the oil chosen
should be based on the ambient temperature
according to ISO 3448.
Ambient temperature
0 up to +25°C Permanently
higher than
25°C
Viscosity
class
ISO VG 46 ISO VG 68
Viscosity at
40 °C
41 up to 51
mm²/s
61 up to 75
mm²/s
Point of igni-
tion
> 200°C
Pour point At least 5°C below lowest
ambient temperature.
Tab. 5: Types of oil
We assume no warranty unless the
lubricants used in our screw compres-
sors show these essential characteris-
tics.
6.3 Changing the oil
Danger
Scalding hazard by draining hot oil.
• Slowly open the oil filler neck.
• Avoid skin contact with hot oil
Used oil has to be disposed of accord-
ing to the local environmental regula-
tions.
Î
Switch the compressor off and depressur-
ise.
Î
Place a suitable collecting vessel under
the oil and condensation water drain valve
15.
Î
Open oil and condensation water drain
valve 15 while it is at operating tempera-
ture.
Î
Drain the oil into the vessel.
Î
Close oil and condensation water drain
valve 15.
Î
Open oil filler neck 18 and fill in the new
oil slowly (refer to chapter 6.2 “Types of
oil”) until the oil level as indicated by the
oil gauge 17 is within the min. / max.
range.
Î
Screw on the oil filler neck.
6.4 Changing oil filter
Danger
Scalding hazard by draining hot oil.
• Carefully and slowly remove the oil fil-
ter.
• Avoid skin contact with hot oil
Use only new oil filters; you cannot
clean a used oil filter.
If you replace the oil filter while the oil
circuit is filled, up to 2l oil can escape
the system.
Dispose of the oil filter according to
the applicable local environmental
regulations.
/