Page is loading ...

If for any reason, this ProMaster product fails within ONE YEAR of the date of
purchase, return this product to your ProMaster dealer and it will be exchanged for
you at no charge. ProMaster products are guaranteed for ONE FULL YEAR
against defects in workmanship and materials. If, at any time after one year, your
ProMaster product fails under normal use, we invite you to return it to ProMaster
for evaluation.
Specifications
Operation
One Year Unconditional Warranty
Safety Precautions
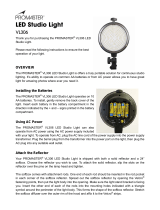
Overview
2
3
4
1
Air Vent
Diffusion Panel Lock Button
2
DC Power Input
3
Dimmer /
Channel Dial
9
Color Temperature
Indicator Light
1
Power Switch
Handle Lock Button
Optional
Battery Locations
Handle
4
Softbox Socket
Switchable handles,
including a light stand
adapter with umbrella holder
and a run and gun handle.
Using the Diffusion Panel
Your VL800B includes one white frosted diffusion panel. The VL800B will work
perfectly fine without a panel installed, giving you its maximum brightness and also its
harshest light. Use the white frosted panel to soften the light.
You can mount the diffusion panel to the VL800B by following these steps.
Running on Batteries
The VL800B has a unique feature in that it can be used on battery power when an AC
outlet is not available. Be sure the unit is not connected to a wall outlet before installing
batteries. Use two NP-F770 or NP-F970 batteries with a full charge. Simply push the
batteries into the two battery slots on the back of the VL800D with the battery contacts
oriented toward the middle of the fixture. Slide the batteries toward each other (away
from the Battery Lock Buttons until they 'click' into place.) You can now operate the
VL800B as normal. Press the Battery Lock Buttons and slide the batteries away from
each other to remove them.
Mounting a Softbox
Use a softbox specifically designed by ProMaster for the VL800B for proper fit.
Locate the eight softbox sockets on the back of the light housing. You will use these to
insert the flexible rods as you mount the softbox. An octagonal softbox will use all eight
slots. A square or rectangular softbox will use four of the slots at the 10, 2, 4, and 8
o’clock positions. Once the softbox is installed you may choose to use or remove its
internal baffle. The baffle will create a more even light across the front of the softbox
while also reducing some of the light output. You do not need to use the frosted
diffusion panel when a softbox is installed. It is unnecessary and will reduce the light
output.
After unboxing the components, choose either the Light Stand Adapter or the Run and
Gun Handle. Press the Handle Lock Button while sliding the handle into the base of the
VL800B. If you are using the Light Stand Adapter, you can now mount the VL800B onto a
standard light stand (5/8" male connector). Be sure to tighten the locking knob at the
bottom of the Light Stand Adapter for a secure fit. If you wish to use an umbrella light
modifier, simply slide it into the umbrella hole found in the neck of the Light Stand
adapter.
Next push the male 2-pin end of the DC power adapter cord into the female DC Power
Input socket on the back of the VL800B. Secure the fitting by turning the knurled ring
clockwise. Attach the AC cord to the other end of the DC transformer and then plug the
unit into a standard wall AC outlet.
Turn the VL800B on using the Power Switch.
Push the Dimmer/Channel Dial to toggle between modes which are indicated by the
Mode Selector Light and Color Temp. Selector Light. Red ‘D’ light on means you are in
dimming mode. Yellow ‘C’ light on means you are in color temperature mode. Both lights
off means you are in channel select mode. Each of these modes is explained below.
Dimming Mode
With the Mode Indicator light on (red ‘D’ light) and the VL800B set to dimming mode, you
can use the Dimmer/Channel dial to adjust light output. The LED Display will show a
number from 10 to 99 demonstrating your light output setting.
Color Temperature Mode
With the Color Temperature Indicator light on (yellow ‘C’ light) and the VL800B set to
color temperature mode, you can use the Color Temp. dial to adjust the warmth and
coolness of the light. The LED display will show a number from 32 to 56 demonstrating
your color temperature setting in Kelvin with a range of 3200K to 5600K.
Channel Select Mode
The D and C lights will be off (unlit) to show you are in channel select mode. This mode
allows you to set the wireless channel of the VL800B. You can select any channel
number between 1 and 99. Once a channel is selected, you can control the VL800B
remotely using the included remote. The remote must be set to the same channel. You
may choose to set multiple VL800B lights to different channels allowing the remote to
control each unit independently. Or you can set multiple VL800B lights to the same
channel and control them together using the remote. This will result in all lights using the
same brightness.
Please refer to the VL800 Wireless Remote Control Instruction Manual for more
information.
Full Power Mode
The VL800B includes a unique Full Power Mode. Most Bi-color lights have a light output
of only half the power of a similar daylight balanced light. This is because half of the
LEDs are devoted to warm light and half to cool light. By pressing the Color Temp. Dial
for 1 second or longer, you can activate the Full Power Mode, in which all of the
VL800B’s LEDs will give maximum light output. In this mode, both the C and D lights will
illuminate. Be sure to use the custom white balance setting in your camera for the unique
color temperature created during this mode.
INSIDE BACKINSIDE COVERFRONTBACK
Code 6340 / 6347
Made in China
WWW.PROMASTER.COM | FAIRFIELD, CT 06825
1. Please keep the VL800B and remote control away from moisture and liquids.
2. Avoid contact with solvents, gasoline, grease, oil, paint and detergents.
3. Do not touch with wet hands.
4. Disconnect from power when not in use.
5. Do not open the housing or attempt to repair yourself.
6. Do not operate light near flammable liquids.
Model
Dimmer
Lamp Life
Voltage
VL800B
Output Power
CRI
LED Quantity
Color Temperature Adjustable 3200K - 5600K +/- 200K
Light Source
Battery Quantity
2PCS
DC 13~19V
10%-100%
50,000 hours
50W
85+
800
45°ultra bright φ5 LED
Input: AC100-240V 50/60Hz. 15V.4A
AC Adapter
Remote Control
Effective Wireless Distance Range
99 channels 2.4G wireless remote control
≥30 meters / 98 feet
Lithium Battery Type
NP-F570, NP-F770, NP-F970
Battery Lock Buttons
Mode Indicator
Light
5
Color
Temperature Dial
8
LED Display
Power Switch Use to turn the light on or off
DC Power Input Connect to the included AC Adapter before connecting the other end to
a wall outlet.
Dimmer / Channel Dial Use this dial to adjust the VL800D’s brightness when the mode
selector red light is on and the unit is in dimming mode. When the mode selector light is
off, the unit is in channel select mode and the dial will change the wireless remote channel.
Diffusion Panel Lock Button Push toward the back of the light to release the diffusion
panel. While holding the button back, rotate the diffusion panel clockwise, tilt and lift up to
remove. Install a new diffusion panel in reverse order.
Mode Indicator Light
Red Light off = channel select mode Red Light on = dimming mode
Battery Lock Buttons Press to release optional NPF-750 and NP-F960 to NP-F770
and NP-F970 batteries.
LED Display This display shows brightness setting from 10 to 99 when the mode selector
red light is on and the unit is in dimming mode. It will show a wireless channel number from
1 to 99 when the mode selector light is off and the unit is in channel select mode.
Color Temperature Dial Use this dial to adjust the color temperature between 3200K
and 5600K. Push and hold this dial for approximately 1 second to put the VL800B into
FULL POWER mode.
Color Temperature Indicator Light Yellow light on = color temperature adjusting mode
1. Be sure the light is turned off before installing or removing the diffusion panel.
2. While facing the front of the VL800B (light emitting side) insert the bottom of the
diffusion panel into the curved slot in the bottom front of the VL800B.
3. Hold the tab at the top of the diffusion panel making sure you can read the word
FRONT.
4. Push the top of the panel toward the light until the panel is flush with the front of the
VL800B. The slots on the perimeter of the panel should be aligned with the tabs
around the bezel of the VL800D at this time.
5. While holding the panel flush to the VL800B and pressing back on the diffusion
panel lock button, rotate the panel counter-clockwise until it positively 'clicks' into
place. The round peg controlled by the diffusion panel lock button will be fully
engaged with the round hole on the diffusion panel below the FRONT Tab.
6. The panel can be removed in reverse order.
/