LG XD5B24PS Owner's manual

Category
Dishwashers
Type
Owner's manual
DWG.
No.
TRIG.
DR COMPLETED
LG Electronics Inc.
UNIT SCALEmm
REVIEWEDDESIGNED
RELATED DWG.
CHECKED APPROVED
17.11.08
17.11.08
B.H.Kim
K.R.Kim
MODELING
I
T
L
E
T
APPROVEDPREPARED
DATE
REF. NO.REV. NO.
REVISION DESCRIPTION
2
3
RELEASING THIS DRAWING
WITHOUT PERMISSION LG
Electronics SHOULD BE
ACCUSED ACCORDING TO THE
LAWS AND COMPANY RULES.
PDF
ILLUSTRATOR
148 148
210
MANUAL,OWNER’S
XD-Global
1/1
MFL70282401
WORK
BRAND
LG
EAP
MODEL
MFL70282401
MATERIAL AND PRINTING DESCRIPTION
PRINTING DEGREE
EXTERIER INTERIER
LANGUAGE
56
PAGE
REMARK
SEC.
5
6
01
70282401
XD3*15**
XD4*14**
DFB31***
DFB41***
S.J.Yun
17.11.08 17.11.08
EJKHB00062 17/11/15
EJKHB00070 17/11/15
EJKHB00109 17/11/23
EJKHC00017 17/12/06
EJKHC00035 17/12/11
18/05/
7
18/07/25
박장
8
18/07/31
박장
700089
700107
XD4*24**
XD3*25** DFB32***
DFB42***
19/01/04
이성민
J100015
9
20/01/16
이성민
J
B00060
10
XD-G4 3rd Rack 개발로 인한 01품번 내용 수정
10
XD4*15**
XD5*24**
11
11
DFB53***
20/05/12
이성민
K500022
11
XD-G
5 Steam 개발로 인한 01품번 내용 수정
www.lg.com
OWNER'S MANUAL
DISHWASHER
Before beginning installation, read these instructions carefully.
This will simplify installation and ensure that the product is
installed correctly and safely. Leave these instructions near the
product after installation for future reference.
ENGLISHEN
XD3*25** XD3*15** XD4*15** XD4*24** XD4*14** XD5*24**
MFL70282401
Rev.11_030520
Copyright © 2017 - 2020 LG Electronics Inc. All Rights Reserved.
TABLE OF CONTENTS
This manual may contain images or
content different from the model you
purchased.
This manual is subject to revision by the
manufacturer.
SAFETY INSTRUCTIONS .......................................................3
IMPORTANT SAFETY INSTRUCTIONS .................................................... 3
INSTALLATION ......................................................................10
Parts ......................................................................................................... 10
Specifications ........................................................................................... 10
Accessories (On Some Models) ............................................................... 11
Preparing Cabinet Opening ...................................................................... 11
Installing Moisture Barrier Tape (On Some Models) ................................. 14
Levelling the Appliance ............................................................................. 14
Installing the Drain Hose .......................................................................... 15
Connecting the Water Supply Hose.......................................................... 16
Preparing Electrical Wiring ....................................................................... 17
Final Check ............................................................................................... 17
OPERATION ...........................................................................18
Before Using the Appliance ...................................................................... 18
Using the Appliance .................................................................................. 22
Control Panel ............................................................................................ 23
Cycles ....................................................................................................... 25
Cycle Options ........................................................................................... 26
Auto Open Dry (AOD) (On Some Models) ............................................... 27
SignaLight™ (On Some Models) .............................................................. 27
Programme Guide (model dependent) ..................................................... 28
Available Options ......................................................................................28
Information for Energy Test (AS/NZS 2007) ............................................. 29
Loading the Dishwasher ........................................................................... 31
Adding Cleaning Agents ........................................................................... 37
Refilling ..................................................................................................... 39
Drying ....................................................................................................... 39
SMART FUNCTIONS .............................................................40
LG ThinQ Application ................................................................................40
Smart Diagnosis ....................................................................................... 42
MAINTENANCE ......................................................................43
Cleaning the Exterior ................................................................................ 43
Cleaning the Interior ................................................................................. 43
Cleaning the Filters ................................................................................... 44
Cleaning the Spray Arms .......................................................................... 45
Cleaning the Water Supply Hose Filter..................................................... 47
TROUBLESHOOTING ...........................................................48
Diagnosing Problems ............................................................................... 48
Error Codes .............................................................................................. 53
3
SAFETY INSTRUCTIONS
EN
The following safety guidelines are intended to prevent
unforeseen risks or damage from unsafe or incorrect
operation of the appliance.
The guidelines are separated into ‘WARNING’ and ‘CAUTION’
as described below.
This symbol is displayed to indicate matters and
operations that can cause risk. Read the part with this
symbol carefully and follow the instructions in order to
avoid risk.
WARNING
This indicates that the failure to follow the instructions can
cause serious injury or death.
CAUTION
This indicates that the failure to follow the instructions can
cause the minor injury or damage to the product.
IMPORTANT SAFETY INSTRUCTIONS
WARNING
To reduce the risk of explosion, fire, death, electric shock,
injury or scalding to persons when using this product,
follow basic precautions, including the following:
Children in the Household
This appliance is not intended for use by persons (including
children) with reduced physical, sensory or mental capabilities, or
lack of experience and knowledge, unless they have been given
supervision or instruction concerning use of the appliance by a
person responsible for their safety. Children should be supervised
to ensure that they do not play with the appliance.
4
EN
Technical Safety
Observe the information given in “Specifications” regarding the
maximum number of place settings to be washed of the
dishwasher.
The water pressure must be between 0.05 and 0.6 MPa.
Installation
Never attempt to operate the appliance if it is damaged,
malfunctioning, partially disassembled, or has missing or broken
parts, including a damaged cord or plug.
If the power cord is damaged or the hole of the socket outlet is
loose, do not use the power cord and contact an authorized
service centre.
Do not modify the power cord provided with the appliance. Please
contact the LG Customer information centre to advise of its
incompatibility.
This appliance should only be transported by two or more people
holding the appliance securely.
Do not install the appliance in a damp and dusty place. Do not
install or store the appliance in any outdoor area, or any area that
is subject to weathering conditions such as direct sunlight, wind,
or rain or temperatures below freezing.
Do not plug multiple socket outlets, an extension power cable or
adapter with this appliance.
Disconnect the power cord, house fuse or circuit breaker before
installing or servicing the appliance.
When moving or installing the product in a different location, call
qualified service personnel for installation and service.
Fix the drain hose securely in place.
This appliance is not designed for maritime use or for mobile
installations such as in RVs, trailers, or aircraft.
This appliance must be positioned near to an electrical power
supply.
When installing or moving the appliance, be careful not to pinch,
crush, or damage the power cord.
5
EN
Use new hose or hose-set supplied with the appliance. Reusing
old hoses can cause a water leak and subsequent property
damage.
Improper connection of the equipment-grounding conductor can
result in risk of electric shock. Check with a qualified electrician or
service personnel if you are in doubt as to whether the appliance
is properly grounded.
This appliance must be grounded. In the event of malfunction or
breakdown, grounding will reduce the risk of electric shock by
providing a path of least resistance for electric current.
This appliance is equipped with a power cord having an
equipment-grounding conductor and a grounding power plug. The
power plug must be plugged into an appropriate socket outlet that
is installed and grounded in accordance with all local codes and
ordinances.
After installing, check the hose connection for leaks before moving
the appliance into the cabinet opening.
Do not damage or place heavy items on the power cord of the
appliance.
This appliance is intended to be used in household and domestic
applications only and must not be used for commercial purposes.
For a permanently connected dishwasher: This appliance must be
connected to a grounded metal, permanent wiring system, or an
equipment-grounding conductor must be run with the circuit
conductors and connected to the equipment-grounding terminal or
lead to the appliance.
Connect the ground wire to the green ground connector in the
terminal box.
6
EN
Operation
Immediately unplug the power plug and contact an LG Electronics
customer information centre if you detect a strange sound, odour,
or smoke coming from the appliance.
Do not repair or replace any part of the appliance. All repairs and
servicing must be performed by qualified service personnel unless
specifically recommended in this Owner’s Manual. Use only
authorized factory parts.
Do not leave the appliance door open. Children may hang on the
door or crawl inside the appliance, causing damage or injury.
Do not use flammable gas and combustible substances (benzene,
gasoline, thinner, petroleum, alcohol, etc.) near the appliance.
Do not attempt to separate any panels or disassemble the
appliance. Do not apply any sharp objects to the control panel in
order to operate the appliance.
Do not bend the power cable excessively or place a heavy object
on it.
Do not put animals, such as pets into the appliance.
Do not touch the power plug or the appliance controls with wet
hands.
If there is a gas leakage (isobutane, propane, natural gas, etc.),
do not touch the appliance or power plug and ventilate the area
immediately.
In case of flood, disconnect the power plug and contact the LG
Electronics Customer Information Centre.
Under certain conditions, hydrogen gas may be produced in a
hot-water system that has not been used for two weeks or more.
HYDROGEN GAS IS EXPLOSIVE. If the hot-water system has
not been used for such a period, before using the appliance turn
on all hot water tap and let the water flow from each for several
minutes. This will release any accumulated hydrogen gas. As the
gas is flammable, do not smoke or use an open flame during this
time.
7
EN
Keep the area underneath and around your appliances free of
combustible materials such as lint, paper, rags, chemicals, etc.
Some dishwasher detergents are strongly alkaline. They can be
extremely dangerous if swallowed. Avoid contact with the skin and
eyes and keep children away from the dishwasher when the door
is open. Check that the detergent receptacle is empty after
completion of the wash cycle.
Do not operate the appliance unless all enclosure panels are
properly in place.
Use only detergents or wetting agents recommended for use in a
appliance and keep them out of the reach of children.
Do not wash and dry articles that have been soaked in explosive
substances such as gasoline, solvents, solvent-based detergent.
When loading items to be washed:
Locate sharp items so that they are not likely to damage the
door seal.
Load sharp knives with the handles up to reduce the risk of
cut-type injuries.
Do not wash plastic items unless they are marked "dishwasher
safe" or the equivalent. For plastic items not so marked, check the
manufacturer’s recommendations.
Do not touch any heating element (where it is exposed) during or
immediately after use.
Do not abuse, sit on, or stand on the door or dish rack of the
dishwasher.
After cleaning the dishes, turn off the tap. Turn on the tap again
and check the connection status of water supply hose before
cleaning.
Do not open the door while the appliance is in operation. Water
will splash out and could cause a slipping hazard.
Be careful not to catch your hand when closing the door of the
appliance.
Do not wash and dry articles that have been soaked in explosive
substances such as gasoline, solvents, solvent-based detergent.
8
EN
Do not come into contact with any fitted steam outlet.
Small parts, such as rack clips and filter retaining posts can be a
choke hazard to small children if removed from the dishwasher.
Keep out of reach of small children.
Knives and other utensils with sharp points must be loaded in the
basket with their points down or placed in a horizontal position.
The door should not be left in the open position since this could
present a tripping hazard.
Maintenance
Never unplug the appliance by pulling on the power cable. Always
grip the power plug firmly and pull straight out from the socket
outlet.
Securely plug the power plug in the socket outlet after completely
removing any moisture and dust.
Do not spray water inside or outside the appliance to clean it.
Disconnect the appliance from the power supply before cleaning
the appliance. Setting the controls to the OFF or stand by position
does not disconnect this appliance from the power supply.
Disposal
Before discarding an old appliance, unplug it. Cut off the cable
directly behind the appliance to prevent misuse.
Dispose of all packaging materials (such as plastic bags and
styrofoam) away from children. The packaging materials can
cause suffocation.
Remove the door before disposing of or discarding this appliance
to avoid the danger of children or small animals getting trapped
inside.
9
EN
CAUTION
To reduce the risk of fire, electric shock, or injury to persons
when using your product, basic safety precautions should
be followed, including the following:
Installation
Install the product on a firm and level floor.
Do not put the drain hose under the dishwasher during installation.
Operation
Turn off the water tap and unplug the appliance if the appliance is
to be left for an extended period of time, such as during vacations.
Do not place objects on the top of the appliance.
Do not wipe or coat the surface of the product with liquid
detergent or bleach (chlorine bleach, oxygen bleach, etc). Failure
to follow these instructions may result in corrosion or discoloration
of the coating.
Do not touch water draining from the machine as it may be hot.
If the drain hose and the water supply hose are frozen in winter,
defrost before using.
Do not put hands, feet, or metal objects below or behind the
appliance.
Do not wash dishes stained with chemical products such as oil,
cream or lotions used in a massage parlor, skin care shop, beauty
shop or barber shop.
MAINTENANCE
If cooking oil is spilled on the exterior of the product, wipe it off
immediately. Do not clean the exterior of the product with cleaners
which contain alcohol, thinners, bleach, benzene, flammable
liquids, or abrasives. These substances may discolor or damage
the appliance.
10
INSTALLATION
Parts
a
Control Panel & Door Handle
b
Front Cover
c
Lower Cover
d
Leveling Feet
e
Drain Hose
f
Water Supply Hose
g
Power Cord
a
Top Wash Impeller
b
Upper Spray Arm
c
Lower Spray Arm
d
Salt Container Cap
e
Filtration System
f
Cutlery Basket
(On Some Models)
g
Detergent and Rinse Aid
Dispenser
h
Cutlery Rack
(On Some Models)
i
Upper Rack
j
Lower Rack
k
Steam Nozzle (Steam Models)
Specifications
Model XD3*25** XD3*15** XD4*15** XD4*24** XD4*14** XD5*24**
Power Supply 220 - 240 V~, 50 Hz
Size 600 mm (W) X 600 mm (D) X 850 mm (H)
Product Weight 52 kg 50 kg 48 kg 48 kg 47 kg 48 kg
Max. Capacity 15 Place Settings 14 Place Settings
Water Feed Pressure 0.05 - 0.6 MPa
Power Consumption 1600 - 1800 W
Appearance and specification is may vary without notice to improve the quality of the appliance.
EN
11
EN
Accessories (On Some Models)
Funnel
(All models)
Noise Strip
(Lower - 1EA / Front
- 1EA / Side - 2EA)
Cover Felt Moisture Barrier Tape
(Aluminum Tape)
Preparing Cabinet Opening
Min. 600 mm
820 - 870 mm
100 mm
600 - 605 mm
Flat and
stable area
75 mm
Cut out for hoses and electrical cables on
either side. (Approximately 100 mm X 75 mm)
Select a location as close to the sink as
possible for ease of connection to the water
and drain pipes.
To ensure drainage, the appliance should not
be installed more than 1 meter away from the
sink.
If the appliance is installed in a corner, allow
minimum clearance of at least 50 mm
between the appliance and an adjacent
cabinet or wall.
Before sliding the appliance into the
installation opening, all necessary height
adjustments should be made using a spanner.
CAUTION
Any bare wood surrounding the appliance
should be sealed with a waterproof paint or
sealant to prevent it from swelling.
Slide the dishwasher into the cabinet, opening
carefully. Make sure that the drain hose
behind the machine and inside the cabinet is
not kinked or stretched.
Install the appliance on a flat and stable area.
Do not place any objects in-between the floor
and base or leg off the appliance.
NOTE
This installation must be conducted by
qualified service personnel to ensure it has
been installed correctly.
Do not pull or lift the appliance using the
handle; dosing so can damage the door and
hinges. Open the door and grab the body
frame and the top front opening of the tub to
move or lift the appliance.
Do not push the door of the dishwasher with
knees.
12
EN
Attaching the Strip to the
Appliance Base (On Some
Models)
To reduce noise attach the strip to the appliance
base.
1
Lay down the appliance and pull on both
the hooks at the bottom of the lower cover.
2
Pull on the lower cover to remove it.
3
Remove the double-sided tape on the back
of the felt and attach it to the front side of
the appliance's bottom.
4
Remove the double-sided tape from the
lower and front strips.
5
Attach the black coloured lower strip to the
bottom of the lower cover.
Black lower strip
6
Attach the white coloured front strip to the
top of the lower cover.
The length of the front strip is longer than
the lower cover. Attach the front strip so
that the overhang is equal on both sides
of the lower cover.
White front strip
7
Attach the lower cover with the strip onto
the appliance.
White
Black
13
EN
Attaching the Strip to the
Appliance side cabinet (On Some
Models)
To reduce noise attach the strip to the appliance
sides, if the opening space allows.
1
Remove the double-side tape from the side
strips.
2
Attach the side strip to the front of the side
cabinet and then push down the side strip
so that the side strip adheres well to the
cabinet.
3
Repeat the above steps for attaching the
opposite side strip to the opposite side
cabinet.
Removing the Top Cover
If the height of the opening is below 850 mm,
follow these instructions.
1
Remove the 2 screws on the back.
2
Pull the top cover backwards after removing
the two screws and then lift it up to remove
it.
3
Remove the locating pins on the top by
using a Phillips screw driver.
NOTE
When the appliance is correctly leveled, there
should be no slant, stickiness or rubbing
sound when the door is opened.
14
EN
Installing Moisture Barrier
Tape (On Some Models)
When the appliance is installed without the top
cover, the counter top underside may be
damaged by steam or condensation when the
door is opened.
Install the moisture barrier tape to the underside
of counter top to protect the counter top from
condensation when the appliance opened.
1
Clean and dry the underside of the counter
top on which the tape will be attached.
2
Remove the protective film from the tape.
3
Install the tape to the underside of the
counter top.
NOTE
Moisture barrier tape is included in the manual
assembly bag.
If the counter top is made of grinite or
waterproof materials, the moisture barrier tape
is not required.
Condensation may occur on the underside or
along the front edge of the counter top when
the room temperature is low.
Levelling the Appliance
Levelling the appliance prevents unnecessary
leakage and poor washing. Place the appliance
on a solid, level floor. Do not install the
appliance on an elevated surface.
If the appliance is not properly level, adjust all
levelling feet as necessary.
Turn them clockwise to raise and counter-
clockwise to lower until the appliance no longer
wobbles, both front-to-back and side-to-side and
corner-to-corner.
Levelling feet
Levelling feet
NOTE
The appliance is not level if there is a rubbing
sound or stickiness when the door is opened.
EN
Case 1. The Door is Slanted to
the Right
1
Unscrew (counter-clockwise) the rear left
leg and correct the level.
2
Check the opening of door and repeat if
necessary until the door opens and closes
properly.
Slant to the right
Case 2. The Door is Slanted to
the Left
1
Unscrew (counter-clockwise) the rear right
leg and correct the level.
2
Check the opening of door and repeat if
necessary until the door opens and closes
properly.
Slant to the left
Installing the Drain Hose
If the end of the drain hose does not fit to the
drain line, use a drain extension kit (optional)
that is resistant to heat and detergent.
This should be available from a plumbing shop
or a hardware store.
Connection to the Waste Spigot
Check the waste spigot when initially installing.
An OE error can occur when the waste spigot
below the sink is not drilled out properly. To
connect the drain hose, drill out at least a 15
mm diameter hole in the waste spigot before
connecting and securing.
Waste spigot
CAUTION
Make sure that plastic debris is not remaining
inside of spigot after it has been drilled out.
Do not attempt to open the waste hole with a
screwdriver and hammer. this will induce
debris to become stuck and cause a
malfunction.
Caution should be taken when passing hoses
through Cabinetry holes as they may have
sharp edges and could damage the hoses.
Smooth or sand edges to avoid damaging the
drain or inlet hose.
Make sure that the line is not kinked or
sharply bent.
Make sure the drain hose is straight before
feeding the end of it through the hole for the
water supply.
15
EN
Case 1. The Door is Slanted to
the Right
1
Unscrew (counter-clockwise) the rear left
leg and correct the level.
2
Check the opening of door and repeat if
necessary until the door opens and closes
properly.
Slant to the right
Case 2. The Door is Slanted to
the Left
1
Unscrew (counter-clockwise) the rear right
leg and correct the level.
2
Check the opening of door and repeat if
necessary until the door opens and closes
properly.
Slant to the left
Installing the Drain Hose
If the end of the drain hose does not fit to the
drain line, use a drain extension kit (optional)
that is resistant to heat and detergent.
This should be available from a plumbing shop
or a hardware store.
Connection to the Waste Spigot
Check the waste spigot when initially installing.
An OE error can occur when the waste spigot
below the sink is not drilled out properly. To
connect the drain hose, drill out at least a 15
mm diameter hole in the waste spigot before
connecting and securing.
Waste spigot
CAUTION
Make sure that plastic debris is not remaining
inside of spigot after it has been drilled out.
Do not attempt to open the waste hole with a
screwdriver and hammer. this will induce
debris to become stuck and cause a
malfunction.
Caution should be taken when passing hoses
through Cabinetry holes as they may have
sharp edges and could damage the hoses.
Smooth or sand edges to avoid damaging the
drain or inlet hose.
Make sure that the line is not kinked or
sharply bent.
Make sure the drain hose is straight before
feeding the end of it through the hole for the
water supply.
16
EN
To prevent siphoning, one of the following
methods must be used.
Method 1
When the drain hose is connected to a waste
spigot, the hose must be looped up to the
underside of the bench top and secured.
300 mm Min.
770 mm – 1000 mm
Method 2
When the drain hose is connected to a
separate standpipe, it is essential that an
airtight connection be made. If not, it can
induce odors.
700 mm Min.
1000 mm Max.
300 mm Min.
Air Tight
Connection
Standpipe 40 mm
diametre Min.
Connecting the Water Supply
Hose
Connect the water supply hose to the water
tap.
WARNING
Do not shorten or damage the water supply
hose as it contains electrical wires and
components. It can not be detached or
removed from the appliance for installation
purposes.
It is important that the water supply hose not
be tampered with, cut, disassembled, pulled,
or kinked. It contains electrical wiring inside
and if damaged, can cause an electrical
hazard.
CAUTION
Only use the threaded nut of the water supply
hose to tighten it to the tap.
Do not twist or kink the water supply hose
when connecting it to the tap.
Water tap
Water supply hose
Bench top
17
EN
CAUTION
This appliance may be fed with either hot or
cold water. If the water connection can not be
maintained below 65ºC, the appliance must
be connected to cold water.
Use sealant tape or sealing compound on the
tap's thread to avoid water leaks.
Make sure that the line is not kinked or
sharply bent.
NOTE
Before connecting the water supply hose to
the tap, turn on the tap to flush out foreign
substances (dirt, sand or sawdust) in the
water lines. Let water drain into a bucket.
It takes about 3 – 4 minitues for the first
supply water.
Preparing Electrical Wiring
Connect the appliance to an earthed socket in
accordance with the current wiring regulations,
protected by a minimum 15 amp circuit breaker
or time delay fuse.
Wiring must be two wires with earth.
The power cord should not be positioned
behind the appliance but within 1.2 meters of
the side so that the plug is easily accessible.
WARNING
For personal safety, remove house fuse or
open circuit breaker or switch off power plug
before installation.
Do not use an extension cord or double
adapter.
The plug must be plugged into an appropriate
outlet that is properly installed and grounded
in accordance with all local codes and
ordinances.
Repairs to the appliance must only be carried
out by qualified service personnel. Repairs
carried out by inexperienced persons may
cause injury or serious malfunctioning.
Contact our local service centre.
Connect to a properly rated, protected, and
sized power circuit to avoid electrical
overload.
Final Check
1
Turn on electrical power.
2
Turn on house water supply.
3
The door should open and close smoothly
and without harsh noises, if the unit has
been leveled correctly.
4
Run the appliance on a Rinse cycle to verify
proper operation and check for leaks.
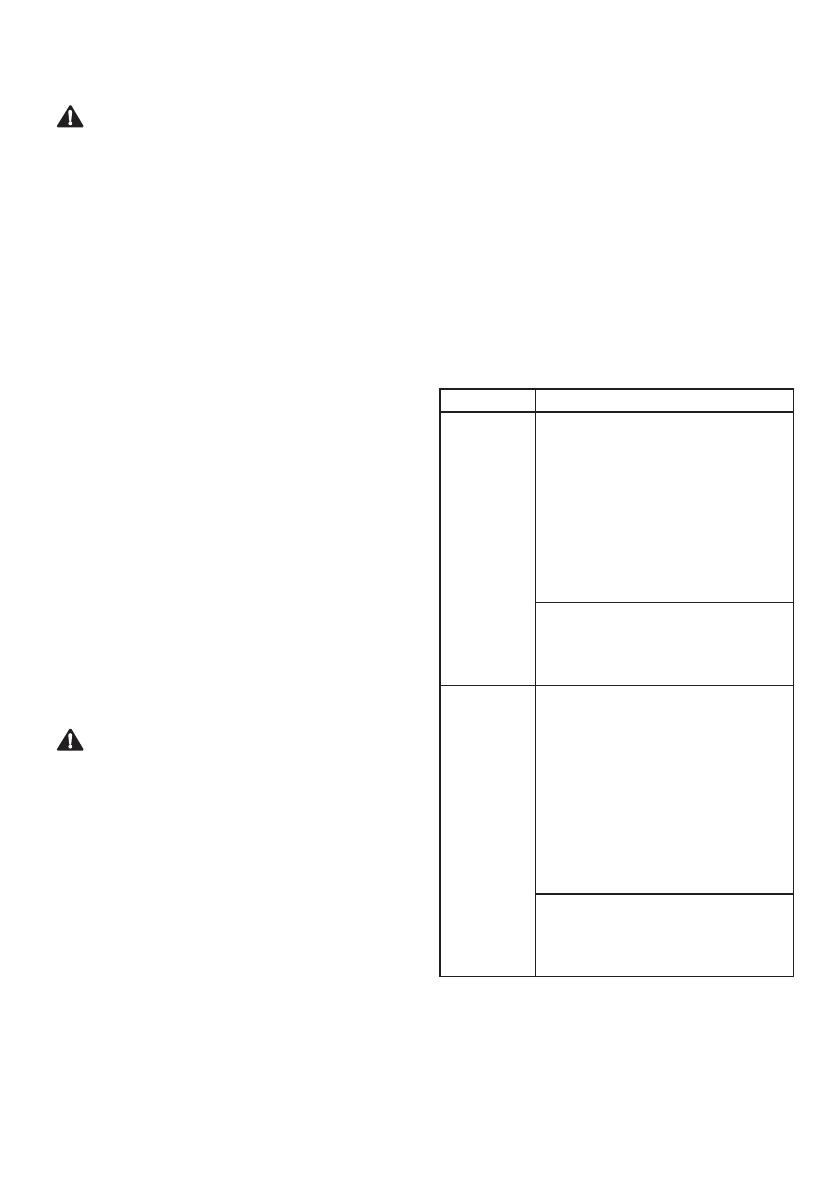
Error Code Possible Cause and Solution
OE Error
Drain hose kinked or pinched.
Feed the drainage and supply
hoses through the hole under the
sink. Then gradually slide the
dishwasher into the cabinet while
pulling on the hoses under the
sink to take up any slack. This
helps avoid kinking the hoses or
trapping them beneath the
dishwasher.
Waste spigot under sink is
clogged.
Drill out the waste spigot under
the sink.
IE Error
Water supply line kinked under
dishwasher.
Feed the drainage and supply
hoses through the hole under the
sink. Then gradually slide the
dishwasher into the cabinet while
pulling on the hoses under the
sink to take up any slack. This
helps avoid kinking the hoses or
trapping them beneath the
dishwasher.
House water supply not turned
on.
Turn water on. Water pressure
may be too high or too low.
18
OPERATION
EN
Before Using the Appliance
This model has a water softener to soften hard
water.
NOTE
The appliance can be used without
dishwasher salt if not required, however, the
hardness level needs to be set to H0 so that
the icon does not remain lit.
In order to provide satisfactory rinsing results,
the appliance requires soft water, i.e.,
containing little or no lime, otherwise water
stains will be left behind on the dishes and
inside the appliance.
If the tap water exceeds a certain level of
hardness, it must be softened, i.e., decalcified.
This is achieved by adding dishwasher salt to
the water softener inside the appliance. The
required amount of the salt is set up according
to how hard tap water is.
Checking Water Hardness Level
1
Check the water hardness in your area. The
water utility company can help you with this.
2
Set the softening system level of the
appliance according to the water hardness
level.
Water Hardness Table
The value
of
hardness
Hardness range
Water
quality
Softening
system
level
°d °e °f
mmol/l
(Ca+Mg)
mg/l
Ca
0 <4 <5 <7 <0.7 <29 Soft H0
75 4 - 7 5 - 9 7 - 13 0.7 - 1.3 29 - 50 H1
125 7 - 14 9 - 17.5 13 - 25 1.3 - 2.5 50 - 100 H2
250 14 - 21 17.5 - 26 25 - 38 2.5 - 3.8 100 - 150 H3
375 >21 >26 >38 >3.8 >150 Hard H4
19
EN
Setting the Water Softening
System
For effective washing performance, adjust the
setting corresponding to the hardness level of
water used in water supply. The water softener
has 5 adjustment levels, and the appliance is
programmed at the factory for a water hardness
level of H0. You can check the default setting
value and adjust it in the following steps:
1
Press Power and Half Load button
simultaneously.
Current setting value indicated.
2
Press the Delay Start button, and then set
up the intended value.
Scope of setting value is H0 to H4.
3
Press the Start button to save the setting.
The power turns off after saving.
NOTE
The Salt refill icon turns on in the display
if dishwasher salt is not in the softening
system.
If the hardness setting is set to H0, no icon
indicates in spite of no salt.
Filling with Dishwasher Salt
The Dishwasher Salt tank must be filled before
starting the washing programme. In case of
insufficient salt, the Salt refill icon indicates
on the display, unless the hardness level has
been set to H0.
CAUTION
Once you have filled with dishwasher salt you
must run the Rinse cycle immediately to
remove the salt and the salt water around the
inner tub in order to prevent corrosion.
1
Remove the lower rack and remove the cap
of the salt container located on the left side
of the filters.
2
Before using the appliance for the first time,
it is necessary to pour 1.0 kg of dishwasher
salt and 1 litre of water at the same time if
intending to use the water softener system.
When refilling the salt, use a funnel. Refer
to Before Using the Appliance section.
Salt
Water
3
Refit the cap tightly.
4
Run the Rinse cycle without dishes.
1 / 1

LG XD5B24PS Owner's manual

Category
Dishwashers
Type
Owner's manual

Ask a question and I''ll find the answer in the document

Finding information in a document is now easier with AI

Ask the document