Page is loading ...

1LX Series Heat Pump Unit Controller User’s Guide
Introduction . . . . . . . . . . . . . . . . . . . . . . . . . . . . . . . . . . . . . . . . . . . . . . . . . . . . . . . . . .9
Feature Description . . . . . . . . . . . . . . . . . . . . . . . . . . . . . . . . . . . . . . . . . . . . . . . . . . . . . . . 9
Sensor Configuration Wizard . . . . . . . . . . . . . . . . . . . . . . . . . . . . . . . . . . . . . . . . . . . . . . 10
Control Features . . . . . . . . . . . . . . . . . . . . . . . . . . . . . . . . . . . . . . . . . . . . . . . . . . . . . . . . 10
LonMark Functional Profile. . . . . . . . . . . . . . . . . . . . . . . . . . . . . . . . . . . . . . . . . . . . . 11
Units in LONWORKS Networks . . . . . . . . . . . . . . . . . . . . . . . . . . . . . . . . . . . . . . . . . . . . . . 14
Language Selection. . . . . . . . . . . . . . . . . . . . . . . . . . . . . . . . . . . . . . . . . . . . . . . . . . . . . . 15
Selecting a Measurement System or Selecting a Language . . . . . . . . . . . . . . . . . . . . . 16
Heat Pump Unit Controller Installation Overview. . . . . . . . . . . . . . . . . . . . . . . . . . . 19
Inputs . . . . . . . . . . . . . . . . . . . . . . . . . . . . . . . . . . . . . . . . . . . . . . . . . . . . . . . . . . . . . . 19
10k Ohm or Digital Input . . . . . . . . . . . . . . . . . . . . . . . . . . . . . . . . . . . . . . . . . . . . . . . . . . 19
Analog Inputs. . . . . . . . . . . . . . . . . . . . . . . . . . . . . . . . . . . . . . . . . . . . . . . . . . . . . . . . . . . 21
4 to 20 mA Analog Input, Externally Supplied . . . . . . . . . . . . . . . . . . . . . . . . . . . . . . . . . . . 21
Sensors and Switches. . . . . . . . . . . . . . . . . . . . . . . . . . . . . . . . . . . . . . . . . . . . . . . . . . . . 21
Auxiliary Alarm Input . . . . . . . . . . . . . . . . . . . . . . . . . . . . . . . . . . . . . . . . . . . . . . . . . . . . . . 22
Bypass Contact Input. . . . . . . . . . . . . . . . . . . . . . . . . . . . . . . . . . . . . . . . . . . . . . . . . . . . . . 22
Coil Differential Pressure Input . . . . . . . . . . . . . . . . . . . . . . . . . . . . . . . . . . . . . . . . . . . . . . 22
Coil Frost Contact Input. . . . . . . . . . . . . . . . . . . . . . . . . . . . . . . . . . . . . . . . . . . . . . . . . . . . 22
Discharge Temperature Input . . . . . . . . . . . . . . . . . . . . . . . . . . . . . . . . . . . . . . . . . . . . . . . 22
Emergency Contact Input . . . . . . . . . . . . . . . . . . . . . . . . . . . . . . . . . . . . . . . . . . . . . . . . . . 22
Fan Speed Selector Input . . . . . . . . . . . . . . . . . . . . . . . . . . . . . . . . . . . . . . . . . . . . . . . . . . 22
Fan State Input . . . . . . . . . . . . . . . . . . . . . . . . . . . . . . . . . . . . . . . . . . . . . . . . . . . . . . . . . . 23
Mode Selector . . . . . . . . . . . . . . . . . . . . . . . . . . . . . . . . . . . . . . . . . . . . . . . . . . . . . . . . . . . 23
Occupancy Input . . . . . . . . . . . . . . . . . . . . . . . . . . . . . . . . . . . . . . . . . . . . . . . . . . . . . . . . . 23
Outdoor Temperature Input . . . . . . . . . . . . . . . . . . . . . . . . . . . . . . . . . . . . . . . . . . . . . . . . . 24
LX Series Heat Pump Unit Controller
User’s Guide
Code No. LIT-12011484
Issued June 22, 2009

LX Series Heat Pump Unit Controller User’s Guide2
Pump State Input. . . . . . . . . . . . . . . . . . . . . . . . . . . . . . . . . . . . . . . . . . . . . . . . . . . . . . . . . 24
Refrigerant Temperature Input. . . . . . . . . . . . . . . . . . . . . . . . . . . . . . . . . . . . . . . . . . . . . . . 24
Setpoint Offset Input . . . . . . . . . . . . . . . . . . . . . . . . . . . . . . . . . . . . . . . . . . . . . . . . . . . . . . 24
Space Humidity Input. . . . . . . . . . . . . . . . . . . . . . . . . . . . . . . . . . . . . . . . . . . . . . . . . . . . . . 24
Space Temperature Input . . . . . . . . . . . . . . . . . . . . . . . . . . . . . . . . . . . . . . . . . . . . . . . . . . 24
Water Temperature Input. . . . . . . . . . . . . . . . . . . . . . . . . . . . . . . . . . . . . . . . . . . . . . . . . . . 25
Window Contact Input . . . . . . . . . . . . . . . . . . . . . . . . . . . . . . . . . . . . . . . . . . . . . . . . . . . . . 25
Outputs. . . . . . . . . . . . . . . . . . . . . . . . . . . . . . . . . . . . . . . . . . . . . . . . . . . . . . . . . . . . . 27
Analog Output Protection. . . . . . . . . . . . . . . . . . . . . . . . . . . . . . . . . . . . . . . . . . . . . . . . . 27
Digital Outputs. . . . . . . . . . . . . . . . . . . . . . . . . . . . . . . . . . . . . . . . . . . . . . . . . . . . . . . . . . 27
Staged Outputs . . . . . . . . . . . . . . . . . . . . . . . . . . . . . . . . . . . . . . . . . . . . . . . . . . . . . . . . . 29
Output Selections . . . . . . . . . . . . . . . . . . . . . . . . . . . . . . . . . . . . . . . . . . . . . . . . . . . . . . . 29
Fan Speed 1 - 3. . . . . . . . . . . . . . . . . . . . . . . . . . . . . . . . . . . . . . . . . . . . . . . . . . . . . . . . . . 29
Heating Outputs 1 - 4. . . . . . . . . . . . . . . . . . . . . . . . . . . . . . . . . . . . . . . . . . . . . . . . . . . . . . 29
Cooling Outputs 1 - 4. . . . . . . . . . . . . . . . . . . . . . . . . . . . . . . . . . . . . . . . . . . . . . . . . . . . . . 29
Reversing Valve. . . . . . . . . . . . . . . . . . . . . . . . . . . . . . . . . . . . . . . . . . . . . . . . . . . . . . . . . . 29
Humidifier and Dehumidifier Outputs. . . . . . . . . . . . . . . . . . . . . . . . . . . . . . . . . . . . . . . . . . 30
Mode Selection . . . . . . . . . . . . . . . . . . . . . . . . . . . . . . . . . . . . . . . . . . . . . . . . . . . . . . 30
Network Variables Used for Mode Selection. . . . . . . . . . . . . . . . . . . . . . . . . . . . . . . . . . 31
Occupied Mode . . . . . . . . . . . . . . . . . . . . . . . . . . . . . . . . . . . . . . . . . . . . . . . . . . . . . . . . . 32
Starting Occupied Mode . . . . . . . . . . . . . . . . . . . . . . . . . . . . . . . . . . . . . . . . . . . . . . . . . . . 32
Ending Occupied Mode . . . . . . . . . . . . . . . . . . . . . . . . . . . . . . . . . . . . . . . . . . . . . . . . . . . . 32
Unoccupied Mode . . . . . . . . . . . . . . . . . . . . . . . . . . . . . . . . . . . . . . . . . . . . . . . . . . . . . . . 32
Starting Unoccupied Mode. . . . . . . . . . . . . . . . . . . . . . . . . . . . . . . . . . . . . . . . . . . . . . . . . . 32
Ending Unoccupied Mode . . . . . . . . . . . . . . . . . . . . . . . . . . . . . . . . . . . . . . . . . . . . . . . . . . 33
Bypass Mode . . . . . . . . . . . . . . . . . . . . . . . . . . . . . . . . . . . . . . . . . . . . . . . . . . . . . . . . . . . 33
Starting Bypass Mode . . . . . . . . . . . . . . . . . . . . . . . . . . . . . . . . . . . . . . . . . . . . . . . . . . . . . 34
Ending Bypass Mode. . . . . . . . . . . . . . . . . . . . . . . . . . . . . . . . . . . . . . . . . . . . . . . . . . . . . . 34
Standby Mode . . . . . . . . . . . . . . . . . . . . . . . . . . . . . . . . . . . . . . . . . . . . . . . . . . . . . . . . . . 34
Starting Standby Mode . . . . . . . . . . . . . . . . . . . . . . . . . . . . . . . . . . . . . . . . . . . . . . . . . . . . 34

LX Series Heat Pump Unit Controller User’s Guide 3
Ending Standby Mode . . . . . . . . . . . . . . . . . . . . . . . . . . . . . . . . . . . . . . . . . . . . . . . . . . . . . 35
Slave Mode. . . . . . . . . . . . . . . . . . . . . . . . . . . . . . . . . . . . . . . . . . . . . . . . . . . . . . . . . . . . . 35
State Selection and Description. . . . . . . . . . . . . . . . . . . . . . . . . . . . . . . . . . . . . . . . . 35
Supervisory Control and Scheduling. . . . . . . . . . . . . . . . . . . . . . . . . . . . . . . . . . . . . . . . 35
Calculating the Space Temperature Setpoint . . . . . . . . . . . . . . . . . . . . . . . . . . . . . . . . . 35
The Effect of nviSetPoint on the Active Setpoints . . . . . . . . . . . . . . . . . . . . . . . . . . . . . . . . 36
The Effect of a Setpoint Offset on the Active Setpoints. . . . . . . . . . . . . . . . . . . . . . . . . . . . 36
Humidity Control . . . . . . . . . . . . . . . . . . . . . . . . . . . . . . . . . . . . . . . . . . . . . . . . . . . . . . . . 37
Defrost cycle . . . . . . . . . . . . . . . . . . . . . . . . . . . . . . . . . . . . . . . . . . . . . . . . . . . . . . . . . . . 37
Cooling State . . . . . . . . . . . . . . . . . . . . . . . . . . . . . . . . . . . . . . . . . . . . . . . . . . . . . . . . . . . 38
Mechanical Cooling . . . . . . . . . . . . . . . . . . . . . . . . . . . . . . . . . . . . . . . . . . . . . . . . . . . . . . . 38
Cooling Demand . . . . . . . . . . . . . . . . . . . . . . . . . . . . . . . . . . . . . . . . . . . . . . . . . . . . . . . . . 39
Cooling Output Sequence . . . . . . . . . . . . . . . . . . . . . . . . . . . . . . . . . . . . . . . . . . . . . . . . . . 39
Ending the Cooling State. . . . . . . . . . . . . . . . . . . . . . . . . . . . . . . . . . . . . . . . . . . . . . . . . . . 39
Heating State . . . . . . . . . . . . . . . . . . . . . . . . . . . . . . . . . . . . . . . . . . . . . . . . . . . . . . . . . . . 39
Heating Demand . . . . . . . . . . . . . . . . . . . . . . . . . . . . . . . . . . . . . . . . . . . . . . . . . . . . . . . . . 41
Heating Output Sequence . . . . . . . . . . . . . . . . . . . . . . . . . . . . . . . . . . . . . . . . . . . . . . . . . . 41
Cooling Outputs Used to Heat. . . . . . . . . . . . . . . . . . . . . . . . . . . . . . . . . . . . . . . . . . . . . . . 41
Ending the Heating State. . . . . . . . . . . . . . . . . . . . . . . . . . . . . . . . . . . . . . . . . . . . . . . . . . . 41
Night Purge. . . . . . . . . . . . . . . . . . . . . . . . . . . . . . . . . . . . . . . . . . . . . . . . . . . . . . . . . . . . . 41
Morning Warm-up . . . . . . . . . . . . . . . . . . . . . . . . . . . . . . . . . . . . . . . . . . . . . . . . . . . . . . . 42
Fan Operation. . . . . . . . . . . . . . . . . . . . . . . . . . . . . . . . . . . . . . . . . . . . . . . . . . . . . . . . 42
Terminal Load . . . . . . . . . . . . . . . . . . . . . . . . . . . . . . . . . . . . . . . . . . . . . . . . . . . . . . . 43
Heating Terminal Load . . . . . . . . . . . . . . . . . . . . . . . . . . . . . . . . . . . . . . . . . . . . . . . . . . . 44
Cooling Terminal Load . . . . . . . . . . . . . . . . . . . . . . . . . . . . . . . . . . . . . . . . . . . . . . . . . . . 45
Networking Operations . . . . . . . . . . . . . . . . . . . . . . . . . . . . . . . . . . . . . . . . . . . . . . . . 46
Slave Operation . . . . . . . . . . . . . . . . . . . . . . . . . . . . . . . . . . . . . . . . . . . . . . . . . . . . . . . . . 46
Load Shedding. . . . . . . . . . . . . . . . . . . . . . . . . . . . . . . . . . . . . . . . . . . . . . . . . . . . . . . . . . 46
Setting Up Network Connections. . . . . . . . . . . . . . . . . . . . . . . . . . . . . . . . . . . . . . . . . . . 46
Network Outputs . . . . . . . . . . . . . . . . . . . . . . . . . . . . . . . . . . . . . . . . . . . . . . . . . . . . . . . . . 47

LX Series Heat Pump Unit Controller User’s Guide4
Optimum Start . . . . . . . . . . . . . . . . . . . . . . . . . . . . . . . . . . . . . . . . . . . . . . . . . . . . . . . 48
Requirements for Optimum Start. . . . . . . . . . . . . . . . . . . . . . . . . . . . . . . . . . . . . . . . . . . 48
Emergency Operation. . . . . . . . . . . . . . . . . . . . . . . . . . . . . . . . . . . . . . . . . . . . . . . . . 49
Emergency Initiation . . . . . . . . . . . . . . . . . . . . . . . . . . . . . . . . . . . . . . . . . . . . . . . . . . . . . 49
Normal Operation. . . . . . . . . . . . . . . . . . . . . . . . . . . . . . . . . . . . . . . . . . . . . . . . . . . . . . . . . 49
The PID Loop. . . . . . . . . . . . . . . . . . . . . . . . . . . . . . . . . . . . . . . . . . . . . . . . . . . . . . . . 49
Proportional . . . . . . . . . . . . . . . . . . . . . . . . . . . . . . . . . . . . . . . . . . . . . . . . . . . . . . . . . . . . 51
Integral . . . . . . . . . . . . . . . . . . . . . . . . . . . . . . . . . . . . . . . . . . . . . . . . . . . . . . . . . . . . . . . . 51
Gain . . . . . . . . . . . . . . . . . . . . . . . . . . . . . . . . . . . . . . . . . . . . . . . . . . . . . . . . . . . . . . . . . . . 51
Time. . . . . . . . . . . . . . . . . . . . . . . . . . . . . . . . . . . . . . . . . . . . . . . . . . . . . . . . . . . . . . . . . . . 51
How It Is Used . . . . . . . . . . . . . . . . . . . . . . . . . . . . . . . . . . . . . . . . . . . . . . . . . . . . . . . . . . . 52
Derivative . . . . . . . . . . . . . . . . . . . . . . . . . . . . . . . . . . . . . . . . . . . . . . . . . . . . . . . . . . . . . . 52
Gain . . . . . . . . . . . . . . . . . . . . . . . . . . . . . . . . . . . . . . . . . . . . . . . . . . . . . . . . . . . . . . . . . . . 53
Time. . . . . . . . . . . . . . . . . . . . . . . . . . . . . . . . . . . . . . . . . . . . . . . . . . . . . . . . . . . . . . . . . . . 53
Dead Band . . . . . . . . . . . . . . . . . . . . . . . . . . . . . . . . . . . . . . . . . . . . . . . . . . . . . . . . . . . . . 54
Alarm Operation . . . . . . . . . . . . . . . . . . . . . . . . . . . . . . . . . . . . . . . . . . . . . . . . . . . . . 54
Alarm Features. . . . . . . . . . . . . . . . . . . . . . . . . . . . . . . . . . . . . . . . . . . . . . . . . . . . . . . . . . 56
Alarm Types . . . . . . . . . . . . . . . . . . . . . . . . . . . . . . . . . . . . . . . . . . . . . . . . . . . . . . . . . . . . 57
Alarm Procedure . . . . . . . . . . . . . . . . . . . . . . . . . . . . . . . . . . . . . . . . . . . . . . . . . . . . . . . . 57
Heartbeat Alarms. . . . . . . . . . . . . . . . . . . . . . . . . . . . . . . . . . . . . . . . . . . . . . . . . . . . . . . . . 57
Disconnect Alarms. . . . . . . . . . . . . . . . . . . . . . . . . . . . . . . . . . . . . . . . . . . . . . . . . . . . . . . . 59
Emergency Mode Alarms. . . . . . . . . . . . . . . . . . . . . . . . . . . . . . . . . . . . . . . . . . . . . . . . . . . 59
User-Set Alarms. . . . . . . . . . . . . . . . . . . . . . . . . . . . . . . . . . . . . . . . . . . . . . . . . . . . . . . . . . 59
Setting up the Heat Pump Controller . . . . . . . . . . . . . . . . . . . . . . . . . . . . . . . . . . . . 60
Persistent Network Variables . . . . . . . . . . . . . . . . . . . . . . . . . . . . . . . . . . . . . . . . . . . . . . 60
Setting Units. . . . . . . . . . . . . . . . . . . . . . . . . . . . . . . . . . . . . . . . . . . . . . . . . . . . . . . . . . . . 61
Input Configuration. . . . . . . . . . . . . . . . . . . . . . . . . . . . . . . . . . . . . . . . . . . . . . . . . . . 61
Heartbeat (Max Send Time). . . . . . . . . . . . . . . . . . . . . . . . . . . . . . . . . . . . . . . . . . . . . . . . 63
Throttle (Min Send Time). . . . . . . . . . . . . . . . . . . . . . . . . . . . . . . . . . . . . . . . . . . . . . . . . . 63
Delta Value . . . . . . . . . . . . . . . . . . . . . . . . . . . . . . . . . . . . . . . . . . . . . . . . . . . . . . . . . . . . . 64

LX Series Heat Pump Unit Controller User’s Guide 5
Override Value . . . . . . . . . . . . . . . . . . . . . . . . . . . . . . . . . . . . . . . . . . . . . . . . . . . . . . . . . . 64
Default Value . . . . . . . . . . . . . . . . . . . . . . . . . . . . . . . . . . . . . . . . . . . . . . . . . . . . . . . . . . . 64
Sensor Hardware Properties. . . . . . . . . . . . . . . . . . . . . . . . . . . . . . . . . . . . . . . . . . . . . . . 64
Input Signal Interpretation . . . . . . . . . . . . . . . . . . . . . . . . . . . . . . . . . . . . . . . . . . . . . . . . 64
Signal Type. . . . . . . . . . . . . . . . . . . . . . . . . . . . . . . . . . . . . . . . . . . . . . . . . . . . . . . . . . . . . 64
Thermistor Type. . . . . . . . . . . . . . . . . . . . . . . . . . . . . . . . . . . . . . . . . . . . . . . . . . . . . . . . . 65
Offset. . . . . . . . . . . . . . . . . . . . . . . . . . . . . . . . . . . . . . . . . . . . . . . . . . . . . . . . . . . . . . . . . . 65
Max Value, Min Value. . . . . . . . . . . . . . . . . . . . . . . . . . . . . . . . . . . . . . . . . . . . . . . . . . . . . 65
Reverse. . . . . . . . . . . . . . . . . . . . . . . . . . . . . . . . . . . . . . . . . . . . . . . . . . . . . . . . . . . . . . . . 65
Increment . . . . . . . . . . . . . . . . . . . . . . . . . . . . . . . . . . . . . . . . . . . . . . . . . . . . . . . . . . . . . . 65
TransTable . . . . . . . . . . . . . . . . . . . . . . . . . . . . . . . . . . . . . . . . . . . . . . . . . . . . . . . . . . . . . 65
Get Value . . . . . . . . . . . . . . . . . . . . . . . . . . . . . . . . . . . . . . . . . . . . . . . . . . . . . . . . . . . . . . 66
Configuring an Input Represented as a L
ONMARK Object . . . . . . . . . . . . . . . . . . . . . . . 66
Output Configuration. . . . . . . . . . . . . . . . . . . . . . . . . . . . . . . . . . . . . . . . . . . . . . . . . . 66
Output Signal Types . . . . . . . . . . . . . . . . . . . . . . . . . . . . . . . . . . . . . . . . . . . . . . . . . . . . . 68
Configuring an Output. . . . . . . . . . . . . . . . . . . . . . . . . . . . . . . . . . . . . . . . . . . . . . . . . . . . 68
Creating a Functional Block. . . . . . . . . . . . . . . . . . . . . . . . . . . . . . . . . . . . . . . . . . . . . . . . . 70
Configuring an Output Represented as a Functional Block. . . . . . . . . . . . . . . . . . . . . . . . . 70
Heating-Cooling Configuration. . . . . . . . . . . . . . . . . . . . . . . . . . . . . . . . . . . . . . . . . . 71
Fan-Valve Configuration . . . . . . . . . . . . . . . . . . . . . . . . . . . . . . . . . . . . . . . . . . . . . . . 73
PID Configuration . . . . . . . . . . . . . . . . . . . . . . . . . . . . . . . . . . . . . . . . . . . . . . . . . . . . 74
Alarm Configuration . . . . . . . . . . . . . . . . . . . . . . . . . . . . . . . . . . . . . . . . . . . . . . . . . . 75
Space Temperatures and Humidity . . . . . . . . . . . . . . . . . . . . . . . . . . . . . . . . . . . . . . . . . . . 76
Discharge Temperature and Auxiliary Alarm. . . . . . . . . . . . . . . . . . . . . . . . . . . . . . . . . . . . 76
Fan Alarm . . . . . . . . . . . . . . . . . . . . . . . . . . . . . . . . . . . . . . . . . . . . . . . . . . . . . . . . . . . . . . 76
Pump Alarm. . . . . . . . . . . . . . . . . . . . . . . . . . . . . . . . . . . . . . . . . . . . . . . . . . . . . . . . . . . . . 77
General Settings Configuration . . . . . . . . . . . . . . . . . . . . . . . . . . . . . . . . . . . . . . . . . 77
Radiation Heating . . . . . . . . . . . . . . . . . . . . . . . . . . . . . . . . . . . . . . . . . . . . . . . . . . . . . . . 78
Options Configuration. . . . . . . . . . . . . . . . . . . . . . . . . . . . . . . . . . . . . . . . . . . . . . . . . 78
Optimum Start . . . . . . . . . . . . . . . . . . . . . . . . . . . . . . . . . . . . . . . . . . . . . . . . . . . . . . . . . . 79

LX Series Heat Pump Unit Controller User’s Guide6
Frost Protection. . . . . . . . . . . . . . . . . . . . . . . . . . . . . . . . . . . . . . . . . . . . . . . . . . . . . . . . . 80
Defrost Cycle . . . . . . . . . . . . . . . . . . . . . . . . . . . . . . . . . . . . . . . . . . . . . . . . . . . . . . . . . . . 80
Humidity Control . . . . . . . . . . . . . . . . . . . . . . . . . . . . . . . . . . . . . . . . . . . . . . . . . . . . . . . . 81
Network Input Configuration . . . . . . . . . . . . . . . . . . . . . . . . . . . . . . . . . . . . . . . . . . . 82
Heartbeat Alarms. . . . . . . . . . . . . . . . . . . . . . . . . . . . . . . . . . . . . . . . . . . . . . . . . . . . . . . . 82
Network Output Configuration. . . . . . . . . . . . . . . . . . . . . . . . . . . . . . . . . . . . . . . . . . 82
Object Manage. . . . . . . . . . . . . . . . . . . . . . . . . . . . . . . . . . . . . . . . . . . . . . . . . . . . . . . 84
Object Status . . . . . . . . . . . . . . . . . . . . . . . . . . . . . . . . . . . . . . . . . . . . . . . . . . . . . . . . . . . 85
Communication Failure . . . . . . . . . . . . . . . . . . . . . . . . . . . . . . . . . . . . . . . . . . . . . . . . . . . . 85
Electrical Fault . . . . . . . . . . . . . . . . . . . . . . . . . . . . . . . . . . . . . . . . . . . . . . . . . . . . . . . . . . . 86
Out of Limits. . . . . . . . . . . . . . . . . . . . . . . . . . . . . . . . . . . . . . . . . . . . . . . . . . . . . . . . . . . . . 86
Disabled. . . . . . . . . . . . . . . . . . . . . . . . . . . . . . . . . . . . . . . . . . . . . . . . . . . . . . . . . . . . . . . . 86
In Alarm . . . . . . . . . . . . . . . . . . . . . . . . . . . . . . . . . . . . . . . . . . . . . . . . . . . . . . . . . . . . . . . . 86
In Override. . . . . . . . . . . . . . . . . . . . . . . . . . . . . . . . . . . . . . . . . . . . . . . . . . . . . . . . . . . . . . 86
Out of Service . . . . . . . . . . . . . . . . . . . . . . . . . . . . . . . . . . . . . . . . . . . . . . . . . . . . . . . . . . . 86
Network Variables. . . . . . . . . . . . . . . . . . . . . . . . . . . . . . . . . . . . . . . . . . . . . . . . . . . . 86
nviApplicMode . . . . . . . . . . . . . . . . . . . . . . . . . . . . . . . . . . . . . . . . . . . . . . . . . . . . . . . . . . 86
nviCoilDiffPress. . . . . . . . . . . . . . . . . . . . . . . . . . . . . . . . . . . . . . . . . . . . . . . . . . . . . . . . . 87
nviDischargeTemp. . . . . . . . . . . . . . . . . . . . . . . . . . . . . . . . . . . . . . . . . . . . . . . . . . . . . . . 88
nviEmergCmd. . . . . . . . . . . . . . . . . . . . . . . . . . . . . . . . . . . . . . . . . . . . . . . . . . . . . . . . . . . 88
nviExtCmdOutputx . . . . . . . . . . . . . . . . . . . . . . . . . . . . . . . . . . . . . . . . . . . . . . . . . . . . . . 88
nviFanSpeedCmd. . . . . . . . . . . . . . . . . . . . . . . . . . . . . . . . . . . . . . . . . . . . . . . . . . . . . . . . 88
nviFanState. . . . . . . . . . . . . . . . . . . . . . . . . . . . . . . . . . . . . . . . . . . . . . . . . . . . . . . . . . . . . 88
nviHotWater . . . . . . . . . . . . . . . . . . . . . . . . . . . . . . . . . . . . . . . . . . . . . . . . . . . . . . . . . . . . 89
nviOccCmd & nviOccManCmd. . . . . . . . . . . . . . . . . . . . . . . . . . . . . . . . . . . . . . . . . . . . . 89
nviOutdoorTemp . . . . . . . . . . . . . . . . . . . . . . . . . . . . . . . . . . . . . . . . . . . . . . . . . . . . . . . . 89
nviPumpState. . . . . . . . . . . . . . . . . . . . . . . . . . . . . . . . . . . . . . . . . . . . . . . . . . . . . . . . . . . 89
nviRefrigTemp . . . . . . . . . . . . . . . . . . . . . . . . . . . . . . . . . . . . . . . . . . . . . . . . . . . . . . . . . . 89
nviSetPoint. . . . . . . . . . . . . . . . . . . . . . . . . . . . . . . . . . . . . . . . . . . . . . . . . . . . . . . . . . . . . 90
nviSetPtOffset . . . . . . . . . . . . . . . . . . . . . . . . . . . . . . . . . . . . . . . . . . . . . . . . . . . . . . . . . . 90

LX Series Heat Pump Unit Controller User’s Guide 7
nviShedding . . . . . . . . . . . . . . . . . . . . . . . . . . . . . . . . . . . . . . . . . . . . . . . . . . . . . . . . . . . . 90
nviSlave . . . . . . . . . . . . . . . . . . . . . . . . . . . . . . . . . . . . . . . . . . . . . . . . . . . . . . . . . . . . . . . 90
nviSpaceRH . . . . . . . . . . . . . . . . . . . . . . . . . . . . . . . . . . . . . . . . . . . . . . . . . . . . . . . . . . . . 90
nviSpaceTemp . . . . . . . . . . . . . . . . . . . . . . . . . . . . . . . . . . . . . . . . . . . . . . . . . . . . . . . . . . 90
nviWaterTemp . . . . . . . . . . . . . . . . . . . . . . . . . . . . . . . . . . . . . . . . . . . . . . . . . . . . . . . . . . 91
nvoCtrlOutput. . . . . . . . . . . . . . . . . . . . . . . . . . . . . . . . . . . . . . . . . . . . . . . . . . . . . . . . . . . 91
nvoDischargeSetPt . . . . . . . . . . . . . . . . . . . . . . . . . . . . . . . . . . . . . . . . . . . . . . . . . . . . . . 91
nvoEffectSetPt . . . . . . . . . . . . . . . . . . . . . . . . . . . . . . . . . . . . . . . . . . . . . . . . . . . . . . . . . . 91
nvoFanSpeed . . . . . . . . . . . . . . . . . . . . . . . . . . . . . . . . . . . . . . . . . . . . . . . . . . . . . . . . . . . 91
nvoHPalarm . . . . . . . . . . . . . . . . . . . . . . . . . . . . . . . . . . . . . . . . . . . . . . . . . . . . . . . . . . . . 91
nvoHPstate. . . . . . . . . . . . . . . . . . . . . . . . . . . . . . . . . . . . . . . . . . . . . . . . . . . . . . . . . . . . . 93
nvoHwInput . . . . . . . . . . . . . . . . . . . . . . . . . . . . . . . . . . . . . . . . . . . . . . . . . . . . . . . . . . . . 94
nvoOccState. . . . . . . . . . . . . . . . . . . . . . . . . . . . . . . . . . . . . . . . . . . . . . . . . . . . . . . . . . . . 94
nvoSpaceTemp . . . . . . . . . . . . . . . . . . . . . . . . . . . . . . . . . . . . . . . . . . . . . . . . . . . . . . . . . 94
nvoTerminalLoad. . . . . . . . . . . . . . . . . . . . . . . . . . . . . . . . . . . . . . . . . . . . . . . . . . . . . . . . 95
nvoUnitStatus. . . . . . . . . . . . . . . . . . . . . . . . . . . . . . . . . . . . . . . . . . . . . . . . . . . . . . . . . . . 95
Standard Network Variable Types (SNVT). . . . . . . . . . . . . . . . . . . . . . . . . . . . . . . . . 96
SNVT_hvac_emerg (103 HVAC Emergency Mode). . . . . . . . . . . . . . . . . . . . . . . . . . . . . 96
SNVT_hvac_mode (108) . . . . . . . . . . . . . . . . . . . . . . . . . . . . . . . . . . . . . . . . . . . . . . . . . . 96
SNVT_hvac_status (112). . . . . . . . . . . . . . . . . . . . . . . . . . . . . . . . . . . . . . . . . . . . . . . . . . 97
Alarm State. . . . . . . . . . . . . . . . . . . . . . . . . . . . . . . . . . . . . . . . . . . . . . . . . . . . . . . . . . . . 100
SNVT_lev_percent (81) . . . . . . . . . . . . . . . . . . . . . . . . . . . . . . . . . . . . . . . . . . . . . . . . . . 101
SNVT_occupancy (109) . . . . . . . . . . . . . . . . . . . . . . . . . . . . . . . . . . . . . . . . . . . . . . . . . 101
SNVT_switch (95). . . . . . . . . . . . . . . . . . . . . . . . . . . . . . . . . . . . . . . . . . . . . . . . . . . . . . . 102
Switch Definition . . . . . . . . . . . . . . . . . . . . . . . . . . . . . . . . . . . . . . . . . . . . . . . . . . . . . . . . 102
SNVT_temp_p (105) . . . . . . . . . . . . . . . . . . . . . . . . . . . . . . . . . . . . . . . . . . . . . . . . . . . . 104
SNVT_tod_event (128) . . . . . . . . . . . . . . . . . . . . . . . . . . . . . . . . . . . . . . . . . . . . . . . . 104

LX Series Heat Pump Unit Controller User’s Guide8

LX Series Heat Pump Unit Controller User's Guide 9
LX Series Heat Pump Unit Controller
User's Guide
Introduction
Feature Description
The LX Series Heat Pump Unit (HPU) Controller integrates into a LONWORKS®
network for the control of almost any heat pump unit due to its wide range of
output types and LONMARK® certification.
The LX Series Heat Pump Unit Controller controls the following equipment:
• four stages of mechanical heating or cooling
• modulating heating or cooling valves
• reversing valves
• floating valves for heating or cooling
• pump for geothermal application
• three fan speeds or variable speed fans
• humidifier and dehumidifier
The Heat Pump Unit Controller has five digital outputs supplying 1.0 ampere at
24 VAC. These outputs produce digital or Pulse Width Modulated (PWM) signals.
Also, two tri-mode analog outputs are on the circuit board. These outputs provide
the following signals:
• linear signals over a 0 to 10 VDC range
• 10 VDC digital or PWM signals
• digital signal of 60 mA at 12 VDC
The Heat Pump Unit Controller has six inputs, each capable of one of 18 possible
input types. Inputs have 12-bit resolution and are configured entirely by software.
For easy maintenance and installation, the controller is equipped with wizard
connectors that can accept flat cable or wires. The controller uses a TP/FT 10;
78 kbps network configuration.
The information in this guide helps you to set up the Heat Pump Unit Controller,
understand the operation of the device, and troubleshoot problems. Information is
organized to follow the Heat Pump Unit Controller configuration wizard menu.

LX Series Heat Pump Unit Controller User's Guide10
Sensor Configuration Wizard
The Heat Pump Unit Controller incorporates the Johnson Controls® sensor
configuration wizard. The wizard provides powerful and simple configuration
tools for the hardware inputs. You can only select digital or analog inputs through
the software. You do not need to move any circuit board jumpers.
Analog input signal types–resistive, voltage, current–are selected in software
without hardware jumpers. Built-in conversion tables are provided for a large
number of thermistors or other sensor types. You can easily create custom
conversion tables by setting the offset, minimum, and maximum values in one
dialog box for the input.
The sensor configuration wizard also provides direct access to network properties
of the analog or digital input including the Standard Network Variable Type
(SNVT), Heartbeat, Send on Delta, Override, Default Value, and Throttle settings.
All of the input features are in one place; therefore, it is not necessary to switch
back and forth between screens to fully configure an input.
The sensor configuration wizard provides warnings of configuration errors as they
occur, allowing you to correct mistakes quickly.
The sensor configuration wizard is accessible in the LX-HPUL wizard view of an
LX-HPUL device in FX Workbench. Each hardware input is represented by a
separate LONMARK object. To configure each input, select the desired hardware
input on the left side of the LX-HPUL wizard view and Sensor Configuration in
the Wizard column of the view and click the Launch button. The sensor
configuration wizard opens. Through use of the wizard, you can configure network
inputs not directly controlled by the HPU Controller.
Control Features
The Heat Pump Unit Controller provides Proportional plus Integral plus Derivative
(PID) loops for advanced control of humidity, discharge temperature, and space
temperature. Each PID loop has an individual, configurable dead band; and,
provides gain and time adjustment for the integral and derivative terms, and gain
adjustment for the proportional term.
Humidification and dehumidification sequences provide the Heat Pump Unit
Controller with the ability to maintain space humidity at the desired level. Defrost
cycles are started by the HPU when the differential pressure is high, or by a
sequence in conjunction with the refrigerant temperature sensor. Space
temperature control is done with a PI loop only, but the presence of the derivative
term provides the HPU Controller with the ability to precisely adjust space
temperature. Precision adjustment ensures both increased comfort and savings.
Often associated with air handlers, the HPU Controller provides advanced control
settings including Optimum Start and load shedding.

LX Series Heat Pump Unit Controller User's Guide 11
The Optimum Start function maintains statistics that enable the Heat Pump Unit
Controller to predict the warm-up or cool-down time period needed to make the
building ready for occupancy. The precise Optimum Start period is calculated
every day using the current outdoor air temperature.
LONMARK Functional Profile
The LX Series Heat Pump Unit Controller uses the LONWORKS protocol. The Heat
Pump Unit Controller is LONMARK certified for interoperability on any
LONWORKS network. The controller is set up through its own configuration wizard
and through the Sensor configuration wizard. Use FX Workbench to install the
device onto the network and bind the network variable connections.
Figure 1 shows the Heat Pump Unit Controller meets the LONMARK standard by
providing the network variable inputs, network variable outputs, and configuration
properties specified by the profile. In addition, the Heat Pump Unit Controller
provides extra network variable inputs and outputs. These extra variables provide
greater flexibility and a number of functions than required in the profile.
For example, functions determined by the network variables include slaving the
controller to another unit through nviSlave or enabling the controller to act as the
master node through nviUnitStatus.

LX Series Heat Pump Unit Controller User's Guide12
Figure 1: LX Series Heat Pump Unit Controller:
L
ONMARK Objects and Network Variables
LX- HPUL- 1 HeatPump
Object Type #8051
Configuration Properties
Occ. Temperature Set Points(mandatory)
Maximum Send Time (mandatory)
Minimum Send Time (optional)
nviSpaceTemp
SNVT_temp_p
Mandatory
Network
Variables
Optional
Network
Variables
Manufacturer
Network
Variables
nviSetPoint
SNVT_temp_p
nvoFanSpeed
SNVT_ switch
nvoTerminalLoad
SNVT_lev_percent
nviFanSpeedCmd
SNVT_switch
nvoDischargSetPt
SNVT_temp_p
nviOccCmd
SNVT_xx
nvoSpaceTemp
SNVT_temp_p
nviApplicMode
SNVT_hvac_mode
nvoEffectSetP
SNVT_temp_p
nviSetPtOffset
SNVT_temp_p
nvoOccState
SNVT_ occupancy
nviWaterTemp
SNVT_temp_p
nvoUnitStatus
SNVT_hvac_status
nviDischargeTemp
SNVT_temp_p
nvoCtrlOutput1
SNVT_switch
nviRefrigTemp
SNVT_temp_p
nviShedding
SNVT_ switch
nviHotWater
SNVT_switch
nviSlave
SNVT_lev_percent
nviOutdoorTemp
SNVT_temp_p
nviOccManCmd
SNVT_ occupancy
nvoCtrlOutput7
SNVT_switch
.
.
.
Manufacturer Configuration Properties
Please see the manual for details.
Wizard for configuration provided.
nviSpaceRH
SNVT_lev_percent
nviEmergCmd
SNVT_hvac_emer
nviFanState
SNVT_switch
nviPumpState
SNVT_switch
nviCoilDiffPress
SNVT_press_p

LX Series Heat Pump Unit Controller User's Guide 13
The HPU Controller also has network inputs that permit the use of outside
enthalpy sensors and space enthalpy sensors. These inputs provide better
calculation of the cooling or heating effect of the outside air upon the conditioned
space.
The input object has configurable conversion tables and hardware properties in the
area marked Manufacturer Configuration Properties. Choose from a list of
standard thermistors to select conversion properties and create your own custom
tables. Hardware properties configuration allow you to modify your input from the
software object. Figure 2 shows the output and input objects.
Figure 2: Output and Input Objects
LX-HPUL- 1 Hardware Input
Object Type #1
nvoHwInputx
SNVT_xxx
Offset (optional)
Maximum Range (optional)
Minimum Range (optional)
Minimum Send Delta (optional)
Minimum Send Time (optional)
Maximum Send Time (optional)
Override Value (optional)
Configuration Properties
Mandatory
Network
Variables
Object Major Version
Object Minor Version
Output Signal Conditioning
PWM Period
Hardware Properties
Default Value
Manufacturer Configuration Properties
LX-HPUL-1 Hardware Output
Object Type #3
nviExtCmdOutputx
SNVT_switch
Maximum Receive Time (optional)
Override Value (optional)
Configuration Properties
Mandatory
Network
Variables
Object Major Version
Object Minor Version
Output Signal Conditioning
PWM Period
Hardware Properties
Default Value
Manufacturer Configuration Properties

LX Series Heat Pump Unit Controller User's Guide14
The node object displays the nvoHPstate and nvoHPalarm variables as
manufacturer’s variables. The node objects provide information about the alarm
conditions in the Heat Pump Unit Controller and about the operating state of the
device (Figure 3).
Units in LONWORKS Networks
Note: Use this section if you are using the Imperial System of measurement.
The Imperial System and the International System (SI) are the two main
measurement systems used today. Table 1 compares Imperial units and SI units.
Table 1: Comparing Imperial and SI Units
Imperial Units SI
inch centimeter
yard meter
mile kilometer
degrees Fahrenheit degrees Centigrade/Celsius
Figure 3: Heat Pump Unit Controller Node
LX- HPUL-1 Node
Object Type #0
nvoStatus
SNVT_obj_status
Location (optional)
Device Major Version (optional)
Device Minor Version (optional)
Configuration Properties
nviRequest
SNVT_obj_request
Mandatory
Network
Variables
Optional
Network
Variables
Manufacturer
Network
Variables
nvoFileDirectory
SNVT_address
nvoHPstate
SNVT_state_64
nvoHPalarm
SNVT_state_64
Manufacturer Configuration
Properties
Maximum Send Time

LX Series Heat Pump Unit Controller User's Guide 15
The LONWORKS network and Echelon® SNVTs are based upon SI units. This
basis creates some unavoidable problems in data conversion if you are using
Imperial Units.
The LX-HPUL view in FX Workbench and other utilities provide some automatic
conversion between SI and Imperial units. However, these are not ideal
conversions because a whole number in one system becomes a long decimal
fraction in the other. For example, 72°F is approximately equal to 22.22222°C.
The values created by converting Imperial to SI or SI to Imperial are subject to
rounding errors. If you enter an Imperial value into a LONWORKS SNVT by using
the HPU Controller configuration wizard, the value is converted, then rounded and
written to the SNVT. When you want to monitor the SNVT, the value must be read
from the SNVT, converted, and rounded again before it is displayed. Due to the
two conversions and two rounding operations, the value may differ slightly from
what you originally entered (Figure 4).
The same process and resulting rounding error applies to Standard Configuration
Property Types (SCPTs).
Instructions for changing or modifying the units of measure used on your computer
are provided in the Selecting a Measurement System or Selecting a Language
section.
Language Selection
The following may require you to change your language settings:
• You changed your regional settings by selecting a different region in the
Regional and Language Options dialog box.
• You work on a site that is in a linguistic region other than your own.
Figure 4: Imperial Units in the LONWORKS Network
Value is written in
Imperial Units.
Value is translated
to SI units.
Value is rounded.
Value is read
from SNVT.
Value is translated
to SI units.
Value is rounded.
Data is displayed
for monitoring in
Imperial Units.
Units
Value is stored
in SNVT.

LX Series Heat Pump Unit Controller User's Guide16
• You are dissatisfied with the language displayed on program menus and dialog
boxes.
You can change your language settings in the Advanced tab of the Regional and
Language Options dialog box. Instructions are provided in the Selecting a
Measurement System or Selecting a Language section.
Selecting a Measurement System or Selecting a Language
To select units of measurement or to select a language:
1. In Microsoft® Windows XP® Operating System, click Start > Control Panel.
The Control Panel appears.
2. In the Control Panel, open Date, Time, Language, and Regional Options.
3. Under the list titled Pick a Task, select and open the second item: Change the
format of numbers, dates, and times (Figure 5).
Figure 5: Date, Time, Language and Regional Options Screen

LX Series Heat Pump Unit Controller User's Guide 17
4. Select your language region from the drop-down list. The number, time, and
date formats fill automatically (Figure 6).
5. In the Number box, verify the number format uses a decimal point to indicate
numerals representing values less than 1. For example, use 123,456,789.00, not
123 456 789,00. You must use a decimal point for the correct display of
numerals.
6. In the Regional Options dialog box, click Customize.
Figure 6: Regional and Language Options

LX Series Heat Pump Unit Controller User's Guide18
7. Click on the drop-down arrow next to the box labeled Measurement system,
and select Metric (Figure 7).
8. Verify the Decimal symbol box contains a decimal point. If the Decimal
symbol box does not contain a decimal point, select the symbol in the box and
click Apply.
9. Click OK.
10. Click the Advanced tab and choose a language region by selecting from the
drop-down list. Verify the correct language appears on program menus.
11. Click OK.
You have now set the units to appear in the LX-HPUL view in FX Workbench. If
you select to have Imperial units appear, remember that the SNVTs still use SI
units. If you are viewing the data in Imperial units, you are viewing a converted
rounded value.
Figure 7: Customize Regional Options

LX Series Heat Pump Unit Controller User's Guide 19
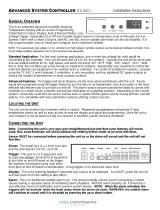
Heat Pump Unit Controller Installation Overview
Figure 8 shows one possible installation of the Heat Pump Unit Controller. Inputs,
outputs, heating, and cooling units have been marked.
Note: Not all possible sensors appear.
Inputs
The Heat Pump Unit Controller has six universal inputs. You can use the HPU
Controller Configuration wizard to configure universal inputs. There are two
possible configurations for universal inputs:
• digital inputs or 10k ohm resistance inputs
• analog inputs sensing either current or voltage
Note: As the Heat Pump Unit Controller can connect to a maximum of six
sensors, you may want to connect some sensors using the L
ONWORKS
network. All valid network inputs have priority over hardware inputs.
10k Ohm or Digital Input
The universal input, when configured as a 10k ohm or digital input, accepts a 10k
ohm resistance input or a digital input such as a switch (cold contact).
Figure 8: Possible HPU Installation
Heating
Filter
Cooling
Humidifier
Intake Air
DATOAT
Setpoint Offsett
Temperature
Humidity
Conditioned Space
Occupancy
LX- HPUL-1 Installation Overview
OAT Outside Air Temperature
DAT Discharge Air Temperature
Sensor Symbols
Humidity
Temperature
Digital Input
Heat Pump Enclosure
Window contact
3 Fan Speeds
Heat Pump Enclosure
Discharge
Air

LX Series Heat Pump Unit Controller User's Guide20
The 10k ohm resistance range accommodates 10k ohm thermistors used in space
temperature sensors or duct temperature sensors, or 10k ohm potentiometers used
as setpoint offsets.
Use the conversion table for resistance input of more than 10k ohm. The digital
range accommodates the occupancy contact, bypass switch, and window switch.
See Figure 9 for wiring information regarding both digital and 10k ohm resistance
inputs.
Figure 9: 10k Ohm or Digital Input
I
1
I
2
I
3
I
4
I
6
I
5
–
++++++
––
Contact
NO -
NC
Thermistor
10k Ohm
LX- HPUL-1
Both inputs are configured as 10k ohm or
digital inputs. Configuration can be done in
either the LX HPUL-1 wizard
/