Page is loading ...

F-Secure Corporation | Tammasaarenkatu 7 | PL 24 | 00180 Helsinki | Finland | Tel. +358 9 2520 0700 |
www.f-secure.com | Protecting the irreplaceable
This guide describes how to set up and configure the F-Secure Messaging Security Gateway
appliance in a basic Microsoft Exchange e-mail server environment.

2
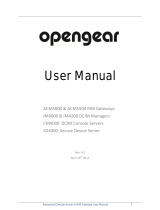
AN EXAMPLE OF A TYPICAL F-SECURE MESSAGING
SECURITY GATEWAY INSTALLATION ENVIRONMENT
Configuring the Firewall
Configure the company firewalls to allow the network traffic shown below.
E-Mail Traffic
Source and destination
Protocol
Port
Internet F-Secure Messaging Security Gateway
TCP
25
Microsoft Exchange F-Secure Messaging Security Gateway
TCP
25
F-Secure Messaging Security Gateway -> DNS Server
TCP/UDP
53
Updates
Source and destination
Protocol
Port
F-Secure Messaging Security Gateway Internet
TCP
80, 443
Administration
Source and destination
Protocol
Port
Administrator F-Secure Messaging Security Gateway
TCP
10000
Administrator F-Secure Messaging Security Gateway
TCP
22
End-User Commands
Source and destination
Protocol
Port
End-user F-Secure Messaging Security Gateway
TCP
443
Microsoft Exchange
msexch.yourdomainhere.com
10.10.10.125
F-Secure Messaging Security
Gateway
fsmsg.yourdomainhere.com
10.10.10.1
Firewall

3
F-Secure Support (recommended)
In troubleshooting situations, F-Secure support may need access to the appliance. For
detailed instructions, see:
http://www.f-secure.com/en_EMEA/support/business/product-support/messaging-security-
gateway-5/article-details.html?id=2455
Setting up the Appliance through a Console
Set up the F-Secure Messaging Security Gateway appliance through a console.
Log into the Appliance
1) Open the appliance BIOS setup.
2) Set the system time and date correctly by using GMT-0 time.
3) Log into the appliance by using the following login name and password:
Login: admin
Password: password
4) To change the admin password, select <Yes>.

4
5) Enter the new admin password.
6) Press ENTER.
Change the Network Settings
1) To change the network settings, select <Yes>.
2) Enter Yes.
Note:
If you forget the admin password the only way to reset it is to
reinstall Messaging Security Product.
Note:
The keyboard input language is English, United States at this
point. Please use characters which can be accessed after
changing Keyboard layout.

5
3) Enter the IP address of the appliance.
4) Enter the subnet mask of the appliance.
5) Enter the IP address of the default gateway.
6) Enter the host name of the appliance.
7) Enter the domain name.
8) Enter the IP addresses of at least two DNS servers that the appliance uses:
9) Enter hostname override settings to hosts file if your network configurations need that.

6
10) Confirm the network settings. Enter Yes. To save the settings, press ENTER.
11) After the settings have been saved, press ENTER.
Change the Keyboard
1) In the F-Secure Messaging Security Gateway menu , select Console Keyboard Selector.
Press ENTER.
Note:
It is recommended to type the old password with the US keyboard
localization in to a text file to verify that all characters can be
accessed through the new desired keyboard localization.

7
2) Select the preferred keyboard from the list. Press ENTER.
3) To confirm the change, select <Yes> and press ENTER.

8
4) To return to the main menu, press ENTER again.
Enable SSH
1) From the main menu, select Advanced System Control Operations. Press ENTER.

9
2) Select Remote SSH Access. Press ENTER.
3) Select Enable Remote SSH Access for all. Press ENTER.

10
4) To confirm SSH access to the appliance, select <Yes>. Press ENTER.
5) To return to the menu, press ENTER.
6) Select Return to Advanced System Control Menu. Press ENTER.

11
7) Select Return to the Main Menu. Press ENTER.
8) Select Logout of the F-Secure Appliance. Press ENTER.

12
9) To confirm your logout, select <Yes>. Press ENTER.
Note:
After the logout, continue the F-Secure Messaging Security
Gateway setup through the web interface and point your browser
to: http://[appliance_ip_address_here]:10000

13
Finalizing Setup on the Web Interface
1) Login to the appliance
2) Read the introductory screen

14
3) Read the License Agreement
4) Verify the server hostname and Domain settings, SELECT Master as the appliance type and
insert your activation ID from the license received from F-Secure

15
5) Verify the Network Settings
6) Verify the DNS Settings
Note:
Here you can set your hostname override also. If your network
settings are set in a way that only certain hosts or ip-addresses
can connect to the DNS servers you should insert that information
here.

16
7) Proxy Settings
8) Inbound Mail settings

17
9) Outbound Mail settings
10) Setting up localization, date & time
Note:
This is important if you choose to use Messaging Security
Gateway solution to scan your email which is sent outside of your
organization.

18
11) Creating profile for Alerts sent by the Messaging Security Gateway server
12) Insert the email address which receives all the alerts sent by the Messaging Security
Gateway

19
13) Click “Finish” to finalize the installation
14) Congratulations you have succesfully implemented the Messaging Security Gateway and are
now ready to use the product
Note:
At this point the Messaging Security Gateway server needs to
have access to Internet otherwise the registration will not get
completed.
/