Page is loading ...

Date Issued: 06/21/2017 IS-43895-US
We’re here to help 866-558-5706
Hrs: M-F 9am to 5pm EST
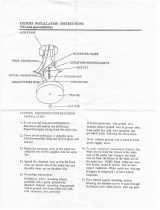
CAUTION – RISK OF SHOCK –
Disconnect Power at the main circuit breaker panel or main
fuse box before starting and during the installation.
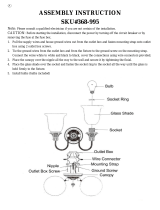
1) PlacethecenterBodyFrameontothexturetakingcarenotto
pinchthewires.
2) Insertthecentertubeintothecenterbodyandplaceintothe
centerbodyframe.
3) Turnthecentertubeclockwiseuntiltight.
4) Placethetopplateontothecentertubeassemblyandscrewon
thelockupknobclockwiseuntilsnug.
5) Passxturewirethroughthechain,lockinglinks.
6) Takethreadedpipefrompartsbagandscrewinscrewcollar
loopaminimumof6mm(1/4”).Lockintoplacewithhexnut.
7) Nowscrewthreadedpipeintomountingstrap.Mountingstrap
mustbepositionedwithextrudedthreadfacedintooutletbox.
Threadedpipemustprotrudeoutthebackofmountingstrap.
Connectmountingstraptooutletbox.
8) Unscrewthethreadedringfromscrewcollarloop.Takecanopy
andpassoverscrewcollarloop.Approximatelyonehalfofthe
screwcollarloopexteriorthreadsshouldbeexposed.Adjust
screwcollarloopbyturningassemblyupordowninmounting
strap.Removecanopy.
9) Afterdesiredpositionisfound,tightentophexnutupagainstthe
bottomofthemountingstrap.
10) Slipcanopyoverscrewcollarloopandthreadonthreadedring.
Attachchain(withxtureconnected)tobottomofscrewcollar
loop.Unscrewthreadedring,letcanopyandthreadedringslip
down.
11) Weaveelectricalwireandgroundwirethroughchainlinksno
morethan3inchesapart.Passwirethroughthreadedring,
canopy,screwcollarloop,threadedpipeandintooutletbox.
12) Makeelectricalconnectionsperbelow.
13) Afterelectricalconnectionsaremade,slidethecanopyupto
theceilingandsecureintoplacewiththescrewcollarloop.
14) Installthe(6)glassbracketsusingthe(12)screwsandball
knobsasshown.
15) Placecurvedglasspanelsintoplaceandsecureintoplacewith
the(24)thumbscrews,acrylicwashers,ballknobsasshown.
16) Installtherecommendedbulbs.
17) Attachmountingstraptooutletboxwithstrapmountingscrews.
18)Groundinginstructions:(SeeIllus.AorB)
A) Onxtureswheremountingstrapisprovidedwitha
holeandtworaisedimples.Wrapgroundwirefrom
outletboxaroundgreengroundscrew,andthreadinto
hole.
B) Onxtureswhereacuppedwasherisprovided.Put
groundwirefromoutletboxundercuppedwasherand
greengroundscrewandthreadscrewintoholein
mountingstrap.
Ifxtureisprovidedwithgroundwire.Connectxtureground
wiretooutletboxgroundwirewithwireconnector,afterfollow-
ingtheabovesteps.Neverconnectgroundwiretoblackor
whitepowersupplywires.
19)Makewireconnections.Referencechartbelowforcorrectcon-
nectionsandwireaccordingly.
GREEN GROUND
SCREW
CUPPED
WASHER
OUTLET BOX
GROUND
FIXTURE
GROUND
DIMPLES
WIRE CONNECTOR
OUTLET BOX
GROUND
GREEN GROUND
SCREW
FIXTURE
GROUND
A
B
Connect Black or
Red Supply Wire to:
Connect
White Supply Wire to:
Black White
*Parallel cord (round & smooth) *Parallel cord (square & ridged)
Clear, Brown, Gold or Black
without tracer
Clear, Brown, Gold or Black
with tracer
Insulated wire (other than green)
with copper conductor
Insulated wire (other than green)
with silver conductor
*Note: When parallel wires (SPT I & SPT II)
are used. The neutral wire is square shaped
or ridged and the other wire will be round in
shape or smooth (see illus.)
Neutral Wire
(12) SCREWS
(24) THUMB
SCREWS
(24) ACRYLIC WASHERS
THREADED RING
SCREW COLLAR LOOP
CHAIN
LOOP
(6) GLASS
(6) SOCKET
OUTLET BOX
(2) LOCKING LINK
GEMSTRAP W/GROUND SCREW
(2) STRAP MOUNTING SCREWS
(3) HEXNUT
1.77 [45.00] THREADED NIPPLE
CANOPY
(6) SOCKET
COVERS
(6) GLASS
BRACKETS
(24) THUMB SCREWS
TO SECURE GLASS
(12) SCREWS
FOR GLASS BRACKETS
(24) ACRYLIC
WASHERS
LOCK UP KNOB
TOP PLATE
CENTER PIPE
CENTER
BODY
CENTER BODY FRAME

Date Issued: 06/21/2017 IS-43895-CB
We’re here to help 866-558-5706
Hrs: M-F 9am to 5pm EST
CAUTION – RISK OF SHOCK –
Disconnect Power at the main circuit breaker panel or main
fuse box before starting and during the installation.
1) PlacethecenterBodyFrameontothexturetakingcarenotto
pinchthewires.
2) Insertthecentertubeintothecenterbodyandplaceintothe
centerbodyframe.
3) Turnthecentertubeclockwiseuntiltight.
4) Placethetopplateontothecentertubeassemblyandscrewon
thelockupknobclockwiseuntilsnug.
5) Passxturewirethroughthechain,lockinglinks.
6) Takethreadedpipefrompartsbagandscrewinscrewcollar
loopaminimumof6mm(1/4”).Lockintoplacewithhexnut.
7) Nowscrewthreadedpipeintomountingstrap.Mountingstrap
mustbepositionedwithextrudedthreadfacedintooutletbox.
Threadedpipemustprotrudeoutthebackofmountingstrap.
Connectmountingstraptooutletbox.
8) Unscrewthethreadedringfromscrewcollarloop.Takecanopy
andpassoverscrewcollarloop.Approximatelyonehalfofthe
screwcollarloopexteriorthreadsshouldbeexposed.Adjust
screwcollarloopbyturningassemblyupordowninmounting
strap.Removecanopy.
9) Afterdesiredpositionisfound,tightentophexnutupagainstthe
bottomofthemountingstrap.
10) Slipcanopyoverscrewcollarloopandthreadonthreadedring.
Attachchain(withxtureconnected)tobottomofscrewcollar
loop.Unscrewthreadedring,letcanopyandthreadedringslip
down.
11) Weaveelectricalwireandgroundwirethroughchainlinksno
morethan3inchesapart.Passwirethroughthreadedring,
canopy,screwcollarloop,threadedpipeandintooutletbox.
12) Makeelectricalconnectionsperbelow.
13) Afterelectricalconnectionsaremade,slidethecanopyupto
theceilingandsecureintoplacewiththescrewcollarloop.
14) Installthe(6)glassbracketsusingthe(12)screwsandball
knobsasshown.
15) Placecurvedglasspanelsintoplaceandsecureintoplacewith
the(24)thumbscrews,acrylicwashers,ballknobsasshown.
16) Installtherecommendedbulbs.
17) Attachmountingstraptooutletboxwithstrapmountingscrews.
18)Groundinginstructions:(SeeIllus.AorB)
A) Onxtureswheremountingstrapisprovidedwitha
holeandtworaisedimples.Wrapgroundwirefrom
outletboxaroundgreengroundscrew,andthreadinto
hole.
B) Onxtureswhereacuppedwasherisprovided.Put
groundwirefromoutletboxundercuppedwasherand
greengroundscrewandthreadscrewintoholein
mountingstrap.
Ifxtureisprovidedwithgroundwire.Connectxtureground
wiretooutletboxgroundwirewithwireconnector,afterfollow-
ingtheabovesteps.Neverconnectgroundwiretoblackor
whitepowersupplywires.
19)Makewireconnections.Referencechartbelowforcorrectcon-
nectionsandwireaccordingly.
GREEN GROUND
SCREW
CUPPED
WASHER
OUTLET BOX
GROUND
FIXTURE
GROUND
DIMPLES
WIRE CONNECTOR
OUTLET BOX
GROUND
GREEN GROUND
SCREW
FIXTURE
GROUND
A
B
Connect Black or
Red Supply Wire to:
Connect
White Supply Wire to:
Black White
*Parallel cord (round & smooth) *Parallel cord (square & ridged)
Clear, Brown, Gold or Black
without tracer
Clear, Brown, Gold or Black
with tracer
Insulated wire (other than green)
with copper conductor
Insulated wire (other than green)
with silver conductor
*Note: When parallel wires (SPT I & SPT II)
are used. The neutral wire is square shaped
or ridged and the other wire will be round in
shape or smooth (see illus.)
Neutral Wire
(12) SCREWS
(24) THUMB
SCREWS
(24) ACRYLIC WASHERS
THREADED RING
SCREW COLLAR LOOP
CHAIN
LOOP
(6) GLASS
(6) SOCKET
OUTLET BOX
(2) LOCKING LINK
GEMSTRAP W/GROUND SCREW
(2) STRAP MOUNTING SCREWS
(3) HEXNUT
1.77 [45.00] THREADED NIPPLE
CANOPY
(6) SOCKET
COVERS
(6) GLASS
BRACKETS
(24) THUMB SCREWS
TO SECURE GLASS
(12) SCREWS
FOR GLASS BRACKETS
(24) ACRYLIC
WASHERS
LOCK UP KNOB
TOP PLATE
CENTER PIPE
CENTER
BODY
CENTER BODY FRAME
/