Page is loading ...

Overview.............................................................2
Interior Overview.........................................................................2
Exterior Overview....................................................................... 3
Opening and Closing..................................... 4
Doors............................................................................................... 4
Keyless Locking and Unlocking4Using the Key4Opening Doors from the Interior6Opening and Closing Front Doors from Outside Model X7Opening and Closing Falcon Wing Doors7Interior Locking and Unlocking8Child-protection Lock9Drive-away Locking9Walk-away Locking9Unlocking When the Key Doesn't Work9Radio Wave Interference9
Windows........................................................................................ 11
Opening and Closing11Locking Rear Windows11
Rear Trunk.................................................................................... 12
Opening12Closing12Adjusting the Opening Height12Opening with No Power13
Front Trunk.................................................................................. 14
Opening14Closing14Interior Emergency Release15Opening with No Power15
Glove Box..................................................................................... 16
Opening and Closing16
Cup Holders................................................................................. 17
Opening and Closing17
Seating and Safety Restraints...................18
Front and Rear Seats............................................................... 18
Correct Driving Position18Adjusting the Driver’s Seat18Adjusting Second Row Seats19Accessing Third Row Seats 19Folding Third Row Seats20Cargo Mode20Head Restraints20Seat Heaters20Seat Covers20
Seat Belts......................................................................................21
Wearing Seat Belts21Wearing Seat Belts When Pregnant21Seat Belt Pre-tensioners22Testing Seat Belts22Seat Belt Warnings22
Child Safety Seats....................................................................24
Guidelines for Seating Children24Choosing a Child Safety Seat25Seating Larger Children27Installing Child Safety Seats27Installing Seat Belt Retained Child Seats27Installing ISOFIXChild Seats28Attaching Upper Tether Straps29Testing a Child Safety Seat30Warnings - Child Safety Seats30
Airbags......................................................................................... 32
Location of Airbags32How the Airbags Work33Types of Airbags33Disabling the Passenger Front Airbags34
Inflation Eects 34Airbag Warning Indicator35Airbag Warnings35
Driving...............................................................36
Driver
Profiles............................................................................ 36
Creating a Driver
Profile 36Restoring a Driver’s Profile 36Saved Driver Settings36Valet Mode36
Steering Wheel..........................................................................37
Adjusting Position37Adjusting Sensitivity37Using Left Steering Wheel Buttons37Using Right Steering Wheel Buttons38Using Voice Commands39Heated Steering Wheel39Horn39
Mirrors.......................................................................................... 40
Adjusting Exterior Side Mirrors40Rear View Mirror40
Starting and Powering
O.....................................................41
Starting41Powering O 41
Gears............................................................................................. 42
Shifting Gears42Keeping Your Vehicle in Neutral (Tow Mode)42
Instrument Panel.......................................................................43
Instrument Panel Overview43Instrument Panel - Driving46
Lights............................................................................................ 48
Controlling Lights48High Beam Headlights51Headlights After Exit51Adaptive Front Lighting System (AFS)51Turn Signals51Hazard Warning Flashers52
Wipers and Washers............................................................... 53
Wipers53Washers53
Brakes........................................................................................... 54
Braking Systems54Brake Wear54Regenerative Braking55Parking Brake55
Traction Control........................................................................ 56
How It Works56
Park Assist...................................................................................57
How Park Assist Works57Visual and Audio Feedback57Controlling Audible Feedback58Limitations and False Warnings58Other Parking Aids58
Vehicle Hold................................................................................59
Launch Mode............................................................................. 60
Performance Dual Motor Vehicles Only60Requirements60To activate Launch Mode60Limitations60
Active Hood.................................................................................61
How Active Hood Works61
Trip Information........................................................................ 62
Displaying Trip Information62
Getting Maximum Range.......................................................63
Driving Tips to Maximize Range63Energy App63Saving Energy63Range Assurance63
Rear View Camera....................................................................65
Camera Location65
Active Spoiler.............................................................................66
Towing a Trailer......................................................................... 67
Towing Capacity67Tire Pressures when Towing67Before Towing a Trailer68Trailer Mode68While Towing a Trailer69Parking with a Trailer69Trailer Sway Mitigation69Impact on Range70
Using a Bicycle Carrier............................................................ 71
Supported Bicycle Carriers71Installing a Bicycle Carrier71Impact on Range71Cautions and Warnings71
Driver Assistance...........................................72
About Driver Assistance........................................................ 72
Driver Assistance Components72Driver Assistance Features74Limitations74Cleaning Driver Assistance Components74
Trac-Aware Cruise Control...............................................75
Operating Trac-Aware Cruise Control75Adjust your following distance76Cruising at the Speed Limit77Changing the Set Speed77Overtake Acceleration77Canceling and Resuming78Summary of Cruise Indicators79Limitations79
Autosteer.....................................................................................80
Operating Autosteer80Hold Steering Wheel81Autosteer is Aborting81Canceling Autosteer81Limitations81
Auto Lane Change................................................................... 82
Operating Auto Lane Change82Canceling Auto Lane Change83Limitations83
Autopark......................................................................................84
Operating Autopark84Calibration85Canceling Autopark85Pausing Autopark85Limitations85
Lane Assist..................................................................................86
Controlling Lane Assist Warnings87Limitations and Inaccuracies87
Collision Avoidance Assist.................................................... 88
Forward Collision Warning88Automatic Emergency Braking89Limitations and Inaccuracies89
Speed Assist................................................................................91
How Speed Assist Works91Controlling Speed Assist91Limitations and Inaccuracies92
Using the Touchscreen............................... 93
Touchscreen Overview........................................................... 93
The Big Picture93
Controls........................................................................................97
Controlling Features97
Settings........................................................................................101
Customizing Your Vehicle101Erasing Personal Data 104
Climate Controls..................................................................... 105
Overview of Climate Controls105Customizing Climate Control106Ventilation109Climate Control Operating Tips109
Smart Air Suspension.............................................................110
Manual Height Adjustments110Location-Based Suspension110Automatic Lowering111Jack Mode111
Media and Audio...................................................................... 112
Overview112Volume Control112FM Radio112Internet Radio112Media Settings113Favorites113My Music & Devices113USB Hub Connections11412V Power Socket114
Phone............................................................................................115
Bluetooth®Compatibility115Pairing a Bluetooth Phone115Importing Contacts115Unpairing a Bluetooth Phone115Connecting to a Paired Phone116Making a Phone Call116Receiving a Phone Call116In Call Options116
Maps and Navigation..............................................................117
Overview117Using Maps117Starting Navigation117During Navigation117Favorite Destinations118Updated Maps118
Calendar...................................................................................... 119
Overview119Calendar and Navigation120
Security Settings...................................................................... 121
About the Security System121
Connecting to Wi-Fi...............................................................122
Software Updates................................................................... 123
Loading New Software123Viewing Release Notes123
Mobile App................................................................................ 124
Model XMobile App124
Charging..........................................................125
Electric Vehicle Components............................................. 125
High Voltage Components125Charging Equipment126
Battery Information................................................................127
About the Battery127Battery Care127
Charging Instructions............................................................128
Opening the Charge Port128Plugging In128During Charging129Stopping Charging129Charge Port Light129Changing Charge Settings130Charging Status131
Maintenance.................................................. 132
Maintenance Schedule.......................................................... 132
Service Intervals132Daily Checks132Monthly Checks132Fluid Replacement Intervals132High Voltage Safety132
Tire Care and Maintenance..................................................133
Maintaining Tire Pressures133Inspecting and Maintaining Tires134Replacing Tires and Wheels135Seasonal Tire Types135Driving in Low Temperatures136Using Tire Chains136Tire Pressure Monitoring136
Temporary Tire Repair...........................................................138
Tire Repair Kit138
Inflating with Sealant and Air139Inflating with Air Only140Replacing the Sealant Canister141
Cleaning......................................................................................142
Cleaning the Exterior142Cleaning the Interior143Polishing, Touch Up, and Body Repair144Using a Car Cover144Floor Mats144
Wiper Blades and Washer Jets......................................... 145
Checking and Replacing Wipers145
Fluid Reservoirs.......................................................................146
Removing the Maintenance Panel146Checking Battery Coolant146Checking Brake Fluid147Topping Up Washer Fluid147
Jacking and Lifting.................................................................149
Jacking Procedure149
Parts and Accessories...........................................................150
Parts, Accessories, and Modifications 150Body Repairs150
Specifications.................................................151
Identification Labels................................................................151
Vehicle Identification Number151
Vehicle Loading....................................................................... 152
Load Capacity Labeling152Calculating Load Limits153
Dimensions and Weights......................................................155
Exterior Dimensions155Interior Dimensions156Weights156
Subsystems................................................................................157
Motor157Transmission157Steering157Brakes158Suspension158Battery - 12V158Battery - High Voltage159
Wheels and Tires.................................................................... 160
Wheel
Specifications 160Tire Specifications 160Understanding Tire Markings161
Roadside Assistance.................................. 163
Contacting Roadside Assistance...................................... 163
Instructions for Transporters..............................................164
Use a Flatbed Only164Disable Self-Leveling (air suspension vehicles only)164Activate Tow Mode164Connect the Towing Eye165Pull Onto the Trailer and Secure the Wheels165
Consumer Information.............................. 166
About this Owner Information...........................................166
Illustrations166Errors or Inaccuracies166Location of Components166Document Applicability166Copyrights and Trademarks167
Disclaimers................................................................................ 168
Vehicle Telematics/Data Recorders168Quality Control168Map Data169
Reporting Safety Defects.....................................................172
Contacting Tesla172
Declarations of Conformity................................................. 173
Key and Passive Unlocking System173Central Body Controller173Tire Pressure Monitoring System173Radio Frequency Information174
Contents

Note: On RHD (Right Hand Drive) vehicles, the controls illustrated above are arranged similarly,
but are mirrored on the right side of the vehicle.
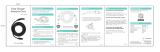
1. Interior doors (Opening Doors from the Interior on page 6)
2.
Trac-Aware Cruise Control (Trac-Aware Cruise Control on page 75) and Autosteer (see
Autosteer on page 80)
3. High beams (High Beam Headlights on page 51), Turn signals (Turn Signals on page 51),
Wipers and washers (Wiper Blades and Washer Jets on page 145)
4. Steering wheel buttons - left (Using Left Steering Wheel Buttons on page 37)
5. Instrument panel (Instrument Panel on page 43)
6. Steering wheel buttons - right (Using Right Steering Wheel Buttons on page 38)
7. Gear selector (Shifting Gears on page 42)
8. Touchscreen (Touchscreen Overview on page 93)
9. Glove box button (Glove Box on page 16)
10. Power window switches (Opening and Closing on page 11)
11. Exterior mirror adjustment switches (Mirrors on page 40)
12. Seats (Front and Rear Seats on page 18)
13. Steering column adjuster (hidden from view in the above image) (Steering Wheel on page
37)
14. Horn (Horn on page 39)
15. Brakes (Brakes on page 54)
16. Hazard warning lights (Hazard Warning Flashers on page 52)
17. Cabin climate control (Climate Controls on page 105)
18. Cup holders (Cup Holders on page 17)
Interior Overview
2 Model X Owner's Manual

1. Exterior lights (Lights on page 48)
2. Front doors (Opening and Closing Front Doors from Outside Model X on page 7)
3. Falcon wing doors (Doors on page 4)
4. Charge port (Charging Instructions on page 128)
5. Active spoiler (Active Spoiler on page 66)
6. Forward looking camera (About Driver Assistance on page 72)
7. Exterior mirrors (Mirrors on page 40)
8. Radar sensor (hidden from view in the above image)(About Driver Assistance on page 72)
9. Hood/Front trunk (Front Trunk on page 14)
10. Wheels and tires (Wheels and Tires on page 160)
11. Rear view camera (Rear View Camera on page 65)
12. Rear trunk/liftgate (Rear Trunk on page 12)
13. Ultrasonic sensors (Park Assist on page 57 and About Driver Assistance on page 72)
Exterior Overview
Overview 3

Keyless Locking and Unlocking
Locking and unlocking Model X is convenient.
Although you must be carrying a valid key,
there's no need to use it. Model X has sensors
that can recognize the presence of a key
within a range of approximately one metre. So
you can keep your key in your pocket or purse
and Model X detects it.
When you walk up to Model X carrying your
key, pressing the driver's door handle unlocks
all doors and partially opens the driver's door.
If the Auto-Present Front Door setting is
turned on, the driver's door opens
automatically as you approach Model X.
Note: You can choose whether you want all
doors, or just the driver's door, to unlock when
you approach your vehicle carrying your key.
To do so, touch Controls > Settings > Vehicle >
Door Unlock Mode and choose Driver or All.
When carrying your key with you, you can also
open the rear trunk without having to use the
key. Simply walk up to Model X and press the
switch located under the trunk’s exterior
handle. Door Unlock Mode (described in the
note above) must be set to All.
Model X also locks automatically. If you set
Walk-Away Door Lock to ON, Model X locks
when you walk away carrying your key with
you (see Walk-away Locking on page 9).
While sitting inside Model X, you can use the
touchscreen to open and close doors, lock and
unlock doors, trunks, and the charge port.
To make it convenient to pick up passengers,
you can also unlock all doors and/or extend
the door handles at any time by shifting into
the Park gear. If you have already engaged the
Park gear, just press the Park button on the
end of the gear selector a second time (see
Shifting Gears on page 42).
Using the Key
To quickly familiarize yourself with the key,
think of the key as a miniature version of
Model X, with the Tesla badge representing
the front. The key has three buttons on the top
that feel like softer areas on the surface, and a
metal button on each side representing the
falcon wing doors.
1. Trunk
• Double-click to open the rear trunk.
• If equipped with a powered liftgate,
double-click to close the rear trunk.
You can also single-click to stop the
liftgate when it is moving.
• Hold the button down for 1-2 seconds
to open the charge port door.
2. Lock/Unlock All
• Double-click to unlock doors and front
and rear trunks. Hazard warning lights
flash twice.
Note: If the Door Unlock Mode is set
to Driver, double-clicking unlocks only
the driver's door. To change this
setting so that all doors and trunks
unlock, touch Controls > Settings >
Vehicle > Door Unlock Mode > All.
• Single-click to lock doors and trunks
(all doors and trunks must be closed).
Hazard warning lights
flash once.
3. Front trunk (also called the "frunk")
• Double-click to open the front trunk.
Doors
4 Model X Owner's Manual

4. Falcon wing doors
• Double-click to open/close the
associated falcon wing door.
• Single-click to stop movement of the
associated falcon wing door.
Subsequently double-clicking reverses
movement of the falcon wing door.
For example if the door was opening,
it closes, and vice versa.
Note: Falcon wing doors are designed
to proactively detect obstacles that
prevent the doors from moving when
an obstacle is detected. To override
obstacle detection, hold down the top
button while double-clicking to open/
close the door.
Warning: Model X falcon wing
doors have several sensors to
detect the presence of an object
in the door's path. In most cases,
when an object is detected, the
door stops moving. However, the
sensors are unable to detect all
areas under all circumstances,
particularly when closing,
Therefore, you must monitor the
movement of falcon wing doors
to ensure the door's path of
movement is free of obstacles,
staying prepared at all times to
proactively intervene to stop the
door from contacting an object
(including a person). Failure to
due so can cause serious damage
or bodily injury.
You do not need to point the key at Model X,
but you must be within operating range
(which varies depending on the strength of
the key’s battery).
If Model X is unable to detect the key, the
touchscreen displays a message indicating
that a key is not inside. Place the key where
Model X can best detect it, which is below the
12V power socket (see Key Not Inside on page
41).
Radio equipment on a similar frequency can
aect the key. If this happens, move the key at
least 30 cm away from other electronic
devices (phone, laptop, etc). If the key does
not work, you may need to change its battery.
If the key’s battery is discharged, you can
open Model X by following the unlocking
procedure (see Unlocking When the Key
Doesn't Work on page 9).
Caution: Remember to bring the key with
you when you drive. Although you can
drive Model X away from its key, you will
be unable to power it back on after it
powers o.
Caution: Protect the key from impact,
high temperatures, and damage from
liquids. Avoid contact with solvents,
waxes and abrasive cleaners.
Replacing the Key Battery
The key’s battery lasts for approximately a
year. When the battery is low, a message
displays on the instrument panel. Follow these
steps to replace it:
1. With the key placed button side down on
a soft surface, use a small
flat-bladed tool,
a fingernail, or the Tesla-provided tool* to
release the bottom cover.
*For convenience, Tesla provides a special
tool to make it easy to open the battery
cover. This tool was included in the box
containing your key when Model X was
initially purchased.
Note: If a lanyard is attached to the key
(see Attaching a Lanyard on page 6),
you can release the bottom cover by
placing your thumb against the "X" on the
bottom cover, then
firmly pulling the
lanyard toward you (hence pushing the
key
o of its cover). You can also pry the
cover o by placing a small flat-bladed
tool, a fingernail, or the Tesla-provided
tool against the lanyard cord.
Doors
Opening and Closing 5

2. Remove the battery by sliding it out at an
angle.
3. Insert the new battery (type CR2354) with
the ‘+’ side facing up.The battery
fits
snugly so you must slide it into position at
an angle.
Note: Wipe the battery clean before
fitting
and avoid touching the battery's flat
surfaces. Finger marks on the flat surfaces
of the battery can reduce battery life.
4. Holding the cover at an angle, align the
tabs on the widest side of the cover with
the corresponding slots on the key, then
press the cover
firmly onto the key until it
snaps into place.
Attaching a Lanyard
The Model X key supports the use of a small
lanyard. To attach a lanyard, release the
bottom cover as described above. Place the
lanyard over the pin on the back side of the
key. Re-align the cover and snap into place.
Getting More Keys
If you lose a key or require an additional one,
contact Tesla. Model X can recognize up to
eight keys.
When ordering a new key for Model X, take all
available keys with you for reprogramming.
Opening Doors from the Interior
To open a front door, pull the interior door
handle toward you.
You can also use the touchscreen to open and
close doors when inside an unlocked Model X.
Touch Controls > Doors, then choose the door
you want to open or close.
Model X has electronically powered doors.
When Model X detects that you have entered,
the touchscreen prompts you to close the
door. Instead of reaching and pulling the door
handle to close the door, you can simply press
Close on the touchscreen's prompt.
Note: To prevent children from opening falcon
wing doors using the interior handles, use the
touchscreen, Controls > Settings > Vehicle >
Child Protection Lock, to turn on the child-
protection locks (see Child-protection Lock on
page 9).
Doors
6 Model X Owner's Manual

Opening and Closing Front Doors
from Outside Model X
Model X doors are electrically powered. When
you approach Model X carrying the key, all
doors unlock. To open a door, press the
handle. You can set the driver's door to open
automatically upon your approach. On the
touchscreen, touch Controls > Settings >
Vehicle > Auto-Present Front Door > On.
Note: If Auto-Present Front Door opens the
door and you do not use the door within one
minute, or the key is no longer detected, the
door closes. Just press the door handle again
to re-open it.
Note: To preserve battery life, Model X is
designed to temporarily disable the Auto-
Present Front Door feature when:
• The key has been out of range for more
than 48 hours.
• The key remains within range for
five
minutes after all doors are closed.
In these cases, touch the handle to open the
front door. There is no need to reset the
setting. The next time you approach Model X,
provided the above conditions do not apply,
the door automatically opens.
If you use the key to unlock Model X more
than twice within one minute, the driver's door
opens, even if the Auto-Present Front Door
setting is turned
o.
Note: If the driver's door has automatically
opened five times but you have not engaged a
driving gear, Auto-Present Front Door is
temporarily suspended until after you engage
a driving gear.
Whenever a door is open, the Door
Open indicator displays on the
instrument panel. The image of the
Model X on the touchscreen Controls
window also shows which door or
trunk is open.
When you touch an exterior front door handle
when the associated door is already open, it
closes.
You can close doors manually or by using the
touchscreen. When Model X detects that you
have entered the vehicle, the touchscreen
displays a message asking if you want to close
the doors.
Note: The powered front doors switch to
manual operation whenever you choose to
open or close a door manually.
Powered doors stop moving if an obstacle is
detected.
Opening and Closing Falcon Wing
Doors
Model X has electrically-powered falcon wing
doors that easily open and close by pressing a
button, using the key, or touching the
touchscreen. The falcon wing doors are
equipped with several sensors that detect the
presence of people and objects and, if an
object is detected, the door stops moving.
Based on detected objects, the doors may
adjust their outward and upward movement in
an attempt to avoid contacting the object. For
example, if an object is detected above Model
X, the door's movement may extend further
outward but lower, whereas if an object is
detected beside the door, the door may
extend outward much less.
Warning: Before opening or closing a
falcon wing door, it is important to check
that the area around the door is free of
obstacles (people and objects). Although
the doors have many sensors, it can not
detect all objects at all times, particularly
when moving. At any given moment,
there may be areas near the door that are
not in the detection zone. Therefore,
when opening or closing a falcon wing
door, you and your passengers must
stand away from the door as it is moving,
while proactively monitoring the door's
movement and being prepared to take
corrective action at any time. To stop a
door from moving, single-click the falcon
wing door button on the key.
Note: If Model X detects an obstacle that may
interfere with opening or closing a falcon wing
door, the touchscreen displays a warning on
the Doors tab and door movement is
restricted until the obstacle is no longer
detected. To see the warnings, touch Control >
Doors.
To open a falcon wing door from outside
Model X, press the door handle or press the
falcon wing door button on the key (see Using
the Key on page 4).
To open a falcon wing door from inside Model
X, pull the switch located on the door pillar, or
touch Control > Doors > Open on the
touchscreen:
Doors
Opening and Closing 7

Note: If Model X is locked, pulling the switch
(illustrated above) the first time unlocks the
associated door. Pulling it a second time
opens it.
To close a falcon wing door, press the button
located on the inside of the door. You can also
use the key (see Using the Key on page 4,
push the switch on the door pillar (illustrated
above), or touch Control > Doors > Close on
the touchscreen:
Note: To prevent children from opening falcon
wing doors using the interior switch, turn on
child-protection locks using the touchscreen
(Controls > Settings > Vehicle > Child
Protection Lock). See Child-protection Lock
on page 9.
Warning: Whenever a front door is
partially open (approximately 20°) as you
are opening or closing the associated
falcon wing door, you MUST keep your
hands (or any object) away from the
opening edge of the front door. When a
falcon wing door passes by a partially
opened front door, the distance between
the two doors is very narrow. Objects,
such as hands or
fingers, placed in this
area, are not detected by sensors and can
therefore become pinched between the
doors. To avoid bodily injury, it is a good
practice to keep your hands away from
the front door whenever you are opening
or closing a falcon wing door.
Warning: When opening or closing a
falcon wing door, it is important to
proactively monitor the movement of the
door to ensure that it does not come into
contact with a person or object. Failure to
do so can cause serious damage or injury
A falcon wing door stops moving when one of
its many sensors detects an object, or when
the door senses resistance because it has
made contact with an object. In these cases,
provided it is appropriate to continue opening
or closing the falcon wing door, you can
override obstacle detection by doing any of
the following:
• Hold down the top button on the key
while double-clicking the key's falcon
wing door button (see Using the Key on
page 4).
• Pull (or push) and hold the switch located
on the door pillar.
• Open or close the door using the
touchscreen.
Note: Falcon wing doors open only when
Model X is stationary.
Caution: Remove accumulation of snow
or ice before opening a falcon wing door.
Snow can get inside Model X and ice can
prevent the door from opening.
Caution: In rainy weather, leaving a falcon
wing open while opening the liftgate can
result in rain water falling from the liftgate
into the rear seating area.
Interior Locking and Unlocking
From inside Model X, you can use the
touchscreen to lock or unlock doors and
trunks, provided a valid key is inside the
vehicle. Touch Controls > Lock/Unlock. You
can also shift into the Park gear, then touch
the Park button on the end of the gear
selector a second time (see Shifting Gears on
page 42).
Doors
8 Model X Owner's Manual

Note: If a door or trunk is still open when you
lock Model X, it locks when you close it.
Child-protection Lock
Model X has child-protection locks on the
falcon wing doors and liftgate to prevent them
from being opened using interior handles. Use
the touchscreen to turn child protection locks
on or o. Touch Controls > Settings >
Vehicle > Child Protection Lock.
Note: It is recommended that you turn child-
protection locks on whenever children are
seated in the rear seats.
Drive-away Locking
Model X automatically locks all doors
(including the trunks) whenever your driving
speed exceeds 8 km/h.
Walk-away Locking
Doors and trunks can automatically lock
whenever you walk away carrying the key.
To turn this feature on or
o, touch Controls >
Settings > Vehicle > Walk-Away Door Lock.
Note: If all doors are closed and you use the
key to unlock Model X, walk-away locking is
temporarily suspended for one minute. If you
open a door within this minute, it does not re-
lock until after all the doors are closed and
you have walked away with the key.
Unlocking When the Key Doesn't
Work
If Model X does not unlock when you walk up
to it, or when you press the unlock button on
your key, the key’s battery may be dead. If this
is the case, you can still unlock and drive
Model X.
To unlock Model X (and disable the security
alarm),
first position the key at the base of the
door pillar between the front door and the
falcon wing door, on the driver's side of the
vehicle, as shown. Then press the front driver's
door handle. If Model X doesn't unlock, try
adjusting the position of the key. The key must
be in the correct position.
To drive Model X, place the key against the
center console, immediately below the 12V
power outlet, then press and hold the brake
pedal to turn Model X on.
Note: Unlocking Model X using this method
disables walk-away locking. You must
manually re-enable walk-away locking after
replacing the key’s battery.
For instructions on how to replace the key’s
battery, see Replacing the Key Battery on
page 5.
Radio Wave Interference
To avoid any possibility of interference
between a pacemaker and the key antennas,
people with implanted pacemakers should
ensure their pacemaker is kept at least 22 cm
away from any key antenna mounted in
Model X. Antenna locations are shown below:
Doors
Opening and Closing 9

1. Center of the rear bumper.
2. Left side door pillar between first and
second row seating positions.
3. Right side door pillar between first and
second row seating positions.
4. Center console.
5. Center for front trunk.
Warning: Radio waves can adversely
aect electric medical equipment. People
with implanted pacemakers should
contact the electric medical equipment
manufacturer for the possible influences
before use.
Doors
10 Model X Owner's Manual

Opening and Closing
Press down on a switch to lower the
associated window all the way down. Window
switches operate at two levels. To lower a
window partially, hold the switch and release
when the window is at the desired position.
Similarly, pull a switch to raise the associated
window. This also operates at two levels—
when raising, hold the switch and release
when the window is at the desired position.
Note: You can also hold down the top button
on the key to open/close all windows.
Warning: Before closing a power window,
it is the driver’s responsibility to ensure
that all occupants, especially children, do
not have any body parts extended
through the window’s opening. Failure to
do so can cause serious injury.
Warning: When leaving Model X, always
take your key with you. Leaving the key in
Model X allows all doors, windows, and
controls to be fully operational and can
cause hazardous, unauthorized or
unintentional use of Model X.
Locking Rear Windows
To prevent passengers from using the rear
window switches, press the rear window lock
switch. The switch light turns on. To unlock
rear windows, press the switch again.
Warning: To ensure safety, it is
recommended that you lock the rear
windows whenever children are seated in
the rear seats.
Warning: Never leave children unattended
in Model X.
Windows
Opening and Closing 11

Opening
To open the rear trunk, do one of the
following:
• Touch Controls > Trunk on the
touchscreen.
• Double-click the rear trunk button on the
key.
• Press the switch located under the
exterior handle .
When the liftgate is open, the
instrument panel displays the Door
Open indicator light. The image of
the Model X on the touchscreen
Controls window also displays the
open trunk.
To stop a powered liftgate while it is moving,
single-click the Trunk button on the key. Then,
when you double-click the Trunk button, it
moves again, but in the opposite direction
(provided it was not almost entirely open or
closed when you stopped it). For example, if
you single-click to stop the liftgate while it is
opening, when you double-click, it closes.
To open the trunk from inside in the unlikely
situation in which Model X has no electrical
power, see Opening with No Power on page
13.
Closing
To close the powered liftgate, do one of the
following:
• Double-click the trunk button on the key.
• Touch Controls > Trunk on the
touchscreen.
• Press the switch located on the underside
of the liftgate (see Adjusting the Opening
Height on page 12).
If a powered liftgate senses an obstruction
when closing, it automatically opens and
sounds two chimes. Remove the obstruction
and try closing it again. If it cannot close the
second time, powered operation is temporarily
disabled. Close it manually to restore powered
operation.
Note: The power closing feature is also
temporarily disabled if you leave the powered
liftgate open for more than an hour.
Adjusting the Opening Height
You can adjust the opening height of the
powered liftgate to make it easier to reach:
1. Open the liftgate, then lower it to the
desired opening height.
2. Press and hold the button on the
underside of the liftgate for two seconds
until you hear a
confirmation beep.
3.
Confirm that you have set it to the desired
height by closing the liftgate, then
reopening it.
Rear Trunk
12 Model X Owner's Manual

Opening with No Power
If Model X has no electrical power, you can
open the rear trunk from inside. Use the
mechanical release cable located on the
underside of the liftgate, next to the interior
light.
1. Remove the cover by pulling its lower
edge very
firmly toward you.
2. Pull the cable to release the latch.
3. Push the liftgate open.
Rear Trunk
Opening and Closing 13

Opening
To open the front trunk:
Touch ControlsFront Trunk on the
touchscreen, or double-click the front
trunk button on the key.
Pull the hood up.
The door open indicator displays on
the instrument panel when the front
trunk is open. The image of the
Model X on the touchscreen Controls
window also displays the open trunk.
The front trunk locks whenever Model X is
locked using the touchscreen, externally using
the key or walk-away locking, or when Valet
mode is active (see Valet Mode).
To open the front trunk in the unlikely
situation in which Model X has no electrical
power, see Opening with No Power.
Closing
The Model X body is made of lightweight
aluminum. Therefore, the hood is not heavy
enough to latch under its own weight and
applying pressure on the front edge or center
of the hood can cause damage. To close the
hood:
• Lower the hood fully until it touches the
latch.
• Place both hands on the front of the hood
in the areas shown below (in green), then
press down
firmly to engage the latches.
• Lift the front edge of the hood to ensure it
is fully closed.
Caution: To prevent damage:
• Apply pressure only to the green
areas illustrated above. Applying
pressure to the red areas can cause
damage.
• Do not close the hood with one hand.
Doing so applies concentrated force
in one area and can result in a dent or
crease.
• Do not apply pressure to the leading
edge of the hood because this can
crease the edge.
• Do not slam or drop the hood.
Warning: Do not drive with the hood
secured by the secondary catch alone.
Front Trunk
14 Model X Owner's Manual

Interior Emergency Release
An interior release button inside the front
trunk allows a person locked inside to get out.
This release button is active whenever
Model X is stationary.
Press the interior release button to open the
front trunk, then push up on the hood.
Note: The button glows for several hours after
a brief exposure to ambient light.
Opening with No Power
If Model X has no electrical power, or if you are
unable to open the front trunk using the
touchscreen or key, follow these steps to open
it:
1. Remove the tow hook cover located in the
lower front of Model X. To do so, insert a
small flat screwdriver into the slot located
along the top of the cover, then pry gently
to release the cover from the top snap.
2. Locate the two straps. One of these straps
is labeled 'A' and the other is labeled 'B'.
3. Pull strap 'A' to release the primary latch.
4. Pull strap 'B' to release the secondary
latch.
5. Lift the hood. You may need to push the
hood down slightly to release the pressure
against the secondary latch.
Note: It is important to pull the straps in the
correct sequence or the appropriate latch
does not release and the front trunk can not
open.
When opening the front trunk using this
method, the latches remain in the open
position and you can not close it again
without electrical power. To close a front trunk
that has been opened by pulling the manual
straps:
1. Charge the 12V battery (for instructions,
contact Tesla).
2. Press the Front Trunk button on the
touchscreen to reset the primary and
secondary latches.
Front Trunk
Opening and Closing 15

Opening and Closing
To open the glove box, press the switch
located on the side of the touchscreen. If you
leave the glove box open for five minutes, its
light automatically turns o.
Note: The glove box locks whenever Model X
is locked externally, using the key or walk-
away locking. It also locks when Model X is in
Valet mode (see Valet Mode on page 36). It
does not lock when Model X is locked using
the touchscreen.
Warning: When driving, keep the glove
box closed to prevent injury to a
passenger if a collision or sudden stop
occurs.
Glove Box
16 Model X Owner's Manual

Opening and Closing
To expose a front cup holder, slide back the
armrest.
To expose rear cup holders, press and release
the cup holder face plate located at the back
of the center console.
Cup Holders
Opening and Closing 17

Correct Driving Position
The seat, head restraint, seat belt and airbags
work together to maximize your safety. Using
these correctly ensures greater protection.
Position the seat so you can wear the seat belt
correctly, while being as far away from the
front airbag as possible:
1. Sit upright with both feet on the
floor and
the seat back reclined no more than 30
degrees.
2. Make sure you can easily reach the pedals
and that your arms are slightly bent when
holding the steering wheel. Your chest
should be at least 25 cm from the center
of the airbag cover.
3. Place the shoulder section of the seat belt
mid-way between your neck and your
shoulder. Fit the lap section of the belt
tightly across your hips, not across your
stomach.
Model X seats include integrated head
restraints. The front driver and passenger head
restraints can be adjusted to a high or low
position.
Adjusting the Driver’s Seat
1. Adjust lumbar support.
2. Adjust backrest.
3. Move seat forward/backward.
4. Adjust the seat’s height and tilt angle.
Warning: Do not adjust seats while
driving. Doing so increases the risk of a
collision.
Warning: Riding in a moving vehicle with
the seat back reclined can result in
serious injuries in a collision, as you could
slide under the lap belt or be propelled
into the seat belt. Ensure your seat back
is reclined no more than 30 degrees when
the vehicle is moving.
Front and Rear Seats
18 Model X Owner's Manual

Adjusting Second Row Seats
Model X has three seating positions in the
second row. Each seating position provides
comfort adjustments. Although the control on
the outside seats are L-shaped and the control
on the middle seat is circular, they both
provide the same functions.
1. Move seat forward/backward.
2. Adjust backrest.
Note: The backrest locks into position
when you release the lever. If a backrest is
not locked into position when a driving
gear is engaged, the instrument panel
displays an alert for the unlocked
backrest. Adjust the backrest again,
ensuring it locks into position.
Accessing Third Row Seats
Model X makes it easy for passengers to enter
and exit the optional third row seating
positions. Press the Easy Entry button located
on the backrest of each second row outside
seat. The associated outside seat's backrest
tilts forward and the seat moves fully forward.
The center seat also moves partially forward.
You can also use the touchscreen to
move the second row seats to the
easy entry position. Touch Controls >
Doors and the Easy Entry button.
If one of the seats is occupied when easy
entry position is initiated, both seats move
partially forward, but only as far as an
occupant in the seat can move forward when
using the seat's comfort adjustment. In
situations where a child safety seat is installed
in a second row seat that must move forward
for easy entry, and an occupant is not
detected in the front seat directly in front of
the child safety seat, the front seat moves
forward to accommodate forward movement
of the second row seat with the child safety
seat.
If a front row seat is positioned such that the
second row seat will collide with it during an
easy entry operation, it automatically moves
forward just enough to accommodate the
forward position of the second row seat.
Note: Forward movement cancels if an
occupant adjusts a second row seat while it is
moving.
Front and Rear Seats
Seating and Safety Restraints 19

Note: When an outside seat has tilted forward
for easy entry, its back rest resets to the
neutral position and may need to be re-
adjusted.
Note: If an obstacle is detected while a seat is
moving forward for easy entry, forward
movement stops and the seat moves back.
Folding Third Row Seats
Before folding, remove items from the seats
and the rear foot well. To allow the third row
seat backs to fold completely
flat, you may
need to move the second row seats forward.
To fold a third row seat, press the button
located in the top outside corner of the seat.
The button has two detents.
1. Fold head restraint forward.
2. Fold seat forward.
You can also use the touchscreen to fold third
row seats. Touch Controls > Doors > Rear
Seats. A convenient way to fold rear seats is to
engage Cargo Mode (described next).
Note: If necessary, the second row seat may
move forward slightly to accommodate the
forward position of the third row seat.
Note: To raise the seats, pull the seat back
upward until it latches into place. To
confirm
the seat back is locked in the upright position,
try pulling it forward.
Warning: Always ensure the seat backs
are locked in their upright position.
Failure to do so increases the risk of
injury.
Cargo Mode
Cargo Mode makes it easy for you to
maximize cargo space by automatically
moving all second row seats fully forward and
folding the third row seats flat. Touch
Controls > Doors > Rear Seats > Cargo Mode
on the touchscreen.
Note: Cargo mode is prohibited if a second or
third row seat is occupied.
Head Restraints
Front seats include adjustable non-removable
head restraints. Use the touchscreen to adjust
these head restraints to either a low or high
position.
The second and third row seats have
integrated non-removable head restraints that
can not be adjusted. However, the head
restraints in the third row seats can be folded
down for storage (see Folding Third Row
Seats on page 20).
Seat Heaters
The front seats are equipped with heating
pads that operate at three levels from 3
(highest) to 1 (lowest). To operate the seat
heaters, see Climate Controls on page 105.
If Model X is equipped with the optional cold
weather package, you can also control seat
heaters in the second row and rear seats, as
well as heated wipers by touching Controls >
Cold Weather (see Controls on page 97).
Seat Covers
Do not use seat covers on Model X. Doing so
could restrict deployment of the side air bags
if an accident occurs. It can also reduce the
accuracy of the occupant detection system.
Front and Rear Seats
20 Model X Owner's Manual
/