Page is loading ...


For Your Safety
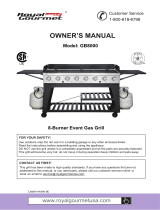
Explosion View
Parts and Hardwares List
…………..……………………………………………………….......
…………………………………………………………………….………….............
Preparation
…………………………………………............................
Assembly lnstructions
…………………………………………….......................................
General Information and Instructions
LP Gas and Cylinder Information
Cylinder Specifications
………………………………………………………………...............
…………………………………………………...........................
LP Cylinder Leak Test
…………………………………………………..................................
Operating Instructions
Cleaning Instructions
……………………………………………………….....................
Trouble Shooting Guide
Grilling Recipes
Warranty and Customer Service
2-3
4
5
6
7-9
10
11
14
………………………………………………………..………………………….
………………………………………………………………………………....
…………………………....................................……
………………………....................................……........
12-13
15-16
……………………………………………….........................
10
17-18
………………………………………………………..............................
19-20
21
Contents

For Your Safety

36"
36"

1
2
6
6
5
5
4
8
3
7
9
15
12
10
11
14
13
2
2

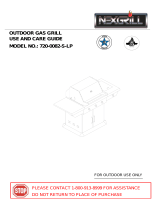
Parts and Hardwares
1
3
1
1
1
1
1
1
1
1
2
2
1
1
Wheel cover
Tank hook
Cart beam
Left side shelf
Tank base
Wheel Axle
Wheel
Main body
Cart joint (left)
Cart joint (right)
W-20130010
W-GB2001002
LG001-CH
W-GD430016
W-GD430017
Z-GB4002023
H-GB2001008
1.
2.
3.
4.
5.
6.
7.
8.
15.
14.
13.
12.
11.
10.
9.
Ref QTYDescription lllustration Ref QTYDescription lllustration
Right side shelf
A B
C
M6x12
Split pin
M6
28pcs
2pcs
4pcs
4
Side table
“S” hook
W-CC115WT008
H-GB2001002
H-GB2001004
H-GB2001007
Z-GB4002024
Grease cup
H-GB4002007
Cooking griddle
ZH-GB2001006

Preparation

Assemble the
right side shelf (1) and left side shelf (3)
to the cart beams (2) with 12 bolts (A) as shown.
Slide the wheel axle (4) through the
left side shelf (3) ,
attach the wheels (5) to the axle from both sides.
Secure them with 2 split pins (B).
Attach the wheel cover (6) to the wheels.
Assembly lnstructions

Remove the rear of main body with 4 bolts, then
attach the cart joint (10,11) as shown.
Attach the left and right cart joints to the rear side of
the main body, then fasten the joints to secure the main
body onto the cart with 6 bolts (A).
Assembly lnstructions
C

Assembly lnstructions

General Information and Instructions
0
Your new gas grill operates on LP (Liquid PetroleumGas.It is odorless,colorless,and non-toxic when
produced. You can smell LP gas as it has been given an odor similar to rotten cabbage for your safety.
Never leave the grill unattended or move the grill when in use.
It will provide you with many years of enjoyment but a minimal amount of maintenance required.
when the burners go out in cooking
when
air vent
reconstructive
Do not obstruct the flow of air for combustion and ventilation
,

11

12
metrics


Operating Instructions

grill
Cleaning Instructions


Emergencies Possible cause Prevention/ Solution
Troubleshooting: Problem Possible cause Prevention/ Solution
Gas leaking from cracked/cut/
burned hose
Grease fire or continuous
excessive flames above cooking
surface
Too much grease buildup in burner area
Turn off LP Tank. Leave lid open to allow
flames to die down. After cooling, clean
food particles and excess grease from
inside firebox area, grease cup/pan/tray,
and other surfaces
Burner will not light using ignitor
Burner will not light using ignitor
Gas issues
1. Trying to light wrong burner
2. Burner not engaged with control valve
3. Obstruction in burner
4. No gas flow
5. Vapor lock at coupling nut to LP tank
6. Coupling nut and LP tank valve not fully
connected.
Electrical issues:
1. Electrode cracked or broken;” sparks at
crack.”
2. Electrode tip not in proper position
3. Wire and/or electrode covered with
cooking residue.
4. Wires are loose or disconnected
5. Wires are shorting (sparking) between
igitor and electrode.
6. Push button sticks at bottom sparking
between ignitor and electrode
1. Replace electrode.
2. Tip of electrode should be pointing
toward port hole in burner. The distance
should be 1/8” to 3/16”. Adjust if
necessary.
3. Clean wire and or electrode with
rubbing alcohol and clean swab.
4. Reconnect wires or replace electrode/
wire assembly.
5. Replace ignitor wire
6. Replace ignitor
7. Inspect wire insulation and proper
connection. Replace wires if insulation
is broken.
1. See instructions on control panel and
section in the Use and Care.
2. Make sure valve are positioned inside
of burner tubes.
3. Ensure burner tubes are not obstructed
with spider webs or other matted, see
cleaning section of use and care
4. Make sure LP tank is not empty. If LP
tank is not empty, refer to “sudden drop
in gas flow.
5. Turn off knobs and disconnect coupling
nut from LP tank. Reconnect and retry.
6. Turn the coupling nut approximately
one-half to three-quarters
Damaged hose
Turn off gas at LP tank, if hoes is cut or
cracked, replace hose.See LP tank lead
test and connection regulator to the LP
Gas leaking from LP tank
Mechanical failure due to resting or
mishandling
Turn off LP tank valve
Failure or tank valve from mishandling or
mechanical failure
Turn off LP tank valve. Return LP tank to
gas supplier
Improper installation, untight connection ,
failure of rubber seal
Turn off LP tank valve, remove regulator
from cylinder and visually inspect rubber
seal for damage, see LP tank test and
connection regulator to the LP tank
Turn off control knobs and LP tank valve.
After fire is out and grill is cold, remove
burner and inspect for spider nests or rust.
see natural hazard and cleaning the
burner assembly pages.
Fire in burner tube section of burner due
to partial blockage
Gas leaking from LP tank valve
Gas leaking between LP tank
and regulator connection
Fire coming through control
panel
Trouble Shooting Guide

Troubleshooting: Problem
Burner will not match light
Sudden drop in gas flow or low
flame
Flames blow out
Persistent grease fire
Flashback…
(fire in burner tube(s)
Flare-up
Unable to fill LP tank
One burner does not light from
other burner(s)
See ”gas issues;” on previous page.
2. Improper method of match-lighting
1. Grease buildup.
2. Excessive fat in meat.
3. Excessive cooking temperature
High or gusting winds. Low on LP gas.
Excess flow valve tripped.
Grease trapped by food buildup around
burner system.
Burner and burner tubes are blocked
1. Grease buildup.
2. Excessive fat in meat.
3. Excessive cooking temperature
Some dealers have older fill nozzles with
worn threads.
Grease buildup or food particles in end of
carryover tube
Turn knobs to OFF. Turn gas off at LP tank.
Leave lid in position and let fire burn out.
After grill cools, remove and clean all parts
Turn knobs to OFF. clean burner
and/or burner tubes. See burner cleaning
section of use and care manual
1. Clean burners and inside of grill/
firebox
2. Trim fat from meat before grilling.
3. Adjust (lower) temperature
Turn worn nozzles don’t have enough
“bite” to engage the valve. Try a second
LP dealer.
Clean carry-over tube with wire brush
Turn front of grill to face wind or increase
flame height.
Refill LP tank.
Refer to “sudden drop in gas flow” above.
1. See “Pilot Gas Control Ignition” section
of use and care.
1. Clean burners and inside of grill/ firebox
2. Trim fat from meat before grilling.
Possible cause Prevention/ Solution
If your problem is not resolved from the information above, please Contact your local gas dealer.
a) Turn the burner on for 15 to 20 minutes. Ensure appliance is cold before continuing.
b) Grids should be cleaned periodically by soaking and washing in soapy water.
c) The interior surfaces of the grill housing cover should also be washed with hot, soapy water. Use a wire brush, steel wool or
a scouring pad to remove stubborn spots.
d) Periodically check the burner to see that it is free from insects and spiders which may clog the gas system, deflecting gas
flow. Ensure to clean venturi pipes on burner very carefully, make sure that there are no obstructions. We recommend that
you use a pipe cleaner to clean the venturi pipe area.
e) Any modifications of this appliance may be dangerous and are not permitted.
Safety Reminders
Stand your gas grill on a safe level surface, away from inflammable items such as wooden fences or overhanging tree
branches.Never use your gas grill indoors!
Once lit do not move your gas grill or leave it unattended.
Keep children and pets at a safe distance from the gas grill.
Keep a fire extinguisher handy.
The gas grill will become hot when in use, so handle lids etc. with the help of gloves.
Ensure that the appliance has completely cooled down before storing.
Notes

Grilling Recipes
/