Page is loading ...

OM3072 E.1 ™ & © Char-Griller / A&J Manufacturing
3-Burner Grill
OWNER’S MANUAL
LP Gas Grill
WARNING
For Outdoor Use Only
(outside any enclosure)
DANGER:
DO NOT use gas grill for indoor cook-
ing or heating. TOXIC fumes can accu-
mulate and cause asphyxiation. Do
not use in or on boats or recreational
vehicles.
PROP 65 WARNING:
Chemicals known to the state of Cali-
fornia to cause cancer, birth defects
or other reproductive harm are creat-
ed by the combustion of propane.
SAVE THESE INSTRUCTIONS FOR FU-
TURE REFERENCE. IF YOU ARE ASSEM-
BLING THIS UNIT FOR SOMEONE ELSE,
GIVE THIS MANUAL TO HIM OR HER TO
SAVE FOR FUTURE REFERENCE.
FOR CUSTOMER SERVICE, CALL 912-
638-4724
WARNING:
Improper installation, adjustment, altera-
tion, service or maintenance could cause
injury or property damage. Read the instal-
lation, operation and maintenance instruc-
tions thoroughly before assembling or ser-
vicing this equipment.
Failure to follow these instructions could
result in fire or explosion that could cause
property damage, personal injury or death.
A propane gas cylinder is required for
operation. This gas grill is not intended
for commercial use.
Keep your receipt with this manual
for Warranty.
Model # 3072

OM3072 E.1
™ & © Char-Griller / A&J Mfg. 2
Danger
If you smell gas:
1. Shut off gas to the appliance.
2. Extinguish any open flame.
3. Open Lid.
4. If odor continues, keep away from the appliance and
immediately call your gas supplier or your fire depart-
ment.
Warning
Do not store or use gasoline or other flammable liquids or va-
pors in the vicinity of this or any other appliance.
An LP cylinder not connected for use shall not be stored in the
vicinity of this or any other appliance.
For Your Safety
Stop! Call us first! Do Not return product to store. This grill has
been made to high quality standards. If you have any questions
not addressed in this manual or if you need parts please call our
customer service department at 1-912-638-4724 (USA), Mon-
day-Friday 8:30am-5pm (EST).
Have your grills serial number (located on the back of the grill
body or on the leg) when calling.

OM3072 E.1 ™ & © Char-Griller / A&J Manufacturing 3
Page intentionally left blank for notes

OM3072 E.1
™ & © Char-Griller / A&J Mfg. 4
Important Safety Information .………………..page 5 - 6
Illustrated Parts List ……………………………….page 7 - 8
Tools, Assembly Tips and Hardware List …page 9
Assembly Instructions …………………………….page 10–22
Operating Grill
Connecting Gas Cylinder…………………………..page 24
Cleaning and Care……………………………………page 25-26
Checking for Leaks………………………………..…page 27
Lighting Grill…...…………………………………….....page 28-30
Trouble Shooting……………………………………....page 31-32
Grill Preparation………………………………………..page 33
Recipes……………………………………………..…...…page 34 - 35
Accessories……………………………………………….page 36 - 37
Table of Contents

OM3072 E.1 ™ & © Char-Griller / A&J Manufacturing 5
WARNING
FOR YOUR SAFETY
1. DO NOT store or use gasoline or any other flammable vapors and liquids within 25
feet (8m) of this or any other appliance.
2. When cooking with oil/grease, do not allow the oil/grease to exceed 350°F (177°C).
Do not store or use extra cooking oil in the vicinity of this or any other appliance.
3. An LP Cylinder not connected for use should be stored a minimum of 10 feet (3m)
away from this or any other appliance. Never fill the cylinder beyond 80 percent
full. If the above information not followed exactly, a fire causing death or serious
injury may occur.
4. If you smell gas:
- Shut Off gas to the grill.
- Extinguish any open flame.
- Open Lid
For Your Safety
Stop! Call us first! Do Not return product to store. This grill has been made to high quality
standards. If you have any questions not addressed in this manual or if you need parts
please call our customer service department at 1-912-638-4724 (USA), Monday-Friday
9am-5pm (EST).
NOTE: The use and installation of this product must conform to local codes. In absence
of local codes, use the National Fuel Gas Code, ANSI Z223.1/NFPA54.
IMPORTANT NOTICE: read all instructions prior to assembly and use.
Read and understand all warnings and precautions prior to operating your grill.
CAUTION
1. This grill is for use with propane gas only (propane gas cylinder not included).
2. Never attempt to attach this grill to the self-contained propane system of a camper
trailer, motor home or house.
3. Never use charcoal or lighter fluid with the gas grill.
4. Do not use gasoline, kerosene or alcohol for lighting. The LP-gas supply cylinder must
be constructed and marked in accordance with the specifications for propane gas
cylinders of the U.S. Department of Transportation (DOT) CFR 49. This grill is not
intended to be used in or installed on recreation vehicles and/or boats.
5. Do not attempt to move the grill while it is lit.
6. Do not use the grill unless it is completely assembled and all parts are securely fas-
tened and tightened.
7. Keep all combustible items and surfaces at least 36 inches (91.4cm) away from grill
at all times.
8. DO NOT use this grill or any gas product near unprotected combustible constructions.
9. Do not use in an explosive atmosphere. Keep grill area clear and free from combus-
tible materials, gasoline and other flammable vapors and liquids.

OM3072 E.1
™ & © Char-Griller / A&J Mfg. 6
10. Do not touch metal parts of grill until it has completely cooled (about 45 minutes) to
avoid burns, unless you are wearing protective gear (BBQ mittens, pot holders, etc.)
11. Do not alter this grill in any manner
12. Clean and inspect the hose before each use. If there is evidence of abrasion, wear,
cuts, or leaks, the hose must be replaced prior to operating the appliance. The re-
placement hose assembly will be that which is specified by the manufacturer.
13. Move gas hoses as far away as possible from hot surfaces and dripping hot grease.
14. Never keep a filled container in a hot car or car trunk. Heat will cause the gas pres-
sure to increase, which may open the relief valve and allow gas to escape.
15. Keep the grill’s valve compartment, burners and circulating air passages clean. In-
spect the grill before each use.
WARNING
1. This grill is for outside use only, and should not be used in a building, garage or any
other enclosed area.
2. The use of alcohol, prescription or non-prescription drugs may impair the operator’s
ability to properly assemble or safely operate the grill.
3. Always open grill lid slowly and carefully as heat and steam trapped within the grill
can burn you severely.
4. Always place your grill on a hard, level surface far away from combustibles. An as-
phalt or blacktop surface may not be acceptable for this purpose.
5. Do not leave a lit grill unattended. Keep children and pets away form the grill at all
times.
6. Do not place this grill on any type of tabletop surface.
7. Do not use the grill in high winds.
8. Disconnect the propane tank (LP tank) by first turning off valve on top of propane
tank, turn off burner valves, then disconnect regulator from valve on propane tank
by turning plastic connector counter clockwise. Unscrew wing-bolt in bottom shelf to
release the tank for removal.
DANGER
Liquid propane (LP) gas is flammable and hazardous if handled improperly. Know its
characteristics before using any propane product.
1. Propane Characteristics; Flammable, explosive under pressure, heavier that air and
settles in pools and low areas
2. In its natural state, propane has no odor. For your safety, an odorant has been add-
ed.
3. Contact with propane can cause freeze burns to skin.
4. This grill is shipped from the factory for propane gas use only.
5. Never use a propane cylinder with a damaged body, valve, collar or footing.
6. Dented or rusted propane cylinders may be hazardous and should be checked by
your propane gas supplier.

OM3072 E.1 ™ & © Char-Griller / A&J Manufacturing 7

OM3072 E.1
™ & © Char-Griller / A&J Mfg. 8
Item # DescripƟon QTY
1 GASHOODASSEMBLY 1
2 MANIFOLD/VALVESASEEMBLY 1
3 CONTROLPANEL(UFC) 1
4 KNOB 4
5 IGNITOR 1
6 CATCHPAN,SMALL 1
7 GREASETRAY 1
8 BOTTOMHALF 1
9 SIDESHELF 1
10 UTENSILHOOK 3
11 LEGCROSSBAR 2
12 LEGBRACE 2
13
LONGLEG 2
14 LEGCAP 2
15 FRONTPANEL 1
16 BOTTOMSHELF 1
17 TANKBLOCKBAR 1
18 AXLEROD 1
19 SHORTLEG 2
20 WHEEL 2
21 HUBCAP 2
22 HOSE/VALVE/REGULATORASSEMBLY 1
23 KNOBBEZEL 1
24 VALVE,INTEGRATED,SB 1
25 SIDEBURNER
SHELFBODY 1
26 SIDEBURNERIGNITOR 1
27 SIDEBURNERPIPE 1
28 CASTIRONBURNERCAP 1
29 POTSTAND 1
30 SIDEBURNERLID 1
31 HOODHANDLEwithWingnuts&LockWashers 1
32 LOGOPLATE 1
33 THERMOMETER 1
34 BEZELFORTHERMOMETER(2727) 1
35
GASSMOKESTACK 2
36 WARMINGRACK 1
37 COOKINGGRATE 3
38 FLAMESHIELD 3
39 BURNERPIPE 3
40 BURNERSPARKERTIPW/SHORTWIRE 2
41 BURNERSPARKERTIPW/LONGWIRE 1
42 BURNERTUBE/FLAREUPSHIELDSUPPORT(BOLTON)FORBACKCG 3
43 BURNERTUBE/FLAREUPSHIELD
SUPPORT(BOLTON)FORFRONTCG 3
44 CATCHPANSTOPPERBRACKET(ISCURVED) 1
45 CATCHPANSLIDERBRACKET 2

OM3072 E.1 ™ & © Char-Griller / A&J Manufacturing 9
¼-20x 1 ½” BOLT………….…....2 PCS
¼-20x ½” BOLT….................. 37 PCS
2/5” FLAT WASHER……………...2 PCS
¼” FLAT WASHER………………...5 PCS
¼-20 HEX NUT…………….........10 PCS
¼” LOCK WASHER……………..33 PCS
HINGE PINS…………..................2 PCS
LARGE HAIR COTTER PIN……...2 PCS
SMALL HAIR COTTER PIN……...2 PCS
SCREW……………………….....…....3 PCS
#10-24 x 0.40” BOLT…...…......6 PCS
HUB CAP………………………………2 PCS
1/4-20 x 3 1/4” WING BOLT…..1 PC
¼-20x 3/4” BOLT………….…....2 PCS
Hardware: 551053
Assembly: Requires 2 people. Get another person to help.
Tools Needed: Pliers, Phillips Head Screwdriver and a 7/16” Nut Driver.
NOTE: Do Not tighten any bolts unless instructed to do so. Tightening too soon may
prohibit parts from fitting together. All Hex Nuts should be on the inside of the grill
unless stated otherwise. Unpack all contents in a well cleared and padded area.
STOP! Do Not Return to Store. If you are missing parts or need assistance please
email us at [email protected] or call 912-638-4724. Do not attempt assembly if
you are missing parts.

OM3072 E.1
™ & © Char-Griller / A&J Mfg. 10
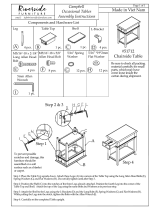
Step 1: Insert the Long Legs and Short Legs into the opening ends of the Leg Cross
Bars. Then place the Leg Braces over the Legs and Leg Cross Bars and secure them
with Lock Washers and two 1/2” Hex Bolts per leg. (NOTE: The orientation of the
Leg Cross Bar is very important for later steps. The two holes on each Leg Cross Bar
must be facing toward the center of the assembly.)
Assembly Instructions
Holes on Leg Cross Bars
TOP VIEW AFTER
ASSEMBLY
Long Legs
Short Legs
Leg Caps
Leg Cross Bars
Lock Washer
Leg Brace
Leg Brace
Hex Bolts
Hex Bolts
Lock Washer

OM3072 E.1 ™ & © Char-Griller / A&J Manufacturing 11
Step 2
Lay the cart assembly from previous step on one side then place the Bottom Shelf
between the four legs then secure it with four Lock Washers and four 1/2” Hex
Bolts. The Bottom Shelf with the Tank Hole should be on the Short Legs side oppo-
site the Long Legs. NOTE: Long Legs have Leg Caps on them.
Long Legs
Leg Cap
Short Legs
Bottom Shelf
Hex Bolt
Step 3
Lay the cart assembly down with the Long Legs on the floor then install the Wheels
and Wheel Axle. On one end of the Axle insert the Large Cotter Pin into the hole on
the Axle and snap in the Hub Cap. Slide one Flat Washer and one Wheel onto the
Axle then slide the Axle through the holes on the Short Legs and Bottom Shelf. Com-
plete the assembly by sliding the other Wheel and Flat Washer onto Axle then insert
the Large Cotter Pin and snap on the Hub Cap.
Lock Washer
Axle
Wheels
Cotter Pin
2/5” Flat Washer
Hub Cap
2/5” Flat Washer
Large Cotter Pin
Hub Cap

OM3072 E.1
™ & © Char-Griller / A&J Mfg. 12
Step 4
Stand the Cart up right. Place Front Panel between Short and Long Legs and secure
it with four Lock Washers and four 1/2” Hex Bolts.
Front Panel
Step 5
Attach two Slider Brackets and one Stopper Bracket onto the bottom of the Grill
Body with six #10-24 x 0.40” Bolts. (NOTE: Oriented The Slider and Stopper Brack-
ets as shown below. This is critical for installing the Catch Pan on later step). The
Bolts should go in from inside the Grill Body.
Hex Bolts
Lock Washers
Slider Brackets
Stopper Bracket
Pan Head Bolts

OM3072 E.1 ™ & © Char-Griller / A&J Manufacturing 13
Step 6
Attach the Cylinder Block Bar onto the assembly Cart. First insert the hook on the
Cylinder Block Bar into the hole at the center of the Leg Brace then secure the other
end with a Flat Washer, Lock Washer, and 1/2” Hex Bolt.
Step 7
Attach the Grill Body to the previous assembly cart using four Lock Washers, four
Flat Washers, and four 1/2” Hex Bolts from the inside of the Grill Body. Oriented the
Grill body so that the three opening holes on the Grill Body for the burner tubes are
facing in the same side as the Front Panel.
Cylinder
Block Bar
Leg Brace
Hex Bolt
Lock Washer
1/4” Flat Washer
Holes for Burners
Grill Body
Front Panel
Lock Washers
Hex Bolts
1/4” Flat
Washers

OM3072 E.1
™ & © Char-Griller / A&J Mfg. 14
Step 8
Install the Catch Pan onto the bottom of the Grill Body by sliding the Catch Pan un-
derneath the Grill Body bottom. Making sure that the Brackets on the Catch Pan
rest on top of Slider Brackets. Slid the Catch Pan all the way till you can hang the
Catch Pan side bracket onto the Stopper Bracket.
Catch Pan
Slider Bracket
Stopper Bracket
Catch Pan
Side Bracket
Grease Cup

OM3072 E.1 ™ & © Char-Griller / A&J Manufacturing 15
Step 9
Install Knobs onto valve’s stems on Side Burner Body/Control Panel Assembly. Then
install Side Burner Body/Control Panel Assembly onto the Grill Body. Lay down the
Side Burner Body Assembly that connect with the Control Panel on the floor and at-
tach the Control Pane to the front of the Grill Body with four 1/2” Hex Bolts and four
Lock Washers (two Hex Bolts and two Lock Washers on each side). Then attach the
Side Burner Body Assembly on the side of the Grill Body with four 1/2” Hex Bolts.
Hex Bolt
Lock Washer
Control Panel
Knob
Side Burner Body Assembly
Hex Bolt
Lock Washer

OM3072 E.1
™ & © Char-Griller / A&J Mfg. 16
Step 10
Secure the Hose Guide Bracket to the side of the Grill. First unscrew the lower bolt
that secure the front side of the leg brace. Then place the Hose Guide over the Leg
Brace and re-screw the bolt.
Hose Guide Bracket
Lock Washer
Hex Bolt
Step 11
Install Side Shelf on the side of the Grill Body using four Lock Washers and four
1/2” Hex Bolts.
Hex Bolt
Lock Washer
Side Shelf

OM3072 E.1 ™ & © Char-Griller / A&J Manufacturing 17
Step 12: Install the Burners into the Grill Body by inserting the IGNITER WIRES and
Burners through the open holes at the front of the Grill Body from inside of the Grill
Body, see figure 12A. (NOTE: IGNITER MUST BE ON BOTTOM SIDE OF BURNER). The
BURNER with the longer wire goes on the right side of the GRILL BODY. Making sure
that the Valve goes inside each burner, see figure 12B. Then secure the Burners to
the Grill Body with the screws provided, see figure 12C.
Figure 12A
Figure 12B
Figure 12C
Valve
Burner
Screw
Burner
Burner
Igniter with Wire

OM3072 E.1
™ & © Char-Griller / A&J Mfg. 18
Step 13
Connect the Igniter Wires to the receptors on the Electronic Igniter underneath the
Control Panel. Any Wire can goes into any of the three receptors on the Electronic Ig-
niter.
Electronic Igniter
Igniter Wires
Control Panel
Step 14
Attach the Hood Handle to the Grill Hood with two Lock Washers and two Wing
Nuts. Then attach the Thermometer and Bezel to the Grill Hood. The Thermometer
goes through the Bezel, the Grill Hood then Flat Washer and secure with a Wing
Nuts.
Thermometer
Bezel
Handle
Flat Washer
Lock Washer
Wing Nut
Grill Hood

OM3072 E.1 ™ & © Char-Griller / A&J Manufacturing 19
Step 15
Attach the two Smokestacks on the Grill Hood by insert the Chimneys through the
holes on the Grill Hood and secure with two 1/2” Hex Bolts and two Hex Nuts for
each Chimney.
Step 16:
Attach the Grill Hood to the Grill Body using the two Hinge Pins and two Small Cotter
Pins provided.
Hex Bolt
Hex Nut
Smokestack
Hinge Pin
Small Cotter Pin
Grill Hood
Grill Body

OM3072 E.1
™ & © Char-Griller / A&J Mfg. 20
Step 17
To install the Warming Rack first attach two 1 1/2” Hex Bolts on the Grill Hood and
two 3/4” Hex Bolts on the Grill Body then secure them with four Hex Nuts. Then Po-
sition the Warming Rack onto the Hex Bolts and Secure it with another two more
Hex Nuts.
1 1/2” Hex Bolt
3/4” Hex Bolt
Hex Nut
/