Streamlight Stinger LED Series Operating instructions

Type
Operating instructions

Streamlight Stinger LED Series: versatile and powerful flashlights designed for professional and personal use. With high-lumen output, long runtimes, and durable construction, they're ideal for tactical, outdoor, and industrial applications. Multiple models available, including the compact Stinger LED, the brighter Stinger HPL, and the rechargeable UltraStinger LED. Choose the one that best fits your needs and experience superior illumination in any situation.

Streamlight Stinger LED Series: versatile and powerful flashlights designed for professional and personal use. With high-lumen output, long runtimes, and durable construction, they're ideal for tactical, outdoor, and industrial applications. Multiple models available, including the compact Stinger LED, the brighter Stinger HPL, and the rechargeable UltraStinger LED. Choose the one that best fits your needs and experience superior illumination in any situation.

STINGER
®
LED FAMILY
Operating Instructions
ENGLISH
OPERATING INSTRUCTIONS FOR THE STREAMLIGHT STINGER
®
LED FAMILY
INCLUDING: STINGER
®
LED, STINGER DS
®
LED, POLYSTINGER
®
LED,
POLYSTINGER DS
®
LED, STINGER
®
HPL, STINGER DS
®
HPL, STINGER LED HL
®
,
STINGER DS LED HL
®
, STINGER
®
CLASSIC LED & ULTRASTINGER
®
LED
Thank you for selecting the Stinger LED, Stinger DS LED, PolyStinger LED, PolyStinger DS LED,
Stinger HPL, Stinger DS HPL, Stinger LED HL, Stinger DS LED HL, Stinger Classic LED or
UltraStinger LED. As with any fine tool, reasonable care and maintenance of this product will provide
years of dependable service. Please read this manual before using your flashlight. It includes important
safety and operating instructions and should be saved.
Flashlight must be charged overnight before first use.
USING THE LIGHT
The Stinger LED, Stinger HPL, PolyStinger LED, Stinger LED HL, Stinger Classic LED and
UltraStinger LED feature a head-mounted push button switch. The Stinger DS LED, Stinger DS HPL,
PolyStinger DS LED and Stinger DS LED HL feature a second independent tactical push button tailcap
switch.
Light press the pushbutton switch for momentary operation at full intensity.
Full press the pushbutton switch (until click) once to turn the light on at full intensity.
Full press and hold the switch to cycle through brightness levels. Release at desired level.
A quick double-click of the switch will activate the rapid flash function.
A single full press of the switch from any "on" mode will turn the flashlight off.
Accessing Other Programs
The UltraStinger LED features a TEN-TAP
®
programmable switch allowing the user to select one of three
different programs. To change to the next program, starting from the "Off" position, tap the momentary
function of the switch rapidly 9 times (within 0.4 seconds per tap) and hold it down the 10th time. Continue
holding the switch until the light turns off (approximately 1 second), then release the switch.
Available programs are High-Medium-Low/strobe enabled (Factory Default), High only/strobe disabled or
High-Medium-Low/strobe disabled.
SAFETY
WARNING - Use of light in "strobe" mode may cause seizure in persons with photosensitive epilepsy.
CAUTION: The Stinger HPL, Stinger DS HPL, Stinger LED HL, Stinger DS LED HL or
UltraStinger LED provides a powerful beam at the high setting. When operated for a long time,
especially if not handheld, it will get uncomfortably warm. This is NORMAL
and is not a defect. Any
LED flashlight of similar size and performance will produce similar amounts of heat during operation.
The only way to reduce operating heat is to SIGNIFICANTLY lower the output, or increase the size of
the flashlight. While this heating may trigger the drop reflex if an unattended hot light is picked up,
the temperature does not present a burn hazard. When used tactically for short periods of time to clear
a room, check for intruders, etc., heating will not be a problem. When using the light for extended
periods of time, use of the low power setting, if the illumination level is appropriate, will prolong battery
life and reduce heat buildup.
A. While eye damage from the Stinger LED Family of lights is unlikely, they are a Class 2 LED product.
B. The Stinger LED Family of lights is not approved for use in hazardous atmospheres.
C. SAVE THESE INSTRUCTIONS. This manual contains important safety, operating and maintenance
information for your flashlight and charger.
D. CAUTION: To reduce risk of fire, electrical shock, or personal injury, do not attempt to use the charger
to recharge any other product. Likewise, do not attempt to charge the Stinger LED Family of lights with
any other charger.
factory.
F. Use only NiCd battery #75175, NiMH battery #75375 or Li-Ion battery #75176. For the UltraStinger LED,
use only NiCd battery #77175 or NiMH battery #77375. The contact arrangement in the flashlight
precludes the use of other batteries. Recycle worn out or damaged batteries properly. Do not attempt
to incinerate the battery as it may explode in a fire. Handle the battery carefully and never allow it to
short circuit.
G. Use of this product for other than a lighting device is not recommended. Streamlight specifically
disclaims liability for other than recommended use.
H. CAUTION: To reduce risk of fire, electrical shock, or personal injury, handle the battery carefully and
never allow it to short circuit. When storing spare batteries outside of the flashlight, keep the yellow
battery cap over the battery contacts to avoid shorting out the battery.
CHARGING
Fully charge your flashlight before first use. Several charge/discharge cycles may be needed to achieve full
battery capacity. The flashlight may be stored in the charger continuously when not in use.
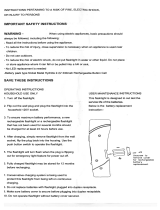
To charge the flashlight, first turn it off and insert it into the charger. The triangular plate on the head fits
into a mating recess in the charger. With the plate toward the charger, slip the barrel of the light between
the charger arms and pull downward until it locks into place. The red LED on the charger housing must light
to ensure that the battery is being charged.
Keep the flashlight and charger contacts clean at all times. Poor contacts can cause charger malfunction.
An abrasive pencil eraser works well to clean the contacts.
SMART CHARGER
The SMART charger/holder is equipped with dual power input ports. The overlapping design prevents both
the USB input and the 12VDC vehicle input to be connected at the same time. An AC/USB power supply
with custom USB cable is supplied to attach to the charger/holder. Place the small micro-USB plug of the
USB cable (SL logo up) into the USB connector sleeve (marked with SL logo) that is located on the base of
the SMART charger/holder. The micro-USB plug and connector on the charger base are keyed and contain
a locking feature and will “snap” into place. Connect the AC/USB power supply to a wall outlet. The charger
may also be connected to any other standard, powered USB outlet (charge time may increase).
Charge time will vary based on battery pack capacity (Ahr) and battery pack size (3 or 5 cell):
5V/1A USB input: 3.5 to 6.5 hours.
12VDC input: 2 to 3.5 hours.
SMART PIGGYBACK
®
CHARGER
The SMART Piggyback charger features an integrated charger/holder for a spare battery. Insert the dual
contact end of the battery into the Piggyback sleeve toward LED indicator. The red PiggyBack LED functions
in the same manner as the primary flashlight charger/holder LED.
Charge time will vary based on battery pack capacity (Ahr). Charge times assume 3 cell battery pack in the
flashlight and the Piggyback locations:
5V/1A USB input: 6 to 7.5 hours.
12VDC input: 2.5 to 4 hours.
NOTE: When the spare battery is out of the PiggyBack charger/holder, keep the yellow battery cap over the
battery contacts to avoid shorting out the battery.
E. Do not try to repair the unit or charger yourself. Take it to a qualified service facility or return it to the
SMART CHARGER LED INDICATORS(S)
The red LED on the charger housing (or PiggyBack sleeve) must light to ensure that the battery is being
charged.
Charging…LED is steady.
Charged…LED pulses shortly every second.
Error…LED pulses rapidly. This may be caused by out of range temperature or input voltage.
It is normal for the indicator to switch between steady and blink
STEADY CHARGER
Full charge within 15 hours (depending of battery pack capacity). Red LED remains on as long as flashlight
is in the charger for NiCd and NiMH batteries. When using the Li-Ion battery, the red charge LED will blink
when the battery is fully charged.
STEADY PIGGYBACK
®
CHARGER
Available in a steady model, the PiggyBack charger features a steady-rate charger holder for a spare battery.
The red Piggyback LED will glow indicating charge a long as the battery remains in the charger. When installing
the Li-Ion battery, the red LED will blink brighter when the battery is fully charged.
NOTE: When the spare battery is out of the Piggyback charger, keep the yellow battery cap over the battery
contacts to avoid shorting out the battery.
Before mounting a Streamlight charger in a vehicle, please read the following sections.
CHARGER MOUNTING
The charger should never be mounted against any heat sensitive surface.
Before drilling any holes, make sure there is room to insert and remove the flashlight.
Two (2) self-tapping #8 x 2" screws are included to mount the charger. The correct size hole for these screws
in sheet metal is 1/8."
VEHICULAR CHARGING
A 12V DC power cord (#22051) is equipped with a cigarette plug and is available for mounting a Streamlight
charger in a vehicle. The plug can be removed and the wires can be attached directly to a power source for a
more permanent installation. (A two amp fuse must be used on the positive lead.)
IMPORTANT: Before making electrical connections in a vehicle, keep in mind that a shorted auto battery
can easily start a fire. Make all connections with insulated lugs or other connectors intended for such use.
Be sure that your installation is fused.
The striped power lead is positive and the unmarked lead is negative. When connecting the charger to a
fuse block the striped, positive power lead goes to the connector that is dead when the vehicle's fuse is
removed. The charger body is electrically isolated from the charge circuit and allows positive ground
installations. The charger is diode protected and if connected in reverse polarity simply won’t operate until
connected properly.
Streamlight recommends connecting chargers to an unswitched source of power to ensure the flashlight is
always fully charged. If the vehicle will not be driven for several days, the flashlight should be removed
from the charger to avoid vehicle battery drain.
Charging the flashlight with a Steady Charger draws a constant .2 amperes from a vehicle.
The optional Fast Charger will draw between .5 and .7 amps for up to 4 hours during the fast charge period.
During maintenance charge, current is pulsing and effectively draws .1 amps.
BATTERY REPLACEMENT
Simply unscrew the tailcap and slide the battery from the flashlight. Replace the battery inserting the contact
end first and reattach the tailcap.
CARE AND USE OF BATTERIES
To obtain the maximum performance and life from nickel-cadmium, nickel metal hydride or Li-Ion batteries:
1. Thoroughly read the sections in this manual covering Safety, Charger Mounting and Charging.
2. Fully charge before first use.
3. Although the flashlight is designed to be left on charge continuously, there is an exception, if the
surrounding temperature is below 10°F charging is not recommended.
4. There are special considerations to note when using the rechargeable multi-cell batteries that operate
the flashlight. If the battery is subjected to repeated and extensive overly deep discharge (such as an
aggressive conditioning procedure) which runs the battery down completely on a regular basis the
battery can suffer a voltage reversal in one of the individual cells. This can cause a buildup of pressure
within the cell which can lead to a venting of electrolyte, cell damage, and possible early battery failure.
Additionally, should the pressure relief vent on the top of the battery become damaged the pressure
buildup could cause the cell to burst causing damage to the flashlight and the possibility of personal
injury.
5. To obtain the safest and longest life from your rechargeable product Streamlight, in conjunction with
the leading manufacturers of NiCd and NiMH batteries offers the following recommendations:
A. Do not periodically "condition" or "exercise" your flashlight battery despite what you may have been
told about nickel-cadmium "memory." The actual existence of "memory" in a battery used under the
conditions of flashlight service is extremely unlikely. Streamlight specifically discourages a regular
cycle of deep discharging, which is not only unnecessary, but will greatly shorten battery life and could
lead to a hazardous battery failure.
B. Rarely there may be a small leakage of alkaline electrolyte from the safety vent on top of the cell. It
appears as a powdery substance and can affect the integrity of the electrical contact. We recommend
that your battery be periodically inspected and the contact area wiped clean. Use caution when handling
a battery that has leaked. The electrolyte is a strong caustic and can burn or irritate the skin and eyes.
IMPORTANT – Be sure to use genuine Streamlight
®
replacement parts.
Shop for quality Streamlight products on our website. Learn more about work lights on our website.
  • Page 1 1
  • Page 2 2
  • Page 3 3
  • Page 4 4
  • Page 5 5

Streamlight Stinger LED Series Operating instructions

Type
Operating instructions

Streamlight Stinger LED Series: versatile and powerful flashlights designed for professional and personal use. With high-lumen output, long runtimes, and durable construction, they're ideal for tactical, outdoor, and industrial applications. Multiple models available, including the compact Stinger LED, the brighter Stinger HPL, and the rechargeable UltraStinger LED. Choose the one that best fits your needs and experience superior illumination in any situation.

Ask a question and I''ll find the answer in the document

Finding information in a document is now easier with AI