skcinc.com Form 37169 Rev 220419 Page 4
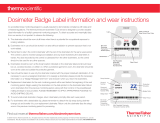
Your package should contain
3-pack Kit includes 3 dosimeters and 1 each: 5-unit Charging Dock with power
supply
, AcoustiCHEK Calibrator,
replacement windscreen, USB cable, and USB drive
with instruction manual, in a protective charging carry case
3-pack Kit with Class 2 Calibrator includes 3 dosimeters and 1 each: 5-unit
Charging Dock with po
wer supply, AcoustiCHEK Calibrator,
replacement windscreen,
USB cable, and USB drive with instruction manual, in a protective charging carry case
5-pack Kit includes 5 dosimeters and 1 each: 5-unit Charging Dock with power
supply, replacement windscreen, USB cable, and USB drive with instruction manual,
in a protective charging carry case
5-pack Kit with Class 2 Calibrator includes 5 dosimeters and 1 each: 5-unit
Charging Dock with po
wer supply, AcoustiCHEK Calibrator
, replacement windscreen,
USB cable, and USB drive with manual, in a protective charging carry case
Intrinsically Safe, No BLE
Dosimeter only, requires charging dock; see kits below or Accessories/Replacement
Parts
Single Kit includes dosimeter, 1-unit Charging Dock with power supply, USB cable,
and USB drive with instruction manual, in a protective carry case
Single Kit with Class 2 Calibrator includes dosimeter, 1-unit Charging Dock with
power supply
, AcoustiCHEK Calibrator, USB cable, and USB drive with instruction
manual, in a protective carry case
3-pack Kit includes 3 dosimeters and 1 each: 5-unit Charging Dock with power
suppl
y
, replacement windscreen, USB cable, and USB drive with instruction manual,
in a protective charging carry case
3-pack Kit with Class 2 Calibrator includes 3 dosimeters and 1 each: 5-unit
Charging Dock with po
wer supply, AcoustiCHEK Calibrator
, replacement windscreen,
USB cable, and USB drive with instruction manual, in a protective charging carry case
5-pack Kit includes 5 dosimeters and 1 each: 5-unit Charging Dock with power
supply, replacement windscreen, USB cable, and USB drive with instruction manual,
in a protective charging carry case
For Use Only in Non-hazardous Locations, BLE
Dosimeter only, requires charging dock; see kits below or Accessories/Replacement
Parts
Single Kit includes dosimeter, 1-unit Charging Dock with power supply, USB cable,
and USB drive with instruction manual, in a protective carry case
Single Kit with Class 2 Calibrator includes dosimeter, 1-unit Charging Dock with
power supply, A
coustiCHEK Calibrator, USB cable, and USB drive with instruction
manual, in a protective carry case
3-pack Kit includes 3 dosimeters and 1 each: 5-unit Charging Dock with power
supply
, AcoustiCHEK Calibrator,
replacement windscreen, USB cable, and USB drive
with instruction manual, in a protective charging carry case
3-pack Kit with Class 2 Calibrator includes 3 dosimeters and 1 each: 5-unit
Charging Dock with po
wer supply, AcoustiCHEK Calibrator,
replacement windscreen,
USB cable, and USB drive with instruction manual, in a protective charging carry case
5-pack Kit includes 5 dosimeters and 1 each: 5-unit Charging Dock with power
supply, replacement windscreen, USB cable, and USB drive with instruction manual,
in a protective charging carry case
5-pack Kit with Class 2 Calibrator includes 5 dosimeters and 1 each: 5-unit
Charging Dock with po
wer supply, AcoustiCHEK Calibrator
, replacement windscreen,
USB cable, and USB drive with manual, in a protective charging carry case
For Use Only in Non-hazardous Locations, No BLE
Dosimeter only, requires charging dock; see kits below or Accessories/Replacement
Parts
Single Kit includes dosimeter, 1-unit Charging Dock with power supply, USB cable,
and USB drive with instruction manual, in a protective carry case
Single Kit with Class 2 Calibrator includes dosimeter, 1-unit Charging Dock with
power supply
, AcoustiCHEK Calibrator, USB cable, and USB drive with instruction
manual, in a protective carry case
3-pack Kit includes 3 dosimeters and 1 each: 5-unit Charging Dock with power
supply, replacement windscreen, USB cable, and USB drive with instruction manual,
in a protective charging carry case