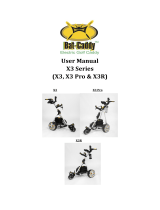
BATCADDY X9R User manual

Type
User manual

BATCADDY X9R, your new golf caddy, is a high-performance device designed to enhance your golfing experience. With its advanced features and user-friendly design, it's set to revolutionize the way you play the game.

BATCADDY X9R, your new golf caddy, is a high-performance device designed to enhance your golfing experience. With its advanced features and user-friendly design, it's set to revolutionize the way you play the game.

ATTENTION: Please follow all assembly instructions. READ the
instructions carefully to understand the operating procedures
BEFORE you operate your caddy.
X9R
X9R Carbon
X9 SERIES
USER MANUAL
2
TABLE OF CONTENTS
Packing List.........……………….............................…............................……3
Optional Accessories......................................................................………..3
Overview .....................…......................…….......………................................4
Wheel Mounting.................................................................….......................5
Opening Your Caddy..........................................................….......................5
Battery & Charger.................................................................................................6
Handle Control..............................................................................................7
USB Port......……….....................…….....................................................……........8
Remote Control.............................................................................................8
Scorecard Holder................................................................................…9, 10
Umbrella Holder..........................................................................................11
Anti-Tip Wheel.............................................................................................11
Tracking Adjustment..................................................................................12
BATCADDY Remote Caddy Comparison.................................................13
Model Weights and Measurements...........................................................14
Customer Service and Technical Support................................................14
3
PACKING LIST
1 - X9 Series frame pre-assembled incl. front wheel
2 - Rear wheels
1 - Advanced Lithium-FePO4 battery
1 - Battery Charger with power cable
1 - Instruction manual
1 - Battery Use Instructions
1 - Seat Installation instructions
1 - Remote Control Handset
Included Accessories
• Umbrella Holder
Scorecard Holder
Dual Cup holders
Seat
4
OVERVIEW
X9 Series
Upper Frame
Upper Bag Holder
Bag Support Strap
Dual Cup Holder
Power/Control Panel
Scorecard Holder
Umbrella Holder
Lower Bag Holder
Seat
Seat
Bracket
Electronics
Unit
Battery Socket
Front Wheel
Lower Handle Assembly
Lower Frame Locking Knob
Rear Wheel
Upper Frame Locking Knob
Current changes in text and image reserved!
5
OPENING YOUR CADDY.
Open the Lower Arm Assembly to a vertical position - Tighten the Lower Screw
Assembly until tight.
Please note that the screw can be screwed into the thread without much effort. If it gets
stuck, loosen and try to re-tighten carefully! Never over-tighten or force the screw,
damage can occur.
Next, raise the Upper Handle Assembly to desired height.
Tighten the Upper Screw Assembly to lock in the handle.
Reverse the process to fold your Batcaddy
Important: The screws must tighten easily! Never
tighten with excessive force, damage can occur.
WHEEL MOUNTING
When attaching the two rear wheels, match the tread direction to the
front tire. Press the small silver buttons with your index and middle
ngers. Slide the wheel onto the axle and turn the wheel until it snaps into
place against the interior sprocket. The rst of the two notches is for the
freewheel mode (small gap between axle and wheel).
To release the wheel, press the silver buttons and pull the wheel off the axle.
Power/Control Panel
Lower Frame Locking Knob
Rear Wheel
Upper Frame Locking Knob
Lower Frame
Screw
Upper Frame
Screw
f
Wheel & axle with small, silver buttons
Figure 3: Golf ball screw above & below
6
Before the rst start-up, you should rst fully charge the battery with the supplied
charger. The battery is fully charged when all 4 LEDs are green. The battery is sufcient
for up to 45 holes – depending on the duration of the game and the playing conditions.
A complete charging cycle takes about 3 hours.
BATTERY & CHARGER
Figure 4: Battery and Charger
Place the battery in the tub provided. Please only use the original supplied BATCADDY
battery. Connect the battery plug to the battery socket.
Figure 5: Battery plug
f
7
HANDLE CONTROL
Press the start/stop button for about 2 seconds to turn on the caddy. The battery level
indicator will now start to light up.
As soon as the battery charge level indicator only lights up red (about 25%), we recom-
mend recharging the battery.
f
With the speed wheel you can adjust the BATCADDY X9R to the desired speed. To do
this, simply turn the wheel forward or back with your index nger.
With a short press of the start/stop button, you can stop the Caddy without it switching off
completely. If you press this button again, the Caddy will continue to drive automatically at
the last set speed.
With the Timer button, you can let the Caddy drive ahead at a xed speed to a xed
distance. (1x press about 10 yards, 2x press about 20 yards, 3x press about 30 yards)
Fig. 6: Control Element
Start/Stop
Timer Feature
Speed Control Rheostat
8
USB CONNECTION
With the USB port, personal belongings, such as GPS golf watches or smartphones, Bluetooth
speakers, etc. can be charged. The range of the battery will slightly shortened.
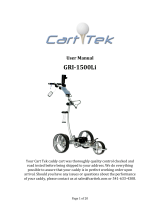
Remote Control Operation
1. POWER Switch: Slide up to turn on the Remote Control. Slide
down to turn off. It is recommended to turn the Remote
Control off when not actively operating your Caddy. This will avoid
accidental button pushes when not paying attention to your Caddy.
2. LED Light: Lights up when Remote Control is turned on and a button
is pushed. This indicates that the remote is sending a signal to the
Caddy.
3. STOPPING: The button will stop the Caddy
4. GOING FORWARD: Pressing the UP BUTTON while the Caddy is standing still will
start the Caddy in forward motion. Pushing the UP BUTTON again will increase the
Caddy’s forward speed one level. Your Caddy has 9 forward speeds. Pushing the
DOWN BUTTON will lower the forward speed one level.
3. GOING BACKWARD: Pressing the DOWN BUTTON while the Caddy is standing
still will start the Caddy in reverse motion. Pushing the DOWN BUTTON again will increase
the Caddy’s reverse speed one level. Your Caddy has 9 reverse speeds. Pushing the UP
BUTTON will lower the reverse speed one level.
4. TURNING RIGHT: Press and hold the RIGHT BUTTON and the Caddy will turn to the
right (from a stop and while in motion) until the button is released.
5. TURNING LEFT: Press and hold the LEFT BUTTON and the Caddy will turn to the left
(from a stop and while in motion) until the button is released.
LED LIGHT
POWER
UP
LEFT
STOP TIMER
RIGHT
DOWN
9
SCORECARD HOLDER
Step 1: Remove the scorecard holder from the box and remove the bubble wrap.
Step 2: Open the lid and loosen the two black cross screws completely.
Step 3: Remove the curved bottom of the mounting device.
Step 4: Place the scorecard holder on the upper bars about 2 nger widths away from
the speed wheel.
6
2
10
Step 5: Position the bottom of the mounting device on the bottom of the top handle, then
you can easily tighten the screws.
SCORECARD HOLDER (Continued)
Step 6: Use the palm of your hand to push the bottom up so that the screws protrude over
the scorecard holder.
Step 7: Now you can tighten the two cross screws completely. Make sure that the scorecard
holder is aligned horizontally.
h
.......................
11
UMBRELLA HOLDER
Turn the screen holder clockwise into the thread of the pre-assembled clamp next to the
handle. For optimal grip, rotate the umbrella holder as far as possible clockwise. To release
the tension and move the umbrella holder, rotate counterclockwise.
AUXILIARY WHEEL
Remove the quick-release bolt from the Anti-Tip Wheel and slide the
Anti-tip wheel in the rear of the device. Subsequently, the Anti-Tip Wheel is connected
with the Quick Release bolt again.
g
12
ADJUSTING THE TRACKING OF YOUR BATCADDY
The caddy is designed to be used with cart bags. Stand bags should not be
used.
Please make sure that the weight distribution of the cart golf bag on the right
and left side is approximately the same. If this is the case, you can loosen the
silver nuts a little on the front wheel on both sides. After that, the small black
nuts can be easily tightened or loosened to adjust the axle forwards or back,
realigning the front wheel. Re-tighten the silver nuts.
g
g
g
13
FEATURES
X3
Sport
X4
Sport X3R X4R X8R
X9R
X9R
Carbon
One-Click Locking Frame ✓ ✓
Dual-Lock Z-Fold Frame ✓ ✓
No-Lock Euro-Wave Frame
Stealth Design Frame
Advanced Stability Geometry
“Forever Traed” Wheels
Single 12V Motor ✓ ✓
Dual 12V Motors ✓ ✓
Dual 24V Motors
Single Handle Operation ✓ ✓ ✓ ✓
Upgraded Handle Electronics
Speed Recall Cruise Control ✓ ✓ ✓ ✓
Fully Directional Remote Control ✓ ✓
Standard Battery Level Indicator ✓ ✓ ✓ ✓
Upgraded Battery Level Indicator
USB Charging Port ✓ ✓ ✓ ✓
Single Anti-Tip Whee
(Upgradeable to “Mountain Slayer”)
✓ ✓
Dual Anti-Tip Wheel
(“Mountain Slayer)
Low Prole High Performance
Dual Anti-Tip Wheel
Power-Off Freewheel ✓ ✓ ✓ ✓
True Freewheel Mode ✓ ✓
Auto-Timed Distance Control ✓ ✓ ✓ ✓
Downhill Speed Control ✓ ✓
Electronic Parking Brake
Caddy Seat Optional Optional Optional Optional Optional
Included
Standard Accessory Package ✓ ✓ ✓ ✓
Upgraded Accessory Package
MODEL COMPARISON
14
Call/text us at (888) 229-5218
or email us at support@batcaddy.com
CUSTOMER SERVICE AND TECHNICAL SUPPORT
X3 Sport X4 Sport X3R X4R X8R
X9R
X9R Carbon
Open
Dimensions
Length: 42.0”
Width: 22.3”
Height: 39.8”
Length: 45.0”
Width: 23.5”
*Height: 36-44”
Length: 42.0”
Width: 25.5”
Height: 37.5”
Length: 45.0”
Width: 23.5”
*Height: 36-44”
Length: 45.0”
Width: 23.5”
*Height: 36-44”
Length: 44.0”
Width: 26.0”
*Height: 36-46”
Folded
Dimensions
Length: 30.0”
Width: 22.3”
Height: 15.3”
Length: 33.0”
Width: 23.5”
Height: 13.0”
Length: 37.0”
Width: 25.5”
Height: 13.5”
Length: 38.0”
Width: 23.5”
Height: 14.0
Length: 36.0”
Width: 23.5”
Height: 13.0”
Length: 35.0”
Width: 26.0”
Height: 12.5”
Shipping Box
Measurements
Length: 36.0”
Width: 21.0”
Height: 13.0”
Length: 33.0”
Width: 24.0”
Height: 11.0”
Length: 34.0”
Width: 24.0”
Height: 14.0”
Length: 38.0”
Width: 23.5”
Height: 14.0
Length: 36.0”
Width: 23.5”
Height: 13.0”
Length: 30.0”
Width: 26.0”
Height: 13.0”
Weight
(Excluding
Battery &
Accessories)
19.0 LBS 20.0 LBS 22.4 LBS 23.3 LBS 25.1 LBS 14.2 LBS
*Open height varies due to adjustable handle on X4, X8, X9 Series Carts
BC-050222
BATCADDY WEIGHTS & MEASUREMENTS
  • Page 1 1
  • Page 2 2
  • Page 3 3
  • Page 4 4
  • Page 5 5
  • Page 6 6
  • Page 7 7
  • Page 8 8
  • Page 9 9
  • Page 10 10
  • Page 11 11
  • Page 12 12
  • Page 13 13
  • Page 14 14

BATCADDY X9R User manual

Type
User manual

BATCADDY X9R, your new golf caddy, is a high-performance device designed to enhance your golfing experience. With its advanced features and user-friendly design, it's set to revolutionize the way you play the game.

Ask a question and I''ll find the answer in the document

Finding information in a document is now easier with AI