Page is loading ...

Sanuvox Technologies Inc, © 2020 All rights reserved. October 2023 International EN v.1
Instruction Manual
Photos illustrating products are non contractual.
R1r
WHOLE HOME UV AIR PURIFIER
Residential Model
Installation Date: _______________ Installed by: _________________
Installer Contact Info.: _________________________________________
IMPORTANT SAFETY INSTRUCTIONS
READ AND SAVE THESE SAFETY INSTRUCTIONS BEFORE USING THIS PRODUCT.
Read and follow all instructions contained in the manual before using the product. Read the maintenance instructions before opening the UV unit
or system. Failure to comply with these instructions may result in injuries or damage to the UV unit or system.
NEVER EXPOSE EYES OR SKIN TO AN OPERATING UV LAMP.
1. Installation and servicing of UV units or systems (in an
air conditioning system or not) can be hazardous. Only
trained and qualied service personnel should install,
repair or service equipment.
2. Untrained personnel can perform basic maintenance
functions such as replacing lamp(s) and/or lter(s). All
other operations should be performed by trained service
personnel.
3. The unit is not to be used by persons (including children)
with reduced physical, sensory or mental capabilities, or
lack of experience and knowledge.
CAUTION: Unit is not a toy. Keep away from
unsupervised children. Do not leave children unattended
with the unit.
4. DO NOT hang onto the UV unit or system.
5. Some UV units or systems could be heavy: Make sure
you have a minimum of 2 people to safely move or install
these UV units or systems, and make sure you adopt the
most ergonomic position possible (use UV unit or system
handles, if applicable).
CAUTION: Installing or maintaining heavy equipment,
especially overhead, can cause back pain or other injuries.
6. When installing or servicing an overhead UV unit or system,
be careful not to fall off the stepladder. Furthermore, make
sure the UV unit or system latches are always in place to
prevent falling parts.
CAUTION: Some parts of some UV units and systems
may open suddenly if the UV unit or system is installed
high up without its locks.
6.1.THIS AIR CLEANER SHALL NOT BE INSTALLED ON THE
HOT-AIR SIDE OF DUCT-TYPE SYSTEMS.
7. Units that are obviously damaged must not be operated.
8. CAUTION: When working on the UV unit or system,
observe precautions on the literature, tags and labels
attached to the UV unit or system, and all other safety
precautions considered as best practices in the HVAC
industry, if applicable.
9. When applicable, local regulation may comprise more
restrictive installation and/or certication requirements.
The aforementioned requirements prevail on those of this
document and the installer agree to conform to these at his
own expense.
10. Follow all the safety instructions outlined in this document
and respect all local and national codes applicable.
11. All UV units or systems contain a UV-C source. Damage to
the housing or unintended use of the UV unit or system may
result in harmful UV-C leaks. UV-C may, even in little doses,
cause harm to the eyes and skin.
12. Never expose eyes or skin to an operating UV lamp.
Therefore, before installing or performing maintenance
on the UV unit or system, TURN OFF AND DISCONNECT
the UV unit or system from all power sources (there
may be more than one switch to disconnect) and also
disconnect the HVAC system, is applicable.
CAUTION: Electrical shock may cause injuries or
possibly death. FIRST AID INSTRUCTIONS: If injured,
consult a doctor.
12.1. To reduce the risk of electric shock, this equipment has a
grounding type plug that has a third (grounding) pin. This
plug will only t into a grounding type power outlet. If the
plug does not t into the outlet, contact qualied personnel
to install the proper outlet. Do not alter the plug in any way.
12.2. The product is to be located so that connection can be
made to the source of electrical supply without the use of
an extension cord.
13. UV rays may damage certain types of lters (polymer or
plastic); please keep the UV unit or system light away from
shining directly on plastic.
14. When installing or performing maintenance on the UV unit
or system, it is recommended to wear safety gloves. In
order to avoid reduced performance of lamp(s), do not
touch lamp glass without gloves.
15. Just like conventional uorescent lamps, UV lamps contain
a small quantity of mercury: if a lamp breaks, clean and
dispose of with care. UV lamps can be disposed/recycled
after use in the same way as any other uorescent lamps.
Contact and follow the specic instructions of your local
and national authorities.
15.1. Dispose of unit or system according to the specic
instructions and standards of your local and national
authorities.
16. Use only specied SANUVOX branded replacement
UV lamps for your UV unit or system. Use of any other
lamps will void your warranty and can result in damage to
the UV unit or system.
17. Sanuvox UV units or systems are not waterproof. DO NOT
INSTALL OUTDOORS OR IN WET LOCATION unless
specied otherwise.
18. Use of this unit or system supplements, but does not
replace, infection control best practices. Users must follow
all these practices, particularly with regard to cleaning and
disinfecting surfaces.
SAVE THESE INSTRUCTIONS
For any inquiries on a UV unit or system, contact :
Robert Smith
146 Barr St, Saint-Laurent
Quebec, CA, H4T 1Y4
1-888-726-8869
REGISTER
YOUR WARRANTY

2
Instruction Manual for R1r
1-888-726-8869www.sanuvox.com
TABLE OF CONTENTS
IMPORTANT SAFETY INSTRUCTIONS 1
TABLE OF CONTENTS 2
ABOUT THE PRODUCT 3
COMPONENTS 3
How it Works 3
ACCESSORIES & KITS 3
SETUP & INSTALLATION 4
What you will need 4
What’s included 4
Step by Step Setup & Installation 4
OPERATION 6
How to Operate your Product 6
How to Read the Ballast Display 6
How to Reset your Product and its Lamp Timer 6
Step by Step Product and Lamp Timer Reset 6
MAINTENANCE 7
How to Replace Lamp(s) 7
Step by Step Lamp Replacement 7
How to Clean your Product 8
STORAGE 8
ULTRAVIOLETS 8
ELECTRICAL RATINGS, POWER CONSUMPTION & AVAILABLE VOLTAGE 8
TROUBLESHOOTING 9
What you will need 9
Step by Step UV Lamp Continuity Test 9
Problems & Solutions Table 9
WARRANTY 10
CUSTOMER SERVICE 10

A
D
B
E
C
F
3
Instruction Manual for R1r
1-888-726-8869www.sanuvox.com
ABOUT THE PRODUCT
Installed into the return or supply plenum, the Sanuvox proprietary process maximizes dwell (contact) time between the air and
UV energy. Installed in a residential HVAC system of up to 2 tons, the patented technology rapidly puries the air within the
home.
For information or recommendations on how to size your specic application, please call SANUVOX at 1-888-726-8869.
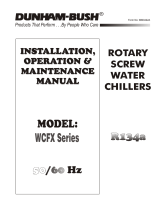
COMPONENTS
How it Works
Foul air is exposed to the UV ‘J’ lamp of the R1r that is positionned parallel to the airow, thus maximizing exposure time to
UV light. The reective mirror surface bounces additional UV energy into the plenum. The UV lamp helps reduce the biological
contaminants. Finally, the treated air circulates through the home.
The unit automatically turns on when the duct frame’s safety pin engages the limit switch.
A. Cover
B. LED Status Display
C. Ballast Reset Button
D. Power Inlet
E. Reector (UV Lamp inside)
F. Frame
ACCESSORIES & KITS
The following optional accessories and/or kits work great with your product (sold separately).
Step-Down Transformer (AC)
ELC-TFR-12024
A transformer to convert a regular outlet (120VAC) to
24VAC.
Duct cover
SUBKIT-R1RPROT
Protective duct cover (includes spacers).
For instruction manuals or information about your optional accessories and/or kits, please call SANUVOX at 1-888-726-8869
or visit www.sanuvox.com.

4
Instruction Manual for R1r
1-888-726-8869www.sanuvox.com
SETUP & INSTALLATION
What you will need
A utility knife to unpack the components, a at screwdriver, a Phillips screwdriver, a 1/4" nutdriver, a marker and a metal saw or
sheet scissors.
CAUTION: Handle your product with care to avoid breaking parts. Make sure you have a free and safe space to unpack,
install and setup your product. Conrm you have access to the necessary power source for the product requirements (see unit
or system label). If you have any questions regarding the installation instructions, call SANUVOX at 1-888-726-8869.
What’s included
The R1r unit, reector, duct mount, a UV lamp, a 6' 24 VAC power cord and a basic installation kit.
The installation kit includes: a UV caution decal, a pair of cotton gloves, sheet metal screws (4) and 6-32 nuts (3).
Step by Step Setup & Installation
1. Prepare the R1r for installation. Unpack the duct frame and its 4 sheet
metal screws.
2. Place the duct frame on the duct at the desired location and trace the
outline to be cut (Horizontal 5.25" x Vertical 5.75").
3. Using a metal saw or sheet scissors, cut the outline.
4. Secure the duct frame to the duct using the 4 provided sheet metal
screws.
STEP 2
STEP 4
5.25"
5.75"

5
Instruction Manual for R1r
1-888-726-8869www.sanuvox.com
5. Unpack the R1r unit and reector.
6. Fasten the reector to the R1r unit using the 3 provided nuts and a 1/4"
nutdriver.
7. Remove the lamp from its packaging.
NOTE: Wear the provided cotton gloves for the following steps.
Fingerprints on the lamp will negatively impact lamp performance.
8. Carefully plug the lamp to the lamp connector. The plug is designed so
that it can only be installed one way. You may have to rotate the socket
90° to line up the pins with the holes. The connector will t into position.
9. Place the lamp on the clamp.
10. Slide the R1r unit into the duct frame ledge and swing it closed. Fasten
the safety lock at the top using a at screwdriver.
STEP 6
STEP 9
STEP 10
11. Plug the two wires of power cord to the furnace 24VAC power supply or
the step-down transformer (sold separately).
12. Plug the barrel connector of the power cord to the unit and secure
the connector by tightening its cap. The R1r will automatically begin
purifying.
You can now enjoy great indoor air quality
with your new R1r!
STEP 12

6
Instruction Manual for R1r
1-888-726-8869www.sanuvox.com
OPERATION
How to Operate your Product
The R1r is an automatic unit: once it’s installed and plugged in, it immediatly turns ON on its own.
CAUTION: The suggested operating temperature range is 10 to 66°C (50 to 150°F). Operating the R1r outside this range will
result in decreased performance.
How to Read the Ballast Display
Once the power has been reconnected the ballast LED will illuminate as will the UV Lamp. In the event the LED status light is
OFF this signals that there is either no power going to the ballast or the ballast has failed. Flashing LED (once every second) is
a reminder that lamp has been running for 8,500 hrs (1 year). Reset timer and consider changing lamp after 17,000 hrs (2 years)
of continuous usage. Use provided sticker with lamp to identify lamp change date.
Normal Operation
SOLID RED: In operation, system OK.
FLASHING RED (once every second): Lamp has been running for 8,500 hrs (1 year).
FLASHING RED (twice every second): Lamp failure.
FLASHING RED (three times every second): Ballast failure.
FLASHING RED (four times every second): Low voltage (under 18V).*
FLASHING RED (ve times every second): High voltage (over 30V).*
* Connects to a Step Down Transformer (sold separately).
How to Reset your Product and its Lamp Timer
After installing a new lamp, make sure the timer function is reset.
Step by Step Product and Lamp Timer Reset
1. On the ballast, press and hold for 3 seconds the reset button until LED
blinks. The timer has now been reset.
STEP 1

7
Instruction Manual for R1r
1-888-726-8869www.sanuvox.com
MAINTENANCE
How to Replace Lamp(s)
Replacing lamps on the R1r is quick and easy. Simply turn off the power source, remove unit from duct, remove and dispose
of old lamp, replace with new Sanuvox branded UV lamp, replace unit in duct and turn power source back on. See below for
detailed step by step instructions.
CAUTION: In order to avoid reduced performance of lamp(s), do not touch lamp glass without gloves.
Step by Step Lamp Replacement
1. To replace a lamp, loosen the power cord cap and unplug it.
STEP 1
2. Turn the safety lock open using a at screwdriver and swing the unit out
of the frame.
3. Unplug the lamp and safely dispose of it.
4. Remove the replacement lamp from its packaging.
NOTE: Wear the provided cotton gloves for the following steps.
Fingerprints on the lamp will negatively impact lamp performance.
5. Carefully plug the lamp to the lamp connector inside. The plug is
designed so that it can only be installed one way. You may have to
rotate the socket 90⁰ to line up the pins with the holes. The connector
will t into position.
6. Place the lamp on the clamp.
7. Place the unit back on its duct frame and swing it closed. Secure the
lamp by turning the safety lock closed.
STEP 2
STEP 3

8
Instruction Manual for R1r
1-888-726-8869www.sanuvox.com
ULTRAVIOLETS
Ultraviolet wavelengths (UV) emitted by Sanuvox units and systems are identical to ultraviolets produced by the sun. UVC
damage nucleic acids (DNA/RNA) of microorganisms, which inactivates them. Unlike conventional UV lamps on the market,
Sanuvox units and systems use a patented process that delivers a maximum dose of UV to the moving air stream or surfaces.
CAUTION: Never expose eyes or skin to an operating UV lamp.
STORAGE
The R1r is an in-duct unit working continuously and automatically and therefore, requires no specic storage.
ELECTRICAL RATINGS, POWER CONSUMPTION & AVAILABLE VOLTAGE
The product is rated at 24 VAC, 50/60Hz, 17W.
See product label to conrm power consumption of your specic unit or system.
NOTE: IF YOU EXPERIENCE A PROBLEM, PLEASE CONTACT CUSTOMER SERVICE FIRST OR SEE YOUR WARRANTY.
DO NOT RETURN THE PRODUCT TO THE ORIGINAL PLACE OF PURCHASE. DO NOT ATTEMPT TO OPEN THE
PRODUCT OR TAMPER WITH ITS COMPONENTS WITHOUT CONTACTING CUSTOMER SERVICE FIRST. DOING SO
MAY VOID YOUR WARRANTY AND CAUSE PERSONAL INJURY OR DAMAGE TO THE PRODUCT.
How to Clean your Product
For optimal performance, the lamp(s) should be kept free of dust and residue deposit: clean every two to three months with a
soft tissue and mild soap or alcohol based solution. Always spot test the cleaner to make sure it does not damage the surface.
CAUTION: Under no circumstance should water be sprayed or splashed onto the product.

9
Instruction Manual for R1r
1-888-726-8869www.sanuvox.com
TROUBLESHOOTING
If your product is not working properly, refer to the following.
What you will need
A at head screwdriver and an ohmmeter.
Step by Step UV Lamp Continuity Test
STEP 2 1. Take the lamp out of the duct. First remove the unit from its frame.
Then disconnect the lamp from its connector and remove it from its clip.
2. Using an ohmmeter place 1 probe on 1 of the 4 pins and by sensing the
3 remaining pins, 1 should have continuity. Make sure the 2 remaining
pins also have continuity.
The 4 pins are in a rectangle pattern. The 2 pins that form the 2 short
sides of the rectangle are the pins that have continuity through the lamp
element.
NOTE: The R1r error code is determined by the LED ashing pattern on the ballast. The ashing pattern on the ballast is determined by the number of LED
blinks (1 to 5) followed by a 1 second pause. This pattern will repeat over and over until the error code is cleared.
Problem Possible Cause Solution
Error Code 1 (EC1) - Lamp has reached over 8,500 hrs (1 year)
of operation.
- Reset lamp timer if lamp has run only for 8,500 hrs (1 year), or
change lamp if lamp has been working for more than 17,000
hrs (2 years).
See Product and Lamp Timer Reset instructions on page
6.
Error Code 2 (EC2) - Lamp has failed. - Press the reset button once to attempt to restart the lamp.
- Shut the power to the ballast (hard reset), wait 10 seconds and
turn the power back ON.
- Check lamp continuity.
See UV Lamp Continuity Test instructions on page 9.
- Get a genuine replacement lamp and reset lamp timer.
See Product and Lamp Timer Reset instructions on page
6.
Error Code 3 (EC3) - Ballast has failed. - Press the reset button once to attempt to restart the ballast.
- Shut the power to the ballast (hard reset), wait 10 seconds and
turn the power back ON.
- Check power source to conrm that it is within specications
on product label.
- Get a replacement ballast.
Error Code 4 (EC4) - Voltage to the ballast is less than 18VAC.
- Power source (furnace control panel or
transformer) does not provide sufcient
power output (measured in VA).
- Measure the voltage being provided to the ballast.
- Install a dedicated transformer (MSCTFR12024 or equivalent)
that provides a minimum output of 20 VA at 24 VAC.
Error Code 5 (EC5) - Voltage to the ballast is over 30VAC.
- Power surge.
- Measure the voltage being provided to the ballast.
- Install a dedicated transformer (MSCTFR12024 or equivalent)
that provides a minimum output of 20 VA at 24 VAC.
Contact your contractor for all your needs in terms of replacement parts: power cord, ballast, UV lamp, brackets, etc.

10
Instruction Manual for R1r
1-888-726-8869www.sanuvox.com
WARRANTY
You should rst read all instructions before attempting to use this product.
For this warranty to be valid, keep a copy of the proof of purchase.
UV lamp 2 years
Ballast 5 years
Other parts 5 years
A. This limited warranty applies to repair or replacement of product found to be defective in material or workmanship. This warranty does not apply to
damage resulting from abusive, unreasonable use or supplemental damage. Defects that are the result of normal wear and tear will not be considered
manufacturing defects under this warranty.
SANUVOX IS NOT LIABLE FOR INCIDENTAL OR CONSEQUENTIAL DAMAGES OF ANY NATURE, ANY IMPLIED WARRANTY OF MERCHANTABILITY
OR FITNESS FOR A PARTICULAR PURPOSE ON THIS PRODUCT IS LIMITED IN DURATION TO THE DURATION OF THIS WARRANTY.
Some jurisdictions do not allow the exclusion or limitation of incidential or consequential damages or limitation on how long an implied warranty last, so
the above limitations or exclusions may not apply to you. This warranty gives specic legal rights, and you also may have other rights which vary from
jurisdiction to jurisdiction. This warranty applies only to the original purchaser of this product from the original date of purchase.
B. At its option, SANUVOX will repair or replace this product if it is found to be defective in material or workmanship.
C. This warranty does not cover damage resulting from any unauthorized attempts to repair or from any use not in accordance with the instruction manual.
D. This warranty does not cover the lters, pre-lters or other accessories (if included), except for material or workmanship defects.
Call us toll-free at 1-888-726-8869 or email: [email protected]
Please be sure to specify product name.
NOTE: IF YOU EXPERIENCE A PROBLEM, PLEASE CONTACT CUSTOMER SERVICE FIRST OR SEE YOUR WARRANTY. DO NOT RETURN THE PRODUCT
TO THE ORIGINAL PLACE OF PURCHASE. DO NOT ATTEMPT TO OPEN THE PRODUCT OR TAMPER WITH ITS COMPONENTS WITHOUT CONTACTING
CUSTOMER SERVICE FIRST. DOING SO MAY VOID YOUR WARRANTY AND CAUSE PERSONAL INJURY OR DAMAGE TO THE PRODUCT.
CUSTOMER SERVICE
TO ORDER REPLACEMENT PARTS
PLEASE CONTACT YOUR CONTRACTOR OR SANUVOX CUSTOMER SERVICE
Toll-Free Phone #: 1-888-726-8869
Email: [email protected]
Website: www.sanuvox.com
Please be sure to specify product name.
Replacement parts for this product
BST24G48ET Ballast 24V
LMPLGXJ65T5 T5 regular intensity 6.5" ‘J’ shaped dual UVC/UVV lamp with odor control, for GX model (yellow caps)
LMPLGJ65T5 T5 regular intensity 6.5" ‘J’ shaped germicidal UVC lamp, for G model (purple caps)
ELC-TFR-12024 Step-down transformer 120 VAC to 24 VAC / 20 VA
WARNING: Use only specied SANUVOX branded replacement UV lamps with your unit or system. Use of any other
lamps will void your warranty and can result in damage to the unit, system and/or lamp(s).
REGISTER
YOUR WARRANTY
ONLINE AT
www.sanuvox.com
/