Page is loading ...

MBM64061801 (1.0) G Printed in Korea
BC
Start Guide
Welcome


1
TABLE OF CONTENTS
INTRODUCTION...................................................2
Your Phone ..........................................................4
Getting Started ....................................................6
Home screen .....................................................11
Unlock screen ....................................................13
Notification Panel ..............................................14
Call/Messaging .................................................15
Contacts ............................................................ 16
Browser ............................................................. 17
Maps .................................................................18
Camera .............................................................20
Video camera ....................................................20
Google account .................................................21
Downloading applications ..................................22
Email .................................................................23
QuickMemo .......................................................24
QSlide ...............................................................25
QuickTranslator .................................................26
Share Files with Android Beam™ ........................27
Connect your phone with your computer ............28
T-Mobile Applications ........................................29
Accessories ....................................................... 34
Approved Firmware Versions ..............................35
Safety Tips .........................................................35
Information About Safeguarding Handsets .........36
Emergency Dialing .............................................36
Caring For Your Phone .......................................37
Additional Information .......................................38
For Your Safety ..................................................41

2
INTRODUCTION
Support
This guide provides you with the information you
need to get started.
For more information and additional support, please
visit
www.t-mobile.com/support
where you can:
Register at
My.T-Mobile.com
to check your
minutes, pay your bill, upgrade your phone, and
change your rate plan.
Review your phone’s User Manual and
troubleshooting FAQs.
View the latest troubleshooting solutions in the
Support Forums or ask a question of your own.
You can also access account and device information
from your phone.
1 From the Home screen, touch
Apps
.
2 Under the Apps tab, touch T-Mobile My Account
.

3
Service
If you are a new T-Mobile
®
customer and your
service has not yet been activated, call Customer
Care at
1-800-937-8997
and a T-Mobile Activations
representative will assist you.
You will need the following information when
activating service:
Service Agreement and agent code on your
Agreement.
Your name, home address, home phone number,
and billing address.
Your Social Security number, current driver’s
license number, and date of birth for credit check
purposes.
Your choice of T-Mobile plan and services
(see
http://www.t-mobile.com/
for latest plan
information).
Micro SIM serial number and IMEI number
(located on the box barcode label).
NOTE
For business and government accounts, please provide
the name of your company or government agency,
address, and tax ID.
NOTE
By activating service, you acknowledge that you have read,
understand, and agree to be bound by each of T-Mobile’s
Terms and Conditions, and your Service Agreement.

4
Your Phone
Front view
1
Proximity Sensor
2
LED Indicator
3
Front Camera Lens
4
Quick Keys
5
Back Key
6
Home Key
7
Recent Apps Key
8
Menu Key
9
Home Screen
10
Earpiece
11
Search Key
12
Write and Share Key
13
Function Key
14
Direction Keys
1
2
3
6 7
5
12
13
11
8
14
4
9
10

5
Side view
15
3.5mm Headset Jack
16
Microphone
15
16
1
Power/Lock Key
2
Volume Keys
3
USB/Charger Port
1 2
3
Rear view
1
Back Cover
2
Rear Camera Lens
3
Speaker
4
LED Flash
3
42
1

6
Getting Started
Before you start using the phone, you may need to
insert the Micro SIM card.
Installing the Micro SIM card and
battery
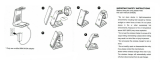
1 Use the fingertip cutout to remove the back cover.
Fingertip Cutout
2 Insert the Micro SIM card. Make sure the gold
contact area on the card is facing downwards and
the notched side is inserted first (see image below).

7
3 To insert the battery, align the gold contacts on the
phone and the battery and press it down until it
clicks into place.
4 Place the back cover over the battery compartment
and press it downwards until it clicks into place.

8
Installing the memory card
To store multimedia files, such as pictures taken
using the camera, to an SD card, you must insert a
memory card into your phone.
1 Use the fingertip cutout to remove the back cover.
Fingertip Cutout
2 Insert the memory card into the slot. Make sure the
gold contact area is facing downwards.
NOTE
The memory card is sold separately.
Warning!
Do not remove the memory card without first unmounting
it using the Storage menu. Otherwise the memory card,
as well as your phone, may become damaged and the
data stored on the memory card may get corrupted. To
unmount the memory card safely, touch
Apps
> Apps
tab > Settings
> Storage > Unmount SD card > OK.

9
Charging your phone
A rechargeable Li-ion battery is used to power your
phone.
A USB Adapter, which is included with your phone,
is used to charge the battery. Ask your T-Mobile
sales representative for further details regarding
approved batteries and chargers.
Before using your phone for the first time, make sure
the battery is fully charged. An uncharged battery
will fully recharge after 3 hours.
USB Adapter
USB Cable
NOTE
Make sure the battery is installed before connecting the
USB Adapter. If the battery is not installed and the USB
Adapter is connected, the phone will not operate properly
due to prolonged power cycling. Also, removing the
battery with the USB Adapter connected may damage the
device. Please unplug the USB Adapter before removing
the battery.
Warning!
If the touch screen does not function while the phone is
in the process of charging, it may be due to an unstable
power supply. As a result, disconnect the USB cable from
the device or unplug the USB Adapter from the power
outlet.

10
1 Connect the USB Adapter and USB cable (as
shown on the previous page).
2 Plug the USB cable (as shown on the next image)
into the phone’s Charger/Accessory Port.
NOTE
The battery must be fully charged initially to improve
battery lifetime.
NOTE
Your phone has an internal antenna. Be careful not to
scratch or damage this rear area, as that will cause loss of
performance.
When charging your phone with a fully discharged battery,
the keypad LED will briefly flash indicating charging is
occurring in a mode designed to prevent battery damage.
The blinking will stop and normal charging will commence
once a sufficient minimum charge has been established.
Internal
Antenna

11
Home screen
You can customize each screen by adding widgets
or shortcuts to your favorite applications.
Adding icons to the Home screen
Swipe your finger right or left to move through the
Home screen canvases. Stop when you get to a
canvas that you want to add items to.
Touch and hold an empty area in the Home
screen. Touch the Apps, Downloads, Widgets or
Wallpapers tabs, then select the item you want
to add.
Touch to perform a voice search using
Google.
TIP!
Touch
Apps
to view all of your applications, then touch
and hold the application you want to add to the Home
screen and place it on the desired canvas. To delete an
application, touch and hold its icon, then drag it to the
icon.

12
Customizing an application icon on the
Home screen
You can edit the icons on the Quick Keys Bar and
Home screen by creating your own icons with the
camera or Gallery images.
To u c h
to use
bigger
icons.
1 Touch and hold an application icon until the
canvas grid is displayed, then release the icon.
The editing icon appears at the upper right
side of the application icon.
2 Touch the icon and select the desired icon design.
- or -
Touch Create photo icon to use an image from
your Gallery or take a picture to create an icon.

13
Unlock screen
After a period of inactivity, the screen you are currently
viewing will be replaced by the lock screen to
conserve battery power.
Unlocking the screen
Press the Power/Lock Key .
Swipe the screen any direction.
Setting up the screen timeout duration
1 From the Home screen, touch the Menu Key >
System settings.
2 Select Display.
3 Touch Screen timeout and select the amount of time
of inactivity after which the screen turns off.
NOTE
To lock your screen using the pattern lock feature, from
the Home screen touch the Menu Key
> Lock screen
settings > Select screen lock > Pattern. A short tutorial
will guide you through the process of setting a pattern lock.

14
Notification Panel
Notification icons on the Status Bar report new
messages, calendar events, alarms, as well as ongoing
events. The Notifications Panel is displayed when the
Status Bar is swiped down. You can also access the
QSlide apps and Quick Settings from this screen.
<Quick Settings>
Turning features on/off
1 Touch and drag the Status Bar downwards to
open the Notifications Panel.
2 Touch the Quick Setting icons to turn the
corresponding features on/off.
To edit the Quick Settings
Swipe the Quick Settings to the left and touch ,
then touch to rearrange the items. Touch
to select which items you want to display on the
Notifications Panel.
TIP!
To preserve battery life, turn off Wi-Fi, Bluetooth and GPS
when you are not using them.

15
Call/Messaging
It only takes a few taps to make a call or send a
message.
Making a call
1 From the Home screen, touch
Phone
.
2 Dial the number you want to call or start typing the
name of the contact.
3 After the number is entered, touch Call .
Sending a message
1 From the Home screen, touch
Messaging
.
2 Touch New to create a new message.
3 Enter the name or number you want to send the
message to, or touch to select a number from
Call logs, Contacts, Favorites, or Groups.
4 Compose your message and touch .
NOTE
To answer an incoming call while the screen is locked,
swipe the
icon in any direction. When the screen is
unlocked, you just need to touch the
icon to answer.

16
Contacts
You can automatically synchronize the contacts on
the phone with any of your online address books or
even import contacts from another Micro SIM card.
To import/export contacts, touch the
Menu Key
>
Import/Export.
Creating a new contact
1 To create a new contact, touch , select the
account where you want to save the contact (if
necessary), and enter the contact’s information.
2 Touch Add another field to add more categories.
3 Touch Save to save the contact.
NOTE
To add a number from a recent call to your contacts, locate
the number in your Call logs and touch the number. Then
touch
> Create new contact to create a new contact
entry or touch existing contacts to add a new number to
existing contacts.

17
Browser
Use the Web browser to surf the Web with ease.
Browsing the Web
1 From the Home screen, touch
Apps
>
Browser
.
2 Touch the URL bar at the top of the screen and enter
the web site address.
3 Touch on the keyboard to navigate to the web
site.

18
Maps
Use Maps during a journey to pinpoint your location
and check for traffic updates on your route.
To search for a location
1 From the Home screen, touch
Apps
>
Maps
.
2 Touch the Search bar at the top of the
screen.
3 Enter the place you’re looking for. You can
enter an address, a city, or a type of business or
establishment. For example, “theater in New York”.
4 Touch the Search Key on the keyboard.
Red markers indicate search matches on the map.
You can touch a marker to open a balloon that
contains a label. Touch the balloon to open a screen
with more information about the location, as well as
options for obtaining directions.
/