Nintendo 148Hx210W User manual
- Category
- Game console accessories
- Type
- User manual

Wii Console Manual
148Hx210W
Wii Operations Manual
System Setup
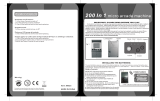
PRINTED IN CHINA
RVL-S-GL-USZ
NINTENDO OF AMERICA INC.
P.O. BOX 957, REDMOND, WA
98073-0957 U.S.A.
61914H
NEED HELP WITH INSTALLATION,
MAINTENANCE OR SERVICE?
Nintendo Customer Service
SUPPORT.NINTENDO.COM
or call 1-800-255-3700
BESOIN D’AIDE POUR L’INSTALLATION,
L’ENTRETIEN OU LA RÉPARATION?
Service à la Clientèle de Nintendo
SUPPORT.NINTENDO.COM
ou composez le
1-800-255-3700
¿
NECESITAS AYUDA DE INSTALACIÓN,
MANTENIMIENTO O SERVICIO?
Servicio al Cliente de Nintendo
SUPPORT.NINTENDO.COM
o llama al 1-800-255-3700

Health and Safety Information 2-3
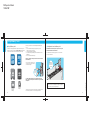
System Components
Wii Console 4-5
Wii Remote™ 6
Wii MotionPlus™ 7
Nunchuk™ 8
Sensor Bar 8
Wii AC Adapter 9
Wii AV Cable 9
Wii Console Stand & Stand Plate 9
System Setup
Wii Console 10-11
Wii AV Cable 12
Sensor Bar 13-17
Wii AC Adapter 17
TV and Audio/Video Settings 18
Setup of Wii Remote 19-23
Synchronizing Your Wii Remote and Wii Console 24-25
Using Game Discs 26
Wii System Play Guidelines 27
Using the Wii Remote 28-29
Using the Nunchuk 30-31
Using Nintendo GameCube Controllers 32-33
Using Memory Cards 34-35
Troubleshooting 36-39
FCC Information 40
Warranty and Service Information 40
NOTE: This product only plays Wii Game Discs and Nintendo GameCube™ Game Discs
labeled with “For use only in USA, Canada, Mexico and Latin America”. This product
does not play CD or DVD discs. This Wii console is for use only in the United States,
Canada, Mexico or Latin America.
TM,
®
and the Wii logo are trademarks of Nintendo. © 2009 Nintendo. All Rights Reserved.
Nintendo of Canada Ltd., Authorized User in Canada. Elements of the Wii console and the Wii
Network Services are patent pending, both in the United States and internationally.
To protect your health and safety, and for correct
use of the Wii system, please read and follow the
instructions in this operations manual before setup
or use.
Throughout this manual, you will see this symbol followed by WARNING or
CAUTION. These terms have different levels of meaning:
WARNING - Warns you about incorrect use of the Wii system that could result in
serious personal injury.
CAUTION - Cautions you about incorrect use of the Wii system that could result in
personal injury or damage to the Wii system, components, game discs or accessories.
IMPORTANT NOTE FOR PARENTS:
Before allowing any child to use the Wii system, a parent or other
responsible adult should determine whether the Wii system is appropriate
for the child. Only children who are old enough and capable of wearing the
wrist strap and properly gripping the Wii Remote should use the system. You
should also consider whether children should be supervised while playing
games, connecting to the internet, and/or downloading games. Be sure to
explain all safety and health information and instructions to any children
who are going to use the system. Failure to do so may result in injuries or
damage to the system or other property.
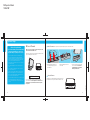
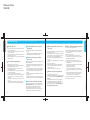
Contents
T
he official seal is your assurance
that this product is licensed or
manufactured by Nintendo.
Always look for this seal when
buying video game systems,
accessories, games and related
products.
Français – Page 41
Español – Página 83
Wii Operations Manual
148Hx210W

2 3
Some people (about 1 in 4000) may have seizures or blackouts triggered by light
flashes or patterns, and this may occur while they are watching TV or playing video
games, even if they have never had a seizure before.
Anyone who has had a seizure, loss of awareness, or other symptom linked to an
epileptic condition should consult a doctor before playing a video game.
Parents should watch their children play video games. Stop playing and consult a
doctor if you or your child has any of the following symptoms:
Convulsions Eye or muscle twitching Loss of awareness
Altered vision Involuntary movements Disorientation
To reduce the likelihood of a seizure when playing video games:
• Sit or stand as far from the screen as possible.
• Play video games on the smallest available television screen.
• Do not play if you are tired or need sleep.
• Play in a well-lit room.
• Take a 10 to 15 minute break every hour.
Health and Safety Information
Health and Safety Information
WARNING - Seizures
Playing video games can make your muscles, joints, skin or eyes hurt. Follow these
instructions to avoid problems such as tendinitis, carpal tunnel syndrome, skin
irritation or eyestrain:
• Avoid excessive play. Parents should monitor their children for appropriate play.
• Take a 10 to 15 minute break every hour, even if you don't think you need it.
• If your hands, wrists, arms or eyes become tired or sore while playing, or if you feel
symptoms such as tingling, numbness, burning or stiffness, stop and rest for
several hours before playing again.
• If you continue to have any of the above symptoms or other discomfort during or
after play, stop playing and see a doctor.
WARNING - Repetitive Motion Injuries
and Eyestrain
The Wii console and Wii Remote can emit radio waves that can affect the operation of
nearby electronics, including cardiac pacemakers.
• Do not operate the Wii console or remote within 9 inches of a pacemaker.
• If you have a pacemaker or other implanted medical device, do not use the
Wii console or remote without first consulting your doctor or the
manufacturer of your medical device.
WARNING - Radio Frequency Interference
The Wii console is a Class I laser product. Do not attempt to disassemble the Wii
console. Refer servicing to qualified personnel only.
Caution: Use of controls or adjustments or procedures other than those specified
herein may result in hazardous radiation exposure.
Specifications:
Laser Type: Semiconductor laser Laser wave length: 662nm (typ.)(647nm~687nm)
Laser power: Max. 0.9mW Numeric aperture: 0.6
CAUTION - Laser Device
To avoid electric shock when you use this system:
• Do not use the Wii during a lightning storm. There may be a risk of electric shock
from lightning.
• Use only the AC Adapter that comes with your system.
• Do not use the AC Adapter if it has damaged, split or broken cords or wires.
• Make sure that the AC Adapter cord is fully inserted into the wall outlet or
extension cord.
• Always carefully disconnect all plugs by pulling on the plug and not on the cord.
Make sure the Wii power button is turned OFF before removing the AC Adapter
cord from an outlet.
WARNING - Electric Shock
CAUTION - Motion Sickness
Playing video games can cause motion sickness in some players. If you or your child
feel dizzy or nauseous when playing video games, stop playing and rest. Do not drive
or engage in other demanding activity until you feel better.
Health and Safety Information
NOTE: This product does not contain latex.
This product complies with applicable laws barring the use of toxic materials such as
lead, mercury, cadmium, hexavalent chromium, PBB or PBDE in consumer products.
IMPORTANT SAFETY INFORMATION – READ THE FOLLOWING
WARNINGS BEFORE SETUP OR USE OF THE Wii. IF THIS
PRODUCT WILL BE USED BY YOUNG CHILDREN, THIS MANUAL
SHOULD BE READ AND EXPLAINED TO THEM BY AN ADULT.
FAILING TO DO SO MAY CAUSE INJURY.
PLEASE CAREFULLY REVIEW THE INSTRUCTION BOOKLET FOR
THE GAME YOU ARE PLAYING FOR ADDITIONAL HEALTH AND
SAFETY INFORMATION.
Wii Operations Manual
148Hx210W

4 5
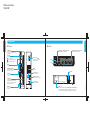
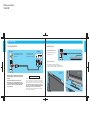
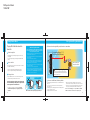
Components
Components
Components
POWER Button
Press to turn the console ON or OFF.
NOTE: The Power LED does not go out when the
power is turned off.
USB Connectors
Connects to USB devices, such as the Wii
LAN Adapter (Sold separately).
Nintendo GameCube Memory Card Slots
For use with Nintendo GameCube Memory Cards.
Battery Cover
For access to CR Coin Lithium battery (CR2032). Perchlorate Material – special handling may apply.
More information can be found at http://www.dtsc.ca.gov/HazardousWaste/Perchlorate/index.cfm.
Do not remove battery cover unless instructed to do so by a Nintendo Customer Service representative.
Air Intake
Nintendo GameCube Controller Sockets
For use with Nintendo GameCube Controllers.
Air Vent
Do not block.
AV Multi Out Connector
Connects to the AV cable for your television.
Sensor Bar Connector
Connects to the Sensor Bar.
DC Input Connector
Connects to the Wii AC Adapter.
Power LED
Shows the status of the Wii console.
Green - Console power is ON.
Orange - Standby mode , WiiConnect24 is ON.
Red - Standby mode, WiiConnect24 is Off.
RESET
Press to restart a game.
SYNCHRO Button (SYNC.)
Used when synchronizing a Wii Remote
with the console. See pages 24-25.
SD Card slot
For inserting an SD memory cards.
See page 35.
EJECT Button
Press to eject a Wii or Nintendo
GameCube Disc.
Game Disc slot
For inserting a Wii or Nintendo GameCube Disc.
Slot lights blue and blinks when a disc is inserted.
When WiiConnect24 is set to ON, the slot will blink
when messages or data are received.
Slot A
Slot B
1234
Wii Console Wii Console
Wii Operations Manual
148Hx210W

6 7
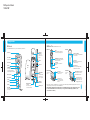
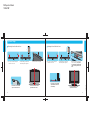
Components
Components
Components
Power Button
Press to turn the Wii console ON or OFF.
Pointer Lens
B Button
Strap Lock
Wrist Strap
Attachment
Wrist Strap cord
Battery
Cover
Wii Remote
Wrist Strap
See page 23 for
information on wrist
strap use.
A Button
Minus (–) Button
HOME Button
Press to display the HOME Menu screen.
See page 64, Wii Operations Manual -
Channel and Settings, for more information.
Plus (+) Button
Speaker
1 Button
2 Button
Player LEDs
Indicate which player the
remote is set up for.
+
Control Pad
Wii Remote
(Shown with the Wii MotionPlus accessory removed and the Wii Remote jacket attached.)
Wii MotionPlus (Shown with the Wii Remote removed.)
External Extension
Connector
Allows connection of external
accessories such as the Nunchuk.
SYNCRO Button
(SYNC.)
Used when synchronizing
a Wii Remote with the
console. See pages 24-25.
Jacket
NOTE: The Power Button on the Wii Remote
controller can be pressed through the jacket.
Wii MotionPlus connector plug
Plugs into the External Extension Connector on
the bottom of the Wii Remote.
Lock Release buttons
Press when attaching or removing Wii MotionPlus
from the Wii Remote.
Lock Switch
Slide towards the top of the Wii Remote to lock
Wii MotionPlus into place.
Jacket slots
Tabs on the bottom of the sensor
unit fit into these slots.
Bottom view
Connector cover
attached
Bottom view
Connector cover
removed
Connector cover
Protects the External Extension
Connector on the bottom of Wii
MotionPlus
External Extension Connector
For connecting accessories such as the
Nunchuk and Wii Classic Controller.
Connector cover cord
Insert this cord into the Connector
Hook on the plug of the accessory
being plugged into the connector.
Wrist Strap slot
Pass the wrist strap through when installing
Wii MotionPlus onto the Wii Remote.
Lock fingers
Insert into the holes on the bottom of the
Wii Remote.
Sensor unit
Front view Back view
To take advantage of the features of the Wii MotionPlus accessory, you must use Wii game software that supports Wii MotionPlus gameplay features. Look for this icon
on game packaging for games that are designed to be used with Wii MotionPlus.
NOTE: Your Wii Remote will still function normally with games that do not include Wii MotionPlus gameplay features. The Wii Remote does not need
to be disconnected from Wii MotionPlus once it is installed, unless you are using your Wii Remote with the Wii Zapper™, Wii Wheel™, or other
accessories that attach in a similar way.
Wii Operations Manual
148Hx210W

To take advantage of the features of the Nunchuk accessory, you must use Wii
game software that supports Nunchuk gameplay features. Look for this icon on
game packaging for games that are designed to be used with Nunchuk.
8 9
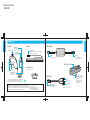
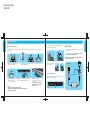
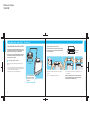
Components
Components
Components
AC Plug
Connects to a 120V AC wall outlet.
DC Plug
Connects to the DC Input connector
on the back of the Wii console.
NOTE: The Wii Console Stand
and Wii Stand Plate come
already assembled together,
as shown above.
AV Multi Out Plug
Plugs into the AV Multi Out connector
on the back of the Wii console.
RCA Plugs
Plug into the AV input connectors on a television.
Video
Audio (Left)
Audio (Right)
Wii AC Adapter
Wii Console Stand
Wii Stand Plate
Wii AV Cable
Control Stick
NOTE: If the Control Stick is moved out of neutral position when the Wii power is turned ON, or when
connecting to the remote, that position will be set as neutral position, causing incorrect game control during
game play. To reset the Control Stick, allow it to return to the normal neutral position, then simultaneously
hold down the A, B, Plus (+) and Minus (–) buttons on the remote for three seconds.
To avoid this from occurring, do not move the Control Stick when:
• Turning the Wii console on
• Plugging the Nunchuk into the Wii Remote
• Starting Channels from the Channel Menu
• Returning to the Wii Menu from games or Channels.
Nunchuk Plug
Connects to the External Extension
Connector on the Wii Remote.
Connector Hook
Insert the cord of the wrist
strap through the hook.
C Button
Z Button
Lock/Release Levers
Squeeze levers to remove
plug from Wii Remote.
Sensor Bar Plug
Plugs into the Sensor Bar Connector on the back of the Wii console.
See pages 13-17 for installation instructions.
Nunchuk
™
Sensor Bar
Sensor Bar Stand
See page 16 for installation instructions.
Wii Operations Manual
148Hx210W

Wii Console Usage Precautions
Please read and follow the precautions listed below when
setting up and using the Wii console. Failure to do so
may result in damage to your Wii system or accessories.
• Do not use any AC Adapter other than the one provided with your system.
• The console has intake and exhaust vents designed to maintain adequate
ventilation. Do not operate the console in any location where these vents may
become covered or obstructed, for example, on carpet or in a tightly enclosed
space. Keep vents clear of any dust or other foreign material.
• Do not disassemble or try to repair the Wii console, accessories or components.
Doing so voids your warranty.
• After you have finished playing, be sure to remove the Game Disc from the
console.
• Do not store the Wii console in a humid place, on the floor, or in any location
where it may collect dirt, dust, lint, etc.
• Do not drop, hit or otherwise abuse the Wii console, components or accessories.
• When disconnecting any plugs from the console or wall outlet, first turn the
Wii console off. Then carefully pull by the plug itself rather than by the cord.
• Do not step on, sharply pull or bend any wire or cables.
• Do not expose the Wii console, components or accessories to extreme heat or cold.
• Do not spill any liquids on the Wii console, components or accessories.
To clean, use a soft slightly damp cloth. Use water only. Allow to dry completely
before using.
Vertical Horizontal
10 11
System Setup
System Setup
Wii Console Placement
NOTE: Choose a location to set up the console that has enough room to allow
for free flow of ventilation around the console.
The Wii console can be placed in a vertical or horizontal position. If located in a vertical
position, it should be placed in the Wii console stand.
The console can be damaged if knocked over, especially if this occurs during
operation of the disk drive. The Wii stand plate has been included to increase
stability of the Wii console, and should be used if the console is placed in a
vertical position.
CAUTION - Console Damage
1. Attach the Wii stand plate to the bottom of the
console stand by inserting the prongs into the
slots as shown above.
2. Firmly slide the stand plate into slots in the
direction shown.
3. Place the console stand on a flat surface and place
the console into the stand. Lower the console
straight down into the console stand rather
than sliding it in from the front.
Horizontal Placement
Place the Wii console on a flat horizontal surface. Retain the Wii console stand and
stand plate for future use in case you want to switch the orientation of the console.
System Setup
Vertical Placement (NOTE: These components come already assembled. If they become separated, see instructions below to reattach.)
Wii Operations Manual
148Hx210W

12 13
System Setup
System Setup
System Setup
Wii Console TV Inputs
Connecting the AV Cable
IMPORTANT: The Wii console will not work with any AV cable other than
the model supplied with your Wii system or the component video cable
listed below.
NOTE: For higher quality video, the Wii component video cable
(Model No. RVL–011) can be ordered through Nintendo’s web site at
support.nintendo.com (USA/Canada only) or by calling Customer Service
at 1-800-255-3700. Before ordering, check to make sure your TV has
component video inputs.
1. Insert the AV Multi Out plug on the Wii AV
Cable into the AV Multi Out connector on the
back of the console.
2. Insert the RCA plugs on the Wii AV
Cable into the input connectors on
the TV, VCR or other audio equipment.
VIDEO
AUDIO L AUDIO R
Sensor Bar mounted
above the screen.
Sensor Bar mounted
below the screen.
Sensor Bar Setup
Connecting the Sensor Bar
Insert the Sensor Bar plug into the Sensor Bar
connector on the back of the console.
Placing the Sensor Bar
The Sensor Bar can be placed either above or below the TV screen.
• See page 14 for instructions on mounting the Sensor Bar to the top of the TV.
• See page 15 for instructions on mounting the Sensor Bar below the TV screen.
CAUTION - TV Screen Damage
Some televisions can be damaged by the display of a stationary image, because the image
may be permanently "burned" into the screen. Playing video games with stationary images
or patterns, or leaving video games on hold or pause, may lead to this type of damage. When
taking a break, place the game on pause and turn the TV off until you are ready to play again.
Before using your Wii system with any TV, especially front and rear projection or
plasma models, be sure to review all documentation included with your TV to find
out whether video games can be played on the TV without damaging it.
If in doubt, contact the manufacturer of the TV. Neither Nintendo nor any of Nintendo's
licensees will be liable for any damage to your TV.
Wii Operations Manual
148Hx210W

System Setup
14 15
System Setup
System Setup
Mounting the Sensor Bar Above the Screen
1. Remove the protective film from the foam pads
on the bottom of the Sensor Bar.
• The front of the Sensor Bar should be
aligned close to the front of the TV.
• The center of the Sensor Bar should be
aligned with the center of the TV.
2. For additional stability, you can add adhesive
backed foam tape from the supplied sheet.
3. Mount the Sensor Bar to the top of the TV.
Mounting the Sensor Bar Below the Screen
1. Remove the protective film from the foam pads
on the bottom of the Sensor Bar.
2. For additional stability, you can add adhesive
backed foam tape from the supplied sheet.
3. Mount the Sensor Bar to the front edge of the
surface the TV is sitting on. Do not place the
Sensor Bar below the surface that the TV is
sitting on; for example, on shelves below
the TV.
• The center of the Sensor Bar should be
aligned with the center of the TV.
• The front of the Sensor Bar should be
aligned with the front of the surface
the TV is sitting on.
Wii Operations Manual
148Hx210W

120V AC outlet
DC Input Connector
Wii AC Adapter
1. Insert the DC plug on the Wii AC Adapter cord into the DC input connector on the
back of the console.
2. Insert the AC plug into a 120V AC wall outlet. Make sure the power is off (the
Power LED is red) when unplugging the AC Adapter.
CAUTION: To prevent electric shock, match the wide blade of the plug to the
wide slot and insert fully into outlet.
Sensor Bar cable position
If desired, the Sensor Bar cable can be fed through a channel on the bottom of the
Sensor Bar to orient the cable to the left or right.
NO
NO NO
YES
Using the Sensor Bar Stand
Communication between the Wii Remote and the Sensor Bar may be improved in some situations by mounting the Sensor Bar on the Sensor Bar stand; for example, if the TV is
sitting on the floor.
Be sure to:
• Align the center of the Sensor Bar with the center of the TV.
• Align the front of the Sensor Bar with the front edge of the TV, or with the front edge of
the surface that the TV is sitting on.
System Setup
System Setup
System Setup
16 17
1. Remove the protective film from the foam pads
on the bottom of the Sensor Bar stand.
2. For additional stability, you can add adhesive backed foam tape from the supplied sheet. These can be applied
to both the top and bottom of the stand.
3. If you are using the extra foam tape,
remove the protective film from the
piece on the top of the Sensor Bar stand.
The Sensor Bar Stand can also be used on top of the TV if part of the TV blocks, or
prevents proper installation of, the Sensor Bar.
Make sure the Sensor Bar is horizontal
and it is not blocked by the TV.
4. Attach the Sensor Bar stand to the Sensor Bar, aligning the pegs
on the stand with the holes in the bottom of the Sensor Bar.
5. Mount the Sensor Bar stand to:
• the front edge of the surface the TV is sitting on, or
• to the top of the TV.
Do not place the Sensor Bar stand below the
surface that the TV is sitting on; for example, on
shelves below the TV.
Wii Operations Manual
148Hx210W

Wii Remote with
Wii MotionPlus
installed
18
19
System Setup
System Setup
System Setup
WARNING - Battery Leakage
TV and Audio/Video Settings
After you have completed all steps of the setup procedure and are ready to
use the Wii system, you will need to set the appropriate "input select"
setting for your TV, VCR or other audio equipment.
1. Turn ON the power for your TV and any audio equipment connected to your
gameplay setup and the power on the Wii console.
2. Select the correct input setting for your TV (see Input Select Information at right).
3. The Wii Menu (see below) should appear on the TV screen. See the Wii Menu
section of the Operations Manual - Channels and Settings, for more information
on this feature.
If the Wii Menu screen does not appear, check to make sure your input setting is
correct and review the Troubleshooting section on pages 36-39.
Input Select Information
The input select allows you to switch between the different inputs on your TV or VCR.
Manufacturers of TVs and VCRs use different names and locations for "input select.”
The common names for the input select are: input, select, input select, line, line in,
source, in, EXT, and AUX. Consult your TV or VCR instruction manual for details.
NOTE: More information on "Input Select" is available on our web site at
support.nintendo.com/consumer/inputselects.html
Locate the input select for the component that the Wii AV Cable is connected to (either
the TV or VCR). The most common locations for input select are:
• A button on the front of the TV or VCR.
• A button on the remote control.
• A high-numbered or low numbered channel (92, 99, 00, or 02) on the TV or VCR.
• An on-screen menu selection.
Setup of the Wii Remote
The Wii Remote comes with the Wii MotionPlus accessory installed.
• Be sure that the jacket is installed during gameplay to reduce
the risk of harm to the remote, surrounding objects, or people.
• It may be necessary to remove the jacket – for example, to replace the
batteries in the Wii Remote. If you do remove the jacket, be sure to replace
it before further play.
Installing Batteries
The Wii Remote uses AA batteries. Nintendo recommends high quality alkaline
batteries for best performance and longevity of battery life. If you use rechargeable
nickel metal hydride (NiMH) batteries, be sure to follow the manufacturer’s
guidelines for safety and proper usage.
Leakage of battery fluid can cause personal injury as well as damage to your remote.
If battery leakage occurs, thoroughly wash the affected skin and clothes. Keep battery
fluid away from your eyes and mouth. Leaking batteries may make popping sounds.
To avoid battery leakage:
• Do not mix used and new batteries (replace all batteries at the same time).
• Do not mix different brands of batteries.
• Nintendo recommends alkaline batteries. Do not use Lithium ion, nickel cadmium
(NiCad), or carbon zinc batteries.
• Do not leave batteries in the remote for long periods of non-use.
• Do not recharge alkaline or non-rechargeable batteries.
• Do not put the batteries in backwards. Make sure that the positive (+) and
negative (-) ends are facing in the correct directions. Insert the negative end first.
When removing batteries, remove the positive end first.
• Do not use damaged, deformed or leaking batteries.
• Do not dispose of batteries in a fire.
See page 20 for instructions on removing the jacket and installing batteries.
Wii Operations Manual
148Hx210W

Hold down both
release buttons
IMPORTANT:
Insert the minus
(–) end first
The white arrow is visible
when unlocked
Hold down both lock
release buttons
Sensor unit
Angle the sensor unit so
that the jacket doesn’t catch on
the corners of the Wii Remote
Pull gently
until you can
see the cord
Make sure the
wrist strap is pulled
completely through
Jacket
Insert
the Wii
Remote all
the way
20
21
System Setup
System Setup
Installing Batteries (cont.)
1. Slide the lock switch on the
back of the Wii MotionPlus
accessory down, towards the
bottom of the Wii Remote.
2. Press and hold the release
buttons and pull the accessory
out of the External Extension
Connector on the bottom of the
Wii Remote. Gently pull the
sensor unit down and towards
the back of the Wii Remote.
3. Pull the strap out through
the hole.
IMPORTANT: Pull carefully
to be sure the strap does not
catch on the jacket.
4. Pull the Wii Remote out of
the jacket.
5. Remove the battery cover and
insert the batteries into the
battery compartment. Be sure
to insert the minus (-) end first
when inserting new batteries,
and remove the plus (+) end
first when replacing the
batteries.
Replace the battery cover.
System Setup
4. While twisting slightly,
gently pull the sensor unit
down and over the end of the
Wii Remote.
5.
Hold down the lock release
buttons on both sides of the
accessory and insert the plug
into the External Extension
Connector on the bottom of the
Wii Remote.
6.
Make sure that neither the
wrist strap or jacket are
pinched between the Wii
Remote and the accessory.
Installing the Wii MotionPlus accessory
1. Make sure the lock on the back of
the accessory is in the unlocked
position, with the arrow visible.
2. Insert the Wii Remote all the way
into the Wii MotionPlus Jacket.
3. Insert the wrist strap through the
hole from the inside of the jacket
and pull completely through until
you can see the cord.
IMPORTANT: Pull carefully to be
sure the strap does not catch on
the jacket.
NOTE: Battery life can be checked by pressing the Home Button. See pages
64-65, Wii Operations Manual - Channels and Settings, for more information.
Slide the switch down
Wii Operations Manual
148Hx210W

Strap lock lever
Lever will click into place
Slide the switch up
Sensor unit
Jacket
Do not separate the sensor unit from
the jacket. They must be used together
for proper operation of the accessory.
When disconnecting the Wii Remote
from Wii MotionPlus, or when replacing
the Wii Remote batteries, do not
separate the jacket from the sensor unit.
The sensor unit must be used with the included jacket. Follow these guidelines to
prevent damage to the Wii Remote, surrounding objects, or injury to other people.
CAUTION - Damage to objects or people
22
23
System Setup
System Setup
Installing the Wii MotionPlus accessory (cont.)
7. Lock the accessory in place by
sliding the switch in the
direction of the arrow.
System Setup
• The Wii MotionPlus accessory can be left installed on your Wii Remote even with
games that do not include Wii MotionPlus features. You do not need to remove it to
play these games.
IMPORTANT: If you remove the Wii MotionPlus accessory from the Wii
Remote, be sure to install the original Wii Remote Jacket back onto the
Wii Remote.
Wearing the Wii Remote Wrist Strap
1. Open the lever on the strap lock and place your hand through the wrist strap. Hold
the remote firmly in your hand.
2. Slide the strap lock up so that the strap will not fall off your wrist. Do not over
tighten the strap lock so that it’s uncomfortable. It should just be tight enough to
hold the wrist strap in place. Close the lever to hold the strap lock in place.
Wii gameplay with the Wii Remote can involve rapid or vigorous motion.
Please use the wrist strap to prevent losing your grip on the remote and causing
damage to the remote or surrounding objects, or injury to other people.
WEAR THE WRIST STRAP WHEN USING THE Wii REMOTE.
• Make sure all players use the wrist strap and that the strap lock is correctly tightened.
• When sharing the Wii Remote between multiple players, make sure each person
uses the wrist strap properly.
• Wearing the wrist strap will prevent you from accidentally dropping or throwing the
remote during gameplay, which could damage the remote or surrounding objects,
or cause injury to other people.
DO NOT LET GO OF THE REMOTE DURING GAME PLAY.
• Read the Instruction booklet for the game you are playing and follow all game
control instructions for correct use of the Wii Remote or accessory controllers.
• Hold the remote securely and avoid excessive motion, as it may cause you to let go
of the remote and may break the wrist strap.
• If your hands become moist, stop and dry your hands.
ALLOW ADEQUATE ROOM AROUND YOU DURING GAME PLAY.
• Stay at least three (3) feet away from the television.
• As you may move around during gameplay, make sure objects and other people are
out of your range of movement or arm motion to prevent damage or injury.
CAUTION - Use the Wrist Strap
Wii Operations Manual
148Hx210W

1P 2P 3P 4P
MORE LESSBattery Life
24 25
System Setup
System Setup
System Setup
Synchronizing Your Wii Remote with the
Wii Console
This procedure allows the remote to communicate with the console.
The Wii Remote included with your Wii system has been synchronized with
the console at the factory.
There are two different modes of synchronizing (syncing) a Wii Remote with
your console.
STANDARD MODE – The Standard Mode procedure is used when adding additional
Wii Remotes to your system or if you want to re-synchronize your original remote.
Once synchronized, the remote will stay synced to the console unless you overwrite
this setting by syncing the remote to a different console.
ONE TIME MODE – This mode allows you to temporarily use your remote on a console
other than your own or to use a friends remote on your console. It does not delete
the Standard Mode setting stored in the remote. In this mode, the remote will
only communicate with the console while the power is on. When the power is turned
off the remote will lose its sync with the console.
• Only a Wii Remote in Standard Mode can turn the console power ON or OFF.
Standard Mode Synchronization
NOTE: Make sure you have placed batteries in the Wii Remote.
1. Press the Power button on the Wii console to turn it on.
2. Remove the battery cover on the back of the remote. Press and release the SYNC.
button inside the cover. The Player LEDs will blink.
3. Open the SD Card Slot cover on the front of the Wii console. Press and release the
SYNC. button on the inside of the compartment
4. When the Player LED blinking stops, connection is complete. The LED that is
illuminated indicates the player number.
This procedure must be followed for each additional Wii Remote added to
your system.
NOTE: This image shows the Wii Remote with the Wii MotionPlus accessory
removed.
One Time Mode Synchronization
NOTE: This mode temporarily removes the Standard Mode synchronization setup for
all remotes until the power of the Wii console is turned off. When the power is turned
back on again, the Standard Mode settings will return.
1. Press the HOME Button on a remote that is synchronized with the console.
2. Select the Wii Remote Settings option
from the Home Button menu, then
select the Reconnect option.
3. Press the 1 and 2 Buttons
simultaneously on the remote
that you want to synchronize with
the console.
The order in which you synchronize
remotes will set the player order for
multiplayer games.
4. The Player LEDs will blink during the syncing process. When the blinking stops,
the connection is complete. See diagram at right for a description of what the
blinking indicates.
NOTE: One Time Mode synchronization is temporary. The Wii Remote will lose
this synchronization under the following conditions:
• When you turn off the console by pressing the Power Button on either the remote
or the console.
• When starting up a game or Channel from the Wii Menu.
• When returning to the Wii Menu after exiting from a game or Channel.
• When you select Reset on the HOME Menu screen.
• When you press the Reset Button on the front of the console.
IMPORTANT: IF YOUR REMOTE LOSES IT’S SYNCHRONIZATION WITH THE CONSOLE
AND YOU ARE UNABLE TO RE-SYNC IT, REVIEW THE Wii REMOTE TROUBLESHOOTING
PROCEDURES ON PAGE 37.
After the syncing
process, LED that is lit
shows the player
number for that remote.
During the syncing
process, the number of
LEDs that blink will show
the battery life of the
remote that is being
synchronized.
Wii Operations Manual
148Hx210W

For best operation, play
directly in front of the TV.
Recommended distance: 3’– 10’
(from Sensor Bar to Wii Remote)
26 27
Using Game Discs
Using Game Discs
Wii System Play Guidelines
Playing a Wii or Nintendo GameCube
Game Disc
Before Inserting a Disc
• Turn ON the power for your TV and any audio equipment connected to your
gameplay setup.
• Select the correct input setting for your TV. (See page 18, TV and Audio/Video
Settings.)
Insert a Game Disc
Insert your Game Disc into the Game Disc slot on the front of the console. The Wii
console will turn ON automatically.
• If your console is placed vertically, the disc label will face to the right.
• If your console is placed horizontally, the disc label will face upwards.
Starting the Game
1. Using the Wii Remote, move the cursor over the Disc Channel option on the
Wii Menu screen and press the A Button to make a selection.
NOTE: Please read the Disc Channel section in the Operations
manual included with your Wii system for complete informa-
tion on using Game Discs in the Wii console.
2. Select “PLAY” on the game title screen to begin the game. Review the
instruction booklet for the game you are playing for specific game
information.
Game Disc Usage Precautions
Please read and follow the precautions listed below when using Wii or
GameCube Game Discs in the Wii Console. Failure to do so may result in
damage to your Wii system or game discs.
• To avoid pinching your finger, do not load the disc with your finger in the
hole. Always handle the disc by the edges.
• Do not touch the bottom unprinted surface of the Game Disc. Always handle
the disc by the edges.
• Do not use cracked, deformed or repaired discs.
• Do not bend or put excessive pressure on discs when loading into console.
• Do not leave discs in direct sunlight or expose them to high temperatures,
high humidity or dust, dirt or other contaminates.
• When not using discs, store them in their cases to prevent them from getting
scratched, dirty or damaged.
• Do not write on, or place stickers on any part of the disc.
• If a disc becomes dirty or contaminated with fingerprints, the system may not
be able to read the game data correctly. If necessary, clean the disc with a
soft, slightly damp cotton cloth (use water only). Clean the disc from center
towards the edges; do not use a circular motion.
Wii System Play Guidelines
CAUTION - Adequate Space Required
Be sure you have enough space around you during game play.
To avoid injury or damage, make sure other people or objects are
not within your range of motion.
For best results when using the Wii system, follow these recommendations.
For best use of the Wii Remote, follow these guidelines:
• Avoid blocking the signal between the remote, the Sensor Bar and the Wii console
with objects.
•
Use the remote the correct distance from the Sensor Bar. The optimal distance is
between 3 and 10 feet.
• Avoid bright light sources, including sunlight, behind or near the TV, shining towards
the remote or reflecting off of the screen.
• Avoid highly reflective surfaces near the Sensor Bar.
• Avoid sources of infrared light in the gameplay area such as electric, propane or
kerosene heaters, flames from fireplaces or candles, and stoves or other sources of heat.
• If the remote seems to operate erratically, check and adjust the Sensor Bar sensitivity if
necessary. (See page 52 in the Wii Operations Manual - Channels and Settings.)
Be sure to read the following pages on using the Wii Remote, Nunchuk
and Nintendo GameCube Controllers before using the Wii system.
NOTE: A GameCube controller is required for playing GameCube games.
Wii Disc
Nintendo GameCube Disc
Label faces
towards the
right side of the
Wii console
Label faces
towards the
right side of the
Wii console
Wii Operations Manual
148Hx210W

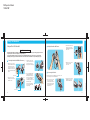
Wii Remote –
Vertical Position
Wii Remote and Classic Controller Pro (sold separately)
Wii Remote – Horizontal Position
Wii Remote and Nunchuk
28
29
Using the Wii Remote
Using the Wii Remote
Using the Wii Remote
Wii Remote Configurations
Depending on the game, the way you hold and operate the remote will vary. You may need to hold the remote in either one or two hands. Read the instruction booklet for the
game you are playing for information about what kind of gameplay control is required for that game. The remote can be used by itself, or in different configurations when
connected up to other Wii accessories. These configurations can be used right or left handed.
Basic Operations
Point
Point the remote at a specific place on
the TV screen.
Waving
Wave the remote back and forth from
side to side
Pushing or Pulling
Move the remote forward and backward.
Twisting
Move the remote in a twisting motion by
rotating your arm.
Holding or Grabbing
Point the remote at a specific place on the TV screen and move the remote while
holding down a button.
Wii Operations Manual
148Hx210W

30
31
Using the Nunchuk
Using the Nunchuk
Using the Nunchuk
Setup and Use of the Nunchuk
Wii gameplay with the Wii Remote and Nunchuk can involve rapid or vigorous motion. Please use the wrist strap to prevent losing your grip on the remote and
causing damage to the remote and surrounding objects, or injury to other people.
Be sure to install the Nunchuk as described. Use the connector hook on the Nunchuk plug with the wrist strap cord or connector cover cord to prevent the
Nunchuk plug from becoming separated from the External Extension connector on the remote or Wii MotionPlus accessory and striking objects or people.
2. Pass the connector cover cord
through the connector hook on the
back of the connector.
Connecting the Nunchuk to the Wii MotionPlus accessory
1. Remove the connector cover from
the bottom of Wii MotionPlus. Grasp
the cover by the sides as shown.
Insert the connector plug into the
External Extension Connector on the
bottom of the remote until it “clicks”
into place.
3. Insert the tab on the edge of the
connector cover into the connector
hook. Press the connector cover
firmly into place on the connector plug.
4. Place your hand through the wrist
strap and adjust the strap lock so
that the strap will not fall off your
wrist. Do not over tighten the strap
lock so that it’s uncomfortable. It
should just be tight enough to hold
the wrist strap in place.
Close the lever (if your strap lock
has one) until it clicks to hold the
strap lock in place.
Connector cover
CAUTION - Use the Wrist Strap
Connector hook
Disconnecting the Nunchuk
Follow these procedures to remove the Nunchuk, Classic Controller, or other
accessories that you have connected to Wii MotionPlus.
1. Remove the connector cover from
the accessory connector plug.
Be sure to pull the connector cover
straight out of the connector hook
to prevent damage to the tab on
the edge of the cover.
Holding the Nunchuk and Wii Remote
2. Press the lock release levers on the
sides of the accessory connector
plug and pull the plug straight out
of the connector.
3. Remove the connector cover cord
from the accessory plug’s
connector hook.
4. Insert the connector cover into the
External Extension Connector on
the bottom of Wii MotionPlus.
Wii Operations Manual
148Hx210W

Press in
and up
32 33
Using Nintendo GameCube Controllers
Using Nintendo GameCube Controllers
Nintendo GameCube
Controller
Using Nintendo GameCube
™
Controllers
Setup of Nintendo GameCube Controllers
NOTE: When using GameCube Controllers with the Wii console, be sure and
use the stand plate to help prevent the console from being tipped over by
pulling on the controller cable. (See page 11, Vertical Placement.)
Optionally, the console can be placed horizontally. When using GameCube
Controllers in the horizontal position, the controller socket cover can be
removed to allow the console to lay flat.
Connecting GameCube Controllers
NOTE: GameCube controllers only work when playing GameCube games on the
Wii console.
• Plug the controllers into the GameCube Controller sockets on the side of the console.
• Review the instruction booklet for the game you are playing for the number and
position of controllers required for that specific game.
• The Wii Classic Controller does not work with GameCube games.
Use the Wii stand plate when
using GameCube Controllers
to prevent the console from
tipping over.
Removing the Controller Socket Cover
If you are using the Wii console in a horizontal position, you must remove
the controller socket cover when using GameCube Controllers to allow the
console to lay completely flat.
1. Stand the Wii console upright as shown and squeeze gently until you feel a
slight click.
2. Remove the cover by pulling straight up out of the console.
3. The cover can be replaced by reinserting the cover straight down into the console
until it clicks into place.
NOTE: The GameCube Memory Slot Cover can be removed with the same
procedure, and should be removed if you are using GameCube Memory
Cards when the Wii console is placed horizontally.
Horizontal
Position
Wii Operations Manual
148Hx210W

Note:
Label faces
towards the Wii
game disc slot
SD Card SDHC Card
miniSD Card
and Adapter
microSD Card
and Adapter
Using Memory Cards
34 35
Using Memory Cards
Using Nintendo GameCube Memory Cards
NOTE: Nintendo GameCube Memory Cards can only be used to save game
information for Nintendo GameCube Game Discs.
To use a Nintendo GameCube Memory Card, open the slot cover and insert the
memory card as shown below.
Note: Label faces
towards the top or
right side of the
Wii console.
Using Memory Cards
Using SD Memory Cards
SD Cards are used in many digital cameras and cell phones and for data storage on PCs.
The Wii console accepts only SD or SDHC Cards (32 GB maximum), including miniSD
or SDHC and microSD or SDHC Cards when used with their respective adapters.
An SD memory card can be used to store the following data from the Wii system
memory:
• Game save information from Wii games (depending on the game, some
information cannot be copied to SD cards)
• Certain data from the Wii Channel applications
• Games downloaded through the Wii Shop Channel such as Virtual Console and
WiiWare games
• Add-on content downloaded within a game
NOTE: Games and add-on content copied to an SD Card cannot be used with a
different Wii console.
To use an SD Card, open the SD Card slot cover
on the front of the console and insert the SD
Card until it clicks into place.
See the SD Card Menu and Photo Channel sections in the Wii Operations
Manual - Channels and Settings for more information on using SD Cards with
the Wii system.
If purchasing a new SD Card, a list of cards that have been tested to work with the Wii console can
be found in the Wii - Systems and Accessories section of http://support.nintendo.com
CAUTION: Do not insert or remove memory cards when reading or writing
information to or from the card or initializing the card. Doing so may damage the
Wii console or memory card, or permanently destroy data.
Wii Operations Manual
148Hx210W

Wii Remote lights blink, but don’t stay lit (remote
does not sync)
• Review the Sensor Bar setup instructions in this manual to ensure proper placement.
• Make sure batteries are not depleted.
• Try resetting the Wii Remote - remove the batteries, wait one minute, then replace
the batteries. Wait a few seconds, and then try synchronizing the remote again.
• If you are unable to re-sync the remote, try the following procedure:
1. Turn off the power of the Wii console with the POWER Button on the front of
the console.
2. Unplug the power cord from the wall outlet for a few seconds, then plug it back
in again.
3. Turn on the power of the Wii console.
4. When you see the Health and Safety screen, press and hold the SYNCHRO
Button on the console down for 15 seconds. This will clear any sync
information left on the console.
5. Synchronize your Wii Remotes using the procedure on page 24.
Wii Remote or controller accessory buttons stick
Clean sticking buttons using the following procedure:
1. For the Wii Remote, remove batteries and disconnect any accessories before cleaning.
2. Use an unused toothbrush and hot tap water. Do not use boiling water, soap
or detergent.
3. Dip the toothbrush in hot water and shake off excess amount. Lightly scrub
sticking buttons, working the bristles around sides of buttons and into cracks.
4. Dry controller with soft cloth or towel and let air dry for at least 2 hours.
5. Test buttons and repeat procedure if necessary. Do not submerge in, or pour
any type of liquid onto a controller or accessory.
Wii Remote doesn't properly respond to player motion
(erratic hand cursor, can’t swing bat, can’t bowl, etc.)
• Review the Sensor Bar setup instructions in this manual to ensure proper placement.
• Make sure no objects are blocking the signals between the Sensor Bar, the Wii
console, and the Wii Remote.
• Make sure batteries are not depleted.
• Use the Sensor Bar Stand if the Sensor Bar is located below under the TV.
• Check and adjust the Sensor Bar sensitivity if necessary. (See page 52 in the Wii
Operations Manual - Channels and Settings.)
The following conditions can interfere with the operation of the remote:
1. Using the remote too close or too far from the Sensor Bar. The optimal distance
is between 3 and 10 feet.
2. Bright light sources, including sunlight, behind or near the TV, shining towards
the remote or reflecting off the TV screen.
3. Highly reflective surfaces near the sensor bar.
4. Sources of infrared light in the gameplay area such as electric, propane or
kerosene heaters, flames from fireplaces or candles, and stoves or other sources
of heat.
5. Radio frequency interference may cause the Wii Remote to work erratically.
Check for and move or turn off wireless devices such as cordless phones,
wireless computer keyboards or mice or other similar devices.
If you think any of these conditions are affecting the operation of the remote, try
removing or reducing the source of interference.
Troubleshooting
36 37
Troubleshooting
No picture on TV screen
• Make sure you have completed all steps, in the order that they appear, on the Quick
Setup sheet included with your system.
• Make sure that all components of your setup are plugged into power outlets and that
all components are turned ON.
• Make sure that cable connections are correctly installed and that all plugs are securely
plugged into the appropriate connectors.
• Make sure that the INPUT settings are correct for your particular setup. (Review page 18
on Input Select information.)
No sound is heard or sound quality is poor
• Make sure the TV volume is not turned off or muted.
• Make sure that all audio connections are correctly installed and that all plugs are
securely plugged into the appropriate connectors.
• Make sure the Wii AV Cable is plugged into the "input" connectors on the
TV or VCR, not the "output" connectors.
• Make sure that the INPUT settings are correct for your particular setup. (Review
page 18 on Input Select information.)
• The sound in some games doesn't begin until the game begins.
• If you have a mono TV or VCR and have left one of the audio cables unconnected
you may not get all game sounds. Use a "Y" Adapter to get both left and right
sound channels.
• If your TV or VCR has both mono and stereo options, make sure it is set to match
your setup.
• Check the instruction booklet for the game you are playing to see if there are
volume controls or mono/stereo options that can be set from within the game.
The console Power LED does not come on, or goes off
during game play
• Make sure the AC Adapter is plugged into both the wall outlet and the back of
the console.
• If the light is still off, disconnect the AC Adapter plug from the wall outlet, wait 2
minutes and plug it back into the outlet. Turn the console power ON.
System unable to read disc or
game disc will not
operate in console
NOTE: Game Discs will not start automatically. You must start disc games from the Disc
Channel on the Wii Menu screen.
• Make sure the disc is inserted correctly. The label side of the disc must face to the
right if the Wii console is set up vertically, or must face up if the Wii console is set
up horizontally.
• Check to be sure that the Game Disc is clean and in good condition. If dirty, wipe
with a soft cloth, from the center to the outside. Do not wipe with a circular motion.
You can also try using the Wii Lens Cleaning Kit (sold separately) to clean the
internal lens.
• Eject the Game Disc, and turn the power OFF and then ON. Reinsert the disc and try
playing the game again.
• Check that the Game Disc will work on your version of the Wii. This system will only
work with Game Discs made for use in the USA, Canada, Mexico and Latin America.
Game Disc slot does not light blue or lights briefly
This is the normal operation of the Game Disc slot. The slot only lights temporarily
when the system is turned on by a) inserting a Game Disc, b) using the Power
Button on the Wii Remote or c) using the Power Button on the Wii console.
The Game Disc slot will also light temporarily if you receive a message via
WiiConnect24 (this feature must be turned on to receive messages, see page 62 in
the Wii Operations Manual - Channels and Settings for more information).
Troubleshooting (Before seeking assistance, review the following problems and solutions.)
Wii Operations Manual
148Hx210W
Page is loading ...
Page is loading ...
-
 1
1
-
 2
2
-
 3
3
-
 4
4
-
 5
5
-
 6
6
-
 7
7
-
 8
8
-
 9
9
-
 10
10
-
 11
11
-
 12
12
-
 13
13
-
 14
14
-
 15
15
-
 16
16
-
 17
17
-
 18
18
-
 19
19
-
 20
20
-
 21
21
-
 22
22


Nintendo 148Hx210W User manual
- Category
- Game console accessories
- Type
- User manual
Ask a question and I''ll find the answer in the document
Finding information in a document is now easier with AI
Related papers
-
Nintendo Switch User manual
-
Nintendo GAME CUBE Owner's manual
-
Nintendo 45496880019 User manual
-
-
-
-
-
Nintendo 3DS Wi-Fi USB Connector Owner's manual
-
-
Other documents
-
Qware QW WII1506 Datasheet
-
Kramer Electronics BC-1T Datasheet
-
Bigben Interactive BB266252 Datasheet
-
DreamGEAR DGWII-1027 User guide
-
-
 Dacota Gaming RETRO GAMING MACHINE 16 BIT MINI GAMING CONSOLE User manual
-
 Nintendo Entertainment System NES Classic Edition Operating instructions
-
 No Drilling Required KL206-CHR Installation guide
-
-
CTA Digital WI-DUM Datasheet


