Roche cobas u 701 Short Guide

Type
Short Guide

Roche cobas u 701 is a microscopy analyzer that helps medical professionals make informed decisions by providing accurate results for various clinical applications.

  • Automated processing: The cobas u 701 automates many laboratory tasks, including sample loading, testing, and result reporting, reducing the risk of human error and increasing efficiency.

  • Wide range of tests: The cobas u 701 can perform a comprehensive range of tests, including routine hematology, infectious disease screening, and urine analysis, making it a versatile tool for various clinical settings.

  • Rapid results: The cobas u 701 provides results quickly, with a typical turnaround time of less than 20 minutes for most tests, enabling healthcare providers to make timely decisions regarding patient care.

cobas u 70
1 microscopy analyzer
Quick Reference Guide
Starting the analyzer
Logging on
Preparing the analyzer
1
Ensure that all covers are closed.
2
Power on the analyzer.
3
Wait until the Overview work area is displayed.
This may take a few minutes.
1
On the Overview work area, choose the Log on button.
A dialog box is displayed.
2
Enter your user name and password.
3
Choose the Log on button.
Your name is now displayed in the global information area.
1
On the Overview work area, check the task indicator.
Address any red and orange items.
2
Check the water container.
(1)
If it is not full, start the appropriate wizard and fill it.
3
Check the liquid waste container.
(1)
If it is not empty, start the appropriate wizard and empty it.
4
Check the cuvette cassette.
If it is nearly empty, ensure that there is a new one available for when the old
one needs to be replaced.
(1) If you work with external water supply, this step is not required.
Defining orders
Loading samples and racks
Start testing
The orders are defined automatically when the rack and tubes have passed the
barcode reader.
o Ensure that the sample barcodes point towards that long side of the rack
where the rack barcode is affixed.
o Ensure that the rack barcodes point outwards and towards the back of the
analyzer when placed on the input buffer.
The analyzer detects the presence of the rack tray or of individual racks in the
priority and single rack slots and moves a rack onto the rack conveyor.
(If you work with an input connection unit, you do not need to load racks
manually, it is done automatically.)
Testing starts automatically.
Monitoring the analyzer
Validating results
1
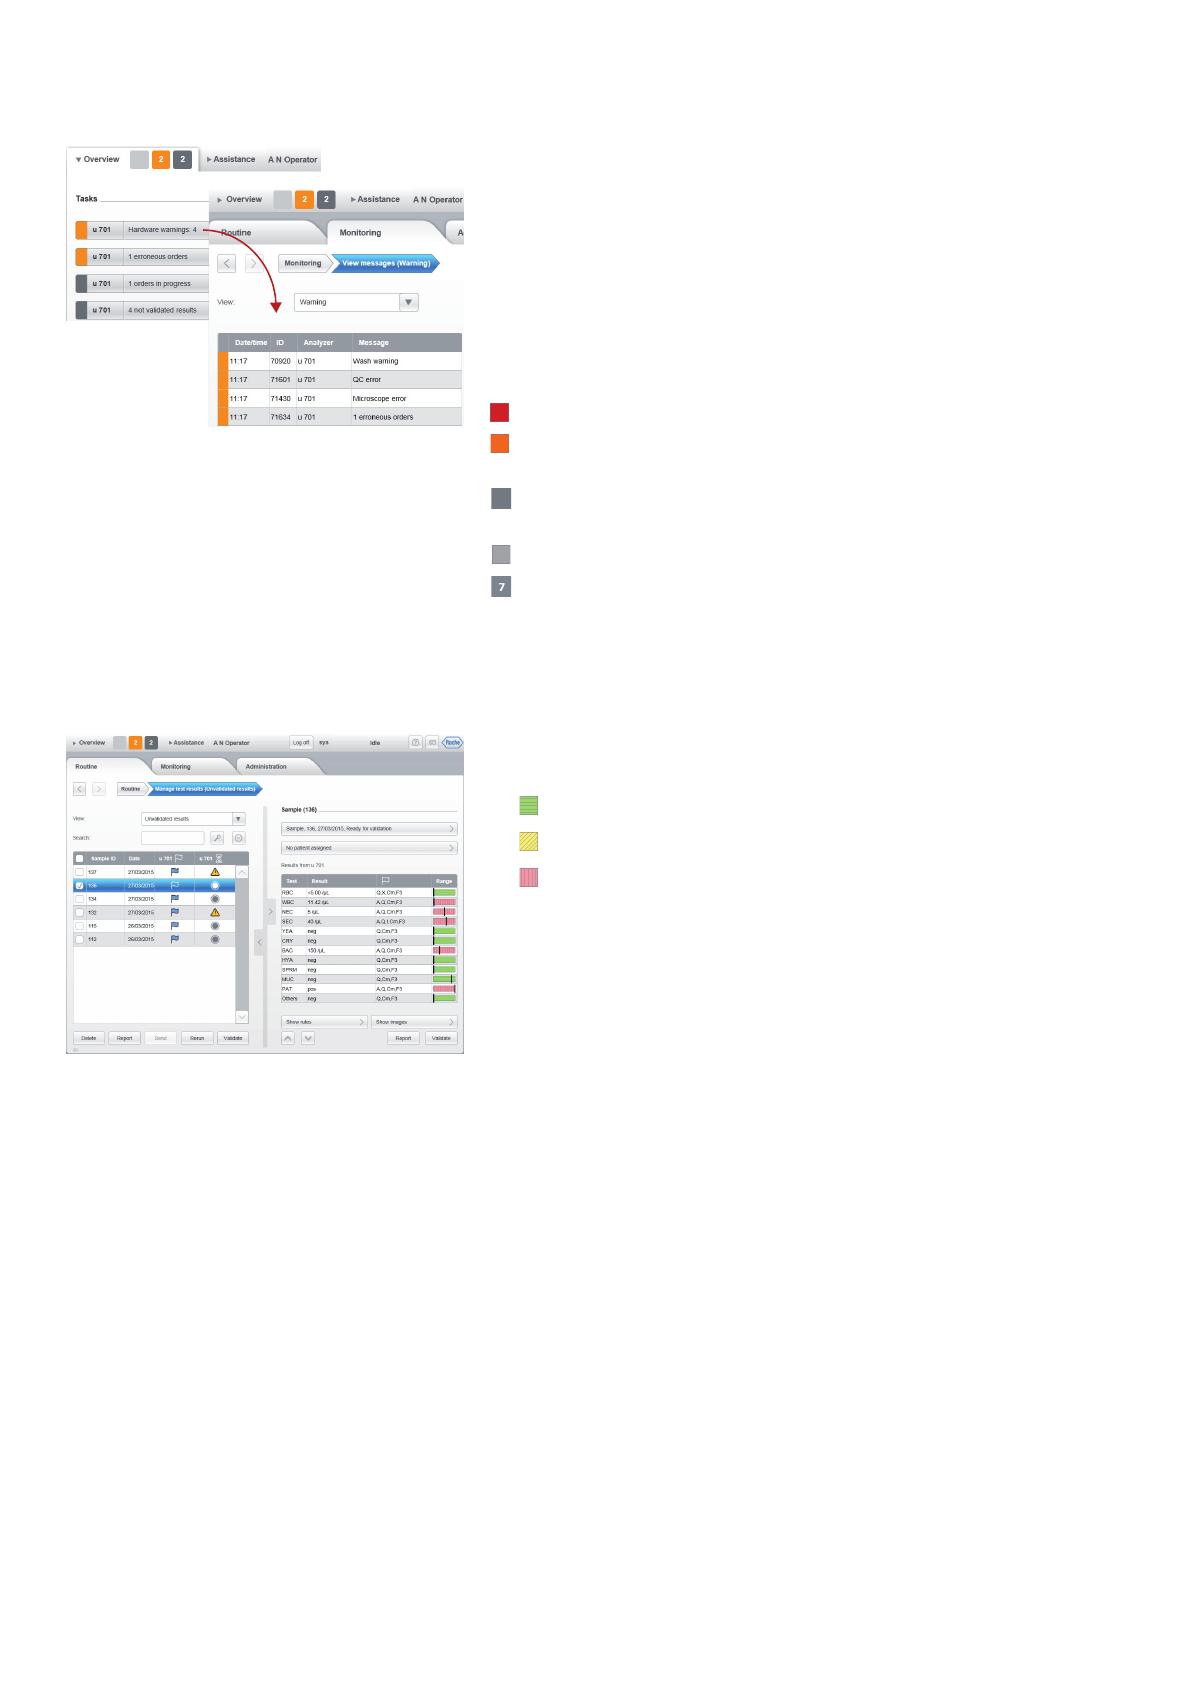
On the Overview work area, check the task indicator and the task list.
Address all red or orange items in the task list.
2
Choose a task button.
If the message list is displayed, choose a message, check the details, and
follow the on-screen instructions.
If another panel is displayed, for example the supplies panel, perform the
appropriate task, usually a wizard is available.
Red Issues that require immediate operator intervention.
Orange Issues that require early operator intervention, operation may
otherwise stop.
Gray Messages that inform about the status of ongoing tasks. If
operator intervention is required, perform it.
Light gray There are no issues of the associated severity.
The number in a button tells you how many tasks of this
severity there are.
1
Choose Routine > Manage test results, if required.
2
Select a result in the list and check for data alarms and the range graphics.
Green: negative
Yellow: positive (low pathological)
Red: positive (pathological)
If you work with patient demographics you can assign a patient to each
result. Choose the No patient assigned button.
3
Choose the Validate or Rerun button as required.
You can set up the analyzer to automatically accept all results or to exclude
results from automatic validation if they have certain data alarms associated
with them. You can also choose to validate all results manually.
(Automatic validation is never applied if the sample barcode could not be read,
there already exists an order for this result, a U or F alarm was generated for this
result, fewer than five images yielded a valid result, or a dilution factor has been
defined by the user.)
Printing and exporting results
Clearing the output buffer
Performing end of shift maintenance and shutting down the analyzer
To print selected or all results, choose Routine > Manage test results.
1
In the result list, select the check box of all results that you want to print or
save to a PDF file.
2
Choose the Report button.
3
Choose whether to print the results or save them to a file.
4
Choose the Yes button.
To print the results of selected patients, choose Routine > Manage patients.
1
In the patient list, select the check box of all patients whose results you want
to print or save to a PDF file.
2
Choose the Report button.
3
Choose whether to print the results or save them to a file.
4
Choose the Yes button.
Remove the rack tray and replace it with an empty one.
If the next shift does not follow immediately after, perform the following tasks:
1
Archive the results according to your laboratory procedures, if required.
2
Empty the liquid and solid waste containers.
(1)
3
Perform the daily wash action and shut down the system.
4
Clean the input and output buffers.
5
Clean the rack conveyors.
6
Clean the probe bend detector.
7
Clean the pipetting stage, pipetting area, and the inside of the centrifuge
chamber.
8
Clean the microscope stage area.
9
Remove spills and soiling from the analyzer housing.
(1) If you work with external water supply, you do not have to empty the liquid waste container,
because the liquid waste is led directly to the laboratory waste system.
c
COBAS, COBAS U and LIFE NEEDS ANSWERS
are trademarks of Roche.
Manufactured in Hungary
for Roche Diagnostics GmbH
©2015 Roche Diagnostics. All rights reserved.
Roche Diagnostics GmbH
Sandhofer Strasse 116
68305 Mannheim
Germany
www.cobas.com
0 6999620018 (02) 2015-07 EN
  • Page 1 1
  • Page 2 2
  • Page 3 3
  • Page 4 4
  • Page 5 5
  • Page 6 6
  • Page 7 7
  • Page 8 8

Roche cobas u 701 Short Guide

Type
Short Guide

Roche cobas u 701 is a microscopy analyzer that helps medical professionals make informed decisions by providing accurate results for various clinical applications.

  • Automated processing: The cobas u 701 automates many laboratory tasks, including sample loading, testing, and result reporting, reducing the risk of human error and increasing efficiency.

  • Wide range of tests: The cobas u 701 can perform a comprehensive range of tests, including routine hematology, infectious disease screening, and urine analysis, making it a versatile tool for various clinical settings.

  • Rapid results: The cobas u 701 provides results quickly, with a typical turnaround time of less than 20 minutes for most tests, enabling healthcare providers to make timely decisions regarding patient care.

Ask a question and I''ll find the answer in the document

Finding information in a document is now easier with AI