Page is loading ...

ULTRAV AC®QDS
LAZERZ®HPMODELS
ForUltraVacSerialNos.
790,000&Higher
PartNo.4500-420Rev.A

Exmarkreservestherighttomakechangesor
addimprovementstoitsproductsatanytime
withoutincurringanyobligationtomakesuch
changestoproductsmanufacturedpreviously.
Exmark,oritsdistributorsanddealers,accept
noresponsibilityforvariationswhichmaybe
evidentintheactualspecicationsofitsproducts
andthestatementsanddescriptionscontained
inthispublication.
©2008—ExmarkMfg.Co.,Inc.
IndustrialParkBox808
Beatrice,NE68310
2
Contactusatwww.Exmark.com.
PrintedintheUSA
AllRightsReserved

Introduction
CONGRATULATIONSonthepurchaseofyour
ExmarkUltraVacQDS.Thisproducthasbeen
carefullydesignedandmanufacturedtogiveyou
amaximumamountofdependabilityandyearsof
trouble-freeoperation.
Thismanualcontainsoperating,maintenance,
adjustment,andsafetyinstructionsforyourExmark
UltraVacQDS.
BEFOREOPERATINGYOURMOWER,
CAREFULLYREADTHISMANUALINITS
ENTIRETY.
Byfollowingtheoperating,maintenance,andsafety
instructions,youwillprolongthelifeofyourUltra
VacQDS,maintainitsmaximumefciency,and
promotesafeoperation.
Ifadditionalinformationisneeded,orshouldyou
requiretrainedmechanicservice,contactyour
authorizedExmarkequipmentdealerordistributor.
AllExmarkequipmentdealersanddistributorsare
keptinformedofthelatestmethodsofservicing
andareequippedtoprovidepromptandefcient
serviceintheeldorattheirservicestations.They
carryamplestockofservicepartsorcansecurethem
promptlyforyoufromthefactory.
AllExmarkpartsarethoroughlytestedandinspected
beforeleavingthefactory,however,attentionis
requiredonyourpartifyouaretoobtainthefullest
measureofsatisfactionandperformance.
Wheneveryouneedservice,genuineExmarkparts,
oradditionalinformation,contactanAuthorized
ServiceDealerorExmarkCustomerServiceandhave
themodelandserialnumbersofyourproductready.
Figure1identiesthelocationofthemodelandserial
numbersontheproduct.Writethenumbersinthe
spaceprovided.
Figure1
1.Modelandserialnumberlocation
ModelNo.
SerialNo.
3

Contents
Introduction...........................................................3
Safety.....................................................................5
SafetyAlertSymbol.........................................5
SafeOperatingPractices..................................5
SafetyandInstructionalDecals.......................8
Specications.......................................................10
ModelNumbers............................................10
Systems.........................................................10
Dimensions...................................................10
TorqueRequirements....................................10
ProductOverview................................................11
Operation.............................................................11
Pre-Start........................................................11
OperatingInstructions..................................11
Transporting.................................................14
Maintenance.........................................................16
RecommendedMaintenanceSchedule(s)...........16
PeriodicMaintenance.......................................16
CheckBlowerHousing/Impeller...................16
CheckDoorClothMesh................................16
LubricateGreaseFittings...............................17
CheckConditionofBelt................................17
Adjustments.....................................................18
Cleaning...........................................................19
CleanMuferandRearFrameArea................19
CleanRearScreenInHood............................19
CleanBlower.................................................19
Troubleshooting...................................................20
4

Safety
Safety
SafetyAlertSymbol
ThisSafetyAlertSymbol(Figure2)isusedbothin
thismanualandonthemachinetoidentifyimportant
safetymessageswhichmustbefollowedtoavoid
accidents
Thissymbolmeans:ATTENTION!BECOME
ALERT!YOURSAFETYISINVOLVED!
Figure2
1.Safetyalertsymbol
Thesafetyalertsymbolappearsaboveinformation
whichalertsyoutounsafeactionsorsituations
andwillbefollowedbythewordDANGER,
WARNING,orCAUTION.
DANGER:Whitelettering/Redbackground.
Indicatesanimminentlyhazardoussituationwhich,if
notavoided,Willresultindeathorseriousinjury.
WARNING:Blacklettering/Orangebackground.
Indicatesapotentiallyhazardoussituationwhich,if
notavoided,Couldresultindeathorseriousinjury.
CAUTION:Blacklettering/Yellowbackground.
Indicatesapotentiallyhazardoussituationwhich,if
notavoided,Mayresultinminorormoderateinjury.
Thismanualusestwootherwordstohighlight
information.Importantcallsattentiontospecial
mechanicalinformationandNoteemphasizes
generalinformationworthyofspecialattention.
SafeOperatingPractices
Training
•ReadthetractorandUltraVacQDSOperator’s
Manualsandothertrainingmaterial.Ifthe
operator(s)ormechanic(s)cannotreadEnglish
itistheowner’sresponsibilitytoexplainthis
materialtothem.
•Becomefamiliarwiththesafeoperationofthe
equipment,operatorcontrols,andsafetysigns.
•Alloperatorsandmechanicsshouldbetrained.
Theownerisresponsiblefortrainingtheusers.
•Neverletchildrenoruntrainedpeopleoperate
orservicetheequipment.Localregulationsmay
restricttheageoftheoperator.
•Theowner/usercanpreventandisresponsible
foraccidentsorinjuriesoccurringtohimselfor
herself,otherpeopleorproperty.
Preparation
•Evaluatetheterraintodeterminewhataccessories
andattachmentsareneededtoproperlyandsafely
performthejob.Onlyuseonmachinesapproved
byExmark.
•Wearappropriateclothingincludingsafetyglasses,
substantialfootwear,longtrousers,andhearing
protection.DoNotoperatewhenbarefootor
whenwearingopensandals.
CAUTION
Thismachineproducessoundlevelsin
excessof85dBAattheoperator’searand
cancausehearinglossthroughextended
periodsofexposure.
Wearhearingprotectionwhenoperatingthis
machine.
•Inspecttheareawheretheequipmentistobe
usedandremoveallrocks,toys,sticks,wires,
bones,andotherforeignobjectswhichcanbe
thrownbythemachineandmaycausepersonal
injurytotheoperatororbystanders.
Operation
•Operateonlyindaylightorgoodarticiallight,
keepingawayfromholesandhiddenhazards.
•Nevermowwiththedischargedeectorraised,
removedoralteredunlessthereisagrass
collectionsystemormulchkitinplaceand
workingproperly.
5

Safety
DANGER
Therearerotatingbladesintheblowerand
underthemowerdeck.Bladecontactcan
causeseriousoperatororbystanderinjury
orevendeath.
•DoNotreachintoblowerunlessrotation
indicatorhasstopped.DisengagePTO,
stopengine,removekey,waitforall
movingpartstostop.Engageparking
brake.
•Neveroperatemowerunlessdischarge
deector,entiregrasscollectionsystem,
ormulchkitisinstalled.
•Stopengine,waitforallmovingpartstostop,
removekeyandengageparkingbrake:
–Beforechecking,cleaningorworkingonthe
mower.
–Afterstrikingaforeignobjectorabnormal
vibrationoccurs(inspectthemowerfor
damageandmakerepairsbeforerestarting
andoperatingthemower).
–Beforeclearingblockages.
–Wheneveryouleavethemower.
WARNING
Hands,feet,hair,clothing,oraccessoriescan
becomeentangledinrotatingparts.Contact
withtherotatingpartscancausetraumatic
amputationorseverelacerations.
•DoNotoperatethemachinewithout
guards,shields,andsafetydevicesin
placeandworkingproperly.
•Keephands,feet,hair,jewelry,orclothing
awayfromrotatingparts.
•Stoptheblades,slowdown,andusecautionwhen
crossingsurfacesotherthangrassandwhen
transportingthemowertoandfromtheareato
bemowed.
•Beawareofthemowerdischargepathanddirect
dischargeawayfromothers.
SlopeOperation
UseExtremecautionwhenmowingand/orturning
onslopesaslossoftractionand/ortip-overcould
occur.Theoperatorisresponsibleforsafeoperation
onslopes.
DANGER
Operatingonwetgrassorsteepslopescan
causeslidingandlossofcontrol.Wheels
droppingoveredges,ditches,steepbanks,or
watercancauserollovers,whichmayresult
inseriousinjury,deathordrowning.
•DoNotmowslopeswhengrassiswet.
•DoNotmowneardrop-offsornearwater.
•DoNotmowslopesgreaterthan15
degrees.
•Reducespeedanduseextremecaution
onslopes.
•Avoidsuddenturnsorrapidspeed
changes.
•Keeptherollbarintheraisedandlocked
positionanduseseatbelt.
•Seeinsidethebackcovertodeterminethe
approximateslopeangleoftheareatobemowed.
•Useawalkbehindmowerand/orahandtrimmer
neardrop-offs,ditches,steepbanksorwater.
(Figure3).
6

Safety
Figure3
1.SafeZone-Usethemowerhereonslopeslessthan15
degrees
2.DangerZone-Useawalkbehindmowerand/orhand
trimmeronslopesgreaterthan15degrees,near
drop-offsandwater.
3.Water
•Removeormarkobstaclessuchasrocks,tree
limbs,etc.fromthemowingarea.Tallgrasscan
hideobstacles.
•Watchforditches,holes,rocks,dipsandrisesthat
changetheoperatingangle,asroughterraincould
overturnthemachine.
•Avoidsuddenstartswhenmowinguphillbecause
themowermaytipbackwards.
•Beawarethatoperatingonwetgrass,acrosssteep
slopesordownhillmaycausethemowertolose
traction.Lossoftractiontothedrivewheelsmay
resultinslidingandalossofbrakingandsteering.
•Alwaysavoidsuddenstartingorstoppingona
slope.Iftireslosetraction,disengagetheblades
andproceedslowlyofftheslope.
•Followthemanufacturer’srecommendationsfor
counterweightstoimprovestability.Always
installandremovetheUltraVacQDS,including
counterweights,asinstructed.Failuretodoso
willcauseareductioninstabilityortraction.Do
Notoperatethemowerwithonlyaportionofthe
UltraVacQDSinstalled.
•Useextremecarewithgrasscatchersor
attachments.Thesecanchangethestabilityofthe
machineandcauselossofcontrol.Thestability
andtractionofthemachinewillchangeasthe
UltraVacQDShopperllswithgrassclippings.
Useprogressivelygreatercareonslopesasthe
hopperlls.
MaintenanceandStorage
•Disengagedrives,setparkingbrake,stopengine
andremovekeyordisconnectsparkplugwire.
Waitforallmovementtostopbeforeadjusting,
cleaningorrepairing.
•Usecarewhencheckingblades.Wraptheblade(s)
orweargloves,andusecautionwhenservicing
them.Onlyreplacedamagedblades.Never
straightenorweldthem.
•Keepallguards,shieldsandallsafetydevicesin
placeandinsafeworkingcondition.
•Checkallboltsfrequentlytomaintainproper
tightness.
•Frequentlycheckforwornordeteriorating
componentsthatcouldcreateahazard.
•Allreplacementpartsmustbethesameas
orequivalenttothepartssuppliedasoriginal
equipment.
7

Safety
SafetyandInstructionalDecals
•Keepallsafetysignslegible.Removeallgrease,
dirtanddebrisfromsafetysignsandinstructional
labels.
•Replaceallworn,damaged,ormissingsafety
signs.
•Whenreplacementcomponentsareinstalled,be
surethatcurrentsafetysignsareafxedtothe
replacedcomponents.
•Ifanattachmentoraccessoryhasbeeninstalled,
makesurecurrentsafetysignsarevisible.
•Newsafetysignsmaybeobtainedfrom
yourauthorizedExmarkequipmentdealeror
distributororfromExmarkMfg.Co.Inc.
•Safetysignsmaybeafxedbypeelingoffthe
backingtoexposetheadhesivesurface.Apply
onlytoaclean,drysurface.Smoothtoremove
anyairbubbles.
•Familiarizeyourselfwiththefollowingsafetysigns
andinstructionlabels.Theyarecriticaltothesafe
operationofyourExmarkcommercialmower.
1-653554
1-653558
98-5954
103-6604
ForUnitswithaTwo-PostROPSOnly
103-6605
ForUnitswithaTwo-PostROPSOnly
8

Safety
103-3508
9

Specications
Specications
ModelNumbers
SerialNos:790,000andHigher
LHPUVD4448;LHPUVD4650;LHPUVD5256
Systems
BaggingSystem
•CollectionHopper:
–Commercialgrade,steelandpolyethylene
hopperwithreardischargedoor,commercial
gradeclothmeshdoorpanel.
–Capacity:6.7bushels
•DumpMechanism:Singlemotionactuationfrom
operator’sseat.
•BlowerTube:Fixed,abrasionresistantmolded
polyethylene.
•Impeller:5–bladed,1/4inch(6.4mm)thick
abrasionresistantsteel,withverticalaxis.
•Impellerbearings:1inch(2.5cm)sealed
non-greaseablebearings.
Dimensions
OverallWidth:
w/UltraVacQDS
44inchDeck58.47inches(148.5cm)
46inchDeck60.67inches(154.1cm)
48inchDeck61.73inches(159.8cm)
50inchDeck64.66inches(164.2cm)
52inchDeck66.47inches(168.8cm)
56inchDeck70.85inches(180.0cm)
OverallLength:
w/UltraVacQDS
44inchDeck93.76inches(283.2cm)
46inchDeck96.69inches(245.6cm)
48inchDeck93.76inches(283.2cm)
50inchDeck97.12inches(246.7cm)
w/UltraVacQDS
52inchDeck95.00inches(241.3cm)
56inchDeck99.86inches(253.6cm)
CurbWeight:
LazerZHP-220lb(100kg),includingthefront
weight.
TorqueRequirements
BoltLocation
Torque
ImpellerSpindleBottom
Nut
55-60ft-lb(75-81N-m)
ImpellerSpindleTopNut75-80ft-lb(102-108N-m)
10

Operation
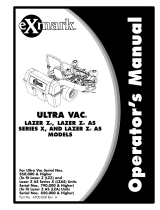
ProductOverview
Figure4
1.Hood4.Tube
2.Weight5.Door
3.Blower
Operation
Note:Determinetheleftandrightsidesofthe
machinefromthenormaloperatingposition.
Pre-Start
Makesureyouunderstandthecontrols,their
locations,theirfunctions,andtheirsafety
requirements.
Ensuretheblower,doormesh,tubeandhopperare
ingoodcondition,properlyattached,andlatched.
ForunitsaboveSerialNumber600,000withTriton
decks:Makesurethattheadjustabledoglegbafeis
closedtomatchtheintakeintotheUltraVacBlower.
WARNING
Ifthedeckdischargeopeningandtheblower
intakeopeningdonotmatchcorrectly,it
willallowobjectstobethrowninoperator’s
orbystander’sdirection.Also,contactwith
bladecouldoccur.Thrownobjectsorblade
contactcancauseseriousinjuryorkillyou
orbystanders.
Adjustdoglegbafetomatchintake
opening.
RefertotheMaintenancesectionandperformallthe
necessaryinspectionandmaintenancesteps.
OperatingInstructions
Mowing
1.TheUltraVacQDSbloweroperateswhendeck
driveisengaged.Besurethatallpersonsareclear
ofthemowerdeckbeforeengagingthecutting
blades.Setthethrottleto“midway”position.Pull
outwardonthePTOswitchtothe“ROTATE”
position.Acceleratetofullthrottletobegin
mowing.
2.TodisengagethePTOandblower,setthe
throttleto“midway”position.Pushinonthe
PTOswitchtothe“STOP”positiontostopthe
cuttingbladesandblower.Thecuttingbladeswill
requireaslightlylongeramountoftimetocome
toacompletestopwhentheblowerisinstalled
onthedeck.Verifythatallrotationindicators
11

Operation
havestoppedbeforeclearingblowerassemblyor
mowerdeck
3.Toemptythehopper,rstshutoffdeckdrive.
Liftuponthehandletoopenthedoorand
emptythehopper.Iftheunitistobedriven
ontoatruckortrailerwiththehopperfull,
alwaysbacktheunituptheramp.Thiswill
reducethechanceofrearwardtipup.Seethe
Transportingsectionforadditionalinformation
regardingloadingaunitonatruckortrailer.
4.Closeandlatchthedoorbeforecontinuing
mowing.DoNotengagethecuttingbladeswhile
thedoorisintheopenposition.
Tipsformowingconditions:
•Whenmowinginareaswithsandysoil,use
lowliftbladesonthecuttingdeckandhigher
cuttingheightstominimizewearontheblower
components.
•Whenmowinginwetconditions,suchasjustafter
arainorinheavydew,uselowliftbladesonthe
cuttingdecktominimizepluggingoftheblower.
•Maintainingagroundspeedthatdoesnotpull
downtheengineRPMwillallowforthehighest
productivityandbestqualityofcut.Boggingthe
engineRPMdownbygoingtoofastwillcause
pluggingandqualityofcutissues.
•Whenthehoppergetsfull,thesoundofthe
blowerwillchangeandtherewillbeslight
blowoutfromthefrontrightcornerofthedeck.
Emptyingthehopperatthispointwillminimize
thepotentialforthetubetoplug.
•ForunitsbelowSerialNumber600,000:
Anti-blowoutkitsareavailableforleafcollection.
Theyhelptoprevent“chasing”theleaves.To
reduce“plowing”leaves,raisethedeckslightly.
•OnTriton:Raisefrontadjustablebafeto
reduceplowing.Loweringfrontadjustablebafe
mayprevent“chasing”.Matchdischargeopening
toUltraVacintakeforbestperformance.
BaggerRemovalforSideDischarge
1.Shutoffthedeckdrive,stopengineandwaitfor
allmovingpartstostop.Removekey.
2.Removethedischargetubebyreleasingthelatch
attheblower.Slidethetubeoffthebloweroutlet
andremovetheupperendfromthehopper.
Figure5
1.HopperAssembly4.Hairpin
2.Tube
5.ClevisPin
3.Blower
3.Removethebeltcoverbylooseningtheknobs.
CAUTION
Thedecksheavewillbecomeveryhot.
Touchingahotdecksheavecancausesevere
burns.
Allowthedecksheavetocoolcompletely
beforeremovingthebelt.
Figure6
1.Hairpin4.Beltshield
2.Chutepivotpin
5.Weight
3.Dischargechute6.Knob
4.Pulltheidlerreleasehandleandremovethebelt
fromtheuppergrooveofthedecksheave.
5.Unlatchthefrontendoftheblower.Pivotthe
blowerbackandliftitoffthedeck.
12

Operation
6.Installthedischargechuteusingthechutepivot
pinandhairpin(seeFigure7).
Figure7
Viewedfromtherightside
1.Hairpin3.Dischargechute
2.Chutepivotpin
Note:Installchutewiththetabstotherearof
thedecktabsasshown.
WARNING
Anuncovereddischargeopeningwill
allowobjectstobethrowninoperator’sor
bystander’sdirection.Also,contactwith
bladecouldoccur.Thrownobjectsorblade
contactcancauseseriousinjuryorkillyou
orbystanders.
Neveroperatemowerunlessdischarge
deector,orentiregrasscollectionsystem,or
mulchkitisinstalled.
7.Re-installtheplasticbeltcoverandtightenthe
knobs.
8.Removethehairpinsandclevispinsholdingthe
hopperassemblytothemountweldment.
9.Liftthehopperassemblyoffthemount.
10.Removethehairpinsandliftthefrontweightsoff
ofthemountplate.
Note:Theremovableweightsareheavy.Use
carewhenliftingthem.Makesurethatyoucan
holdthemsecurelybeforeliftingthem.Use
cautionwhenpositioningyourhandssothatyou
DoNotsetthemdownonyourhandsorngers.
Note:TheportionsoftheUltraVacbaggerthat
arenotboltedtothemoweraredesignedtobe
installedorremovedintheirentirety.DoNot
operatethemowerwithonlyaportionofthe
UltraVacinstalled.
WARNING
Casterorfrontoorpanweightsinstalled
withoutbaggermaycauselossoftraction
andsteeringcontrol.Lossofcontrolcan
resultinanaccident,whichmaycausedeath,
injury,orpropertydamage.
Installcasterorfrontoorpanweights
ONLYwhenbaggerisinstalled.
11.Themachinecannowbeusedforsidedischarge
mowing.
BaggerInstallationforBagging
1.Stopengine,removekey,andwaitforallmoving
partstostop.
2.Removehairpinandchutepivotpin.Remove
dischargechute.Pivotpinandhairpinmaybe
storedinthepivotholesofthedischargechute
duringbaggingoperation.
3.Slidetubeendsofhopperassemblyintothetubes
ofthemountweldment(seeFigure5).Installtwo
clevispinsthroughholesintubes.Retainwith
twohairpins.
4.Removethebeltcoverontherightsideofthe
deck(seeFigure6).Installtheblowerbyinserting
themountingpinintothetubeweldedtotherear
cornerofthedeck.Pivotthebloweruntilthe
frontpinengagestheslotinthedeck.Adjustthe
positionofthefrontpinifnecessarytoengage
theslot.Usethelatchtolocktheblowerinthis
position.
5.Pulltheidlerreleasehandleandinstallthebeltin
theuppergrooveofthedecksheave.
6.Installthebeltcoverusingthetwoknobs.
7.Installthedischargetubeassemblybyslippingthe
upperendintothehood,thenslidingthelower
endovertheblowerdischargeopening.Usethe
latchestoretainthelowerendtotheblower.
8.ForUnitsSerialNumber600,000andHigher
withTritonDecks:Adjustpositionofdogleg
bafetomatchtheintakeoftheUltraVacblower
bafeadjustedtoowidemayallowobjectstobe
thrownfromunderdeck.Bafeadjustedtoo
narrowmaycausepluggingissues.
13

Operation
Transporting
TransportingaUnit
Useaheavy-dutytrailerortrucktotransportthe
machine.Lockbrakeandblockwheels.Securely
fastenthemachinetothetrailerortruckwithstraps,
chains,cable,orropes.Besurethatthetrailerortruck
hasallnecessarylightingandmarkingasrequiredby
law .Secureatrailerwithasafetychain.
CAUTION
Thisunitdoesnothaveproperturn
signals,lights,reectivemarkings,ora
slowmovingvehicleemblem.Drivingona
streetorroadwaywithoutsuchequipment
isdangerousandcanleadtoaccidents
causingpersonalinjury.Drivingonastreet
orroadwaywithoutsuchequipmentmayalso
beaviolationofStatelawsandtheoperator
maybesubjecttotrafcticketsand/ornes.
DoNotdriveaunitonapublicstreetor
roadway.
WARNING
Loadingaunitonatrailerortruckincreases
thepossibilityofbackwardtip-over.
Backwardtip-overcouldcauseseriousinjury
ordeath.
•Useextremecautionwhenoperatinga
unitonaramp.
•Useonlyasingle,fullwidthramp;Do
Notuseindividualrampsforeachside
oftheunit.
•Ifindividualrampsmustbeused,use
enoughrampstocreateanunbroken
rampsurfacewiderthantheunit.
•DoNotexceeda15°anglebetweenramp
andgroundorbetweenrampandtrailer
ortruck.
•Avoidsuddenaccelerationwhiledriving
unituparamptoavoidtippingbackward.
•Avoidsuddendecelerationwhilebacking
unitdownaramptoavoidtipping
backward.
LoadingaUnit
Iftheunitistobedrivenontoatruckortrailer
withthehopperfull,alwaysbacktheunitupthe
ramp.Thiswillreducethechanceofrearward
tipup.
DumpcontentsofhopperbeforetransportDoNot
transporttheunitwiththehopperfull.
Useextremecautionwhenloadingunitsontrailersor
trucks.Onefullwidthrampthatiswideenoughto
extendbeyondthereartiresisrecommendedinstead
ofindividualrampsforeachsideoftheunit.The
lowerrearsectionofthetractorframeextendsback
betweentherearwheelsandservesasastopfor
tippingbackward.Havingafullwidthrampprovides
asurfacefortheframememberstocontactifthe
unitstartstotipbackward.Ifitisnotpossibletouse
onefullwidthramp,useenoughindividualrampsto
simulateafullwidthcontinuousramp.
Rampshouldbelongenoughsothattheangles
betweentherampandthegroundandtherampand
thetrailerortruckDoNotexceed15°.Asteeper
anglemaycausemowerdeckcomponentstoget
14

Operation
caughtastheunitmovesfromramptotraileror
truck.Steeperanglesmayalsocausetheunittotip
backward.Ifloadingonornearaslope,position
thetrailerortrucksoitisonthedownsideofthe
slopeandtherampextendsuptheslope.Thiswill
minimizetherampangle.Thetrailerortruckshould
beaslevelaspossible.
Important:DoNotattempttoturntheunit
whileontheramp,youmaylosecontroland
driveofftheside.
Avoidsuddenaccelerationwhendrivinguparamp
andsuddendecelerationwhenbackingdownaramp.
Bothmaneuverscancausetheunittotipbackward.
15

Maintenance
Maintenance
Note:Determinetheleftandrightsidesofthemachinefromthenormaloperatingposition.
WARNING
Whilemaintenanceoradjustmentsarebeing
made,someonecouldstarttheengine.
Accidentalstartingoftheenginecould
seriouslyinjureyouorotherbystanders.
Removethekeyfromtheignitionswitch,
engageparkingbrake,andpullthewire(s)
offthesparkplug(s)beforeyoudoany
maintenance.Alsopushthewire(s)aside
soitdoesnotaccidentallycontactthespark
plug(s).
WARNING
Theenginecanbecomeveryhot.Touching
ahotenginecancausesevereburns.
Allowtheenginetocoolcompletelybefore
serviceormakingrepairsaroundtheengine
area.
RecommendedMaintenanceSchedule(s)
MaintenanceService
Interval
MaintenanceProcedure
Beforeeachuseordaily
•Checktheblowerhousing/impeller.
•Checkdoorclothmesh.
•Cleanmuferandrearframearea.
•Cleanrearscreeninthehood.
Every25hours
•Lubricategreasettings.
Every50hours
•Checkconditionofbelt.
Yearlyorbeforestorage
•Cleanblower.
PeriodicMaintenance
CheckBlower
Housing/Impeller
ServiceInterval:Beforeeachuseordaily
1.Stopengine,waitforallmovingpartstostop,and
removekey.Engageparkingbrake.
2.Inspectforwearordamagedaily.Replaceor
repairwornpartsasneeded
Note:Whenmowinginareaswithsandysoil,
uselowliftbladesonthecuttingdeckandhigher
cuttingheightstominimizewearontheblower
components.
CheckDoorClothMesh
ServiceInterval:Beforeeachuseordaily
1.Stopengine,waitforallmovingpartstostop,and
removekey.Engageparkingbrake.
2.Inspectthebagsforwear,tears,ordamage.
WARNING
Undernormalusetheclothmeshwill
deteriorateandwear.Objectscouldexit
throughwornclothmeshathighspeeds.
Thrownobjectscancauseseriousinjuryor
killyouorbystanders.
Checkclothmeshfrequentlyfortearsand
holes.Replacewornclothmesh.
16

Maintenance
LubricateGreaseFittings
Note:Seechartforserviceintervals.
1.Stopengine,waitforallmovingpartstostop,and
removekey.Engageparkingbrake.
2.LubricatettingswithNGLIgrade#2
multi-purposegungrease.
Refertothefollowingchartforttinglocations
andlubricationschedule.
LubricationChart
Fitting
Locations
Initial
Pumps
Numberof
Places
Service
Interval
1.Idler
Bushings
1–21
25Hours
CheckConditionofBelt
ServiceInterval:Every50hours
1.Stopengine,waitforallmovingpartstostop,and
removekey.Engageparkingbrake.
2.Inspectthebeltpositionontheidlerarm.
Theidlerarmmaybecomebentduringuseor
transport.Abentidlerarmcouldcausethebelt
tojumpoffoftheidlerandbedamaged.
A.Makesurethebeltcoverisinstalledandrun
theblowerforonetotwominutes.
B.Shutoffthedeckdrive,stopengineandwait
forallmovingpartstostop.Removekey.
Removethebeltcoverandchecktomakesure
thatthebeltisridingnearthecenterofthe
atidlerontheidlerarm.
C.Ifthebeltisnotridingnearthecenterofthe
idler,removetheblower,andbendtheidler
armslightly.
D.Reinstalltheblowerandbeltcoverandrepeat
stepsAthroughCuntilthebeltispositioned
nearthecenteroftheidler.
3.Inspectthebeltfordamageorwear.Replacebelt
withoneofthefollowing:
Deck
PartNo.
44inchDeck
1-653332
46inchDeck
1-653438
48inchDeck
1-653333
50inchDeck
103-0866
52inchDeck
1-653438
56inchDeck
109-9249
A.Toreplacebelt,removethebeltguideonthe
blower(Figure8)
Figure8
1.Springloadedidler
4.Beltguide
2.Impellersheave5.Decksheave
3.Fixedidler
B.Installthebeltontotheblowerassemblyas
shown.
C.Reinstallthebeltguideremovedpreviously.
17

Maintenance
Adjustments
Note:TheUltraVacQDSwasadjustedatthe
factorytooperateproperly.However,therearethree
basicadjustmentsthatcanbemade,shouldyourunit
requirethem:
Figure9
1.Bellcrankarm
2.Upperframetube
3.Maintainsamedistanceonbothsides
1.ArmPosition:Theleftandrightbellcrankarms
controlthetimingoftheleftandrightdoor
openingmechanisms.Theendsofthesearms
mustbepositionedequallyfromtheupperframe
tubeforproperactuation.Checkthisdistance
withthedoorclosed.Ifadjustmentisnecessary,
loosentheallenheadclampingscrewonthehub
oftherighthandarm.Positionthearmssothat
theirendsarethesamedistancefromtheupper
frametube.Tightentheclampingbolttohold
theminthisposition(seeFigure9).
2.Doorclosing:Theclosingofthedooris
controlledbythetwohingelinks(Figure10A).
Thelengthofthehingelinkscanbechanged
toprovidecompleteclosingofthedoorand
reasonableforceonthehandletolatchorunlatch
thedoor.Lengthenthelinkstoreducetheforce.
Shortenthelinkstoincreasetheforce.Theleft
andrightsidesmustbeapproximatelyequal.With
thedoorclosed,bothlinksshouldbeslightlytight
tominimizerattling.
3.Dooropening:Afteradjustingthehingelinks
fordoorclosing,thehingestops(Figure10B)can
beadjustedtoobtainmaximumdooropening.
Thestopplatesshouldbeadjustedsothatthe
doorlinkcontactsthemwhentheuppertubeof
thedoorframeiswithin1/4inch(6.4mm)±1/8
inch(3.2mm)fromthelowerlipofthemolded
hood.Bothleftandrightstopsmustmake
contactwhenthedoorlinkarmisatthisposition.
Figure10
1.1/4inch(6.4mm)±1/8inch(3.2mm)
18

Maintenance
Cleaning
CleanMuferandRear
FrameArea
ServiceInterval:Beforeeachuseordaily
Stopengine,waitforallmovingpartstostop,and
removekey.Engageparkingbrake.
WARNING
Operatingengineparts,especiallythe
mufer,becomeextremelyhot.Severeburns
canoccuroncontactanddebris,suchas
leaves,grass,brush,etc.cancatchre.
•Allowengineparts,especiallythemufer,
tocoolbeforetouching.
•Removeaccumulateddebrisfrommufer
andenginearea.
•Installandmaintaininworkingordera
sparkarresterbeforeusingequipment
onforest-covered,grass-covered,
brush-coveredunimprovedland.
CleanRearScreenInHood
ServiceInterval:Beforeeachuseordaily
1.Stopengine,waitforallmovingpartstostop,and
removekey.Engageparkingbrake.
2.Opendoorandremoveclippingsthatarestuck
tothescreen.
CleanBlower
ServiceInterval:Yearlyorbeforestorage
Grassbuildupmaycauseproblemswiththeimpeller
whentheunitisputbackintooperation.
1.Stopengine,waitforallmovingpartstostop,and
removekey.Engageparkingbrake.
2.Removegrassbuildupfromaroundtheimpeller
beforeplacingitinstorage.
19

Troubleshooting
Troubleshooting
Important:Itisessentialthatalloperatorsafetymechanismsbeconnectedandinproperoperating
conditionpriortomoweruse.
Whenaproblemoccurs,DoNotoverlookthesimplecauses.Forexample:startingproblemscouldbe
causedbyanemptyfueltank.
Thefollowingtablelistssomeofthecommoncausesoftrouble.DoNotattempttoserviceorreplacemajor
itemsoranyitemsthatcallforspecialtimingoradjustmentprocedures(suchasvalves,governor,etc.).Have
thisworkdonebyyourEngineServiceDealer.
Note:WhendisconnectingelectricalconnectorsDoNotpullonthewirestoseparatetheconnectors.
ProblemPossibleCauseCorrectiveAction
1.Cuttingblade(s)is/arebentorunbalanced.
1.Installnewcuttingblade(s).
2.Blademountingboltisloose.2.Tightentheblademountingbolt.
3.Looseblowerpulleyorpulleyassembly.
3.Tightentheappropriatepulley.
Abnormalvibration.
4.Blowerimpellerbladesarebent.4.ContactanAuthorizedServiceDealer.
Blowerdrivebeltsnapsorbreaksfrequently.
1.Idlerarmisoutofalignment.1.Correctthealignmentoftheidlerarm.
1.Hopperisfull.1.Dumpmorefrequently.
2.Pluggedscreeninbaggerhood.2.Removedebris,leavesorgrassclippings
fromthescreen.
3.Groundspeedistoofast.
3.Drivesloweratfullthrottle.
4.Blowerbeltisworn,loose,orbroken.4.Installnewblowerbelt.
5.Pluggedtubeorblower.5.Locateandremovepluggeddebris.
Excessivegrassblowoutfromthedeck.
6.Conditionsaredry.6.Uselowerliftblade.
1.Hopperistoofull.1.Dumpmorefrequently
2.Groundspeedistoofast.
2.Drivesloweratfullthrottle.
3.Grassistoowet.
3.Cutgrasswhenitisdry.
4.Grassistoolong.4.Cutgrassmorefrequentlyorathighercut
height.
5.Pluggedscreeninbaggerhood.5.Removedebris,leaves,orgrassclippings
fromthescreen.
6.Blowerdrivebeltisworn,loose,or
broken.
6.Installnewbelt.
Blowerandtubesplugtoofrequently.
7.Blowerisplugged.7.Uselowliftbladesinwetconditions.
1.Pluggedblower.1.Removedebris,leaves,orgrassclippings
fromtheblowerimpeller.
Blowerimpellerdoesnotspinfreely.
2.Impellernotaligned.2.ContactanAuthorizedServiceDealer.
Plowingleaves.
1.Deckistoolow.
1.
UnitsbelowSerialNumber
600,000:Raisethedeckslightly.
Triton:Raisethefrontadjustablebafe.
Chasingleaves.
1.Blowoutfromdeck.
1.
UnitsbelowSerialNumber600,000:
Installananti-blowoutkit–contact
anAuthorizedServiceDealer.
Triton:Lowerthefrontadjustable
bafe.MatchdischargeopeningtoUltra
Vacintake.
Blowercomponentsshowsignsofwear
and/oraircleanersandcoolingnsaredirty.
1.Sandordryconditions.1.Uselowliftbladesonthecutting
deckandhighercuttingheights.
Cleanaircleanersandcoolingns
frequently.
20
/