Page is loading ...

This page has been intentionally left blank
Page is loading ...

This page has been intentionally left blank

Quickstart Manual (English)
Table of Contents
Basic information ……..........................................................................
Tutorial of the MPC2500........................................................................
Playing back a demo song...................................................................
Playing a preset program ....................................................................
Recording a performance with the pads ............................................
Playing back several sequences in a series ......................................
Selecting the sequences in real time ......................................................................
Playing back the sequences in the selected order .................................................
Recording a sound................................................................................
Preparing the recording ..........................................................................................
Starting the recording .............................................................................................
Assigning the recorded sound to the pad ...............................................................
Loop playback of a phrase sample .....................................................
Adjusting the start/end points of the sample ..........................................................
Recording to a sequence ........................................................................................
Setting the same number of bars for sample and sequence ..................................
Setting the same tempo for sample and sequence ................................................
Saving the data .....................................................................................
Turning off the Autoload function ......................................................
Other useful functions .........................................................................
1
2
2
2
3
4
4
4
5
5
5
6
7
7
8
8
8
9
9
10

This page has been intentionally left blank

1
MPC2500 Quickstart Manual
Welcome to MUSIC PRODUCTION CENTER MPC2500. This Quickstart Manual describes basic operations to get started
with the MPC2500. For detailed information, see the Operator's Manual.
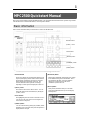
Basic information
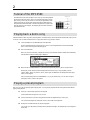
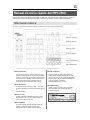
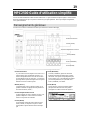
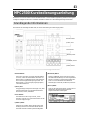
Below is basic information that you need to know in order to use the MPC2500.
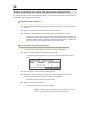
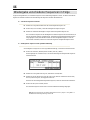
Function buttons
[ DATA ] wheel
Cursor buttons
[ MODE ] button
[ WINDOW ] button
[ MAIN ] button
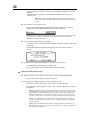
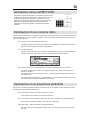
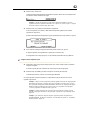
• Function buttons
These are six buttons (F1 to F6) aligned under the LCD
(liquid crystal display) that are used as function buttons.
These buttons correspond to each of the six functions
that are displayed on the bottom of the LCD. The
functions that each button represents will change,
depending on which options are displayed on the LCD.
• [ DATA ] wheel
The location of the cursor is called a “field.” You can
change the settings of the selected field, by turning the
[ DATA ] wheel.
• Cursor buttons
The highlighted part on the screen is called the “cursor.”
You can move the cursor on the screen using the four
cursor buttons on the panel.
• [ MODE ] button
You can switch modes by pressing the [ MODE ] button
and hitting a pad. The mode that a pad corresponds to is
displayed above each pad.
• [ WINDOW ] button
Pressing the [ WINDOW ] button brings up a window
for the detailed setting of the selected field. This is
not available for all fields. If there are detailed
settings for a specific field, the LED of the
[ WINDOW ] button will be lit.
• [ MAIN ] button
When pressed, this button takes you to the main
screen of the MPC2500 where you record and play
back sequences.

2
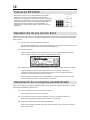
Tutorial of the MPC2500
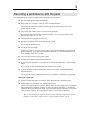
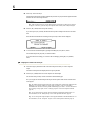
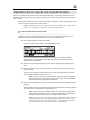
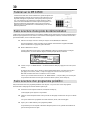
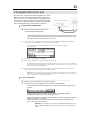
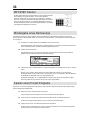
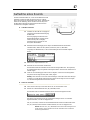
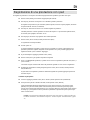
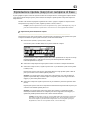
The MPC2500 consists of the sampler section, where you record and playback
the sound, the sequencer section, where you record the performance, and the
pads, which you use to play the sounds. You record your performance to the
sequencer and play the sounds of the sampler using the recorded sequences.
The performance data (MIDI data) is sent from the pads to the sequencer and
from the sequencer to the sampler. The sampler plays the actual sound from
the performance data.
STEREO OUT
PADS SAMPLER
SEQUENCER
PHONES
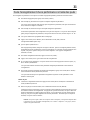
Playing back a demo song
The MPC2500 has a demo song and a preset program in its internal memory and it loads the data automatically when you turn
on the unit. This is called Autoload function. To play back a demo song, proceed as follows:
01. Connect headphones to the PHONES jack of the MPC2500.
For more information about connecting devices, see the “Connecting MPC2500 to external Audio/MIDI
device” section of the Operator's Manual (page 6).
02. Turn on the MPC2500.
When you turn on the MPC2500, it displays the start-up screen and then loads the internal data automatically.
After the data is loaded, the MAIN page is displayed.
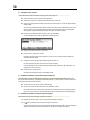
03. Make sure that "01-KEEN BEETZ!!!" is selected in the Sq field and press the [ PLAY START ] button.
Pressing the [ PLAY START ] button starts playback of the demo song. To stop playback, press the
[ STOP ] button. When you press the [ PLAY ] button again, the MPC2500 will start playback at the point
where you last stopped.
After you finish playing back "01- KEEN BEETZ!!!", try to play another song. You can select a song by
turning the [ DATA ] wheel in the Sq field.
Playing a preset program
Next, let’s try to play the preset program using the pads. You can play the program selected in the Pgm field of the MAIN
page by hitting the pad.
01. Select any of the (unused) sequences in the Sq field.
(Unused) means that the sequence is not yet used.
02. Use the cursor buttons to switch to the Pgm field and select the program that you wish to play.
You can select the program by turning the [ DATA ] wheel while in the Pgm field.
03. Hit the pad. The MPC2500 will play the preset program.
You can play up to 64 pads by switching between pad bank A through D, but samples may not be assigned to
all the pads.

3
Recording a performance with the pads
To record the performance to a sequence using the internal preset program, proceed as follows:
01. Press the [ MAIN ] button to display the MAIN page.
02. In the Sq field, select a sequence to which you wish to record the performance.
You can select any sequence for recording a performance but, for the purposes of this section, select a
sequence that says “unused.”
03. In the Tr field, select a track to which you wish to record the performance.
The performance data will be recorded on a track in the sequence. You can select any track but, for the
purposes of this section, select “Tr : 01”.
04. In the Pgm field, select a program you wish to play.
05. Press the [ PLAY START ] button while holding the [ REC ] button.
The recording will start after 4 counts.
06. Play the pads to the click sounds.
In default, the sequence is set to 2 bars. After recording for 2 bars, the MPC2500 will start playing back the
recorded performance. If you make another performance with the pads, you can add the performance to the
current recording. This is called “over dub”.
07. You can stop the over dub by pressing [ STOP ] button.
08. Press the [ PLAY ] button to play the recorded performance.
09. If you do not like the performance, you can start a new recording by pressing the [ REC ] + [ PLAY START ]
buttons.
This cancels the currently recorded performance data and starts a new recording.
10. To add the recording to the already recorded data, press the [ PLAY START ] button while holding the
[OVER DUB] button.
This plays back the currently recorded performance and you can add the new performance by using the pads.
Deleting only a specific pad:
11. Start the overdub by pressing the [ PLAY START ] button while holding the [ OVER DUB ] button.
12. Hold the pad that you wish to delete, while holding [ ERASE ] button.
Only the section beginning where you press the [ ERASE ] button and pad and ending where you release them
will be deleted from the performance recording. By pressing the pad at the right timing, you can delete the
performance data at certain timing in the phrase. If you select another sequence in the Sq field, you can record
a new performance separately. By playing back those sequences, you can create one whole song.
Tip : You can set the length of the sequence in the Bar field, and the time signature in the Tsig field. For more
information, see the“Chapter 3 : Sequence feature” section of the Operator's Manual. ( page 12)

4
Playing back several sequences in a series
There are two ways to play back several sequences in a series. You can either select the sequences to be played in real time,
or set the order of the sequences in SONG mode.
Selecting the sequences in real time
01. In the Sq field in the MAIN page, select the sequence you wish to play first.
02. Press the [ PLAY START ] button to start the play back of the sequence.
03. Select the Sq field during play back, and select the next sequence to play.
Selecting a sequence in the Sq field during the playback brings up the Next field, where you can
select the next sequence. After playing the currently selected sequence to the end, the MPC2500
will start playing the sequence selected in the Next field. By repeating this step, you can play back
several sequences continuously.
Playing back the sequences in the selected order
To play back the sequences in the selected order, use the SONG mode.
01. Press the [ MODE ] button and then [ PAD 16 ] (SONG).
This brings up the SONG page, where you can set the order of the sequences to be played.
02. In the Song field, select a song whose name is (unused).
03. Select the (end of song) field by pressing the down cursor button, and select the sequence that you
want played back next using the [ DATA ] wheel.
Assign the sequences in the desired order by repeating this step.
04. Press the [ PLAY START ] button.
The assigned sequence will be played in the order that you specify.
Tip : For more information about the SONG mode, see the “Chapter 7 : Song mode” section
of the operator's manual. (on page 42)

5
Recording a sound
In this section, you will learn how to record sounds into the MPC2500
and assign these sounds so they can be played with the pads. This
way you are not restricted to only playing with the sounds that are
already included in the presets. Below is how to record an analog
signal from a CD player connected to the RECORD IN on the rear
panel of the MPC2500.
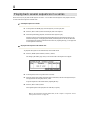
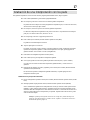
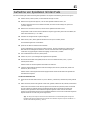
Preparing the recording
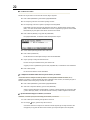
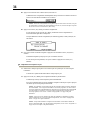
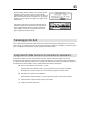
01. Connect the LINE OUT of your CD player
to the RECORD IN of the MPC2500.
The analog input of the MPC2500 is a
standard phone jack, while the CD Player’s
LINE OUT is most likely a dual RCA jack.
To connect the CD player, you will need
two RCA to ¼ inch TS connectors.
CD PLAYER
LINE OUT
02. Once you have connected the CD player’s audio output to the RECORD IN of the MPC2500,
press the [ MODE ] button and then [ PAD 5 ] (RECORD).
This brings up the RECORD page, where you can change the settings for the recording.
03. Select the Input field, and select ANALOG.
04. Select the Time field and set the recording time.
The MPC2500 will finish the recording at the time set in this field. We recommend you set the time
a little longer than the actual recording time. You may also finish the recording manually.
05. Test the recording level by playing the CD. Check the level meter on screen and adjust the level
using the [ REC GAIN ] knob.
Important: If the meter goes too far to the right, the sound will be distorted, but if the sound level
is too low, the sample will gain a lot of noise. Set the level as high as possible but not reaching the
right edge.
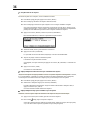
Starting the recording
06. Cue up your CD player with the audio that you would like to record.
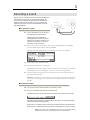
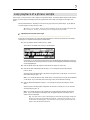
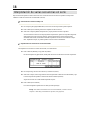
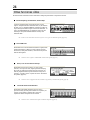
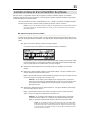
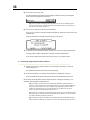
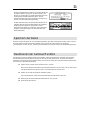
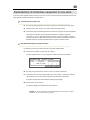
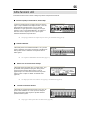
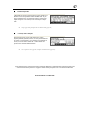
07. Press [ F6 ] (RECORD) button while in the RECORD page.
The MPC2500 will be in record enable mode and the bottom of the screen will look like this:
This indicates that the MPC2500 is waiting for the incoming signal. The recording will begin
automatically when the CD begins playing.
Pressing the [ F5 ] (CANCEL) button cancels the record enable mode and resets the MPC2500.
Pressing the [ F6 ] (START) button manually starts the recording before you play the CD player.
Note: If you press the [ F6 ] (RECORD) button while a sound is already playing,
the MPC2500 will start the recording right after you press the button.

6
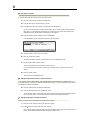
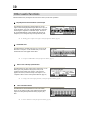
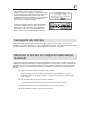
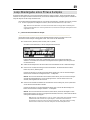
08. Press “Play” on the CD Player.
The MPC2500 will start the recording automatically when the CD player starts the playback and the
bottom of the screen will change as below:
Tip : If the recording level is too low, the MPC2500 may not start the recording when you play the
CD player. In this case, go back to step 5 and adjust the level with the [ REC GAIN ] knob again.
09. Press the [ F6 ] (STOP) button to stop the recording.
If you do not press [ F6 ] (STOP), the MPC2500 will stop the recording at the time set in the Time
field.
When the MPC2500 finishes the recording, the Keep or Retry window will be displayed.
10. You can check the recorded sample by pressing and holding the [ F4 ] (PLAY) button.
The recorded sample will play until you release the button.
If you do not like the recording, you can remove the recording by pressing the [ F2 ] (RETRY)
button.
Assigning the recorded sound to the pad
11. Select the Assign to pad field with the cursor and hit the pad to which you wish to assign the
sample.
The number of this pad will be displayed in the Assign to pad field.
12. Press the [ F5 ] (KEEP) button to save the sample to the selected pad.
This closes the Keep or Retry window and returns to the RECORD page.
Now you can play the recorded sample with the pad. Hit the pad to make sure the recorded sound
will be played.
Tip : The samples will be assigned to the pads of the program that is selected in the Pgm field of the
MAIN page. To assign the samples to a new program, you need to create a new program in
PROGRAM mode and select it in the Pgm field of the MAIN page in advance. For more information
about creating a new program, see the “Creating a program” section of the Operator's Manual.
(page 78)
Tip : You can play back only a specific part of the sample by adjusting the start/end points. For
more information, see the “Setting the loop” section of the Operator's Manual. (page 76)
Tip : You can change the assigned sample or set the playback method in the PROGRAM mode. For
more information, see the “Chapter13 : Program” section of the Operator's Manual. (page 78)

7
Loop playback of a phrase sample
In this section, you will learn how to create a sequence using a phrase sample. To handle the phrase sample with the sequence
function, you need to adjust the start/end points of the sample and then set the tempo of the sequence to the tempo of the
phrase.
Proceed as described in the “Recording a sound” section on page 5 and record a phrase sample. To play back the
loop to the rhythm, record by bars (1bar, 2 bars….).
Tip : When you record a phrase, start the recording a little before and stop the recording a little after the part
that you wish to use. This way, you ensure that you are not chopping off any desired audio.
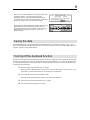
Adjusting the start/end points of the sample
To play the loop to the rhythm, you need to adjust the start/end points so that only the desired part of the sample
will be played. To adjust the start/end points, use TRIM mode.
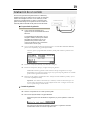
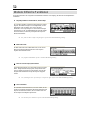
01. Press the [ MODE ] button and then [ PAD 6 ] (TRIM).
This switches to the TRIM mode, where you can edit samples.
In this mode, you can set the start and end points in the St and End Field of the TRIM page, respectively.
The waveform from the set start point to the set end point will be highlighted and the MPC2500 will play
only the highlighted part.
02. Select the Sample field in the upper left corner and select a sample you wish to edit.
03. Select the St (start) field and adjust the start point. You can change the start point by turning the
[ DATA ] wheel.
Adjust this point so that the first beat of the phrase will be played when you hit the pad. You can check
the sound by hitting any pad 1 - 12.
Note : If you set the start point too early (smaller value), it may take some time to play the first beat after
you hit the pad. If you set the start point too late (larger value), the first beat may be missing.
04. Select the End field and adjust the end point. You can change the end point by turning the [ DATA ]
wheel.
Adjust this point so that the playback of the phrase will end when you hit the pad. You can check the
sound by hitting any pad 1 -12.
Note : If you set the end point too early (smaller value), the playback may end before the end of the
phrase. If you set the end point too late (larger value), the playback may have unnecessary noise or
silence at the end of the phrase.
Tip : If you hold [ PAD 16 ] while in the TRIM page, the MPC2500 will play back the sample from
the start point to the end point repeatedly (loop playback). Use this function to make sure you set
the start and the end points properly. If you don’t set those points properly, the phrase will not be
played to the rhythm and will sound off-beat.

8
Recording to a sequence
To loop the phrase with the sequence function, proceed as follows:
01. Press the [ MAIN ] button to display the MAIN page.
02. In the Sq field, select a sequence that says “unused.”
03. In the Pgm field, select the track that you assigned the recorded sample to.
You can record the sequence in real time by pressing the [ PLAY START ] button while pressing the [
REC ] button.. For the purposes of this tutorial, we will enter an event with the step recording in the
STEP EDIT mode to play the phrase at the beginning of the sequence.
04. Press the [ MODE ] button and then [ PAD 14 ] (STEP EDIT).
In the STEP EDIT page, the performance data of the pad will be listed.
05. Turn the [ DATA ] wheel to select “001.01.00”.
06. Press the [ OVER DUB ] button.
The LED of the button will be lit which indicates that you are in STEP EDIT mode.
07. Hit the pad that contains a phrase sample.
The event of this pad will be entered at the point of 001.01.00.
If you hit a different pad by mistake, press the [ F4 ] (DELETE) button. The entered event will be
deleted.
08. Press the [ STOP ] button.
This deactivates the STEP EDIT mode.
Setting the same number of bars for sample and sequence
A new sequence is set to 2 bars in default. If the recorded phrase is also 2 bars, there is no problem. However, if
the number of the bars of the phrase is different from that of the sequence, you need to adjust the number of bars of
the sequence to match that of the phrase.
09. Press the [ MAIN ] button to display the MAIN page.
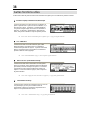
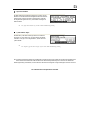
10. Select the Bars field and press the [ WINDOW ] button.
The Change Bars window will be displayed. Set the number of the bars in the New bars field, and press
the [ F5 ] (DO IT) button. This closes the window and changes the length of the sequence.
Setting the same tempo for sample and sequence
Finally, you need to set the same tempo for the sample and the sequence.
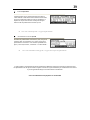
11. Press the [ PLAY START ] button to play back the sequence.
12. In the
(tempo) field, adjust the tempo of the sequence.
If the end of the phrase overlaps the beginning of the next phrase, set the tempo slower (smaller value), if
there is silence part between phrases, set the tempo faster (greater value).

9
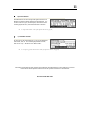
In this section, you have learned how to loop a phrase sample with
the sequence function. You can also set the loop points
automatically based on a tempo and number of beats using the
“Auto Phrase Loop” function. For more information, see the “Auto
Phrase Loop” (page 77) section of the Operator’s Manual.
The MPC2500 also has a Patched Phrase function which allows the
phrase sample to follow the tempo of the sequence when it is
dynamically changed. For more information, see the “Dividing a
phrase sample to several Regions” (page 69) section of the
Operator’s Manual.
Saving the data
The data and audio that you input into the MPC2500 will be deleted when you turn off the unit, unless you save it. If you
wish to keep the data, proceed as described in the “Save / Load” section ( page 103) or the “Connecting the MPC2500 to your
computer” (page 112) of the Operator's Manual.
Turning off the Autoload function
The MPC2500 is designed like the other MPC series samplers. However, the MPC2500 is set to automatically load the preset
file when you switch on the unit, so that you can start playing with the pads immediately. You can also turn this feature off, if
you would like the MPC2500 not to load the preset file. In this case, when you turn on the unit you have to manually load or
record samples on the MPC2500.
01. Press the [ MODE ] button and then [ PAD 2 ] (LOAD).
When you press the [ MODE ] button, its LED will turn on to let you know that you can select a mode. If you
press [ PAD 2 ] (LOAD) when the LED is lit, the LOAD page will be displayed.
02. In the LOAD from field, press the [ WINDOW ] button.
This brings up the Load Setup window, where you can set the Autoload function.
03. Select OFF in the Autoload field, and press [ F4 ] (CLOSE).
04. Turn off the MPC2500 and then turn it on again.

10
Other useful functions
The MPC2500 has many exciting and clever functions to assist you with music production.
See “Dividing a phrase sample to several regions” section of the Operator's Manual. (page 69)
See “Chapter 6 : GRID EDIT” section of the Operator's Manual. (page 37)
See “Setting a LFO (Low Frequency Oscillator)” section of the Operator's Manual. (page 89)
See “Mixer Automation” section of the Operator's Manual. (page 92)
ChopShop function & Patched Phrase / Sliced Sample
The ChopShop function divides a phrase sample into several
regions. After dividing the phrase sample, there are two ways you
can use the sample. One is the “SLICED SAMPLES” where each
divided region is assigned to an individual sample. The other is
the “PATCHED PHRASE” which maintains the phrase as one
sample but you can change the tempo of the phrase freely later.
GRID EDIT mode
The MPC2500 has a Grid Edit mode where you can enter or edit
Pad events in a sequence. In the Grid Edit mode, you can enter
and edit Pad events in the graphic matrix editor.
Effect & LFO with tempo synchronization
The MPC2500 has two stereo effects and one master effect. In the
Effect types, some parameter in Flying Pan / Delay can be
synchronized to the tempo of the sequence. The LFO in the
program can also be synced to the tempo of the sequence. See
“Chapter15 : Effect” section of the Operator's Manual. (page 97)
Mixer Automation function
The MPC2500 can record information such as Level and Pan,
which you can change with the Q-Link sliders and knobs during
sequence recording and reproduce them during sequence play
back.

11
See “Input Thru Function” section of the Operator's Manual. (on page 94)
See “Chapter 9 : Q-Link Slider & Knob” section of the Operator's Manual. (on page 49)
This manual only describes the basic operation of the MPC2500. The MPC2500 has a lot more features for your music
creation. Please read the Operator's Manual to learn the operation and functions of the MPC2500.
Have fun with the MPC2500!
Input Thru function
The MPC2500 can mix an incoming audio signal from REC IN or
DIGITAL IN with the internal playback from the MPC2500. You
can also control level, pan, cut-off frequency and resonance of the
incoming signal with the Q-Link sliders and knobs in real-time.
Q-Link sliders & knobs
By using the Q-Link sliders and knobs, you can control parameters
such as filter, tune, etc. For controlling the parameter in a Pad,
there are two ways - “NOTE ON” and “REAL TIME.”

12
This page has been intentionally left blank
Page is loading ...
Page is loading ...
Page is loading ...
Page is loading ...
Page is loading ...
Page is loading ...
Page is loading ...
Page is loading ...
Page is loading ...
Page is loading ...
Page is loading ...
Page is loading ...
Page is loading ...
Page is loading ...
Page is loading ...
Page is loading ...
Page is loading ...
Page is loading ...
Page is loading ...
Page is loading ...
Page is loading ...
Page is loading ...
Page is loading ...
Page is loading ...
Page is loading ...
Page is loading ...
Page is loading ...
Page is loading ...
Page is loading ...
Page is loading ...
Page is loading ...
Page is loading ...
Page is loading ...
Page is loading ...
Page is loading ...
Page is loading ...
Page is loading ...
Page is loading ...
Page is loading ...
Page is loading ...
Page is loading ...
Page is loading ...
Page is loading ...
Page is loading ...
Page is loading ...
Page is loading ...
Page is loading ...
Page is loading ...
Page is loading ...
Page is loading ...
Page is loading ...
Page is loading ...
Page is loading ...
Page is loading ...
Page is loading ...
Page is loading ...
-
 1
1
-
 2
2
-
 3
3
-
 4
4
-
 5
5
-
 6
6
-
 7
7
-
 8
8
-
 9
9
-
 10
10
-
 11
11
-
 12
12
-
 13
13
-
 14
14
-
 15
15
-
 16
16
-
 17
17
-
 18
18
-
 19
19
-
 20
20
-
 21
21
-
 22
22
-
 23
23
-
 24
24
-
 25
25
-
 26
26
-
 27
27
-
 28
28
-
 29
29
-
 30
30
-
 31
31
-
 32
32
-
 33
33
-
 34
34
-
 35
35
-
 36
36
-
 37
37
-
 38
38
-
 39
39
-
 40
40
-
 41
41
-
 42
42
-
 43
43
-
 44
44
-
 45
45
-
 46
46
-
 47
47
-
 48
48
-
 49
49
-
 50
50
-
 51
51
-
 52
52
-
 53
53
-
 54
54
-
 55
55
-
 56
56
-
 57
57
-
 58
58
-
 59
59
-
 60
60
-
 61
61
-
 62
62
-
 63
63
-
 64
64
-
 65
65
-
 66
66
-
 67
67
-
 68
68
-
 69
69
-
 70
70
-
 71
71
-
 72
72
-
 73
73
-
 74
74


Akai MPC 2500 Owner's manual
- Category
- DJ controllers
- Type
- Owner's manual
Ask a question and I''ll find the answer in the document
Finding information in a document is now easier with AI
in other languages
- italiano: Akai MPC 2500 Manuale del proprietario
- français: Akai MPC 2500 Le manuel du propriétaire
- español: Akai MPC 2500 El manual del propietario
- Deutsch: Akai MPC 2500 Bedienungsanleitung
Related papers
-
Akai MPC2500 Owner's manual
-
Akai MPC Owner's manual
-
Akai MPC500 User manual
-
-
-
Akai Professional MPC ONE User guide
-
Akai Professional MPX16 Owner's manual
-
-
Akai MPC 2500 User manual
-
Akai MPC5000 User manual