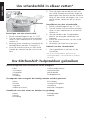
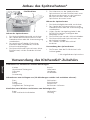
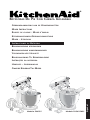
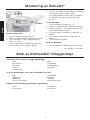
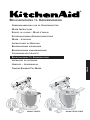
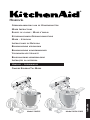
KitchenAid 5KSM150PSEWH0 Owner's manual
- Category
- Mixers
- Type
- Owner's manual

®
GEBRUIKSAANWIJZING VAN DE
KEUKENROBOTTEN
MIXER
INSTRUCTIONS
ROBOTS DE CUISINE
: MODE D’EMPLOI
KÜCHENMASCHINEN
-GEBRAUCHSANLEITUNG
MIXER
- ISTRUZIONI
INSTRUCCIONES DE
BATIDORA
BRUKSANVISNING KÖKSMASKIN
BRUKSANVISNING KJØKKENMASKINER
YLEISKONEEN KÄYTTÖOHJEET
BRUGSANVISNING TIL KØKKENMASKINE
INSTRUÇÕES DA BATEDEIRA
H
RÆRIVÉL – LEI
ÐBEININGAR
∆ΗΓΙΕΣ ΡΗΣΕΩΣ
ΤΥ ΜΙΕΡ
TILT-HEAD STAND MIXERS
C
A
U
T
I
O
N
:
U
n
p
l
u
g
b
e
f
o
r
e
i
n
s
e
r
t
i
n
g
o
f
r
e
m
o
v
i
n
g
p
a
r
t
s
A
RTISAN
1
0
21
4
6
8
O
10
2
1
4
6
8
O
C
A
U
T
I
O
N
:
U
n
p
l
u
g
b
e
f
o
r
e
i
n
s
e
r
t
i
n
g
o
f
r
e
m
o
v
i
n
g
p
a
r
t
s
K
it
c
h
e
n
A
id
S
t
.
J
o
s
e
p
h
,
M
i
c
h
i
g
a
n
U
S
A
Model 5KSM150PSModel 5K45SS
Page is loading ...

Nederlands
®
GEBRUIKSAANWIJZING VAN DE
KEUKENROBOTTEN
MIXER
INSTRUCTIONS
ROBOTS DE CUISINE
: MODE D’EMPLOI
KÜCHENMASCHINEN
-GEBRAUCHSANLEITUNG
MIXER
- ISTRUZIONI
INSTRUCCIONES DE
BATIDORA
BRUKSANVISNING KÖKSMASKIN
BRUKSANVISNING KJØKKENMASKINER
YLEISKONEEN KÄYTTÖOHJEET
BRUGSANVISNING TIL KØKKENMASKINE
INSTRUÇÕES DA BATEDEIRA
HRÆRIVÉL – LEIÐBEININGAR
∆ΗΓΙΕΣ ΡΗΣΕΩΣ ΤΥ ΜΙΕΡ
MULTIFUNCTIONELE MIXERS MET KANTELBARE KOP
C
A
U
T
I
O
N
:
U
n
p
l
u
g
b
e
f
o
r
e
i
n
s
e
r
t
i
n
g
o
f
r
e
m
o
v
i
n
g
p
a
r
t
s
A
RTISAN
1
0
21
4
6
8
O
10
2
1
4
6
8
O
C
A
U
T
I
O
N
:
U
n
p
l
u
g
b
e
f
o
r
e
i
n
s
e
r
t
i
n
g
o
f
r
e
m
o
v
i
n
g
p
a
r
t
s
K
i
t
c
h
e
n
A
id
S
t
.
J
o
s
e
p
h
,
M
i
c
h
i
g
a
n
U
S
A
Model 5KSM150PSModel 5K45SS
Page is loading ...
Page is loading ...
Page is loading ...
Page is loading ...
Page is loading ...
Page is loading ...
Page is loading ...
Page is loading ...
Page is loading ...
Page is loading ...
Page is loading ...
Page is loading ...
Page is loading ...
Page is loading ...
Page is loading ...
Page is loading ...

16
Nederlands
9709309 (3977dZw605)
FOR THE WAY IT’S MADE.
®
®Geregistreerd handelsmerk van KitchenAid, V.S.
™Handelsmerk van KitchenAid, V.S.
De vorm van de staande keukenrobot is een handelsmerk van KitchenAid, V.S.
© 2005. Alle rechten voorbehouden.
Technische beschrijvingen kunnen zonder voorafgaande kennisgeving gewijzigd worden.
®
KLANTENCONTACT
In België: Gratis oproepnummer:
00800 38104026
Adres: KitchenAid Europa, Inc.
Postbus 19
B-2018 ANTWERPEN 11
www.KitchenAid.com
In Nederland: Tel.: +31 (0)418 54 05 05
Adres: Micave B.V.
Schimminck 10 a
NL-5301 KR ZALTBOMMEL
www.KitchenAid.com

English
C
A
U
T
I
O
N
:
U
n
p
l
u
g
b
e
f
o
r
e
i
n
s
e
r
t
i
n
g
o
f
r
e
m
o
v
i
n
g
p
a
r
t
s
A
RTISAN
1
0
21
4
6
8
O
10
2
1
4
6
8
O
C
A
U
T
I
O
N
:
U
n
p
l
u
g
b
e
f
o
r
e
i
n
s
e
r
t
i
n
g
o
f
r
e
m
o
v
i
n
g
p
a
r
t
s
K
i
t
c
h
e
n
A
id
S
t
.
J
o
s
e
p
h
,
M
i
c
h
i
g
a
n
U
S
A
Model 5KSM150PSModel 5K45SS
®
GEBRUIKSAANWIJZING VAN DE KEUKENROBOTTEN
MIXER INSTRUCTIONS
ROBOTS DE CUISINE
: MODE D’
EMPLOI
KÜCHENMASCHINEN-G
EBRAUCHSANLEITUNG
MIXER - I
STRUZIONI
INSTRUCCIONES DE
BATIDORA
BRUKSANVISNING KÖKSMASKIN
BRUKSANVISNING KJØKKENMASKINER
YLEISKONEEN KÄYTTÖOHJEET
BRUGSANVISNING TIL KØKKENMASKINE
INSTRUÇÕES DA BATEDEIRA
HRÆRIVÉL – LEIÐBEININGAR
∆ΗΓΙΕΣ ΡΗΣΕΩΣ ΤΥ ΜΙΕΡ
TILT-HEAD STAND MIXERS

English
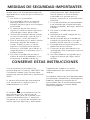
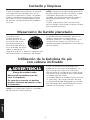
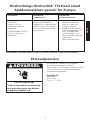
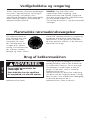
Your safety and the safety of others are very important.
We have provided many important safety messages in this manual and on your
appliance. Always read and obey all safety messages.
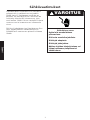
This is the safety alert symbol.
This symbol alerts you to potential hazards that can kill or hurt
you and others.
All safety messages will follow the safety alert symbol and either
the word “DANGER” or “WARNING.” These words mean:
You can be killed or seriously
injured if you don’t immediately
follow instructions.
You can be killed or seriously
injured if you don’t follow
instructions.
All safety messages will tell you what the potential hazard is, tell you how to
reduce the chance of injury, and tell you what can happen if the instructions are
not followed.
DANGER
WARNING
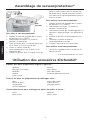
Table of Contents
Important Safeguards........................................................................................1
Electrical Requirements......................................................................................2
5K45SS Tilt-Head Stand Mixer Features .............................................................3
5KSM150PS Tilt-Head Stand Mixer Features ......................................................4
Assembling Your Tilt-Head Stand Mixer .............................................................5
Assembling Your Pouring Shield ........................................................................6
Using Your KitchenAid
®
Accessories...................................................................6
Beater to Bowl Clearance...................................................................................7
Care and Cleaning .............................................................................................8
Planetary Mixing Action.....................................................................................8
Stand Mixer Use ................................................................................................8
Speed Control Guide - 10 Speed Mixers ............................................................9
Mixing Tips......................................................................................................10
Mixing and Kneading Yeast Dough..................................................................11
Egg Whites......................................................................................................12
Whipped Cream ..............................................................................................12
Attachments and Accessories - General Instructions ........................................13
When You Need Service ..................................................................................14
Household KitchenAid
®
Tilt-Head Stand Mixer Warranty ..................................15
Service Centers ................................................................................................15
Customer Service .............................................................................................16

1
English
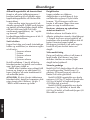
IMPORTANT SAFEGUARDS
When using electrical appliances, basic
safety precautions should always be
followed including the following:
1. Read all instructions.
2. To protect against risk of
electrical shock, do not put Stand
Mixer in water or other liquid.
3. Close supervision is necessary
when any appliance is used by or
near children.
4. Unplug Stand Mixer from outlet
when not in use, before putting
on or taking off parts and before
cleaning.
5. Avoid contacting moving parts.
Keep hands, hair, clothing, as
well as spatulas and other
utensils away from beater during
operation to reduce the risk of
injury to persons and/or damage
to the Stand Mixer.
6. Do not operate Stand Mixer with
a damaged cord or plug or after
the Stand Mixer malfunctions, or
is dropped or damaged in any
manner. Return appliance to the
nearest Authorized Service Center
for examination, repair or electrical
or mechanical adjustment.
7. The use of attachments not
recommended or sold by
KitchenAid may cause fire,
electrical shock or injury.
8. Do not use the Stand Mixer
outdoors.
9. Do not let the cord hang over
edge of table or counter.
10. Remove flat beater, wire whip or
dough hook from Stand Mixer
before washing.
11. This product is designed for
household use only.
12. The appliance is not intended for
use by young children or infirm
persons without supervision.
13. Young children should be
supervised to ensure that they do
not play with the appliance.
SAVE THESE INSTRUCTIONS
This appliance is marked according to
the European directive 2002/96/EC on
Waste Electrical and Electronic
Equipment (WEEE).
By ensuring this product is disposed
of correctly, you will help prevent
potential negative consequences for
the environment and human health,
which could otherwise be caused by
inappropriate waste handling of this
product.
The symbol on the product, or
on the documents accompanying the
product, indicates that this appliance
may not be treated as household
waste. Instead it shall be handed over
to the applicable collection point for
the recycling of electrical and
electronic equipment.
Disposal must be carried out in
accordance with local environmental
regulations for waste disposal.
For more detailed information about
treatment, recovery and recycling of
this product, please contact your local
city office, your household waste
disposal service or the shop where you
purchased the product.

2
English
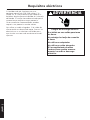
Your Stand Mixer operates on a
regular 220-240 volt A.C., 50/60 hertz
house current. The wattage rating for
your Stand Mixer is printed on the
trim band. This wattage is determined
by using the attachment which draws
the greatest power. Other
recommended attachments may draw
significantly less power.
Do not use an extension cord. If the
power supply cord is too short, have a
qualified electrician or serviceman
install an outlet near the appliance.
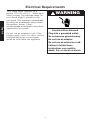
WARNING
Electrical Shock Hazard
Plug into a grounded outlet.
Do not remove ground prong.
Do not use an adapter.
Do not use an extension cord.
Failure to follow these
instructions can result in
death, fire, or electrical shock.
Electrical Requirements

3
English
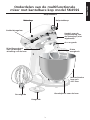
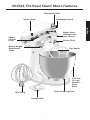
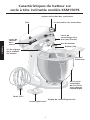
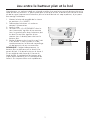
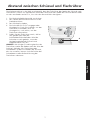
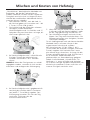
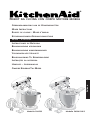
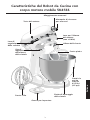
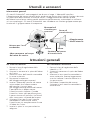
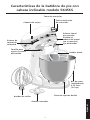
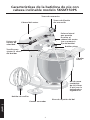
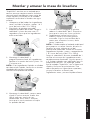
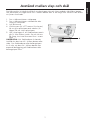
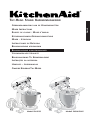
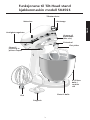
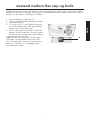
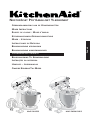
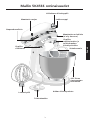
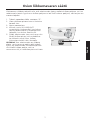
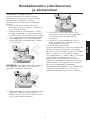
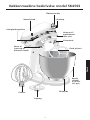
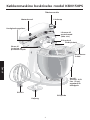
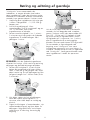
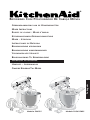
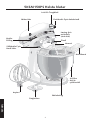
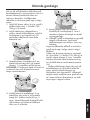
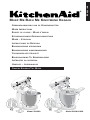
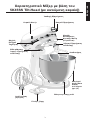
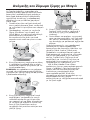
5K45SS Tilt-Head Stand Mixer Features
10
2
1
4
6
8
O
C
A
U
T
I
O
N
:
U
n
p
l
u
g
b
e
f
o
r
e
i
n
s
e
r
t
i
n
g
o
f
r
e
m
o
v
i
n
g
p
a
r
t
s
K
itc
h
e
n
A
id
St. Joseph, Michigan USA
Motor Head
Beater Height
Adjustment
Screw
Motor Head
Locking Lever
(not shown)
Attachment Knob
Attachment Hub
Flat Beater
Wire Whip
Dough Hook
Speed
Control
Lever
Bowl Clamping Plate
Beater Shaft
4,25 liter
(4.5 qrt)
Stainless
Steel
Bowl

4
English
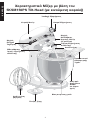
C
A
U
T
I
O
N
:
U
n
p
l
u
g
b
e
f
o
r
e
i
n
s
e
r
t
i
n
g
o
f
r
e
m
o
v
i
n
g
p
a
r
t
s
A
RTISAN
10
21
4
6
8
O
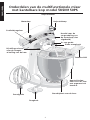
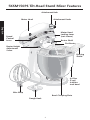
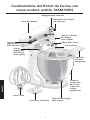
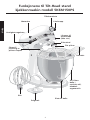
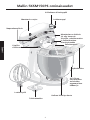
Motor Head
Beater Height
Adjustment
Screw
Motor Head
Locking Lever
(not shown)
Attachment Knob
Attachment Hub
Flat Beater
Wire Whip
Dough Hook
Speed
Control
Lever
Bowl Clamping Plate
Beater Shaft
4,8 liter
(5 qrt)
stainless
steel bowl
5KSM150PS Tilt-Head Stand Mixer Features
Pouring
Shield

5
English
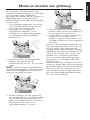
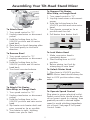
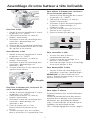
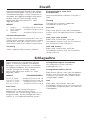
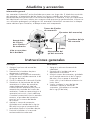
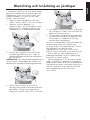
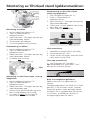
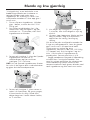
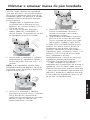
Assembling Your Tilt-Head Stand Mixer
To Attach Bowl
1. Turn speed control to “O”.
2. Unplug stand mixer or disconnect
power.
3. Hold the locking lever in the
UNLOCK position and tilt motor
head back.
4. Place bowl on bowl clamping plate.
5. Turn bowl gently in clockwise
direction.
To Remove Bowl
1. Turn speed control to “O”.
2. Unplug stand mixer or disconnect
power.
3. Hold the locking lever in the
UNLOCK position and tilt motor
head back.
4. Turn bowl counterclockwise.
To Attach Flat Beater,
Wire Whip, or Dough Hook
1. Turn speed control to “O”.
2. Unplug stand mixer or disconnect
power.
3. Hold the locking lever in the
UNLOCK position and raise motor
head.
4. Slip beater onto beater shaft and
press upward as far as possible.
5. Turn beater to right, hooking
beater over pin on shaft.
To Remove Flat Beater,
Wire Whip, or Dough Hook
1. Turn speed control to “O”.
2. Unplug stand mixer or disconnect
power.
3. Hold the locking lever in the
UNLOCK position and raise motor
head.
4. Press beater upward as far as
possible and turn left.
5. Pull beater from beater shaft.
To Lock Motor Head
1. Make sure motor head is
completely down.
2. Place locking lever in LOCK
position.
3. Before mixing, test lock by
attempting to raise head.
To Unlock Motor Head
1. Place lever in UNLOCK position.
NOTE: Motor head should always be
kept in LOCK position when using
mixer.
To Operate Speed Control
Plug mixer in proper electrical outlet.
Speed control lever should always be
set on lowest speed for starting, then
gradually moved to desired higher
speed to avoid splashing ingredients
out of bowl. See page 9 for Speed
Control Guide.
Pin
10
21
4
6
8
O

6
English
Using Your KitchenAid
®
Accessories
Flat Beater for normal to heavy mixtures:
cakes biscuits
creamed frostings quick breads
candies meat loaf
cookies mashed potatoes
pie pastry
Wire Whip for mixtures that need air incorporated:
eggs sponge cakes
egg whites angel food cakes
heavy cream mayonnaise
boiled frostings some candies
Dough Hook for mixing and kneading yeast doughs:
breads coffee cakes
rolls buns
pizza dough
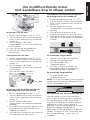
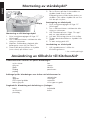
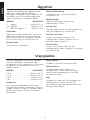
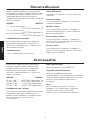
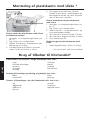
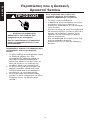
To Attach Pouring Shield
1. Turn speed control to “O”.
2. Unplug stand mixer or disconnect
power.
3. Attach flat beater, dough hook or
wire whip and bowl. See page 5.
4. Place the back half of the shield
(without the chute) on rim of
the bowl.
5. Insert the tabs on the front half of
the shield (with the chute) under
the tab openings on the back half
of the shield, then lower the shield
to lock into place.
To Remove Pouring Shield
1. Turn speed control to “O”.
2. Unplug stand mixer or disconnect
power.
3. Hold the locking lever in the
UNLOCK position and tilt motor
head back.
4. Lift pouring chute from bowl.
5. Slide back half of shield from bowl.
6. Remove attachment and bowl.
To Use Pouring Shield
1. Pour ingredients into bowl through
pouring chute.
Assembling Your Pouring Shield*
* If Pouring Shield is included.
Tab
Pouring
Chute

7
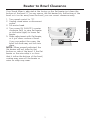
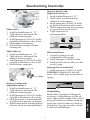
English
Your Stand Mixer is adjusted at the factory so the flat beater just clears the
bottom of the bowl. If, for any reason, the flat beater hits the bottom of the
bowl or is too far away from the bowl, you can correct clearance easily.
Beater to Bowl Clearance
1. Turn speed control to “O”.
2. Unplug stand mixer or disconnect
power.
3. Lift motor head.
4. Turn screw (A) SLIGHTLY counter
clockwise (left) to raise flat beater
or clockwise (right) to lower flat
beater.
5. Make adjustment with flat beater,
so it just clears surface of bowl.
If you over adjust the screw, the
bowl lock lever may not lock into
place.
NOTE: When properly adjusted, the
flat beater will not strike on the
bottom or side of the bowl. If the flat
beater or the wire whip is so close
that it strikes the bottom of the bowl,
coating may wear off the beater or
wires on whip may wear.
A

8
English
Bowl, white flat beater and white
dough hook may be washed in an
automatic dishwasher. Or, clean them
thoroughly in hot sudsy water and
rinse completely before drying. Do not
store beaters on shaft.
NOTE: Always be sure to unplug
Stand Mixer before cleaning. Wipe
Stand Mixer with a soft, damp cloth.
Do not use household/commercial
cleaners. Do not immerse in water.
Wipe off beater shaft frequently,
removing any residue that may
accumulate.
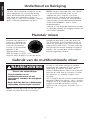
Care and Cleaning
During operation, the
flat beater moves
around the
stationary bowl, at
the same time
turning in the
opposite direction on its
own axis. The diagram shows the
complete coverage of the bowl made
by the path of the beater.
Your KitchenAid
®
Stand Mixer will mix
faster and more thoroughly than most
other electric mixers. Therefore, the
mixing time in most recipes must be
adjusted to avoid overbeating.
Planetary Mixing Action
Stand Mixer Use
NOTE: Do not scrape bowl while
Stand Mixer is operating.
The bowl and beater are designed to
provide thorough mixing without
frequent scraping. Scraping the bowl
once or twice during mixing is usually
sufficient. Turn unit off before
scraping.
The Stand Mixer may warm up during
use. Under heavy loads with extended
mixing time, you may not be able to
comfortably touch the top of the unit.
This is normal.
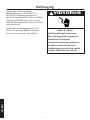
WARNING
Injury Hazard
Unplug mixer before touching
beaters.
Failure to do so can result in
broken bones, cuts or bruises.

9
English
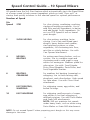
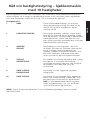
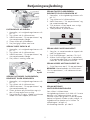
Speed Control Guide – 10 Speed Mixers
All speeds have the Soft Start feature which automatically starts the Stand Mixer
at a lower speed to help prevent ingredient splash-out and “flour puff” at
startup then quickly increases to the selected speed for optimal performance.
Number of Speed
Stir
Speed STIR For slow stirring, combining, mashing,
starting all mixing procedures. Use to
add flour and dry ingredients to batter,
and add liquids to dry ingredients. Do
not use STIR Speed to mix or knead
yeast doughs.
2 SLOW MIXING For slow mixing, mashing, faster
stirring. Use to mix and knead yeast
doughs, heavy batters and candies,
start mashing potatoes or other
vegetables, cut shortening into flour,
mix thin or splashy batters. Use with
Can Opener attachment.
4 MIXING, For mixing semi-heavy batters, such as
BEATING cookies. Use to combine sugar and
shortening and to add sugar to egg
whites for meringues. Medium speed for
cake mixes. Use with: Food Grinder,
Rotor Slicer/Shredder, Pasta Roller, and
Fruit/Vegetable Strainer.
6 BEATING, For medium fast beating (creaming) or
CREAMING whipping. Use to finish mixing cake,
doughnut, and other batters. High speed
for cake mixes. Use with Citrus Juicer
attachment.
8 FAST BEATING, For whipping cream, egg whites, and
WHIPPING boiled frostings.
10 FAST WHIPPING For whipping small amounts of cream,
egg whites or for final whipping of
mashed potatoes. Use with Pasta Maker
and Grain Mill attachments.
NOTE: Will not maintain fast speeds
under heavy loads, such as when using
Pasta Maker or Grain Mill attachments.
NOTE: Do not exceed Speed 2 when preparing yeast doughs as this may cause
damage to the mixer.

10
English
Mixing Tips
Converting Your Recipe
for the Stand Mixer
The mixing instructions found in this
book can be used to convert your
favorite recipes for use with your
KitchenAid
®
Stand Mixer.
To help determine a mixing
procedure, your own observations
and experience will be needed. Watch
the batter or dough and mix only
until it has the desired appearance
described in your recipe such as
“smooth and creamy.” Use the
“Speed Control Guide,” Page 9, to
help determine proper mixing speeds.
Adding Ingredients
The standard procedure to follow
when mixing most batters, especially
cake and cookie batters, is to add:
1
⁄3 dry ingredients
1
⁄2 liquid ingredients
1
⁄
3 dry ingredients
1
⁄2 liquid ingredients
1
⁄3 dry ingredients
Use STIR Speed until ingredients have
been blended. Then gradually increase
to desired speed.
Always add ingredients as close to
side of bowl as possible, not directly
into moving beater. The Pouring
Shield can be used to simplify adding
ingredients.
NOTE: If ingredients in very bottom
of bowl are not thoroughly mixed, the
beater is not far enough into the
bowl. See “Beater to Bowl Clearance,”
page 7.
Cake Mixes
When preparing packaged cake mixes,
use Speed 4 for medium speed and
Speed 6 for high speed. For best
results, mix for the time stated on the
package directions.
Adding Nuts, Raisins, or
Candied Fruits
Solid materials should be folded in
the last few seconds of mixing on
STIR Speed. The batter should be thick
enough to prevent the fruit or nuts
from sinking to the bottom of the
pan during baking. Sticky fruits
should be dusted with flour for better
distribution in the batter.
Liquid Mixtures
Mixtures containing large amounts of
liquid ingredients should be mixed at
lower speeds to avoid splashing.
Increase speed only after mixture has
thickened.
Kneading Yeast Doughs
ALWAYS use the dough hook to mix
and knead yeast doughs.
Use Speed 2 to mix or knead yeast
doughs. Use of any other speed
creates high potential for unit failure.
NEVER use recipes calling for more
than 0.87 kg (7 cups) all-purpose
flour or 0.81 kg (6 cups) whole wheat
flour when making dough with a
4,25 liter (4.5 qrt) tilt-head mixer.
NEVER use recipes calling for more
than 1.00 kg (8 cups) all-purpose
flour or 0.81 kg (6 cups) whole wheat
flour when making dough with a
4,8 liter (5 qrt) tilt-head mixer.

11
English
“Rapid Mix” describes a bread baking
method that calls for dry yeast to be
mixed with other dry ingredients
before liquid is added. In contrast, the
traditional method is to dissolve yeast
in warm water.
1. Place all dry ingredients including
yeast into bowl, except last 125 to
250 gr (1 to 2 cups) flour.
2. Attach bowl and dough hook. Lock
mixer head. Turn to Speed 2 and
mix about 15 seconds, or until
ingredients are combined.
3. Continuing on Speed 2, gradually
add liquid ingredients to flour
mixture and mix 1 to 2 minutes
longer.
NOTE: If liquid ingredients are added
too quickly, they will form a pool
around the dough hook and slow
down mixing process.
4. Continuing on Speed 2, gently add
remaining flour, 60 gr (
1
⁄2 cup) at a
time. Mix until dough clings to
hook and cleans sides of bowl,
about 2 minutes.
5. When dough clings to hook, knead
on Speed 2 for 2 minutes, or until
dough is smooth and elastic.
6. Unlock and tilt back head and
remove dough from hook. Follow
directions in recipe for rising,
shaping, and baking.
When using the traditional method to
prepare a favorite recipe, dissolve
yeast in warm water in warmed bowl.
Add remaining liquids and dry
ingredients, except last 125 to 250 gr
(1 to 2 cups) flour. Turn to Speed 2
and mix about 1 minute, or until
ingredients are thoroughly mixed.
Proceed with Steps 4 through 6.
Both methods work equally well for
bread preparation. However, the
“Rapid Mix” method may be a bit
faster and easier for new bread
bakers. It is slightly more temperature
tolerant because the yeast is mixed
with dry ingredients rather than with
warm liquid.
Mixing and Kneading Yeast Dough
A
R
TISA
N
10
2
1
4
6
8
O
A
R
TIS
A
N
10
2
1
4
6
8
O
A
RT
IS
A
N
1
0
21
4
6
8
O

12
English
Egg Whites
Place room temperature egg whites in
clean, dry bowl. Attach bowl and wire
whip. To avoid splashing, gradually turn
to designated speed and whip to
desired stage. See chart below.
AMOUNT SPEED
1 egg white .......GRADUALLY to 10
2-4 egg whites ........GRADUALLY to 8
6 or more
egg whites ........GRADUALLY to 8
Whipping Stages
With your KitchenAid
®
Stand Mixer,
egg whites whip quickly. So, watch
carefully to avoid overwhipping. This
list tells you what to expect.
Frothy
Large, uneven air bubbles.
Begins to Hold Shape
Air bubbles are fine and compact;
product is white.
Soft Peak
Tips of peaks fall over when wire whip
is removed.
Almost Stiff
Sharp peaks form when wire whip is
removed, but whites are actually soft.
Stiff but not Dry
Sharp, stiff peaks form when wire
whip is removed. Whites are uniform
in color and glisten.
Stiff and Dry
Sharp, stiff peaks form when wire
whip is removed. Whites are speckled
and dull in appearance.
Whipped Cream
Pour cold whipping cream into chilled
bowl. Attach bowl and wire whip. To
avoid splashing, gradually turn to
designated speed and whip to desired
stage. See chart below.
AMOUNT SPEED
59 ml (
1
⁄4 cup) ........GRADUALLY to 10
118 ml (
1
⁄
2 cup) ......GRADUALLY to 10
236 ml (1 cup) ........GRADUALLY to 8
472 ml (1 pint ).......GRADUALLY to 8
Whipping Stages
Watch cream closely during whipping.
Because your KitchenAid
®
Stand Mixer
whips so quickly, there are just a few
seconds between whipping stages.
Look for these characteristics:
Begins to Thicken
Cream is thick and custard-like.
Holds its Shape
Cream forms soft peaks when wire
whip is removed. Can be folded into
other ingredients when making
desserts and sauces.
Stiff
Cream stands in stiff, sharp peaks
when wire whip is removed. Use for
topping on cakes or desserts, or filling
for cream puffs.

13
English
®
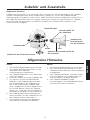
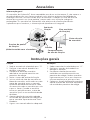
Attachments and Accessories
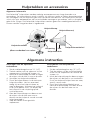
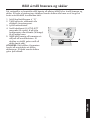
To Attach
1. Turn speed control to “O”.
2. Unplug Stand Mixer or disconnect
power.
3. Loosen attachment knob by
turning it counterclockwise.
4. Remove attachment hub cover.
5. Insert attachment shaft housing
into attachment hub, making
certain that attachment power
shaft fits into square attachment
hub socket. It may be necessary to
rotate attachment back and forth.
When attachment is in proper
position, the pin on the
attachment will fit into the notch
on the hub rim.
6. Tighten attachment knob by
turning clockwise until attachment
is completely secured to Stand
Mixer.
7. Plug into proper electrical outlet.
To Remove
1. Turn speed control to “O”.
2. Unplug Stand Mixer or disconnect
power.
3. Loosen attachment knob by
turning it counterclockwise. Rotate
attachment slightly back and forth
while pulling out.
4. Replace attachment hub cover.
Tighten attachment knob by
turning it clockwise.
General Information
KitchenAid
®
Attachments are designed to assure long life. The attachment
power shaft and hub socket are of a square design, to eliminate any possibility
of slipping during the transmission of power to the attachment. The hub and
shaft housing are tapered to assure a snug fit, even after prolonged use and
wear. KitchenAid
®
Attachments require no extra power unit to operate them;
the power unit is built-in.
‡Not part of mixer.
General Instructions
Attachment
Hub Socket
Attachment
Knob
Notch
Pin
Attachment Shaft
Housing
Attachment
Power Shaft‡
Attachment
Housing

14
English
Please read the following before
calling your service center.
1. The Stand Mixer may warm up
during use. Under heavy loads with
extended mixing time periods, you
may not be able to comfortably
touch the top of the unit. This is
normal.
2. The Stand Mixer may emit a
pungent odor, especially when new.
This is common with electric motors.
3. If the flat beater hits the bowl,
stop the Stand Mixer. See “Beater
to Bowl Clearance,” page 7.
If your Stand Mixer should
malfunction or fail to operate,
please check the following:
- Is the Stand Mixer plugged in?
- Is the fuse in the circuit to the Stand
Mixer in working order? If you have
a circuit breaker box, be sure the
circuit is closed.
- Turn the Stand Mixer off for 10-15
seconds, then turn it back on. If the
mixer still does not start, allow it to
cool for 30 minutes before turning it
back on.
- If the problem is not due to one of
the above items, see “Service
Centers.”
When You Need Service
WARNING
Electrical Shock Hazard
Unplug before servicing.
Failure to do so can result in
death or electrical shock.

15
English
Length of
Warranty:
Europe, Australia
and New Zealand:
For the Artisan
®
mixer
5KSM150PS: Five years
Full Warranty from date
of purchase.
For the KitchenAid
Classic
®
mixer 5K45SS:
Two years Full Warranty
from date of purchase.
Other:
One Year Full Warranty
from date of purchase.
KitchenAid
Will Pay For:
Replacement parts and
repair labor costs to
correct defects in
materials or
workmanship. Service
must be provided by an
Authorized KitchenAid
Service Center
KitchenAid
Will Not Pay For:
A. Repairs when Stand
Mixer is used for
operations other
than normal
household food
preparation.
B. Damage resulting
from accident,
alterations, misuse,
abuse, or installation/
operation not in
accordance with
local electrical codes.
KITCHENAID DOES NOT ASSUME ANY RESPONSIBILITY FOR
INDIRECT DAMAGES.
Household KitchenAid
®
Tilt-Head Stand Mixer Warranty
Service Centers
All service should be handled locally
by an Authorized KitchenAid Service
Center. Contact the dealer from
whom the unit was purchased to
obtain the name of the nearest
Authorized KitchenAid Service Center.
In the U.K.:
Call: 0845 6011 287
In Ireland:
M.X. ELECTRIC
Service Department
25 Alymer Crescent
Kilcock, CO.KILDARE
Call: 1 679 2398/87 2581574
Fax: 1 628 4368
In Australia:
Call: 1800 990 990
In New Zealand:
Call: 0800 881 200
WARNING
Electrical Shock Hazard
Unplug before servicing.
Failure to do so can result in
death or electrical shock.
Page is loading ...
Page is loading ...
Page is loading ...
Page is loading ...
Page is loading ...
Page is loading ...
Page is loading ...
Page is loading ...
Page is loading ...
Page is loading ...
Page is loading ...
Page is loading ...
Page is loading ...
Page is loading ...
Page is loading ...
Page is loading ...
Page is loading ...
Page is loading ...
Page is loading ...
Page is loading ...
Page is loading ...
Page is loading ...
Page is loading ...
Page is loading ...
Page is loading ...
Page is loading ...
Page is loading ...
Page is loading ...
Page is loading ...
Page is loading ...
Page is loading ...
Page is loading ...
Page is loading ...
Page is loading ...
Page is loading ...
Page is loading ...
Page is loading ...
Page is loading ...
Page is loading ...
Page is loading ...
Page is loading ...
Page is loading ...
Page is loading ...
Page is loading ...
Page is loading ...
Page is loading ...
Page is loading ...
Page is loading ...
Page is loading ...
Page is loading ...
Page is loading ...
Page is loading ...
Page is loading ...
Page is loading ...
Page is loading ...
Page is loading ...
Page is loading ...
Page is loading ...
Page is loading ...
Page is loading ...
Page is loading ...
Page is loading ...
Page is loading ...
Page is loading ...
Page is loading ...
Page is loading ...
Page is loading ...
Page is loading ...
Page is loading ...
Page is loading ...
Page is loading ...
Page is loading ...
Page is loading ...
Page is loading ...
Page is loading ...
Page is loading ...
Page is loading ...
Page is loading ...
Page is loading ...
Page is loading ...
Page is loading ...
Page is loading ...
Page is loading ...
Page is loading ...
Page is loading ...
Page is loading ...
Page is loading ...
Page is loading ...
Page is loading ...
Page is loading ...
Page is loading ...
Page is loading ...
Page is loading ...
Page is loading ...
Page is loading ...
Page is loading ...
Page is loading ...
Page is loading ...
Page is loading ...
Page is loading ...
Page is loading ...
Page is loading ...
Page is loading ...
Page is loading ...
Page is loading ...
Page is loading ...
Page is loading ...
Page is loading ...
Page is loading ...
Page is loading ...
Page is loading ...
Page is loading ...
Page is loading ...
Page is loading ...
Page is loading ...
Page is loading ...
Page is loading ...
Page is loading ...
Page is loading ...
Page is loading ...
Page is loading ...
Page is loading ...
Page is loading ...
Page is loading ...
Page is loading ...
Page is loading ...
Page is loading ...
Page is loading ...
Page is loading ...
Page is loading ...
Page is loading ...
Page is loading ...
Page is loading ...
Page is loading ...
Page is loading ...
Page is loading ...
Page is loading ...
Page is loading ...
Page is loading ...
Page is loading ...
Page is loading ...
Page is loading ...
Page is loading ...
Page is loading ...
Page is loading ...
Page is loading ...
Page is loading ...
Page is loading ...
Page is loading ...
Page is loading ...
Page is loading ...
Page is loading ...
Page is loading ...
Page is loading ...
Page is loading ...
Page is loading ...
Page is loading ...
Page is loading ...
Page is loading ...
Page is loading ...
Page is loading ...
Page is loading ...
Page is loading ...
Page is loading ...
Page is loading ...
Page is loading ...
Page is loading ...
Page is loading ...
Page is loading ...
Page is loading ...
Page is loading ...
Page is loading ...
Page is loading ...
Page is loading ...
Page is loading ...
Page is loading ...
Page is loading ...
Page is loading ...
Page is loading ...
Page is loading ...
Page is loading ...
Page is loading ...
Page is loading ...
Page is loading ...
Page is loading ...
Page is loading ...
Page is loading ...
Page is loading ...
Page is loading ...
Page is loading ...
Page is loading ...
Page is loading ...
Page is loading ...
Page is loading ...
Page is loading ...
Page is loading ...
Page is loading ...
Page is loading ...
Page is loading ...
Page is loading ...
Page is loading ...
-
 1
1
-
 2
2
-
 3
3
-
 4
4
-
 5
5
-
 6
6
-
 7
7
-
 8
8
-
 9
9
-
 10
10
-
 11
11
-
 12
12
-
 13
13
-
 14
14
-
 15
15
-
 16
16
-
 17
17
-
 18
18
-
 19
19
-
 20
20
-
 21
21
-
 22
22
-
 23
23
-
 24
24
-
 25
25
-
 26
26
-
 27
27
-
 28
28
-
 29
29
-
 30
30
-
 31
31
-
 32
32
-
 33
33
-
 34
34
-
 35
35
-
 36
36
-
 37
37
-
 38
38
-
 39
39
-
 40
40
-
 41
41
-
 42
42
-
 43
43
-
 44
44
-
 45
45
-
 46
46
-
 47
47
-
 48
48
-
 49
49
-
 50
50
-
 51
51
-
 52
52
-
 53
53
-
 54
54
-
 55
55
-
 56
56
-
 57
57
-
 58
58
-
 59
59
-
 60
60
-
 61
61
-
 62
62
-
 63
63
-
 64
64
-
 65
65
-
 66
66
-
 67
67
-
 68
68
-
 69
69
-
 70
70
-
 71
71
-
 72
72
-
 73
73
-
 74
74
-
 75
75
-
 76
76
-
 77
77
-
 78
78
-
 79
79
-
 80
80
-
 81
81
-
 82
82
-
 83
83
-
 84
84
-
 85
85
-
 86
86
-
 87
87
-
 88
88
-
 89
89
-
 90
90
-
 91
91
-
 92
92
-
 93
93
-
 94
94
-
 95
95
-
 96
96
-
 97
97
-
 98
98
-
 99
99
-
 100
100
-
 101
101
-
 102
102
-
 103
103
-
 104
104
-
 105
105
-
 106
106
-
 107
107
-
 108
108
-
 109
109
-
 110
110
-
 111
111
-
 112
112
-
 113
113
-
 114
114
-
 115
115
-
 116
116
-
 117
117
-
 118
118
-
 119
119
-
 120
120
-
 121
121
-
 122
122
-
 123
123
-
 124
124
-
 125
125
-
 126
126
-
 127
127
-
 128
128
-
 129
129
-
 130
130
-
 131
131
-
 132
132
-
 133
133
-
 134
134
-
 135
135
-
 136
136
-
 137
137
-
 138
138
-
 139
139
-
 140
140
-
 141
141
-
 142
142
-
 143
143
-
 144
144
-
 145
145
-
 146
146
-
 147
147
-
 148
148
-
 149
149
-
 150
150
-
 151
151
-
 152
152
-
 153
153
-
 154
154
-
 155
155
-
 156
156
-
 157
157
-
 158
158
-
 159
159
-
 160
160
-
 161
161
-
 162
162
-
 163
163
-
 164
164
-
 165
165
-
 166
166
-
 167
167
-
 168
168
-
 169
169
-
 170
170
-
 171
171
-
 172
172
-
 173
173
-
 174
174
-
 175
175
-
 176
176
-
 177
177
-
 178
178
-
 179
179
-
 180
180
-
 181
181
-
 182
182
-
 183
183
-
 184
184
-
 185
185
-
 186
186
-
 187
187
-
 188
188
-
 189
189
-
 190
190
-
 191
191
-
 192
192
-
 193
193
-
 194
194
-
 195
195
-
 196
196
-
 197
197
-
 198
198
-
 199
199
-
 200
200
-
 201
201
-
 202
202
-
 203
203
-
 204
204
-
 205
205
-
 206
206
-
 207
207
-
 208
208
-
 209
209
-
 210
210
-
 211
211
-
 212
212
-
 213
213
-
 214
214
-
 215
215
-
 216
216
-
 217
217
-
 218
218
-
 219
219
-
 220
220
-
 221
221
-
 222
222
-
 223
223
-
 224
224
-
 225
225
-
 226
226
-
 227
227
-
 228
228
-
 229
229
-
 230
230
-
 231
231
-
 232
232
-
 233
233
-
 234
234
-
 235
235
-
 236
236
-
 237
237
-
 238
238


KitchenAid 5KSM150PSEWH0 Owner's manual
- Category
- Mixers
- Type
- Owner's manual
Ask a question and I''ll find the answer in the document
Finding information in a document is now easier with AI
in other languages
- italiano: KitchenAid 5KSM150PSEWH0 Manuale del proprietario
- français: KitchenAid 5KSM150PSEWH0 Le manuel du propriétaire
- español: KitchenAid 5KSM150PSEWH0 El manual del propietario
- Deutsch: KitchenAid 5KSM150PSEWH0 Bedienungsanleitung
- Nederlands: KitchenAid 5KSM150PSEWH0 de handleiding
- português: KitchenAid 5KSM150PSEWH0 Manual do proprietário
- dansk: KitchenAid 5KSM150PSEWH0 Brugervejledning
- svenska: KitchenAid 5KSM150PSEWH0 Bruksanvisning
- suomi: KitchenAid 5KSM150PSEWH0 Omistajan opas
Related papers
-
KitchenAid 5KSM45AOB User manual
-
-
KitchenAid 91099 User manual
-
KitchenAid KSM3311XBF User guide
-
-
KitchenAid 5K45SS User manual
-
-
KitchenAid KP2671XBU3 Owner's manual
-
-
Other documents
-
Centurion KT340-G User manual
-
 Yoo Digital COOKYOO7000 Owner's manual
-
 POINT POKM267 KJØKKENMASKIN, GRÅ User manual
-
Hotpoint KM 040 AC0 Owner's manual
-
Groupe Brandt SP-251PLUS Owner's manual
-
Andersson KNM 2.1 User manual
-
 Yoo Digital Home COOKYOO 7900 Owner's manual
-
 Caso Design KM 1800 Black-G Operating instructions
-
OBH Nordica First DELI Owner's manual
-
HAEGER BL-15W.012A User manual


