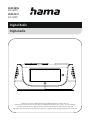
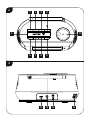
Hama 00054896 allows you to enjoy your favorite radio stations in crystal-clear digital quality with DAB+ and FM. Equipped with a 4.16" color display, it provides clear station information and a user-friendly interface. Save up to 60 presets (30 DAB/30 FM) for quick access to your preferred stations. The Bluetooth 5.0 connectivity lets you stream music wirelessly from your smartphone or tablet. Additionally, you can charge your devices via the USB port.
Hama 00054896 allows you to enjoy your favorite radio stations in crystal-clear digital quality with DAB+ and FM. Equipped with a 4.16" color display, it provides clear station information and a user-friendly interface. Save up to 60 presets (30 DAB/30 FM) for quick access to your preferred stations. The Bluetooth 5.0 connectivity lets you stream music wirelessly from your smartphone or tablet. Additionally, you can charge your devices via the USB port.


-
 1
1
-
 2
2
-
 3
3
-
 4
4
-
 5
5
-
 6
6
-
 7
7
-
 8
8
-
 9
9
-
 10
10
-
 11
11
-
 12
12
-
 13
13
-
 14
14
-
 15
15
-
 16
16
-
 17
17
-
 18
18


Hama 00054896 allows you to enjoy your favorite radio stations in crystal-clear digital quality with DAB+ and FM. Equipped with a 4.16" color display, it provides clear station information and a user-friendly interface. Save up to 60 presets (30 DAB/30 FM) for quick access to your preferred stations. The Bluetooth 5.0 connectivity lets you stream music wirelessly from your smartphone or tablet. Additionally, you can charge your devices via the USB port.
Ask a question and I''ll find the answer in the document
Finding information in a document is now easier with AI
Related papers
Other documents
-
Revo SuperSystem Owner's manual
-
Revo SUPERCD Owner's manual
-
Revo Superconnect Owner's manual
-
Roberts Revival I-stream 3( Rev.1) User guide
-
Roberts Stream 67 User guide
-
-
-
Kenwood CR-ST100S-W Owner's manual
-
 LEMEGA M4+ Owner's manual
-
Teufel Radio 3sixty Operating instructions
