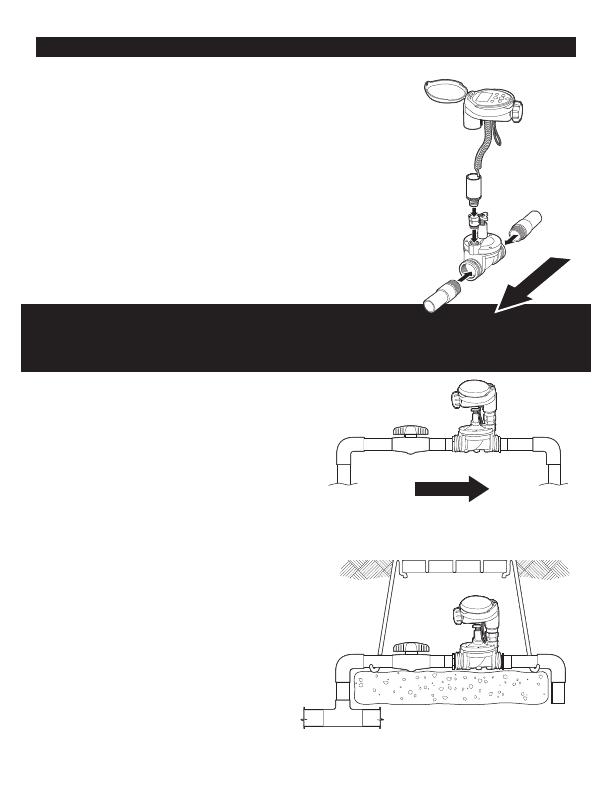
DIG RBC 7000 User manual

Category
Sanitary ware
Type
User manual

DIG RBC 7000 is a battery-powered, single-station inline valve with a watering timer. It features a large LCD display, 4 start times per day, and run times from 1 minute to 5 hours and 59 minutes. The RBC 7000 can be programmed to water on specific days of the week, odd/even days, or every X hours up to every 30 days. It also has a rain delay feature that can delay watering for up to 99 days. The RBC 7000 is easy to install and use, and it comes with a two-year warranty.

DIG RBC 7000 is a battery-powered, single-station inline valve with a watering timer. It features a large LCD display, 4 start times per day, and run times from 1 minute to 5 hours and 59 minutes. The RBC 7000 can be programmed to water on specific days of the week, odd/even days, or every X hours up to every 30 days. It also has a rain delay feature that can delay watering for up to 99 days. The RBC 7000 is easy to install and use, and it comes with a two-year warranty.

Battery Powered
Inline Valve
with Watering Timer
RBC 7000
INSTRUCTION MANUAL
TABLE OF CONTENTS
1. Introduction ………………………………………………………… 1
2. About the RBC 7000 battery timer …………………………………… 1
3. Component identification …………………………………………… 1
4. LCD display and controls …………………………………………… 2
5. Installing the batteries ……………………………………………… 3
6. Installation…………………………………………………………… 4
7. Programming ………………………………………………………… 7
8. Setting current time and date ………………………………………… 7
9. Setting watering day schedules ……………………………………… 9
10. Setting watering start times …………………………………………13
11. Setting watering run time duration ……………………………………14
12. Setting rain delay – optional feature …………………………………16
13. Manual watering ……………………………………………………17
14. Connecting a rain sensor ……………………………………………18
15. Changing the batteries ………………………………………………19
16. Maintenance, troubleshooting and repairs ……………………………20
17. Warranty ……………………………………………………………22
18. Technical assistance …………………………………………………23
19. To order replacement or spare parts …………………………………23
1
1. INTRODUCTION
Thank you for purchasing DIG’s RBC 7000 Single Station Battery Operated Timer.
This manual describes how to get the RBC-series timer up and running quickly.
After reading this manual and becoming familiar with the basic functionality of the
timer, use the manual as a reference for less common tasks in the future.
2. ABOUT THE RBC 7000 BATTERY OPERATED TIMER
The RBC 7000 watering timer employs the latest irrigation programming features
to allow for complete control of any irrigation system and can be installed on either
an outdoor faucet or a PVC main water line. The RBC 7000 is available as a single
station with a rain sensor connection, and is powered by two AA batteries that can
last up to three years [using name brand alkaline batteries]. The timer is enclosed
in a compact, waterproof housing to protect it from the elements.
3. COMPONENT IDENTIFICATION
1. Timer cover
2. Quick reference label
3. LCD Display displays the icon-based
applications/programs
4. Seven button programming keypad: Use for
programming, system on/off, manual run
and reviewing program
5. Battery compartment cap for
two AA alkaline batteries (not included)
6. Rain sensor yellow wire connection
7. Collapsible 36˝ solenoid wire
8. DC solenoid
9. Manual flow control
10. Solenoid Adapter
11. Professional-grade 3/4 in-line valve
w
e
r
y
t
q
u
i
o
a
s
2
4. LCD DISPLAY AND CONTROLS
LCD Display
1. Time and Date Icon – Indicates current time and day is displayed
2. Sensor Icon – Appears when a rain sensor is active or when the yellow wire
loop has been cut and watering is halted
3. Watering Icon – Appears when valve is open by program
4. Set Watering Days Icon – Choose either specific days, odd/even days, every X
hours, or up to once every 30 days
5. Start Time Icon – Up to four start times per day available
6. Run Time Icon – Watering duration from 1 minute to 5 hours and 59 minutes
7. Rain Delay Icon – Delay irrigation program start from 1 to 99 days
8. Manual Run Icon – Appears when manual button is pushed
9. Battery Level Indicator – Flashes when batteries are low and need to be replaced
10. Day of the Week Underscore Shows which day of the week the timer
will operate
11. Represents the current Month
12. Represents the current Year
q
ry u i
o
t
w
es
d
a
2
3
Control Buttons
Select programming mode
Turn program(s) ON/OFF
Start/stop a manual cycle
Move left/right to select a value
Raise/lower the selected value
5. INSTALLING THE BATTERIES
1. Open the battery compartment cap by
turning it counterclockwise.
2. Install two fresh, brand name, AA
alkaline batteries (not included)
and note the proper direction of the
positive and negative orientation on the
underside of the timer.
3. Insert and screw the battery cap
clockwise. Make sure to securely
tighten the cover firmly by hand only.
The timer display appears with a day,
PM, and the hour digit flashing. The timer
is ready to be installed and programmed.
6. INSTALLATION
The RBC 7000 timer has a 3/4 inlet and outlet with female
pipe thread so it can be installed directly onto
3/4 PVC male pipe thread fittings as part of a sprinkler
valve manifold or as a stand-alone unit. (Figure 1)
OR
The RBC 7000 timer can be attached to a hose or faucet/
spigot using the two adapters that are included with the
timer. (Figure 7)
Warning: Wrap all male pipe thread fittings with Teflon
tape. Do not use pipe dope/pipe cement on valve! This
will damage the valve and void the warranty!
ATTENTION: PLEASE NOTE THE DIRECTION OF
THE VALVE WHEN INSTALLING. THE SOLENOID AND TIMER MOUNT ARE
POSITIONED TOWARDS THE OUTLET SIDE OF THE VALVE.
IN-LINE INSTALLATION
Rated operating pressure: 10-125 PSI
Recommended Operating Pressure:
10-80 PSI
1. Shut off main water supply.
2. Install a 3/4 ball or gate valve onto the PVC pipe
or to the valve manifold before installing the timer (Figure 2 and 3). This valve can
be very useful as an emergency
backup to turn the system off. This
type of arrangement is used by
professional installers.
3. Turn water supply on to flush the line
and then shut the water off using the
ball or gate valve.
4. Install the timer wrapping Teflon
tape on all male pipe thread fittings.
4
Figure 1
Figure 2
Below ground installation
Figure 3
water
flow
WATER FLOW
5. Turn water supply on to pressurize the system. The timer will open momentarily
and then will shut off.
6. The unit is now ready to be programmed.
FAUCET INSTALLATION
1. Wrap the swivel adapter and the nipple male pipe threads with four to six layers
of Teflon tape in a clockwise direction.
2. Screw the swivel adapter male threads into the inlet side of the controller valve
and tighten with a wrench or pliers. Repeat the steps with the 3/4 MPT x MHT
nipple. (see Figure 4).
Note: Do not apply any Teflon tape to the male hose thread faucet.
3. Make sure the washer is in place inside the female swivel adapter, and then
screw the female swivel thread clockwise onto the faucet and tighten by hand
only. Do not use pliers or a wrench. (Figure 5)
4. Open the faucet and check for leaks.
Warning: Do not tighten the swivel nut with pliers or a wrench: Over-
tightening can cause damage to the swivel and washer resulting in leaks
and/or disconnection from the faucet.
Basic installation of converting the controller with pipe thread into a hose thread
Figure 2
3/4 FHT x MNPT
swivel adapter
Nipple pipe
x hose thread
Figure 5Figure 4
water
flow
5
water
flow
6
If a backflow preventer is part of the faucet (new houses), do not install any other
backflow preventer to the faucet. If backflow preventers are part of your city code
and you have purchased a unit as part of your drip system, install the device on the
downstream side of the RBC 7000 (Figure 6 and 6a).
It is best to include a filter on a drip system. The filter cleans small particles out of
the water that would otherwise clog the drippers. The filters can also automatically
apply fertilizer through a drip system (Figure 7 and 8).
backflow preventer
Hose end drip system installation using a pressure regulator
pressure regulator
swivel adapter
to drip system
Figure 6 Figure 6a
Hose end drip system installation using a filter and a pressure regulator
Figure 8Figure 7
filter
pressure regulator
swivel adapter
to drip system
water
flow
water
flow
backflow preventer
Figure 8
7. PROGRAMMING
The RBC 7000 timer can be programmed to operate on any day of the week, odd
days or even days. In cyclical mode, the RBC can also operate from every 1 hour up
to every 12 hours or from once a day up to every 30 days. The RBC has four start
times per day and durations from 1 minute up to 5 hours and 59 minutes.
This section explains the programming features, and the steps necessary to
assign irrigation schedules. To program the timer, use to select the desired
programming mode, to make the entry flash, and the buttons to
change the value.
NOTE: Only a flashing value can be changed.
NOTE: If the last data entered stops flashing, press again to resume
programming and repeat the steps.
8. SETTING CURRENT TIME AND DATE
The timer can display the time in either a 12- or 24-hour format.
To change the time format from the home screen:
1. Press the button for three seconds until the display switches format
(AM/PM disappears).
SETTING THE CURRENT TIME AND DATE
To enable the timer to operate properly, the current time and date must
be set.
1. Press the button, until the icon appears along with the time and the day
of the week.
7
2. If the current time has not been set or needs to be updated, press and the
hour digit starts flashing.
3. To set the current hour, press or (note AM and PM designations).
4. To set the minutes, press again and the minute digit starts flashing. Press
or to set the current time in minutes.
5. Press again and repeat the steps to set the current date including, month,
day and year. When the date is selected and updated, the day of the week will
be updated at the same time to correspond with the date.
MONTH DAY YEAR
8
Press to proceed to the next step, SET DAYS or to review the program.
9. SETTING WATERING DAY SCHEDULES
Option 1 – Setting Specific Days of the Week:
This setting determines which days the RBC 7000 timer will operate. Choose either
watering on specific days of the week, EVEN/ODD days or cyclical from daily up to
once every 30 days. The timer’s default setting is to water on all specific days of
the week.
For example, if you want to water every Tuesday, Thursday and Sunday:
1. Press the button until the icon and the days of the week appear on
the screen.
2. Press once and M (for Monday) starts flashing.
3. Press and underscore under M (Monday) disappears. Monday is
de-selected.
4. Press twice and W (for Wednesday) starts flashing.
5. Press and the underscore under W (Wednesday) disappears. Wednesday is
de-selected.
6. Press twice and F (Friday) starts flashing.
7. Press and the underscore under F (Friday) disappears. Friday is de-selected.
9
8. Press and the underscore under Sa (Saturday) starts flashing.
9. Press and the underscore under Sa disappears. Saturday is de-selected.
Press the button to proceed to the next step, START TIME , or to review
the program.
Option 2 – Setting Even or Odd Days:
To select EVEN days or ODD days, refer to the example.
Example: setting the timer to water on ODD days
1. Press the button until the icon and the days of the week appear.
2. Press and to skip all the days of the week (underscore must be
removed beneath all days).
3. Press and EVEN appears flashing.
4. Press and ODD appears flashing
10
5. Press the button to proceed to the next step, START TIME , or to review
the program.
Option 3 – Setting every X hours:
Example: setting the timer to water once every seven hours
1. Press the button until the icon and the days of the week appear.
2. Press and to skip all the days of the week (underscore must be
removed beneath all days).
3. Press and EVEN appears flashing.
4. Press again and 1:00 hour appears flashing. To select the number of hours
between watering to seven hours, press until 7:00 appears on the display.
Press the button to proceed to the next step, START TIME , or to review
the program.
11
12
Option 4 – Setting every X days:
Example: setting the timer to water once every 10 days:
1. Press the button until the icon and the days of the week appear.
2. Press and to skip all the days of the week (underscore must be
removed beneath all days).
3. Press and EVEN appears flashing.
4. Press again and 1 hour appears flashing.
5. Press again and 1 DAY appears flashing. To select the number of days
between watering to 10 days, press until 10 appears on the display.
In this case, the cycle will start 10 days from the current day:
Note: See section 12 to set start day in cyclical mode.
To set the timer back to specific days mode:
1. Push the button until – START EVERY and the icon appear at the bottom
left of the screen.
2. Push the until the days of the week appear at the top of the screen.
Press the button to proceed to the next step, START TIME , or to review
the program.
12
10. SETTING WATERING START TIMES
The RBC 7000 smart timer can have up to four separate irrigation start times
per day. (Note: if the timer is set to water every X hours, only one start time is
available to be programmed.)
To set a start time,
1. Press the button until the icon appears. START 1 displays OFF, or the
last start time programmed in START 1 appears.
2. Press and OFF (or the first start time programmed) begins flashing.
3. To set the desired first start time hour (note AM and PM designations), press
or .
4. Press and the minutes start flashing.
5. Press or and set the desired start time minutes.
6. Press again; the second start time and OFF, or the last start time
programmed appear flashing. Repeat the steps to set the second, third, and
if needed, the fourth start time. During programming, if you are set to water
on specific days of the week, the screen also shows which days the timer will
operate with an underline.
13
14
To delete a start time:
1. Press until START 1 appears.
2. Press until the start time appears that you want to delete (hour digits will be
flashing).
3. Press until the word OFF appears.
Press the button to proceed to the next step RUN TIME or to review
the program.
11. SETTING WATERING RUN TIME DURATIONThis setting
This setting determines the length of time the RBC 7000 smart timer will allow the
valve to remain open (duration is from 1 minute up to 5 hours and 59 minutes). For
example, setting watering run time to 10 minutes on certain days of the week will
program the timer to turn the water on for 10 minutes on each of the days chosen
and at every start time selected. (Note: if the timer is set to water every X hours,
the maximum duration is 59 minutes)
To set the watering run time :
1. Press the button until the icon appears and OFF, or the last run time
setting appears. (OFF will appear if duration is set to 0)
2. Press the button and 0:05 (or the last run time programmed) appears.
14
15
3. To set a desired watering run time in hours, press or and select the
number of hours.
4. If only watering duration in minutes is required, press to skip the hour digit,
and the minutes will start flashing.
5. To set the desired watering duration in minutes (example of 10 minutes), press
or to select minutes. When programming the watering duration, if you
are set to water on specific days of the week, the screen will also show the days
the timer will operate with an underline.
At this point the controller’s normal programming is concluded.
Press the button to proceed to the next step, RAIN DELAY , or to review
the program or to exit.
16
12. SETTING RAIN DELAY – OPTIONAL FEATURE
The Rain Delay setting is used to temporarily suspend all irrigation for a defined
number of days. For example, during rainy weather, regularly scheduled programs
can be turned off from 1-99 days. At the end of the designated period, regularly
scheduled programming will resume automatically.
To set a temporary suspension of the program:
1. Press the button until the icon and OFF appear.
2. Press the button and OFF starts flashing.
3. To set the desired temporary suspension of the program (1-99 days), press
or .
4. The temporary suspension of the program can be cancelled at any time by
re-entering Rain Delay screen and changing the setting to OFF. (Press
or until OFF appears.)
17
Note: OFF appears in between a numeric value of 99 and 1.
Press the button to review the program or to exit.
13. MANUAL WATERING
The manual mode allows the user to test the system and water for a specified run
time set in watering duration. The timer will automatically stop watering at the end of
the defined irrigation period. The originally programmed irrigation schedule continues
to function at the assigned times. The sensor condition is disregarded in this mode.
To start a manual run:
1. Press the button, and the icon and icon appears. ON appears
momentarily and then the last watering duration is displayed with . The
timer will open the valve, and in five seconds a count down of the remaining
irrigation duration will appear, showing when the timer will close the valve.
2. Press the button to end manual run.
3. After five seconds, the display will revert to the current time screen.
18
To activate a manual watering without the use of the timer, turn the solenoid a 1/4
turn counterclockwise. To stop, tighten the solenoid clockwise by hand only–do not
over tighten (figure 9).
14. CONNECTING A RAIN SENSOR
Most “normally closed” rain sensors can be connected to the RBC 7000 timer.
The function of the sensor is to prevent automatic watering by the set program due
to excessive rainfall.
To connect the sensor to the timer, please follow these steps:
1. Cut the yellow wire loop that exits the timer in the middle of the loop.
2. Strip approximately 1/2 of insulation from the end of each wire.
3. Splice one yellow wire to each of the wires coming from the sensor.
Use waterproof wire connectors to secure the connections.
4. When the sensor is active and preventing automatic operation, the icon will
appear on the display.
FIGURE 9
  • Page 1 1
  • Page 2 2
  • Page 3 3
  • Page 4 4
  • Page 5 5
  • Page 6 6
  • Page 7 7
  • Page 8 8
  • Page 9 9
  • Page 10 10
  • Page 11 11
  • Page 12 12
  • Page 13 13
  • Page 14 14
  • Page 15 15
  • Page 16 16
  • Page 17 17
  • Page 18 18
  • Page 19 19
  • Page 20 20
  • Page 21 21
  • Page 22 22
  • Page 23 23
  • Page 24 24
  • Page 25 25
  • Page 26 26

DIG RBC 7000 User manual

Category
Sanitary ware
Type
User manual

DIG RBC 7000 is a battery-powered, single-station inline valve with a watering timer. It features a large LCD display, 4 start times per day, and run times from 1 minute to 5 hours and 59 minutes. The RBC 7000 can be programmed to water on specific days of the week, odd/even days, or every X hours up to every 30 days. It also has a rain delay feature that can delay watering for up to 99 days. The RBC 7000 is easy to install and use, and it comes with a two-year warranty.

Ask a question and I''ll find the answer in the document

Finding information in a document is now easier with AI