GROHE 35 235 Installation Instructions And Operating Manual

Category
Sanitary ware
Type
Installation Instructions And Operating Manual

This manual is also suitable for

Installation Instructions and Operating Guide
Please leave this document with the user after finishing installation!
95.063.231/ÄM 49 016/10.00
Grohsafe
Concealed Pressure Balance Valve with Shower Kit
35 235 35 236
950632.book : t95063.fm Seite 1 Mittwoch, Oktober 4, 2000 7:42 AM
I
Mixer Body and
Connections 1/2” BSP to
Screws
Wall Plate
Handle
Screw
Cap
ø 15mm copper pipe
Rosette
Shower Arm
Headshower
Handshower
Filter
Elbow Outlet
Stop
Shower Rail
Flexible Hose
35 235
35 236
35 235
35 236
Filter
Fitting Template
Backplate
Bracket
Screws
Wallplugs
Clips
Screws
Screws
35 235
Table Of Contents
Installation Dimensions (mm)
1 2
35 236
kl950632.fm Seite 1 Montag, Oktober 2, 2000 8:25 AM
II
Spare Parts
3 4
35 235
1
2
4
3
7
8
13
7.1
8.1
8.2
5
2.1
1.1
15
6
35 236
1
2
4
5
9
10
11
12
13
14
11
10.1
15
10.2.1
3
12.1
12.2
2.1
1.1
10.2
8.1
9.1
6
Spare Parts
Spare Parts
kl950632.fm Seite 2 Montag, Oktober 2, 2000 8:25 AM
5
Index
Spare Parts
Table Of Contents . . . . . . . . . . . . . . . . . 1
Installation Dimensions . . . . . . . . . . . . 2
Spare Parts Drawing. . . . . . . . . . . . 3 + 4
Spare Parts List . . . . . . . . . . . . . . . . . . 5
Technical Data. . . . . . . . . . . . . . . . . . . . 6
Installation. . . . . . . . . . . . . . . . . . . . . . . 7
Rough Installation . . . . . . . . . . . . . . . . 7
Preassemble Valve . . . . . . . . . . . . . . . 8
Wall Plate Installation. . . . . . . . . . . . . 10
Bottom Outlet Installation. . . . . . . . . . 11
Reversed Supplies Installation. . . . . . 12
Maximum Hot Water Limit Setting . . . 13
Maintenance . . . . . . . . . . . . . . . . . . . . 14
Care . . . . . . . . . . . . . . . . . . . . . . . . . . . 15
Trouble Shooting . . . . . . . . . . . . . . . . 15
Guarantee . . . . . . . . . . . . . . . . . . . . . . 19
Dear Customer,
Thank you for choosing a GROHE product.
Please follow these instructions carefully
and you will enjoy many years of reliable
service from this fitting.
No. Description Cat.-No.
Pack-
ing
unit
9 Handshower 28 216 1
9.1 Shower spray plate 45 794 1
10 Shower rail 28 666 1
10.1 Sliding shower holder 07 659 1
10.2 Shower rail holder 45 362 1
10.2.1 Cover cap 45 363 1
11 Flexible hose 28 151 1
12 Elbow outlet 28 680 1
12.1 Non-return valve 45 481 1
12.2 Cover cap 45 364 1
Optional accessories
13 Extension 25mm 47 069 1
14 Compensation ring 45 406 1
15 Service stops 47 038 2
No. Description Cat.-No.
Pack-
ing
unit
1 Handle complete 47 547 1
1.1 Screw and cap 47 548 1
2 Wall plate complete 47 549 1
2.1 Screws and stop 47 550 1
3 Pressure balancing 47 080 1
cartridge
4 Seal kit 47 552 1
5 Fixing set 47 553 1
6 Clips and screws 47 560 2
7 Shower arm 28 541 1
7.1 Rosette 02 201 1
8 Headshower 28 270 1
8.1 Filter 07 002 2
8.2 Shower spray plate 45 663 1
950632.book : i95063gb.fm Seite 5 Mittwoch, Oktober 4, 2000 7:42 AM
6
Technical Data
Functioning Principle
The Grohsafe pressure balance valve is a
safety mixer designed to compensate for
fluctuations in the water supply pressures,
which would otherwise affect the mixed
water temperature.
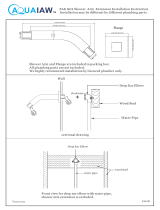
This product is supplied with connectors to fit
ø 15mm pipework. Connection should be hot
left, cold right as viewed from the operating
position. The product is preassembled, as
standard, with the outlet up.
For bottom outlet installation refer to
page 7 and 10.
Plumbing Systems
Suitable for use with multi-point gas water
heaters or combination boilers with a modu-
lating hot water output. To maintain sufficient
hot water output ensure the combination
boiler temperature setting is on high. Also
suitable for mains pressure unvented and
instantaneous thermal hot water storage
systems.
Not suitable for instantaneous hot water
displacement heaters or gravity-fed plum-
bing systems with an open vented hot water
cylinder and cold water storage cistern.
Supply Pipework
Ensure the supply pipework is thoroughly
flushed before installing the mixing valve.
GROHE recommends installing isolating
valves upstream of the mixing valve for
servicing purposes, and in-line strainers to
prevent the ingress of water borne debris.
New Water Regulations
This GROHE-product is designed to comply
with the current Water Bylaw 17 and the new
Water Regulations covering back-flow pre-
vention. It must be installed in accordance
with local authority bye-laws. Incorrect instal-
lation could contravene bye-law installation
requirements.
Specification
Concealed single handle pressure
balancing shower valve.
Integral non-return valves prevents cross
flow.
The pressure balance valve cartridge is a
safety mixer and will shut off in the event
of total pressure failure of the hot or cold
water supplies.
Flow pressure
- min. 1 bar
- recommended 1.5 - 5 bar
- greater than 5 bar, fit pressure reducing
valve
Max. operating pressure 10 bar
Max. test pressure 20 bar
Flow rate at 3 bar pressure:
35 235 approx. 13.5 l/min
35 236 approx. 16 l/min
Temperature
- Max. (hot water inlet) 80 °C
- Recommended (for economy) 60 °C
- Max. outlet temperature is reached
when handle is turned counter-clock-
wise through 270°.
- Max. outlet temperature can be pre-set
using the adjustable hot water limit stop.
- Temperature accuracy +/- 1 °C with 50%
pressure drop of hot or cold supplies.
Back to back installation possible by
reversing the pressure balancing cartridge
Water connection hot - LH
cold - RH
- Installation with reversed supplies
possible by rotating the cartridge 180°.
950632.book : i95063gb.fm Seite 6 Mittwoch, Oktober 4, 2000 7:42 AM
7
Installation
Rough Installation
The pressure balance shower mixing valve
can be installed in two different ways. The
mixing outlet can be at the bottom for use
with a handshower or at the top for use with
a headshower.
The standard position is outlet up, if you
want to have the outlet down please refer to
chapter "Bottom Outlet Installation" on
page 11.
The concealed pressure balancing valve is
supplied with a bracket.
With bracket mounted from the front the
valve can be used for installation into solid
and dry-lined walls.
With bracket mounted from behind the wall
the valve can be used for installation into
the front face of a stud partition wall
structure or the rear face of a shower
cubicle or laminated panel.
Solid and dry-lined walls
Determine the route for the incoming hot and
cold water supply and for the outlet pipe-
work in accordance with the pressure
balance valve pressure balancing valve.
1.Mark a 160mm diameter hole for the valve
and mark the fixing hole positions for the
bracket (A), see Fig. [1].
2.Drill 6mm diameter holes and insert the
supplied wallplugs (A1), see Fig. [2].
3.Remove the plaster and brick or block.
Laminated panel walls
Determine the route for the incoming hot and
cold water supply and for the outlet pipe-
work in accordance with the pressure
balance valve.
1.Mark a 160mm diameter hole for the valve
and mark the fixing hole positions for the
bracket (A), see Fig. [3].
1
A
2
A1
3
A
950632.book : i95063gb.fm Seite 7 Mittwoch, Oktober 4, 2000 7:42 AM
8
Installation
Preassemble Valve
1.Remove the two screws (B1) from the
fitting template (B), then remove the
template, see Fig. [4].
2.Install concealed pressure balance val-
ve in wall and thread the compression
fitting (C) into the valve body by use of
an additional sealing compound, see
Fig. [5].
2.Place the backplate (D) onto the mixer
body (E). Make sure that the locating pins
on the valve body slot into the apertures
on the back plate, see Fig. [6].
3.Screw backplate (D) to bracket (A) with
fixing screws (D1).
4.Fix the valve body (E) to the backplate (D)
with clips (F) and screws (F1).
Do not use excessive force to tighten the
screws (F1).
5.Align the valve with the bracket horizon-
tally, vertically and parallel to the wall by
using a spirit level.
4
B
B1
C
5
6
E
A
F
F1
D
D1
950632.book : i95063gb.fm Seite 8 Mittwoch, Oktober 4, 2000 7:42 AM
9
Installation
6.Slide the compression nut (C1), then the
ring (C2), over the pipe. Insert the pipe
ends into the openings of the inlet and
outlet connectors of valve body. Then slide
the rings (C2) and nuts (C1) into place and
tighten the compression nuts (torque min.
20 Nm), see Fig. [7].
7.Fix valve (E) with bracket (A) to wall by
using supplied screws (A1).
The hot water supply must be connected on
the left and the cold water supply on the
right. In case of reversed supply pipes refer
to chapter "Reversed Supplies Instal-
lation" on page 12.
Important:
Shut off valves must not be installed in the
outlet (mixed water line) of this concealed
Pressure Balancing Valve.
Open hot and cold water supply.
Check the pipework and connections to the
pressure balance valve for leaks.
Reinstall fitting template for finishing wall
surface.
8.Observe the installation depth in accor-
dance with the instructions given on the
fitting template, see Figs. [8] for Head-
shower and [9] for Handshower.
9.Fitting template must remain intact for
finished wall surface measurements and
as a template for plastering and / or tiling.
On tiled wall surface grouting must be
either flush or raised for proper sealing of
gasket on the wall plate.
On prefabricated walls, it is recommended
to use sealant around the wall plate to
prevent water condensation from seeping
into wall.
Plaster and tile the wall.
Do not remove fitting template before
installation is completed.
7
C1
C2
A1
A
E
A1
8
Face of tiles
Front face of
fitting template
9
Face of tiles
Front face of
fitting template
950632.book : i95063gb.fm Seite 9 Mittwoch, Oktober 4, 2000 7:42 AM
10
Installation
Wall Plate Installation
1.Remove the two screws (B1) from the
fitting template (B), then remove the
template, see Fig. [10].
2.Turn the driver (G) clockwise to the OFF
position, see Fig. [11].
3.Install two of the four screws (H1) into the
valve cover (J). These screws allow for
variation in wall thickness when mounting
the wall plate.
4.Line up the screw heads with the pre-cut
notches in the center of the wall plate (H).
5.Slide the wall plate (H) over the screw
heads and rotate the wall plate counter-
clockwise until it is vertically aligned, see
Fig. [12].
Additionally seal the top edge of the wall
plate with silicone if it is fitted against a
particularly rough surface (deep tile joints,
highly textured tile).
6.Tighten the wall plate screws.
7.Push adjustable hot water limit stop (K)
to the intermediate ring (M) as described in
Fig. [13].
Please refer to chapter "Maximum Hot
Water Limit Setting" on page 13 for
limiting maximum outlet temperature.
8.Push the handle (L) on the intermediate
handle (M) so that the "OFF" position on
the wall plate is in alignment with the arrow
on the handle.
9.Tighten handle (L) with screw (L1) and
cover with cap (L2).
The pressure balancing valve is now ready
for use.
If the pressure balancing valve is in-
stalled too deep, the fitting depth can be
increased by 25mm with an extension set
(see spare parts page 3, 4 and 5, item 13).
B
B1
10
J
G
H1
H
11
H
12
K
L1
L2
L
M
13
950632.book : i95063gb.fm Seite 10 Mittwoch, Oktober 4, 2000 7:42 AM
11
Installation
Bottom Outlet Installation
1.Install the mixer with the outlet down.
2.Shut off hot and cold water supply!
3.Remove the two screws (B1) from the
fitting template (B), then remove the
template, see Fig. [14].
4.Loosen screw (G1) and pull off driver (G),
see Fig. [15].
5.Detach stop ring (N) and note position.
6.Loosen the four corner screws (J1) and
remove valve cover (J).
7.Pull the pressure balancing cartridge (O)
out of the valve body. Do not damage the
O-ring seals, see Fig. [16].
8.Reverse the pressure balancing cartridge
180° by turning it upside down. Place it
into the valve body. Ensure the two
alignment pins (O1) on the rear of the
pressure balancing cartridge are properly
seated in the holes (Z) of the valve body.
Reassemble in reverse order. Be sure
that the stop ring (N) is in the previously
noted position.
9.Replace the template to show the instal-
lation depth and hot and cold connection
labels upper most.
B
B1
14
J1
J
G
N
15
G1
O1
O
Z
16
950632.book : i95063gb.fm Seite 11 Mittwoch, Oktober 4, 2000 7:42 AM
12
Installation
Reversed Supplies Installation
For reversed supplies installation, the
cartridge must be rotated 180° to ensure
proper valve operation.
1.Shut off hot and cold water supply!
2.Remove the two screws (B1) from the
fitting template (B), then remove the
template, see Fig. [17].
3.Loosen screw (G1) and pull off driver (G),
see Fig. [18].
4.Detach stop ring (N) and note position.
5.Loosen the two screws (J1) and remove
valve cover (J).
6.Pull the existing pressure balancing
cartridge (O) out of the valve body. Do not
damage the O-ring seals, see Fig. [19].
7.Reverse the pressure balancing cartridge
180° by turning it upside down. Place it
into the valve body. Ensure the two
alignment pins (O1) on the rear of the
pressure balancing cartridge are properly
seated in the holes (Z) of the valve body.
Notice the position of hot "H" and cold "C"
markings on the cartridge to assure the
correct position in relation to reversed or
back to back installation.
Reassemble in reverse order. Be sure that
the stop ring (N) is in the previously noted
position.
B
B1
17
J1
J
G
N
18
G1
O1
O
Z
19
950632.book : i95063gb.fm Seite 12 Mittwoch, Oktober 4, 2000 7:42 AM
13
Installation
Maximum Hot Water Limit Setting
On applications requiring limiting the valve
opening from full hot position, the adjustable
hot water limit stop must be reset as de-
scribed below.
1.Detach handle cap (L2) loosen screw (L1)
and remove handle (L), see Fig. [20].
2.Remove the adjustable hot water limit
stop (K).
3.Turn the intermediate ring (M) counter-
clockwise until the outlet water reaches
the desired temperature, see Fig. [21].
4.Place the hot water limit stop (K) over the
splines on the intermediate handle with the
limit stop resting against the wall plate stop
post, see Fig. [22].
5.Close the valve by turning the intermediate
handle (M) clockwise.
6.Reinstall handle as described in Fig. [20]
in reversed direction.
20
L
L1
L2
K
21
M
22
K
M
950632.book : i95063gb.fm Seite 13 Mittwoch, Oktober 4, 2000 7:42 AM
14
Maintenance
Pressure Balancing Cartridge
1.Shut off hot and cold water supply!
2.Detach handle cap (L2) loosen screw (L1)
and remove handle (L), see Fig. [23].
3.Detach hot water limit stop (K) and note
position.
4.Loosen screws (H1) and remove wall
plate (H).
5.Loosen screw (G1) and pull off driver (G),
see Fig. [24].
6.Detach stop ring (N) and note position.
7.Loosen screws (J1) and detach valve
cover (J) with sleeve.
8.Pull the existing pressure balancing
cartridge (O) out of the valve body noting
the location of "H" and "C" marking near
the cartridge inlets.
The pressure balancing cartridge (O) must
be replaced as a complete unit.
Reassemble in reverse order.
Ensure the two alignment pins (O1) on the
rear of the pressure balancing cartridge are
properly seated in the holes (Z) of the valve
body and that the hot "H" and cold "C"
markings are on the correct side.
Be sure that the stop ring (N) is in the
previously noted position.
Check, clean and if necessary replace parts.
Only genuine GROHE replacement parts
must be used.
23
L
L1
L2
H
H1
K
24
Z
G
G1
N
J
J1
O1
O
950632.book : i95063gb.fm Seite 14 Mittwoch, Oktober 4, 2000 7:42 AM
15
Care
Trouble Shooting
We want to ensure that you get long-lasting
satisfaction and pleasure from your GROHE
fitting. Therefore, please read the following
care instructions because damage to the
surface and underlying material resulting
from improper treatment is not covered by
guarantee.
Do not use any abrasive sponges or scou-
ring agents for cleaning. We also advise not
to use cleaning agents containing solvent or
acid, limescale removers, household vinegar
and cleaning agents with acetic acid. They
are aggressive to the surface and will leave
your fitting dull and scratched. As the for-
mulations of commercially available cleaning
agents frequently change, we cannot gua-
rantee they will provide the gentle care our
fitting deserves.
Clean the fitting with a little soap and a moist
cloth only, then simply rinse off and wipe dry.
You can avoid lime spots by drying the fitting
each time it is used. If lime deposits do oc-
cur, remove them with Grohclean (ref. no.
18 078), our environment-friendly cleaning
liquid. Grohclean is specially formulated to
gently clean the surface of our fittings.
Problem Cause Remedy
Shower control
opening through hot
Hot and cold water supplies have
been connected in reverse
Rotate cartridge as described in
chapter
"Reversed Supplies
Installation
"
Shower head drips
after shutting off the
valve
O-ring seal on the inlet of the
cartridge is faulty
Incorrect setting of the stop ring
against the stop pin causing a
partially opened cartridge
Check the O-ring for cuts or
damage and replace if necessary
Detach stop ring and close cartrid-
ge without using excessive force.
Replace stop ring so it is position-
ed against stop pin on the cover
Shower insufficiently
hot
Adjustable hot water limit stop
incorrectly set
Hot water supply temperature too
low
Refer to the instructions in chapter
"Maximum Hot Water Limit
Setting
"
Check hot water source tempera-
ture setting
No flow of hot or cold
water
Either the hot or cold side is not
fully pressurized
Debris caught inside the inlet of
the cartridge
Be sure the system is fully
pressurized
Remove cartridge and flush out or
remove any debris lodged inside
the hot or cold inlets
Valve body too deep in
the wall
The measured rough in or finished
wall surface is incorrect
Install 25mm extension
950632.book : i95063gb.fm Seite 15 Mittwoch, Oktober 4, 2000 7:42 AM
19
Guarantee
Guarantee declaration
Our products correspond to the valid tech-
nical and water supply standards as well as
the relevant approvals requirements. We
guarantee them to be free of design and
production faults at the time of delivery and
that with correct use and care in accordance
with our printed instructions they will function
reliably.
Guarantee period
- The guarantee is valid in private homes for
5 years from the purchase date. Proof of
purchase has to be provided when making
a guarantee claim.
- By use in commercial or institutional appli-
cations the guarantee is valid for 1 year
after first use. An extension of the
guarantee up to 5 years can be achieved
by showing that the product is
professionally maintained each year.
To make a guarantee claim, proof of pur-
chase or, the beginning of use is required.
The guarantee period is not renewed or in-
creased through supply of spare parts or
repair during the guarantee period. The
guarantee period for purchased spare parts
is the same as for original products.
Guarantee performance
A)During the whole guarantee period we will
correct all functional defects for which we
are responsible (limitations see E + F).
B)It is our option if we correct the defects by
repair or replacement.
C)During the above guarantee period we will
not charge for the cost of parts, travel,
working time, freight and packaging
needed to effect the correction of defects.
D)If we are not able to correct the defect we
are prepared to supply a replacement
product.
E)Deliberate or careless damage is not co-
vered by this guarantee. If the installation,
assembly or care instructions that were
valid at the time of installation are not fol-
lowed or the product is used for a purpose
other than that given in the written infor-
mation the guarantee declaration does not
apply. Problems caused by dirt, lime-scale
or aggressive cleaners are not covered by
the guarantee.
F)The guarantee becomes void if repairs are
not carried out competently or spare parts
of non GROHE origin are used.
G)Replaced parts become the property of
GROHE and are to be surrendered to our
service personnel or sent to our registered
offices.
Please enter date of purchase and installation here.
Our address
GROHE Limited
1, River Road
Barking,
Essex, IG11 OHD
GB
Tel.: 01 81 / 5 94 72 92
Fax: 01 81 / 5 94 88 98
© 1999 Friedrich Grohe AG
Friedrich Grohe Aktiengesellschaft · Hauptstraße 137 · 58675 Hemer
Tel. 0 23 72 / 93-0 · Telex 827433 · Fax: 0 23 72 / 93 13 22
950632.book : garant_uk.fm Seite 19 Mittwoch, Oktober 4, 2000 7:42 AM
  • Page 1 1
  • Page 2 2
  • Page 3 3
  • Page 4 4
  • Page 5 5
  • Page 6 6
  • Page 7 7
  • Page 8 8
  • Page 9 9
  • Page 10 10
  • Page 11 11
  • Page 12 12
  • Page 13 13
  • Page 14 14
  • Page 15 15

GROHE 35 235 Installation Instructions And Operating Manual

Category
Sanitary ware
Type
Installation Instructions And Operating Manual
This manual is also suitable for

Ask a question and I''ll find the answer in the document

Finding information in a document is now easier with AI