Page is loading ...

C1000R-AT RECUMBENT BIKE
OWNER’S MANUAL
H1-1225

-2-
Table of Contents
(2013.08 UM6627-10)
Important Safety Information 3
Before You Start 4
Assembly Instruction 5-15
Console Overview 16-18
Monitoring Your Heart Rate 19-21
Exploded View 22
Parts List 23-24

-3-
Important Safety Information
WARNING! Before using this unit or starting any exercise program, consult your physician.
This is especially important for persons over the age of 35 and/or persons with pre-existing
health problems. The manufacturer or distributor assumes no responsibility for personal
injury or property damage sustained by or through the use of this product.
SAFETY PRECAUTIONS AND TIPS
1. It is the owner's responsibility to ensure that all users of this unit have read the Owner's
Manual and are familiar with warnings and safety precautions.
2. This unit has a user maximum capacity of 380 pounds.
3. The unit should only be used on a level surface and is intended for indoor use only. The
unit should not be placed in a garage, patio, or near water and should never be used while
you are wet. We recommend a mat be placed under the unit to protect floor or carpet and
for easier cleaning.
4. Wear comfortable, good-quality walking or running shoes and appropriate clothing. Do
not use the unit with bare feet, sandals, socks or stockings.
5. Always examine your unit before using to ensure all parts are in working order.
6. Allow the unit to fully stop before dismounting.
7. Pets should never be allowed near the unit.
8. Do not leave children unsupervised near or on the unit.
9. Never operate the unit where oxygen is being administered, or where aerosol products are
being used.
10. Never insert any object or body parts into any opening.
11. For safety and to prevent damage to your unit, no more than one person should use the
unit at a time.
12. Service to your unit should only be performed by an authorized service representative,
unless authorized and/or instructed by the manufacturer.
13. Failure to follow these instructions will void the unit warranty.

-4-
Before You Start
Thank you for purchasing this new Recumbent! This quality product you have chosen was
designed to meet your needs for cardiovascular exercise. Before you start, please read the
Owner's Manual and become familiar with the operation of your new unit.
Remember to take the time to perform the stretching exercises provided to avoid
injury.
If you are taking medication, consult your physician to see if the medication will affect your
exercise heart rate.
If you have heart problems, you are not active, and/or are over the age of 35 years, do not
use the pre-set programs or start an exercise program without first contacting and receiving
approval from your physician.
To avoid the risk of electrical shock, always keep the console dry. Do not spill liquids on
the console. We recommend a sealed water bottle for beverages consumed while using the
unit.
Please review the following drawing below to familiarize yourself with the listed parts.

-5-
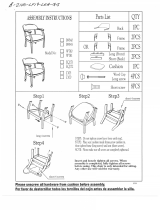
Assembly Instruction
FIGURE 1
Step 1:
Connect Foot Tubes (5 &6) to Main Frame (1) using :
Qty 4 – (85) M8 X70mm Hex Head Screw
Qty 8 – (101) 8x19x1.0t Washer
Qty 4 –(79) M8 X20L Head Screw
Note:
(A) Make sure the transportation wheels and the Foot Cap Adjusters (38) under rear foot
caps are assembled onto the front and rear Foot Tubes(5&6) .
(B) Make sure that the Foot Tubes (5 &6) with four Foot Caps (32) are assembled onto the
two sides of Foot Tube (5&6) .
(C) Foot Adjusters (38) can help to adjust bottom height when the ground is uneven.
FIGURE 1
5
32
32
101
79
79
85
85
79
79
101
101
6
38
38
32
32
1
REMOVE ALL SECURITY TAPE AND WRAPPING
BEFORE BEGINNING

-6-
Assembly Instruction
FIGURE 2
Step 1:
Install the Back Leaning Bracket (7) onto the Seat Carriage Slider (8) with four
Screws (80) and four washers (101) as showed in diagram.
Step 2:
Insert the Locking Handle (19) into the bracket of Seat Carriage Fixer (2) and screw
with two Phillips screws (71).
FIGURE 2
80
80
80
101
101
101
8
7
19
71

-7-
Assembly Instruction
FIGURE 3
Step1:
Attach the Rear Handlebar(4) to platform of Seat Carriage Slider(8) and lock them
together by four Washers (99) and four Hex Head Screws (78).
Step2:
Connect the Long Extension Pulse Wire (106) out from hole of the Seat Carriage
Slider(8) with the Hand Pulse Wire (109) together out from the Rear Handlebar(4).
FIGURE 3
78
99
99
4
109
106
7
8

-8-
Assembly Instruction
FIGURE 4
Step1:
Attach Seat Pad(43) to the Seat Carriage Slider (8) using four Washers (98) and
Screws (68).
Step2:
Attach Back Pad(46) to the Back Leaning Bracket (7) ,then lock them together by
using Washers (98) and Screws (68).
Step3:
Press the Back Pad Cover(47) into back side of Back Pad (46).
FIGURE 4
43
46
47
7
98
98
68
68
68
68
98
98
8

-9-
Assembly Instruction
FIGURE 5
Step 1:
Thread the Right Pedal (34) into the hole of Right Crank (18), then secure in place by
turning it clockwise to tighten.
Note: Right Pedal (34) is marked with an “R”.
Step 2:
Thread the Left Pedal (33) into the hole of Left Crank(17) ,then secure in place by turning it
counter-clockwise to tighten.
Note: Left Pedal (33) is marked with an “L”
FIGURE 5
35
33
36
34
18
17

-10-
Assembly Instruction
FIGURE 6
Step 1:
Slide the Console Tube (11) to get through the Console Tube Collar(52)
Step 2:
Connect the Extension Wire (112) , Short Extension Pulse Wire(107)in the Console Tube
(11) to Gear Box Wire(110) and Long Extension Pulse Wire(106) respectively in the Main
Frame (1) as shown in the diagram.
Step 3:
Slide the Console Tube (11) onto the Main Frame (1) and secure using Screws(76&84),the
Washers (101) , and the Nylon Nuts (93).
Step 4:
Put the Console Tube Collar (52) down and fix it to the Console Tube (11) with Screws (62)
FIGURE 6
93
101
101
1
84
76
76
101
101
52
62
62
107
112
11
110
106
112
107

-11-
Assembly Instruction
FIGURE 7
Attach the Front Handlebar (3) to Console Tube (11) using three Washers (101) and three
Hex Head Screws (78).
FIGURE 7
11
112
107
3
101
101
101
78
78
78

-12-
Assembly Instruction
FIGURE 8
To change KM or ML , please push the switch to select scale (KM or ML)

-13-
Assembly Instruction
FIGURE 9
Step 1:
Connect the Short Extension Pulse Wires (107) and Extension Wire (112) to the wires from
Monitor (114). Secure Monitor (114) to Console Tube (11) using four Screws (70).
Note: The four Screws (70) will already be installed into the back of Monitor (114) when
you remove it from the box.
FIGURE 9
112
107
70
11
114

-14-
Assembly Instruction
FIGURE 10
The monitor only can be powered by using the AC adaptor input, pls make sure the AC
adapter has already been pluged into the adapter jack on the bottom housing. (as showed on
the drawing)

-15-
Assembly Instruction
Congratulations!
You have completed the assembly of your new Recumbent!

-16-
Console Overview
FUNCTION
SCAN : Alternates between WATTS/CALORIES and RPM/SPEED. 6 seconds per display.
RPM : 0~15~999
SPEED : 0.0~99.9 km/h
TIME : 0:00~99:59.
DISTANCE : 0.00~99.99 km
CALORIES : 0~999.
PULSE : P~30~240
HEART SYMBOL : ON / OFF flashes
MANUAL : 1~16 level
PROGRAM : P1~P12
WATTS CONSTANT : 10~350
PERSONAL : U1~U4
H.R.C : 55%、75%、90%、IND (TARGET)
PULSE : P~30~240,max value is available.
USER DATA : U0 ~U4 (U1 ~ U 4 memorized user data
AGENDA / SEX : GIRL / BOY SYMBOL select
AGE : 10-25-99
HEIGHT : 100-160-200 ( CM ) / 40-60-80 (INCH)
WEIGHT : 20-50-150 (KG) / 40-100-350 (LB)
BMI : 14.5- 70
FAT% : 5.0%~50%
FAT CODE : S、M、L、XL
DESCRIPTION
This product is used UM series motor system.
REVOLVING- IRCLE-BAR –DISPLAY on Top of LCD screen
USER see and follow up points of REVOLVING-CIRC-BAR-DISPLAY step by step to operate this computer to finish
inputting setting initial function mod and function value. Below are key words to let you easy to know how to use this
computer.
1. PRE-SET USER/SEX/AGE/HEIGHT/WEIGHT
User inputting his/her real user data (sex / age/ height / weight) into computer to stove it to be used in
calculated reference.
FUNCTION CONTROL
MODE
TRAINING
PROGRAMS
SPEED / RPM
TIME
WATTS / CALORIES
Target Heart Rate
USER DATA
REVOLVING- IRCLE-BAR –DISPLAY
PROGRAM P1-P12
WATT BAR
PLUG IN PORT
TARGET H.R.C BAR
QUICK CONTROL MODE SELECTION KEY
WATT / PERSONAL / H.R.C.
QUICK CONTROL MODE SELECTION KEY
BODY FAT / MANUAL / PROGRAM
DOWN KEY
UP KEY
RECOVERY KEY
STOP KEY
ENTER KEY
RESET KEY
DISTANCE

-17-
2. SELECT MANUAL/PROGRAMS/ WATT CONSTANT/PERSONAL/H.R.C
User can choose different control mode to start his work out. See below is main description of each control
mode.
3. EXECUTE MANUAL/PROGRAMS/ WATT CONSTANT/PERSONAL/H.R.C
Execute selected control mode.
4. RE-SET TIME/DISTANCE/CALORIES/WATTS/HEART RATE
Setting and inputting user wanted function value of above, the function value of display will count down to zero;
or user can not inputting these, just forget setting value, computer will know your workout is from 0 to end value.
5. PRESS ENTER/UP/DOWN/START/PAUSE
USE UP / DOWN key to increase / decrease function value.
After setting each function value to press “ENTER” to confirm your setting
START / PAUSE- Finish previous setting step to press START to start operating; user can press “PAUSE” if
he/her want to pause workout a while.
6. TEST RECOVERY/BODY FAT
Press RECOVERY or BODY FAT, the computer will calculate your recovery and body fat value on display
regarding with your user data and actual workout function value.
FUNCTION DESCRIPTION
MANUAL Set the resistance level using the dot matrix display then (if required) set exercise parameters
TIME/DISTANCE / CALORIES / PULSE then press START/STOP to START manual program.
PROGRAM 12 automatic adjusting programs with control exercise (P1~P12),
Resistance level can be adjusted during PROGRAM DIAGRAM is flashing.
WATTS CONSTANT User can default WATTS value at his/her desire 10-350 watts between 10~350 watts by using
the UP/ DOWN knob. To fix WATTS constant value and then press ST/STOP key. Use
WATTS control mode to train yourself in different WATTS’s constant.
PERSONAL Create your own Program profile through U1~U4 by setting the resistance level for each individual
segment. Then the Program will be automatically saved for future use. U0 ENTER can be set the
same as U1~U4 but this Program cannot be saved.
H.R.C HEART RATE CONTROL- Select your own target Heart Rate of choose one of the preset programs
55%, 75%,or 90%. Please enter your age into the User Data to ensure that your target heart rate is
set correctly. The PULSE display will flash when you have reached your target heart rate according
to the Program you have chosen.
i. 55% -- DIET PROGRAM
ii. 75% -- HEALTH PROGRAM
iii. 90% -- SPORTS PROGRAM
iv. TARGET—USER SET TARGET HEART RATE
RECOVERY:
When you have finished your workout, press RECOVERY. For RECOVERY to function correctly, it needs your Heart
Rate input. TIME will count down from 1 minute and then your fitness level from F1 to F6 will be displayed.
NOTE: during RECOVERY, no other displays will operate.
F 1 ~ F6 = RECOVERY HEART RATE LEVEL
Operating ENTER:
1. User press H.R.C key to start the H.R.C.
2. Get the result from F1 - F6.
Condition Score Heart Rate
Excellent
F1 Above 50
Good
F2 40 ~ 49
Average
F3 30 ~ 39
Fair
F4 20 ~ 29
Poor
F5 10 ~ 19
Very Poor
F6 Under 10
Operating Mode:
1. User press H.R.C key to start the H.R.C testing
2. Get the result from F1 - F6.

-18-
BODY FAT : Press the “BODY FAT” key, and hold hand-pulse with both hand 6 seconds. The LCD monitor
show the user 1-user 4‘s body fat percent.
AREA GENDER
THIN
S
STAND
M
FAT
L
EXTRA FAT
XL
MALE <10% 10%~19.9% 20%~24.9%
≧25%
ASIA
FEMALE <20% 20%~29.9% 30%~34.9%
≧35%
MALE <13% 13%~25.9% 26%~30% >30%
EUROPE
FEMALE <23% 23%~35.9% 36%~40% >40%
OPERATION
1. After power-on U1 by default but you can select any User ENTER by turning the UP/DOWN key the press the
ENTER key for confirmation. Input user data, sex, age, height, weight on top –right window. Then press ENTER
key for confirmation.
2. Function Control display will flash indicating you can select the Programs P1-P12 by turning UP/DOWN key and
then press ENTER key for confirmation. Any of the default values can be changed by pushing the ENTER key
until the desired program profile is flashing. Press the ENTER key again for confirmation.
3. When the Program and other protocols are entered press START/STOP key and begin your workout.
4. User can choose inputting PLUG-IN RECEIVER and put on CHEST BELT optionally, display pulse rate on the
computer.
5. VERTICAL BAR DISPLAY
KEY FUNCTIONS
1. QUICK KEY : BODY FAT / MANUAL / PROGRAM / RECOVERY / WATT / H.R.C.
2. ENTER KEY : Function select and confirmation key.
3. UP/DOWN KEY : Increase and decrease or select option.
4. RESET KEY : Reset all displays to default values.
5. START/STOP KEY : START / STOP key
6. RECOVERY KEY : Fitness test by measuring your recovery rate.
7. PLUG IN port : The port offer user to input PLUG-IN receiver from outside.
TIPS
1. Option: Plug in AC Adaptor (6 VOLT, 1A
).
2. Keep moisture away from computer.
TARGET HEART RAT BAR
MAXIM HEART RATEF = 220-AGE
TARGET HR = A% OF MAX HEART RATE
WATTS BAR
SHOWING USER’S WATT value by this easily bar
display

-19-
Monitoring Your Heart Rate
Monitoring Your Heart Rate
To obtain the greatest cardiovascular benefits from your exercise workout, it is important to
work within your target heart rate zone. The American Heart Association (AHA) defines
this target as 60%-75% percent of your maximum heart rate.
Your maximum heart rate may be roughly calculated by subtracting your age from 220.
Your maximum heart rate and aerobic capacity naturally decreases as you age. This may
vary from one person to another, but use this number to find your approximate effective
target zone. For example, the maximum heart rate for an average 40 year-old is 180 bpm.
The target heart rate zone is 60%-75% of 180 or 108-135 bpm.
See Fitness Safety on next page
Before beginning your workout, check your normal resting heart rate. Place your fingers
lightly against your neck, or against your wrist over the main artery. After finding your
pulse, count the number of beats in 10 seconds. Multiply the number of beats by six to
determine your pulse rate per minute. We recommend taking your heart rate at these times;
at rest, after warming up, during your workout and two minutes into your cool down, to
accurately track your progress as it relates to better fitness.
During your first several months of exercising, the AHA recommends aiming for the lower
part of the target heart rate zone-60%, then gradually progressing up to 75%. According to
the AHA, exercising above 75% of your maximum heart rate may be too strenuous unless
you are in top physical condition. Exercising below 60% of your maximum will result in
minimal cardiovascular conditioning.
Check your pulse recovery rate – If your pulse is over 100 bpm five minutes after you stop
exercising, or if it’s higher than normal the morning after exercising, your exertion may
have been too strenuous for your current fitness level. Rest and reduce the intensity next
time.

-20-
Monitoring Your Heart Rate
(MHR) = Maximum Heart Rate
(THR) = Target Heart Rate
220 - age = maximum heart rate (MHZ)
MHZ x .60 = 60% of your maximum heart rate.
MHZ x .75 = 75% of your maximum heart rate.
For example, if you are 30 years old, your calculations will be as follows:
220 - 30 = 190
190 x .60 = 114 (low end or 60% of MHZ)
190 x .75 = 142 (high end or 75% of MHZ)
30 year-old (THR) Target Heart Rate would be 114-142
See Heart Rate Table (on next page) for additional calculations.
Fitness Safety The target heart rate chart indicates average rate zones for different
ages. A variety of different factors (including medication, emotional state,
temperature and other conditions) can affect the target heart rate zone that is best
for you. Your physician or health care professional can help you determine the
exercise intensity that is appropriate for your age and condition.
/