
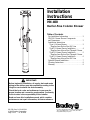
Installation
Instructions
HN-400
Barrier-Free Column Shower
P.O. Box 309, Menomonee Falls, WI 53052-0309
TEL: 1-800-BRADLEY FAX: (262) 251-5817
http://www.bradleycorp.com
Table of Contents
Pre-Installation Information . . . . . . . . . . . . . . . .2
HN-200 Column Shower Components
and Dimensions . . . . . . . . . . . . . . . . . . . . . . . . . .2
Installation Instructions
Type A Column Shower . . . . . . . . . . . . . . . . . .3
Supplies from Below/Vent Off Line
Type B Column Shower Installation . . . . . . . .4
Supplies from Above/Vent Through Column
Type H Column Shower Installation . . . . . . . .5
Supplies from Below/Vent Through Column
Type O Column Shower Installation . . . . . . . .6
Supplies from Above/Vent Off Line
Optional Shroud Installation . . . . . . . . . . . . . . . .7
Cleaning Instructions . . . . . . . . . . . . . . . . . . . . .9
Warranty . . . . . . . . . . . . . . . . . . . . . . . . . . . . . . .9
IMPORTANT:
Before beginning installation, all supply, drain and waste
piping to the shower must be completed according to the
rough-ins received with the drain assembly.
Check the local codes and ordinances in your area for
proper location and connection requirements. Conformity
to local codes is the responsibility of the installer.
Read and save this installation manual, which contains
maintenance and repair information, for future reference.
215-781; Rev. D; EN 03-310
© 2003 Bradley Corporation
Page 1 of 9 12-16-2003

42"
(1067 mm)
TO FLOOR
48"
(1219 mm)
TO FLOOR
INLINE
BACKFLOW
PREVENTER
169-988
QUICK
DISCONNECT
169-937
SUPPLY
ELBOW
169-941
GRAB BAR
S53-039
HOSE
169-937
HOSE SPRAY
169-936
MOUNTING
POST
S70-078
SWIVEL
CONNECTOR
169-943
DIVERTER
S45-323
SOAP TRAY
126-005A
2 Bradley Corporation • 215-781 Rev. D; EN 03-310
Barrier-Free Column Shower
HN-400 Installation Instructions
12-16-2003
Pre-Installation Information
Overview
The Bradley HN-400 Barrier-Free Column Shower features one station that is adapted for use by the
handicapped. Valve and showerhead height for all wash stations, including the handicapped station,
measures 42" (1067 mm).
Components
Material: Column showers are constructed of 16-gauge, type 304 stainless steel. The base flange is
14-gauge stainless steel. All exposed stainless steel parts are #4 finish. Exterior brass components are
polished and chrome-plated.
Handicapped Station: The handicapped station includes a grab bar, diverter valve, hand-held
shower with bracket, in-line backflow preventer, and quick disconnect (see shower components and
dimensions shown below).
HN-400 Column Shower
Components and Dimensions
Supplies required for installation:
• Supply piping to column’s 3/4"
type “L” copper tubing
• 2" NPT vent pipe (for type B and
type H drains only)
• (5) 5/16" screws (for shroud slip
ring installation)

3Bradley Corporation • 215-781 Rev. D; EN 03-310
Barrier-Free Column Shower
Installation Instructions HN-400
12-16-2003
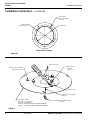
Installation Instructions for Type A HN-400 Column Shower
Step 1: Install column shower components
NOTE: Flush supply lines before making connections.
1. Remove the five bolts that secure the disposable washer to
the drain and lift the disposable washer off.
2. Bolt the column shower to the drain with the five bolts
(removed in procedure #1) and oval washers provided (see
Figure 1).
Step 2: Connect water supply
1. Remove the two 1/4"-20 screws from the access panel on
the lower body of the column shower and lift the panel off.
2. Through the access opening, connect water supplies to the
shower’s 3/4" copper tubing as shown in Figure 2 (piping
supplied by installer).
3. Turn on water to the shower and test for leaks and adequate
water flow.
4. Replace the access panel onto the shower with 1/4"-20 screws provided.
NOTE: For column shower drains with a dome grate drain, install the two halves of the grate with
the screws provided after the column installation is complete.
(5) 5/16"-18
HEX-HEAD
BOLTS
160-092
(5) WASHERS
142-034
Figure 1
Figure 2
Supplies from Below/Vent Off Line

4 Bradley Corporation • 215-781 Rev. D; EN 03-310
Barrier-Free Column Shower
HN-400 Installation Instructions
12-16-2003
Installation Instructions for Type B HN-400 Column Shower
Step 1: Install column shower components
NOTE: Flush supply lines before making connections.
1. Remove the five bolts that secure the disposable washer to
the drain and lift the washer off.
2. Loosen the screw(s) securing the shower cover and lift the
cover off. DO NOT remove the screw(s)!
3. Insert a 2" NPT vent pipe (supplied by installer) into the shower.
NOTE: Make sure that vent pipe does not snag internal wiring or
come in contact with electronic components.
4. Position the shower over the drain and screw the 2" NPT
vent pipe into the vent connection (see Figure 4).
5. Bolt the shower to the drain with the five bolts (removed in
procedure #1) and oval washers provided (see Figure 1).
Step 2: Connect water supply
1. Drop the supplies to the top of the column shower.
2. Slide the column cover up the vent and supply piping.
NOTE: If you are installing a column shroud, slide the slip ring up the vent and supply piping first,
and then slide the column cover up (see page 7 for shroud installation).
3. Make supply connections. Supply connection must be made inside the top of the shower so that
there is no interference with the piping and the column cover.
4. Turn on water to the shower and test for leaks and adequate water flow.
5. Secure the column cover with the screws provided.
NOTE: For column shower drains with a dome grate drain, install the two halves of grate with the
screws provided after column installation is complete.
(5) 5/16"-18
HEX-HEAD
BOLTS
160-092
(5) WASHERS
142-034
Figure 3
Figure 4
Supplies from Above/Vent Through Column

5Bradley Corporation • 215-781 Rev. D; EN 03-310
Barrier-Free Column Shower
Installation Instructions HN-400
12-16-2003
Installation Instructions for Type H HN-400 Column Shower
Step 1: Install column shower components
NOTE: Flush supply lines before making connections.
1. Remove the five bolts that secure the disposable washer to
the drain and lift the washer off.
2. Loosen the screw(s) securing the shower’s cover and lift the
cover off. DO NOT remove the screw(s)!
3. Insert a 2" NPT vent pipe (supplied by installer) into the shower.
NOTE: Make sure that the vent pipe does not snag internal wiring
or come in contact with the electronic components.
4. Position the shower over the drain and screw the 2" NPT vent
pipe into the vent connection (see Figure 6).
5. Bolt the shower to the drain with the five bolts (removed in
procedure #1) and oval washers provided (see Figure 5).
Step 2: Connect water supply
1. Remove the two 1/4"-20 screws from access panel on lower
body of column shower and lift panel off.
2. Through access opening, connect water supplies to the shower’s 3/4" copper tubing as shown in
Figure 6 (piping supplied by installer).
3. Slide column cover over vent.
NOTE: If you are installing a column shroud, slide the slip ring up the vent and supply piping first,
and then slide column cover up (see page 7 for shroud installation).
4. Turn on water to the shower and test for leaks and adequate water flow.
5. Replace access panel onto shower with the 1/4"-20 screws provided.
NOTE: For column shower drains with a dome grate, install the two halves of grate with the screws
provided after the column installation is complete.
(5) 5/16"-18
HEX-HEAD
BOLTS
160-092
(5) WASHERS
142-034
Figure 5
Figure 6
Supplies from Below/Vent Through Column

6 Bradley Corporation • 215-781 Rev. D; EN 03-310
Barrier-Free Column Shower
HN-400 Installation Instructions
12-16-2003
Installation Instructions for Type O HN-400 Column Shower
Step 1: Install column shower components
NOTE: Flush supply lines before making connections.
1. Remove the five bolts that secure the disposable washer to
the drain and lift the washer off.
2. Bolt the shower to the drain with the five bolts (removed in
procedure #1) and oval washers provided (see Figure 7).
3. Loosen the screw(s) securing the shower’s cover and lift the
cover off. DO NOT remove the screw(s)!
Step 2: Connect water supply
1. Drop the supplies to the top of the column shower.
2. Slide the column cover up the vent and supply piping.
NOTE: If you are installing a column shroud, slide the slip ring
up the vent and supply piping first, and then slide the column
cover up (see page 7 for shroud installation).
3. Make the supply connections. The supply connection must be
made inside the top of the shower so that there is no interference with the piping and the column
cover.
4. Turn water to the shower on and test for leaks and adequate water flow.
5. Secure the column cover with the screws provided.
NOTE: For column shower drains with a dome grate, install the two halves of the grate with the
screws provided after the column installation is complete.
(5) 5/16"-18
HEX-HEAD
BOLTS
160-092
(5) WASHERS
142-034
Figure 7
Figure 8
Supplies from Above/Vent Off Line

7Bradley Corporation • 215-781 Rev. D; EN 03-310
Barrier-Free Column Shower
Installation Instructions HN-400
12-16-2003
Installation Instructions for Optional
Column Shower Shroud
NOTE: The column shower must be installed before
the shroud. The shroud clips and knock-outs in the
column cover must also be prepared. Before making
the supply connections, slide the shroud slip ring up
the vent and supply piping.
IMPORTANT: If the shroud is longer than 48"
(it has a welded seam rather than a snap
together hem) it must also be slid up the vent
and supply piping.
If the supply connections are completed prior to the
shroud installation, the supplies will have to be dis-
connected in order to slide the slip ring (and shroud if
over 48" long) over the vent and piping.
Step 3: Preparing the Column Cover
1. Remove the column cover from the top of the
shower by loosening the screw(s) that secures the
column cover retainer.
2. Carefully remove the necessary knock-outs from
the cover (see Figure 11).
3. Insert the three shroud clips into the locations
shown in Figure 11. Snap the clips in place using
a flat blade screwdriver.
4. Reassemble the cover on shower and proceed
with remainder of installation.
Step 4: Complete the Installation
1. Make sure the slip ring (and shroud if required)
is in place over the vent and supply piping.
2. Fasten the slip ring to the ceiling with five 5/16"
diameter screws (supplied by installer) (see
Figure 10 for screw location dimensions).
3. Bring the shroud seam around the vent and sup-
ply piping and slide the shroud together (0-48"
long shrouds only). Fasten hem together using
the supplied #6-32 screws.
4. With the column cover in place and the supply
connections made, lower the shroud and fasten to
the column cover with the #10-24 screws
provided (see Figures 9 and 11).
SLIP RING
S57-020A (12" LONG)
S57-141 (7" LONG)
(SLIDES INSIDE SHROUD -
FASTEN TO CEILING WITH
5/16" SCREWS SUPPLIED
BY INSTALLER)
SHROUD
(0-48" LENGTHS
HAVE HEMMED EDGE)
(54"-72" LENGTHS
HAVE WELDED SEAM)
BOTTOM OF
SLIP RING
SCREW
160-400
Figure 9

8 Bradley Corporation • 215-781 Rev. D; EN 03-310
Barrier-Free Column Shower
HN-400 Installation Instructions
12-16-2003
Installation Instructions .....continued
SHROUD CLIP
159-413
(QTY. 3)
#10-24 x 3/4" SCREW
160-142
RETAINER-COLUMN COVER
132-049
COLUMN COVER
107-062A - 2-5 PERSON
107-074A - 6 PERSON
107-529 - 6 PERSON WITH THERMOBLENDER
107-530 - 2-5 PERSON WITH THERMOBLENDER
KNOCK-OUTS
KNOCK-OU
T
Slip Ring Bolt Pattern
BOLT CIRCLE
(5) 3/8" DIA.
EQUALLY SPACED
HOLES
#10-24 x 1/2" SCREW
160-245 (QTY. 3)
7-3/8" DIA
6-3/8" DIA
Figure 10
Figure 11

9Bradley Corporation • 215-781 Rev. D; EN 03-310
Barrier-Free Column Shower
Installation Instructions HN-400
12-16-2003
Cleaning Instructions
IMPORTANT: Cleanliness is of utmost importance. Do not permit salty solutions to
evaporate and dry on stainless steel. Never use ordinary steel wool or
steel brushes on stainless steel. Always use stainless steel wool or
stainless steel brushes.
1. Remove ordinary deposits of dirt and grease with soap and water. Whenever possible, the metal
should be thoroughly rinsed and dried after washing.
2. Use stainless steel polishing powder to get rid of tightly adhering deposits.
3. Look for the source of the rust in some iron or steel not actually a part of the stainless steel struc-
ture. Sometimes the appearance of rust streaks on stainless steel leads to the belief that the stain-
less steel is rusting. A steel nail or screw may be the cause of the trouble.
4. If the showerhead delivers an uneven spray, remove the showerhead from the unit, disassemble,
and remove foreign matter.
5. Reassemble showerhead and reinstall into unit.
HN-400 Column Shower Warranty
Bradley Corporation warrants to commercial and institutional purchasers only each unit free from defects in
material and workmanship under normal use and service upon the following terms and conditions:
1. This warranty is limited to replacing or repairing, at our option, transportation charges prepaid by the
purchaser, any Bradley unit or part thereof which our inspection shall show to have been defective within
the limitations of this warranty.
2. The period during which Column Shower components are warranted is one (1) year, measured from the
date of our invoice.
3. This warranty does not cover installation or any other labor charges and does not apply to any units
which have been damaged by accident, abuse, improper installation or improper maintenance.
4. The replacement or repair of defective units as stated in this warranty shall constitute the sole remedy of
the purchaser and the sole liability of Bradley Corporation under this warranty. Bradley Corporation
shall not otherwise be liable under any circumstances for incidental, consequential or indirect damages
caused by defects in the repair or replacement thereof.
5. This warranty extends only to commercial and institutional purchasers and does not extend to any others,
including consumer customers of commercial and institutional purchasers.
6. This warranty is in lieu of all other warranties, express or implied, including any implied warranty of
merchantability or fitness for a particular purpose or otherwise.
-
 1
1
-
 2
2
-
 3
3
-
 4
4
-
 5
5
-
 6
6
-
 7
7
-
 8
8
-
 9
9


Ask a question and I''ll find the answer in the document
Finding information in a document is now easier with AI
Related papers
-
Bradley s19314 series Installation guide
-
Bradley Halo S19314AC Installation guide
-
-
-
-
-
Bradley Smoker WS-1X User manual
-
-
-
Bradley Smoker WF2708 User manual
Other documents
-
APW Wyott GCRB-24H Datasheet
-
Bradley Corporation S19-120ABF Installation guide
-
-
-
-
-
-
-
Bosch Appliances GWH 425 EF User manual
-