
0
0

Content
Manual and Reference --------------------------------------------------------------- 2
Assembly Instructions--------------------------------------------------------------3-5
Folding Instructions -------------------------------------------------------------------6
Technical Parameter --- ---------------------------------------------------------------7
Grounding methods -------------------------------------------------------------------7
Operation Guide----------------------------------------------------------------------8-12
Exercise Instruction ------------------------------------------------------------------13
Maintenance Instruction---------------------------------------------------------13-14
Running belts centering ------------------------------------------------------------15
Exploded Drawing --------------------------------------------------------------------16
Parts list ------------------------------------------------------------------------------17-18
1

2
MANUAL AND REFERENCE
WARNING
Read all instructions carefully before using this product. Retain this owner’s manual for future reference:
----When using this treadmill, keep the safety pull pin rope attached to your clothes.
----When you are running, keep your hands swinging natural, look forward,
Never look down at your feet.
----Increase the speed step by step when running.
----When emergency happens, stop the treadmill by pulling the safety stop switch cord that should be
attached to your clothing immediately.
----Leave the treadmill only after the running belt has stopped completely.
Caution: Read the assembly instruction carefully, follow the instructions when assembling.
ATTENTION
1、 Before starting any exercise program, consult with your physician or health professional.
2、 Check all the bolts are tight.
3、 Never put the treadmill in wet areas, or it will cause problems and void warranty.
4、 We take no responsibility for any problems or injuries due to above reasons.
5、 Dress in sport clothes and shoes before running.
6、 Do not do exercise at least 40 minutes after eating a meal.
7、 To prevent injuries, please warm up before exercise.
8、 Consult with doctor before exercise if you have high blood pressure or any health issues.
9、 The treadmill is only used for adults。
10. Provide the elderly, children and handicapped with good adult supervision.
11、Do not plug anything into any parts of this equipment, or it may cause damage.
Do not lengthen the power cable or change the power cable plug; do not put any thing heavy on the
power cable or put the power cable near heat source;
12、Cut off the power when the equipment is not in use. Unplug power cord from wall socket , do not pull
the power
cord when removing the plug from the wall socket.

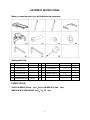
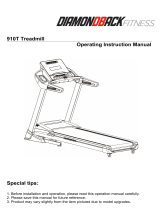
ASSEMBLY INSTRUCTIONS
When you open the carton, you will find the below spare parts:
Spare parts list:
No.
Description Specification Qty
No.
Description Specification
1 Main Frame 1 83
Sheet metal screw
M6*16 6
3 Left upright tube 1 88
Lock washer
10 12
4 Right upright tube 1
20
5#
Allen Wrench
5 mm 1
10 Handle bar tube 1
21
6#
Allen Wrench
6 mm 1
113
Console frame 1 22
Philip Screw driver
S=13、14、15
1
67
Socket flat head bolt
M10*20 12
FIXING TOOLS:
5#ALLEN WRENCH 5mm 1pcs、6# ALLEN WRENCH 5mm 1pcs
WRENCH W/SCREW DRIVER S=13、14、15 1pcs
3

Notice: Do not turn on before assembly is done.
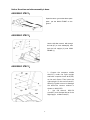
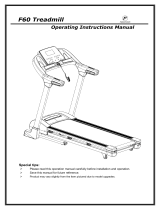
ASSEMBLY STEP 1:
4
Open the carton,get out the above spare
parts , put the MAIN FRAME on the
ground.
ASSEMBLY STEP 2:
Use the 6# allen wrench, drill through
the bolt (67) to Lock washer(88), then
lock the Left upright (3) onto MAIN
FRAME (1)
ASSEMBLY STEP 3:
1 、 Connect the computer middle
wire(117) under the right upright
tube with computer lower wire(118)
on the main frame. Then insert the
right upright (4) into main frame(1)
Warning: Please note not to damage
the wires.The connect method is
shown on lable(126)
2 、 Use 6# wrench, M10*20
screw(67) and flat head bolt to fix the
Right upright to Main Frame(1)

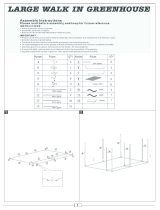
ASSEMBLY STEP 4:
1、Pull through the computer middle
wire of Handle bar tube(10) from
the left and right Upright(3,4).
Then insert the handle bar tube into
left and right upright;
2、Fix the handle bar tube(10) and
left/right upright with screw driver
and M6*16 sheet metal screw(83)
ASSEMBLY STEP 5:
1.Connect the computer upper
wire(116,127,134,135) with
computer middle wire(117a) out of
the Left/Right Upright(3,4).
Warning: Please make sure note
not to damage the wires. The
connect method is shown on
lable(126)
2.Use wrench, M10*20 screw(67)
and washer(88) to fix the computer
(113) to the left/Right Upright(3,4)
ATTENTION : Please complete all assembly instruction before
tightening and checking all bolts. Do the following operation after
checking everything is OK. Before you use the treadmill, pls read the
instruction carefully.
5

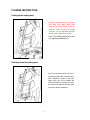
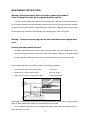
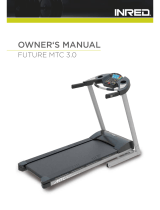
FOLDING INSTRUCTION
Folding up the walking deck
Hold the handle bar with one hand
and with the other hand hold
support (A), then PUSH in an up
direction until the deck is locked
securely into the adjusting bracket
as the upper-left picture shows.
Note: The walking deck must lock
into adjusting bracket(119)
Unfolding down the walking deck
Hold the handle bar with one hand,
and Hold Support place A with the other
hand, Support the weight of the deck
where using your foot to release the
locking bracket(119), Release the deck
and move away, the deck will lower itself
to the floor without assisitance.
6

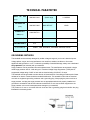
TECHNICAL PARAMETER
BUILT UP SIZE
(mm)
2060*835*1425 Speed range 1.0-20KM/h
FOLDABLE IZE
(mm)
1060*835*1885 MAX WEIGHT 130KG
RUNNING BELT
SIZE (mm)
2900*500*T2.8
NET WEIGHT
117.5KG
INCLINE LEVELS
0-15
1 LCD DISPLAY SPEED, TIME, DISTANCE, CALORIES, INCLINE, PULSE
GROUNDING METHODS
This treadmill can be seriously damaged by sudden voltage changes in your home’s electrical power.
Voltage spikes, surges, and noise interference can result from weather conditions or from other
appliances being turned on or off. To reduce the possibility of treadmill damage, always use a dedicated
surge protector (not included) with your treadmill.
Surge protectors can be purchased at most hardware stores. The manufacturer recommends a single
outlet surge protector with UL 1449 rating as a Transient Voltage Surge Suppressor (TVSS) with UL
suppressed voltage rating of 400V or less and an electrical rating of 240VAC, 15 amps.
This treadmill must be grounded to reduce the risk of electrical shock. Grounding provides a path of least
resistance for electric current should the treadmill malfunction. This treadmill comes with an electrical
cord with an equipment-grounding conductor and a grounding plug. Always plug the power cord into a
surge protector, and plug the surge protector into an appropriate outlet that is properly installed and
grounded in accordance with all local codes and ordinances. Do not connect other equipment to the
surge protector or this could cause permanent damage to your treadmill.
This product is for use on a nominal 240-volt circuit and has a grounding plug that looks like the plug
illustrated in the drawing below.
7

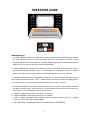
OPERATION GUIDE
WINDOW DISPLAY:
1、”PULSE” WINDOW: Show user’s pulse. When the user holds the Pulse bar with both hands or attach
the chest transmitter belt, it can track and display the user’s pulse approx 5 seconds, and the
indicating light will be on at the same time. The pulse display range will be 50-200 times/minute(This
data just is for your refernce and can’t be as the medicine data)
2、“TIME” WINDOW: Show running time. Time count up from 0:00 to 99:59, when up to 99:59, the man
chine will stop smoothly and show “ End “ in window; When time count down, it will be from setting
data to 0:00, when down to 0:00, the machine will stop smoothly and show “End “ in window.
3. “DISTANCE” WINDOW: Show running distance. Count up from 0.00 to 99:9, when up to 99.9, the man
chine will stop smoothly and show “ End “ in window; When count down, it will be from setting data to
0.00, when down to 0.00, the machine will stop smoothly and show “End “ in window.
4.“CALORIES” WINDOW: Show runner’ s calories. it will show from 0 to 999, when up to 999, it will clear
the data and recount from 0, when exercise in a record distance, the set calorie will run down until it
count down to 0, and meanwhile the window will show “end”.
5、“INCLINE” WINDOW: Show incline, the range is 0-15 section.
6、“SPEED” WINDOW: Show speed, the range is 1.0-20 KM/H.
7、“LAPS” :It display 400 meters virtual racetrack , circles and program drawing and so on. It display
P1-P9,U1-U3,HP1-HP3 under pre-setting status.
8、“INCLINE+SPEED”:
Showing the incline and speed when in PROGRAM
8

9
BUTTON FUNCTION:
1、“PROGRAM” Button:When the treadmill is not running, press the program button to choose one of the
programs: 9 preset programs, 3 user programs and 3 heart rate programs.
“Manual quick start” must press the start button, the treadmill count dowm from 3 to 1 and start at 1.0
kph.;
2、、“MODE” Button:This allows user to select and adjust TIME, DISTANCE, CALORIES. Press the
mode button to choose TIME using the incline ot speed button “+””-“ to increase or decrease the
time.When you have programmed your running/walking time, showen in one of the four wording display
at the top of the screen. Press start and the treadmill will run for the selected time and the digital time will
count back to “0”. You can choose a distance to run or number of calories you require to brun in the
game way. You have selected time.
3.“START” button: When switch the power on and attach the magnet end of the safety pulling rope to
the computer. Press the button at any time and motor can start right away. If start under manual mode, it
will begin from 1.0km/h, incline level is 0.
4.STOP” button: Press this button while running; it can stop motor and set program default
5.“SPEED+”、“SPEED-” Button:User adjust the speed up and down , the speed will adjust by 1 KPH
per each press of the button. Set default count; to adjust speed when treadmill starts, the scope is
0.1km/hypo in kilometer. Press the button more than 0.5 seconds, will be up or down curatively。
6. “INC+”、“INC-” Button:It adjust incline level 0-15 up and down. Each press of the button will adjust
the deck by one level.
7、Quick incline button:2、4、6、8、10、12、14、15” incline shift buttonallows you to quickly select your
incline level.
8、Quick speed button:2、4、6、8、10、12、14、16、18” speed adjust buttons. This allows you to quickly
select a speed without holding the speed button down.
START-UP QUICKLY(MANUAL)
1、Open the power switch, attach the magnet end of the safety pulling rope to the computer.
2、Press START button,the system will enter into 3 seconds count down, the buzzer will make sound
and the matrix window display count down, the speed will run 1.0km/hour after 3 seconds
3、After start-up, you can use speed up or down and “INCLINE+”、“INCLINE -”to adjust the speed and
incline
The operation of exercise process:
1、Press speed-down “-“ will reduce the running speed.
2、Press speed-up “+” will increase the running speed.
3、Press incline-down “-“will reduce the incline level.
4、Press incline-up “+” will increase the running level.
5、Press the quick speed button to adjust the speed directly to the corresponding speed 2-18.
6、Press the quick incline button to adjust the incline directly to the corresponding incline
7、Hold the handle pulse or wear chest belt after 5 seconds it will display the user’s heart rate.

10
Manual mode:
1、 If you do not make any setting and press START button directly, the treadmill will start to move at
1.0km/h, the other windows will start to count from positive direction from windows default, press
“INCLINE+”,”INCLINE-”, “SPEED+”, “SPEED-” change the incline and speed.
2、set up the Time, press “MODE” button to enter into time count down, the TIME window will display“15:
00” and flashing. Press “INCLINE+”,”INCLINE-”, “SPEED+”, “SPEED-” to set up the time that you need.
The setting range is 5:00-99:00.
3、In Time setting model, press “ MODE “ button to enter into distance count down, the DISTANCE
window will display “1.0” and flashing. Press “INCLINE+”,”INCLINE-”, “SPEED+”, “SPEED-” to set up
the distance that you need. The setting range is 0.5—99.9.
4、To set up the Calories, press “MODE” button to enter into calories count down, the CAL window will
display “50’ and flashing. Press “INCLINE+”,”INCLINE-”, “SPEED+”, “SPEED-” to set up the calories that
you need. The setting range is 10-999. This is a basic ave related to the distance the belt travels calorie
coosumption will valy from pearow to person. This should be treated as a basic quideling ??
5、When setting is finished, press “START” button to start up, the treadmill will run after 3 seconds, press
“INCLINE+”,”INCLINE-”, “SPEED+”, “SPEED-” to adjust the speed and the incline; press the PAUSE,
the treadmill will stop.
Inner install program
Press “PROGRAM” button“matrix”window will display P1-P9 to choose the program you like. Setting of
the running time, then the TIME window display flashing. Display the advance setting time15:00, press
“INCLINE+”,”INCLINE-”, “SPEED+”, “SPEED-” to set up the exercise time that you need. Press “START”
button to start the inner install program, the inner install program is divided into 20 sect. Each exercise
time=the setting time/20. When the system enter into the next sect will make 3 sound “B—B—“ and the
speed will be changed according to the setting program, then press “INCLINE+”,”INCLINE-”, “SPEED+”,
“SPEED-” to change the INCLINE and SPEED, When the program enter next sect will come back to the
current speed and incline, and run the one program, the system will make 10 sound “B—B—“ and
change to the manual program automatically after 5 seconds

11
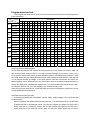
Program exercise chart
Each program will divide into 20 grade for the exercise time and each time sect has the speed and
incline accordingly.
Time interval
Time
Program
1 2 3 4 5 6 7 8 9 10 11 12 13 14 15 16 17 18 19 20
SPEED 2 3 3 4 5 3 4 5 5 3 4 5 4 4 4 2 3 3 5 3
P1
INCLINE 1 1 2 2 2 3 3 2 2 1 2 2 2 1 1 3 3 2 2 2
SPEED 2 4 4 5 6 4 6 6 6 4 5 6 4 4 4 2 2 5 4 2
P2
INCLINE 1 2 2 2 2 3 3 2 2 2 2 2 3 3 3 4 4 3 2 2
SPEED 2 4 4 6 6 4 7 7 7 4 7 7 4 4 4 2 4 5 3 2
P3
INCLINE 2 3 3 2 2 3 3 3 2 2 2 2 4 4 4 6 6 3 2 2
SPEED 3 5 5 6 7 7 5 7 7 8 8 5 9 5 5 6 6 4 4 3
P4
INCLINE 2 3 3 2 2 3 3 3 2 2 2 2 4 4 4 6 6 3 2 2
SPEED 2 4 4 5 6 7 7 5 6 7 8 8 5 4 3 3 6 5 4 2
P5
INCLINE 3 3 3 4 4 5 5 5 4 4 4 4 5 5 3 3 3 2 2 2
SPEED 2 4 4 4 5 6 8 8 6 7 8 8 6 4 4 2 5 4 3 2
P6
INCLINE 3 5 5 5 4 4 4 3 3 3 3 4 4 4 3 3 3 4 3 2
SPEED 2 3 3 3 4 5 3 4 5 3 4 5 3 3 3 6 6 5 3 3
P7
INCLINE 4 4 4 4 3 3 6 6 6 7 7 8 8 9 9 6 6 5 3 3
SPEED 2 3 3 6 7 7 4 6 7 4 6 7 4 4 4 2 3 4 4 2
P8
INCLINE 4 5 5 5 6 6 6 7 8 9 9 9 10 10 10 12 12 8 6 3
SPEED 2 4 4 7 7 4 7 8 4 8 9 9 4 4 4 5 6 3 3 2
P9
INCLINE 5 5 5 6 6 6 4 4 6 6 5 5 8 8 9 9 9 7 4 2
Besides the 9 preset programs, we do have 3 user’s programs U1、U2、U3.You can use these to make
you and your family select programs.
To start press the program until it shows the user program(U1,U2,U3) choose one and the “TIME” will
flash showing the pre-set time of 15mm . If you wish to change the length of your workout , press (+) or (-)
on the speed or incline button, when you have adjusted the time to your desired workout duration , press
the “mode” button and your workout time will be select. After pressing the mode button the first segment
of your program will flash go straight to the quick speed or quick set incline button and select your
desired speed or incline , press mode and your choice will be set, the next workout segment will flash, go
through the same set as completed with segment one. You must complete all 20 segments at the end ,
the computer will flash “OK”, your user program is now saved and ready to use,
When using your user program the screen will switch from incline to speed(every second) and your set
programmed levels will be displayed.
Heart Rate Control (HRC) program
1、At the beginning state,press “PROGRAM” until the “matrix” window displays “HP1-HP3”(Heart rate
control program)
Both the programs have default speed and max heart rate . The default speed for HP1 is 8KPH with
a default heart rate of 99 beats per minute. The HP2 has a default max speed of 9.0 KPH with a
default heart rate of 117 beats per munute. The HP3 has a default max speed of 10.0 KPH with a
default heart rate of 135 beats per munute. When you reach the default speed and you haven’t

12
reached your desired heart rate, the treadmill will automatically increase the incline level
After selecting the HP1/HP3 by pushing the program button, press “mode” the pulse window will flash
30. This is the pre-ser age , press “+” or “-“ on the incline or speed button to select your current age.
Press “mode” when you have choosen the correct age, the pulse window will flash ……….(continue)
2、Press “MODE” into age set-up,the “TIME” display the default age-30 years. Press “INCLINE+”、
“INCLINE -”、“SPEED+”、“ SPEED -” to adjust the age, the age range is from 15 to 60 years.
3、Press “MODE” into pulse set-up, The system will display a default pulse date in the “PULSE” window
according to the ages you entered. Press “INCLINE+”、“INCLINE -”、“SPEED+”、“ SPEED -” to adjust
the pulse, the range is 78-151.
4、Press”MODE” into time set-up,”TIME” window will display the default time 15:00. Press “INCLINE+”、
“INCLINE -”、“SPEED+”、“ SPEED -” to adjust the running time, the range is 10:00-99:00
5、Press the “START” after finishing all the parameters set-up.
6、At the status of “HP1-HP3”, If press the “START” without seting up anything, then the system will
control the speed and incline according to the default pulse
7、At the status of “HP1-HP3”,you can press “INCLINE+”、“INCLINE -”、“SPEED+”、“SPEED -” to adjust
the speed and incline,but system will adjust the speed and incline to make your pulse close to the default
pulse automaticlly.;
8、It’s the warm-up status one minutes after beginning exercise, system will not adjust the speed and
incline automatically, only manual adjust; one minutes later, system will add speed with 0.5km/h rate
according to your pulse. If it’s still not close to target pulse when reach to the most fast speed, system
will add incline with 1 level at one time to make your pulse close to the target
Remark:Heart rate control program must use the chest belt to test pulse, and the chest belt must close to
chest and skin.
9. Pulse display on console, either using chest belt or hand-held pulse pads, may have variance to your
actual heart rate at any given time, due to gender difference, chest belt position, wetness of skin, contact
in between HR sensor and user, battery capacity, distance and angle to built-in HR receiver and other
potential interference from surrounding environment. The HRC programs are designed based on
ACSM findings, however, users are advised to test run the programs and modify them where necessary
to suit your personal needs before commit to rountine
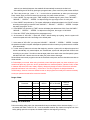
Range of data:
Parameter
PROGRAM
BEGIN SET UP RANGE
DISPLAY
RANGE
TIME(MIN:SECOND)
0:00 15:00 10:00-99:00
0:00-99:59
INCLINE(%)
0 0 0-15 0-15
SPEED(K/h)
1.0 1.0 1.0-20 1.0-20
DISTANCE(K)
0 1.0 0.5-99.9
0.00-99.9
PULSE(hypo/min)
P N/A N/A 50-200
CALORIE(THERM)
0 50 10-999
0-999
Safety lock function
Pull out the safety pulling rope, then the treadmill will stop immediately. All the windows display“―――”,
the buzzer will make 3 sound “B—B—”,now the treadmill must be stop. Attach the magnet end of the
safety pulling rope to the computer, the treadmill will be at the beginning of running.

13
Power save function:
The system is with saving on power function, at the state of waiting for operation, if without any operate,
the saving on power function will be available after 10 mins, the display will be closed up. You can press
any button to wake up the display.
Turn off:
Turn off the power: You can close up the power to stop the treadmill, it won’t be damaged at any time.
Caution:
1. We recommend that you maintain a slow speed at the beginning of a session and hold on to the
handrails until you become comfortable and familiar with the treadmill.
2. Attach the magnet end of the safety pulling rope to the computer and also attach the clip of the safety
pulling rope to your clothing.
3. To end your workout safely, press the PAUSE button or pull out the safety pulling rope, then the
treadmill will stop immediately.
4. Please feel free to contact the Orbit service department if the treadmill has any problem. please don’t try to
open or amend the product by yourself.
EXERCISE INSTRUCTIONS
Most people are anxious to get started, we sugget that you get checked out by your family physician
before entering into any strenuous exercise program especially if you have been inactive for some time.
No matter what your level of fitness we still suggest you start your exercise program on your new
treadmill slowly.
Straddle the walking deck standing on the specially made rubbersafety surface, attach the safety cord to
your clothing then press start to activate the treadmill motor the treadmill will count down and start slowly.
Take hold of the hand rails and step on to the moving belt. Make sure you are confortable , keep your
eyes facing towards(don’t look down at your feet)We suggest you increase the speed to a walking pace
that suits your natural walking speed this would be approx 5-6kph, after 5 minutes stop the treadmill get
off and complete several stretching movements especially for the calf, leg bicep and quadriceps. Re
straddle the treadmill start the treadmill up, start walking then move speed up to a comfortable jog, you
should be able to jog and still talk without effort if you are getting out of breath, you are going to back to a
walking pace, slow down and continue to jog for 10-15 minute increase the incline by one increment , do
this for 5 minutes, then decrease the incline in increments of one until you are level again; continue to
walk for another 5 minutes at a slower walking pace. You have now finished your first workout. At this
slow walking pace to stop just press the stop button and the treadmill will slow down and stop.
Set aside time to exercise daily , to achieve any long term fitness or weight loss goals , you must
exercise for a minimium of 30 minutes 3 times per week.

MAINTENANCE INSTRUCTIONS
Warning: Unplug the treadmill before cleaning or repairing the treadmill.
Clean: Cleaning all the time will prolong the treadmill using life.
Get rid of the dust all the time to keep the components clean. Clean the two exposed sides of the
running belts will avoid the dust and dirt getting under the belt. Keep the running shoes clean otherwise
the dirt on the shoes will wear the runningboard and running belts out. Clean the surface of the running
belt with clean rags. Be aware of the water spill on the electrical parts or the running belts
Warning: Remove the power plug from the wall socket before removing the motor
cover.
Running belts and treadmill lubricant
We have put the lubricant on the running board and running belts.The friction between the running
belts and running board affects the life and function of the treadmill, therefore, we suggest checking
the board regularly. Should there is any wear on the board, please contact our service center.
We recommend lubrication of the deck according to the following timetable:
¾ Light user (less than 3 using hours/ week) once a year
¾ Medium user (3-5 using hours/ week) every six months
¾ Heavy user (more than 5 using hours/ week) every three months
We suggest you purchasing the lubricant from our local distributors or contact with our company directly.
Note: For other maintenance, please have specialized person to operate.
1. To have a better maintenance over the treadmill and prolong its life, unplug the treadmill from the
power inlet when not in use.
14

2. Loose belts will result in the belt slipping while running, if the belt is too tight it shall decrease the
motor performance and creating more friction between the roller and running belts. The most suitable
tightness of the belts would be: the belts can be pulled out 50-75mm away from the running boards.
3.
Check that all the bolts are tightened after the first training session. Bolts etc should be checked and
tightened reg
ularly as part of the treadmills ongoing maintenance program.
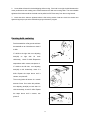
Running belts centering
A
Put the treadmill on a flat ground and have
the treadmill run at 6-8 km/hour to check if
it drifts
If it drifts to the right side, turn adjusting
knob(36) on right side 1/4 circle
clockwisely, check if it drifts. Repeat the
steps above until it centers, see picture A.
B
If it drifts to the left side, turn adjusting
knob(36) on left clockwisely, check if it
drifts. Repeat the steps above until it
centers, see picture B
The running belts will loosen in a certain
amount of time. So to solve this problem,
turn adjusting knob(36) on both side 1/4
circle clockwisely, check if it drifts. Repeat
the steps above until it centers, see
picture C
C
15

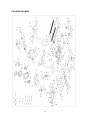
EXPLODED DRAWING
16

17
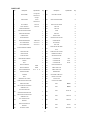
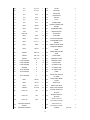
PARTS LIST
No Description Specification Qty No Description Specification Qty
1 MAIN FRAME
Left /righ
t side
tube60*30*2.0
1
35
RIGHT BACK COVER
1
2 BASE FRAME
Left/righ
t
connect
tube80*40*2.0
1
36
REAR ADJUSTING KNOB
2
3 LEFT UPRIGHT 100*40*2.0 1
37
RIGHT BOTTLE FRAME
1
4 RIGHT UPRIGHT 100*40*2.0 1
38
TUB PLUG
2
5 COMPUTER BRACKET 1
39
TUB PLUG
2
6
INCLINE SUPPORT FRAME
1 40
FOAM
2
7
REAR INCLINE FRAME
1 41
SIDE RAIL
2
8
SLIDING BLOCK
2 42
NON-SLIP PAD
4
9
MOTOR BRACKET
1 43
MOTOR BOTTOM COVER
1
10
HANDLE BAR BRACKET
Φ31.8*2.0
1 44
SLIDING BLOCK
2
11
LEFT HANDLE BAR
70*41.6*2.0
1 45
MOTOR BELT
1
12
RIGHT HANDLE BAR
70*41.6*2.0
1 46
FOOT PAD
2
13
Z-SHAPE SENSOR CONNECT
1 47
RING PROTECTING WIRE
PLUG
2
14
FRONT ROLLING
1 48
WHEEL PROTECT COVER
2
15
REAR ROLLING
1 49
TRANSPORT WHEELS
4
16
SLIDE RAIL ROD
2 50
ADJUSTING ROLLER
2
17
REAR INCLINE BUSHING
2 51
CUSHION PAD1 RED
2
18
SPRING
1 52
CUSHION PAD2 BLUE
2
19
BOLT
2 53
CUSHION PAD3 BLACK
2
20
5#ALLEN WRENCH
5mm 1 54
TAPER CUSHION PAD
2
21
6#ALLEN WRENCH
6mm 1 55
INNER TUBE PLUG
4
22
PHILIP SCREW DRIVER
S=13、14、15
1 56
INNER TUBE PLUG
2
23
WHEELS BUSHING
4 57
RUNNING BELT
1
24
CYLINDER
2 58
60*30 INNER TUBE PLUG
2
25
BOLT
2 59
MOTOR TOP COVER
1
26
COMPUTER TOP COVER
1 60
PLASTIC PAD
2
27
COMPUTER BOTTOM COVER
1 61
LEFT BOTTLE FRAME
1
28
COMPUTER PANEL
1 62
BOLT
M8*20 4
29
TOP COVER FOR ADJUSTING
SPEED BUTTON
1 63
BOLT
M8*25 4
30
BOTTOM COVER FOR
ADJUSTING SPEED BUTTON
1 64
BOLT M8*40L 20
4
31
SIDE COVER FOR ADJUSTING
SPEED BUTTON
2 65
BOLT M8*50L15
4
32
LEFT WATER BOTTLE
BRACKET
1 66
BOLT M8*60L15
1
33
RIGHT WATER BOTTLE
BRACKET
1 67
BOLT M10*20
12
34
LEFT BACK COVER
1 68
BOLT M10*30L15
2

18
69
BOLT M10*45L15
1 103 PULSE 2
70
BOLT M10*65L15
1 104 ADAPTOR 1
71
BOLT M8*30
4 105
OVERLOAD
PROTECTER
1
72
BOLT
M6*28
6 106 SWITCH 1
73
BOLT M6*32
1 107 PLUG 1
74
BOLT M8*15
2 108 POWER WIRE 1
75 BOLT M8*65 1 109
POWER CONNECTION
BOARD
1
76 BOLT M8*55 2 110 RUNNING BOARD 1
77 NUT M3 2 111 INCLINE MOTOR 1
78 EVA PAD 1 112 DC MOTOR 1
79 BOLT M4*6 20 113 PC BOARD 1
80 BOLT M5*12 2 114 QUICK KEYS BOARD 1
81 BOLT
M5*12 L7
2 115
PROGRAM BUTTON
BOARD
1
82 BOLT M5*8 11 116 COMPUTTER UP WIRE 1
83 BOLT M6*16 12 117
COMPUTER MIDDLE
WIRE
1
84 SCREW ST4.2*32 4 118
COMPUTER BOTTOM
WIRE
1
85 SCREW ST4.2*16 30 119 HOCK PANEL 1
86 SCREW ST4.2*13 4 120 MAGNETIC CORE 1
87 LOCK WASHER 8 12 121 MAGNETIC RING 1
88 LOCK WASHER 10 18 122 SINGLE LINE1 1
89 LOCK WASHER 8 4 123 AC SINGLE LINE 1
90 WASHER 8 2 124 AC SINGLE LINE 2
91 FLAT WASHER 8 6 125 AC SINGLE LINE 1
92 FLAT WASHER 6 4 126 LABEL 2
93 FLAT WASHER 4 3 127
PULSE WITH SWITCH
UP WIRE
2
94 BOLT M6*45 2 128
ADJUSTABLE KNOB
COVER
2
95 BOLT M3*10 2 129 SAFETY KEY 1
96 BOLT M3*12 2 130 SAFETY KEY IRON 1
97 SCREW ST2.9*8 20 131 SAFETY KEY HOODLE 1
98
1SHAPE NUT
M6 8 132
INCLINE SHORTCUT
BUTTON
1
99
1SHAPE NUT
M8 11 133
SPEED SHORTCUT
BUTTON
1
100
1SHAPE NUT
M10 6 134
INCLINE SHORTCUT
BUTTON BOTTOM WIRE
1
101
BOTTOM CONTROL
BOARD
1 135
SPEED SHORTCUT
BUTTON BOTTOM WIRE
1
102 MAGNETIC SENSOR 1 136 SCREW ST4.2*45 4
-
 1
1
-
 2
2
-
 3
3
-
 4
4
-
 5
5
-
 6
6
-
 7
7
-
 8
8
-
 9
9
-
 10
10
-
 11
11
-
 12
12
-
 13
13
-
 14
14
-
 15
15
-
 16
16
-
 17
17
-
 18
18
-
 19
19


Ask a question and I''ll find the answer in the document
Finding information in a document is now easier with AI
Related papers
Other documents
-
 Roger Black Gold Plus Treadmill User manual
-
 Roger Black Platinum Treadmill User manual
-
 Diamondback Fitness 910T Owner's manual
-
LifeSpan LS-12 Owner's manual
-
 Freeform F60 Operating Instructions Manual
-
Bodyworx Sport 2550 Treadmill User manual
-
 McGregor 8728047 User manual
-
 INRED FUTURE MTC 3.0 Owner's manual
-
New Balance 1600 User manual
-
York Fitness Perform 220 Owner's manual


