WizWheelz TerraTrike 3.21 Owner's manual

Category
Bicycles
Type
Owner's manual

WizWheelz TerraTrike 3.21 is a versatile recumbent tricycle designed for comfortable and stable riding on various terrains. With its three wheels, it offers increased stability and balance, making it suitable for riders of all skill levels. The TerraTrike 3.21 features adjustable handlebars and seat for a customized riding position, ensuring comfort during long rides. It also boasts a rear derailleur and front brakes for precise shifting and controlled stopping. Additionally, the included parking brake provides added safety when stationary.

WizWheelz TerraTrike 3.21 is a versatile recumbent tricycle designed for comfortable and stable riding on various terrains. With its three wheels, it offers increased stability and balance, making it suitable for riders of all skill levels. The TerraTrike 3.21 features adjustable handlebars and seat for a customized riding position, ensuring comfort during long rides. It also boasts a rear derailleur and front brakes for precise shifting and controlled stopping. Additionally, the included parking brake provides added safety when stationary.

TerraTrike 3.21
Owner’s Manual
Never underestimate the power of a human.
Cautions/Safety:
Stop!
Make sure to read and understand this manual completely before riding your
TerraTrike. We want to keep you riding your TerraTrike safely for endless miles and
years to come. So, always follow these safety precautions for each ride:
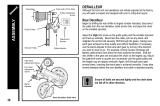
>- Inspect your TerraTrike each time before riding. Check the tires for proper
pressure and any damage; Ensure the brakes are functioning at their full
capacity.
>- Your helmet! You do have a helmet, don't you? Please remember: A helmet is
your most important piece of safety equipment. Put on a skidlid, noggin box,
brain bucket, melon mount, or whatever you call it... you'll look cooler!
>- Do not ride the TerraTrike at night under any circumstances without a white
headlight visible from a distance of 500 feet, and a red rear taillight.
>- Look behind you! We strongly recommend the use of a rear view mirror. With it,
you can keep tabs on the action you just left behind. But make sure to turn your
head and look before turning or changing lanes. You can miss seeing vehicles
or other riders coming up behind you if you only use the mirror.
>- Turning: It's fun to ride on two wheels, but only when your vehicle has only two. If
you have three, keep them all on the ground. AIso, use caution when cornering
at speed and learn what are safe speeds for negotiating corners and going
down hills (Just as if you were to turn sharply at high speed in a car, the
TerraTrike can be upset if turned too sharply for a given speed). It is best to be
more cautious while you are gaining proficient riding experience.
>- Braking: Make sure to brake evenly using both hands. The TerraTrike is designed
with front brakes only. You will experience brake-steer if you brake unevenly on
only one side (On a 2-wheeled bike, if you were to jam on the front brake, you
could easily flip over the handlebars. Similarly, on the TerraTrike, sudden uneven
braking can cause the TerraTrike to turn sharply or possibly rollover).
>- Although with more rugged tires, the TerraTrike is suitable for riding on dirt
roads, it was not designed for all-terrain, off-road use, or near-earth-orbit! No
airborne-use. The TerraTrike only becomes unsafe if operated in an unsafe
manner!
>- The unique look of the TerraTrike attracts much attention. So, you're more likely
to be seen by motorists, provided you are not obstructed from view by other
vehicles. Remember, your first line of defense is always your own common
sense. Ride in places where you are easily seen.
>-
Do not use the steering system to support your weight while getting on and off. Use
the wheels and/or seat instead.
The handlebar was not designed to hold your
weight.
>- The TerraTrike was designed to accommodate a rider of average height and
weight. Heavier riders should consider the TerraTank Frameset option. If You are
of average build or below, then you are within the design limits of the standard
frameset. Although, that is not a license to ride in a hazardous or abusive
manner! Anyone could damage the trike if they tried hard enough. Use
common sense.
>-
The alignment of the front wheels is a crucial adjustment when connecting the
tierods. A misaligned TerraTrike can become very unstable at high speeds.
Make sure to follow the setup instructions (
Step 6.
) for the toe adjustment very
carefully.
Assembly & Setup Information:
When your TerraTrike arrives, carefully unpack the contents and inspect for any
damage that may have occurred during shipping. If anything is amiss, contact the
WizWheelz sales office immediately at (616) 940-1909.
Checklist
When you unpack, this is what you should have:
o Boom with attached parts
o Frame with attached parts
o Left and Right front wheels with hub mounts
o Rear Wheel D Seat frame
o Parts Package:
• Chain & master links
• Rear Derailleur/cable housing
• Quick release skewer
• 4 cable end cups
• Parking Brake (Velcro Strap)
• Miscellaneous fasteners
• Seat mesh & end caps
o Any ordered accessories
***Save all boxes and packing materials.***
***You will need them if you ever want to ship your TerraTrike,
or need to have any warranty service.***
The following assembly is required:
Attachment of the wheels, attachment of the boom, steering system setup,
setup of the derailleurs, connection of the brake and shift cables, chain
attachment, and attachment of the seat.
Tools you need:
Bicycle air pump (presta valve), adjustable wrench or metric & English socket sets,
tape measure, Phillips head screwdriver, wire cutters, pliers, English & metric Allen
wrenches.
If you don't feel qualified to perform any of the assembly and setup operations,
make sure to contact a local bicycle shop for assistance.
WizWheelz can recommend
a good shop in most cities.
Time Required For Assembly:
I'm an expert bike mechanic
°°°°° 1.25 hours
I'm a fairly mechanically inclined person
°°°°°°°° 2.00 hours
I don't normally do this, but I'll give it a try
°°°°°°°°°°°° 3.00 hours
What is a wrench?
°°°°°°°°°°°°°°°°°°°°°°°°° Call a Bike Shop!
Assembly & Setup:
Step 1.
Inflate the tires to 80% of their recommended pressures indicated on the
tire sidewalls.
This is because you are riding on
three
wheels rather than two! It is also
very important that both front tires have the
same
pressure. Otherwise, the steering
will not be balanced.
Step 2.
Putting on the rear wheel:
Install the quick release skewer in the axle with a
spring on either side (small end of spring points in). Loosen both sides of the skewer so
that the dropouts (the slotted ends of the frame to hold the rear wheel) can be
completely seated on the rear axle. Thumb tighten the nuts. Clamp the quick release
closed. If you have it correct, you should feel resistance when the lever is about a
third of the way through its movable range.
Make sure it's tight!
(See Fig. 1 )
Step 3.
Putting on the front wheels:
The front wheels are preconnected to their
respective hub mounts, and have a left a right side orientation. The hub mounts will
need to be connected to the yokes at the ends of the outrigger tubes. Remove the
kingpin from the hub mount by unscrewing the kingpin nut. Position each hub mount in
the yoke so that the kingpin can be passed through the top hole in the yoke, the hub
mount, and finally the bottom hole in the yoke. Put the kingpin nut back on the
kingpin.
Note:
It is very important that the hub mounts turn freely. This will affect your
high-speed stability. The steering system should be tight enough to eliminate play, but
still turn with little to no resistance. (See Fig. 2)
Step 4.
Attaching the boom:
To attach the boom, slide it onto the stub tube at the
front of the frame. Make sure the chainring is on the drive side, and is parallel with the
rear wheel (perpendicular to the ground). Tighten the front clamp bolt. Make sure the
idler chain guard L-bracket is pointing straight down, and tighten the idler axle bolt
until you cannot move the chainguard with your hand.
Do not over tighten, or it will
affect your chain line.
(See Fig. 3)
Step 5.
Handlebar adjustment:
Attach the steering brace to the frame using the
nut and washer supplied. Loosen the bolts in the steering clamp. Set the handlebar
up so the grips are pointing straight up (perpendicular to the floor). This is a good
place to start, but you may want to adjust the angle later to suite you're your
personal ergonomics. Tighten the bolts. (See Fig. 4)
Note:
Your new steering brace comes with holes for commuting, and touring.
The rear holes in the steering brace tongue are for quick, tight maneuvering.
This position will be best in traffic and tight cornered bike paths. The forward
holes are for long, strait or higher speed trips. This position will be more stable at
higher speeds, but won't turn as tightly.
Make sure you use the same position for
both Left and Right. If you switch positions later you will need to reset your
alignment.
Note:
It is also important that the steering brace turn freely. This will affect your high-
speed stability. The steering system should be tight enough to eliminate play, but still
turn with little to no resistance.
Step 6.
Steering set up:
Remove the bolts at the end of each tierod. Position the
tierod end under the hole in the hub mount. Slide the bolt through the hub mount, the
tierod end, and then the locknut. Make sure the locknut is screwed on completely
and securely! (See Fig: 5)
The alignment of the front wheels is a crucial adjustment. A misaligned TerraTrike
can become very unstable at high speeds, and cause premature tire wear.
Make sure
that the tires are properly inflated. The tierods are adjusted by loosening the tierod
locknuts toward either end of the tierods. The tierod can then be rotated freely. This
will cause the tierod ends to be moved closer together or further apart, and move
the hub mounts either more inward or outward in relation to the frame.
Make sure the
handlebar stays parallel with the outrigger tubes of the frame during these adjustments.
Measure the distance between the frame and the leading edge (A), and then the
trailing edge (B) of one wheel. Adjust that wheel's tierod until these measurements
are the same. This will give you one wheel that is parallel with the frame. Now
measure the distance between the leading (C), and trailing (D) edges of the front
wheels. Adjust the other tierod until these measurements are the same. Make the
measurements from the center of the tread on each tire, and keep the tape measure
level with the ground. (See Fig. 6)
Note: The TerraTrike frame has a degree of built-in flex to absorb road shock.
Therefore, the weight of a rider will alter the steering geometry slightly. So to achieve
the optimal initial set-up, it is best to sit in the seat of the TerraTrike while having an
assistant perform the toe adjustment. The parallel position is the starting point for
finding an optimum alignment. Once the measurement is correct, tighten the tierod
locknuts. Depending on rider height, weight, and riding position, other alignments,
either toe-in or toeout, may give a more stable ride at higher speeds. If you find that
the TerraTrike becomes unstable at higher speeds, this is a good indication that the
toe adjustment is not correct. Feel free to play with the alignment, to achieve the
best position for you. As a general rule, heavier riders can see better results with a
slight toe-out, and fighter riders with a slight toe-in.
Never change the alignment more than
1
/
16
" at one time.
Keep in mind, a difference of more than
1
/
4
" is not recommended.
Step 7 .
Derailleur set up:
If you don't have experience with derailleurs, don't pull
your hair out over adjusting these things, as this can be difficult. Please seek the
assistance of your local bike shop!
Here is the
rear
derailleur setup procedure: Screw the rear derailleur onto the
frame. (See Fig. 7) Use caution not to cross the threads.
This can ruin the frame.
Turn the top adjustment screw to line up the derailleur guide pulley with the
outside line of the smallest sprocket. (See Fig. 8)
Route the rear (right) shift cable:
• From the shifter on the handlebar
• Under the steering system
• To the cablestop on the underside of the maintube
• Through the cable housing at the rear of the maintube
• Then along the chainstay
• Through the derailleur cable housing, and to the rear derailleur (See Fig. 9)
Make sure all slack is out of the system, and tighten. Trim the excess to about one
and a half (1.5”), and crimp on a cable end cup. (See Fig. 10)
Note:
After routing any
of the cables, make sure all cable housing has proper slack, and doesn't bind up when
the handlebars are turned.
Push the derailleur arm so that the pulley wheel lines up with the center of the
largest sprocket. Turn the bottom adjustment screw to secure this position. (See Fig.
11) Very bad things can happen to your rear wheel (the chain could shift into the
spokes, and cut them) if this adjustment is not correct.
Go put the chain on in
Step 8
and then come on back.
Spin the crank forward, and move the shifter one click (one click = one gear). If
the chain does not move to the next sprocket, turn the adjustment barrel out, or
counterclockwise, until the chain shifts. Continue to shift to all of the gears. Adjust the
barrel as necessary to insure accurate shifting.
Position the chain on the smallest chainring up front, and the largest sprocket in
back. Turn the crank backward. Turn the tension adjustment screw so the pulley is as
close to the sprocket as possible without touching it. Next position the chain on
smallest sprocket in back, and repeat the procedure. (See Fig. 12)
Here is the
front
derailleur setup procedure: Your front derailleur has been preset
for height by the factory. The front derailleur has "H" and "L" (high and low) adjustment
screws similar to the rear. Set the "L" adjustment so the clearance between the inner
plate of the derailleur and the chain is O.5mm. (See Fig. 13)
Route the front (left) shift cable:
• From the handlebar
• Under the steering system
• To the cablestop at the rear of the boom tube
• Through the cable housing at the front of the boom, and to the derailleur.
. .
Make sure all slack is out of the system, and tighten. Trim the excess to about 1.5"
and crimp on a cable end cup. (See Fig. 14)
Shift to the large chainring. Set the "H" adjustment screw so the clearance
between the outer derailleur plate and the chain is O.5mm. {See Fig. 15) Check the
system by shifting to each ring.
Step 8.
Attaching
the chain:
The chain is guided by two idler wheels mounted
under the frame. (See Fig. 16) The routing of the chain is important, and can affect
the operation of the TerraTrike if not installed correctly! Hint: It's easier to pull the
chain backwards when routing it through the system. Make sure the chain does not
bind on the "L" bracket chain guards. Bend them for more clearance if needed.
Route the chain from:
The back of the smallest rear sprocket
In front the top derailleur pulley
Behind and under the lower derailleur pulley
Over the outside groove of the rear idler wheel
Under the outside groove of the front idler wheel
Under and around to the top of the small front chainring
Through the front derailleur
Under the inside groove of the front idler wheel
Under the inside groove of the rear idler wheel
Under the chainstay and bridge tube and back to the top of the sprocket
(See Fig. 17)
Note:
Chain length should be set at the factory, so you can attach it
with the master links provided.
Now go back to
Step 7
and finish your derailleur setup.
Step 9.
Connecting
the brake cables:
The brake cables run directly from the brake
levers to the front hubs. They will need to be connected to the brake actuation
Levers before the brakes will operate. Place the cable stopper in the hole in the end
of the brake actuation lever. Then, place the cable adjustment sleeve (the threaded
metal tube at the end of the brake cables), into the notch on the brake flange. Pull
the excess cable through the protective sheath (short piece of cable housing) then
the cable stopper, and tighten securely. When adjusted properly, you should feel the
brakes engage after the brake levers are squeezed a short distance. Turn the cable
adjustment sleeve or the brake lever adjustment barrel to remove any slack. Once
you have the left and right balanced, trim the excess cable so about 1.5" remain.
Crimp a cable end cup on the end of the cables. (See Fig. 18)
Step 10.
Attaching the seat:
First put the end caps in the seat frame. Then attach
the seat mesh to the seat frame. Insert the ends of the seat frame into the narrow
pockets in the seat mesh. (See Fig. 19) Wrap the remaining part of the mesh (with the
grommets) around to the back of the seat frame, and lace the mesh tightly together
in the rear (similar to lacing shoe laces).
Connect the seat frame to the trike frame by positioning one of the seat clamp
holes over one of the two seat-pin holes in the frame. Insert the seat-pin through the
right-hand side of the seat clamp, one of the washers, through the frame, the other
washer, and then through the left hand side of the seat clamp. Attach loosely with
the locknut. (See Fig. 20)
The seat was not designed to be placed in the front most position (front frame hole,
rear seat clamp hole). This position will interfere with the steering system.
Note: It is generally easier to keep the washers in position while you push the seat
pin through by first turning the TerraTrike on its side, and then pushing the pin down
through the holes.
Next, connect the lower seat stays by screwing the bolts through the ends of the
lower seat stays into the forward mounting holes on the top side of the dropouts, with
the washers in between the seat stays and the frame. (See Fig. 21) There are two
mounting holes on each dropout. The front most hole is for the seat stay. The other is
for mounting a rack.
Once you have found a suitable recline angle and a comfortable fore-aft position,
firmly tighten the locknut
. (Note: Never put weight on the seat without the seat pin in
place! Check the locknut from time to time to make sure it hasn't loosened during
riding.)
Adjusting the seat movement and recline:
To adjust the forward position of the
seat, loosen and remove the seat pin bolt. Slide the seat to the desired position, and
then reinsert the seat pin bolt. It may then be necessary to adjust the seat recline.
Remove the ring pins that connect the upper and lower segments of the seat stays.
The stays can then be telescoped to a new position. Line up one of the holes on the
upper seat stay with the hole on the bottom seat stay. Then reinsert the ring pins and
tighten the seat pin locknut.
You Did It!
(Wipe your brow and go get a drink of your favorite beverage. )
Riding:
Note:
If the beverage you just finished was alcoholic, don't drink and Trike.
Getting on & off:
Do not use the steering system to support your weight while getting
on and off!! Use the wheels or seat instead.
The handlebar was not designed to
hold your weight. Step
in front of
the outrigger tubes while facing forward.
Place one hand on the seat behind you to support you. Sit back into the seat.
Place your feet on the pedals & go!
Shifting:
The TerraTrike comes equipped with standard bar end shifters. The gears
can only be shifted while pedaling. Simply move them up or down to find the
desired gear.
Turning:
When turning you will find that the TerraTrike does not lean into a corner
the way a regular bicycle does. It behaves more like an automobile. For this
reason you will feel a tendency to be pulled to the outside of a turn. To
counteract this force, lean into the center of the turn.
Please read the cautions
and safety section carefully before taking high-speed turns.
Stopping:
To stop, squeeze the brake levers. Each brake lever will actuate the
corresponding brake on either of the front hubs. To achieve a balanced
braking effort, it is necessary to use both brake levers simultaneously.
It is not
recommended to brake using only one brake lever. This will result in an
unbalanced braking effort, and may cause the TerraTrike to veer in one
direction.
Please note: The drum brakes require a very brief break-in period.
The brake
shoes have a skim coat applied by the manufacturer, which must be worn off
before the full braking action will occur. This usually occurs with a few
applications of the brakes in a ride around the block. Additionally, the
tightening of the spokes of the wheel during manufacturing causes the drum to
be slightly out of round in relation to the brake pads. This will also even out very
quickly.
To keep your Trike from rolling away on inclines, use the supplied Velcro strap as
a parking brake. Hold one of the brake handles down, wrap the strap around
the handlebar and the brake handle, and secure it.
Riding over obstacles:
Please refrain from riding over any obstacles bigger than a
breadbox, and avoid any entanglements with dogs, cats, planes, trains and
automobiles. They tend to mare the finish. To successfully negotiate/ride over
obstacles on the scale of a few inches, steer the TerraTrike so that the obstacle
comes between one of the front wheels and the pedals when riding over it. This
way the rear wheel will not hit the object, which could otherwise result in an
upset in your ride, or damage to the rear wheel. Remember, there are three
wheels on the TerraTrike. It's easy to forget the rear wheel until it hits something
you just steered directly between the front wheels.
Maintenance:
Lubrication:
Chain and cables need regular lubrication with good quality bike
lubrication. All drivetrain parts and rear wheel bearings will need lubrication
periodically.
Spokes:
Break-in period. During the first 500 miles; the spokes will experience a
period of stretching to a degree more than that of a two-wheeled bicycle. This
is due to the higher lateral (or side) forces applied to the wheels while turning.
The spokes may require tightening, and the wheels truing. Have this performed
by a qualified bicycle technician unless you have the necessary wheel truing
skills.
Brakes:
The brake cables will stretch in the early life of the TerraTrike. This is a
normal effect. To tighten the brake cables when they have loosened, turn the
cable sleeve at the end of the cable housing counter-clockwise, where it
connects to the hub mount. Replace the cables at the first indication of wear
or fray.
Balancing:
If the braking action ever appears to be uneven (one side brakes
harder than the other), the brakes will need to be adjusted. Adjustments are at
the brake handles and the cable sleeves.
Pads:
Unless you are routinely making transcontinental jaunts, the brake pads
should last many seasons. If they do ever need replacing, contact your local
shop or WizWheelz to order replacements.
Shifters:
The shift cables will also stretch when new. You may need to adjust them
occasionally as they break in.
Idler Wheels:
The chain Idler wheels will experience normal wear on the tension
side of the chain over extended periods of riding. To obtain greater life from
the idlers, you may wish to monitor the wear and rotate the idlers as necessary.
Look for a change in the depth of the inner grooves.
Steering:
All of the steering parts tend to settle in after the first 100 miles or so. This
may require some tightening of nuts and bolts. Afterwards, you should just
check it every now and then for loosening.
Cleaning:
Your TerraTrike will operate for years to come if you keep it regularly
cleaned and lubed! Water and soap won't hurt the TerraTrike, provided you
lubricate right after cleaning. Avoid getting the seat mesh wet. If you need to
wash the seat mesh, wash it in the gentle cycle and let it air dry . If you ride in
inclement weather, immediately clean and lube your TerraTrike after your ride.
Road salt will kill your TerraTrike. Clean it off immediately!
Survival Tips:
> Keep your upper body quiet (no movement) while riding to avoid unwanted
biofeedback, or tad poling. This is especially crucial at high speeds.
> If you feel you are riding at high speeds regularly, you may want to consider
a larger front chainring to slow down your cadence. To help avoid tad
poling, you'll want to ride with a slower cadence than on an upright bike.
> Try to avoid being hidden by traffic while riding.
> The TerraTrike is only rated to 5 atmospheres. Therefore, attempt underwater
exploration with caution.
> Desert riding range: as much water as you can carry.
Limited Warranty:
Your TerraTrike is warranted (for as long as you own same, and is not transferable)
against defects in manufacturing occurring in the frame and steering components.
Other components on the Trike are warranted by their respective manufactures. This
warranty is limited to manufacturing defects only, and will not cover any problems
that arise from owner misuse or abuse. WizWheelz retains the right to make the
determination as to whether the problem complained of was caused by a
manufacturing defect or the owner's misuse or abuse.
For all manufacturing defects, WizWheelz will determine whether to refund the
purchase price, repair the defect, or replace the defective part. WizWheelz is not
responsible to take any action other than the aforementioned and is not liable for
any consequential damages or injuries resulting from or caused by any defective part
or component.
LIABILITY WAIVER: Riding a TerraTrike can result in injury or death. By riding a
TerraTrike, the rider is expressly assuming the risk for any injury that may result from
same. The owner is responsible for any and all injuries and/or property damages
caused by someone riding the owner's TerraTrike. The owner shall indemnify
WizWheelz for any damage or financial loss incurred by WizWheelz as the result of an
injury or property damage caused by someone riding the owner's TerraTrike.
MONEY BACK GUARANTEE: If, for any reason (including non-acceptance of the
terms and conditions herein) you are not satisfied with your TerraTrike, we will buy
back your TerraTrike and accessories for just $100 less than your purchase price not
including any shipping charges, provided that the TerraTrike must be received by
WizWheelz, Inc. in the same condition as shipped within 30 days of the original
shipping date. WizWheelz will not honor any returns received after 30 days. If the unit
is returned in less than new condition,
WizWheelz reserves the right to deduct for any
damages.
Please take extreme care in repackaging the product.
Why $100? We do incur some costs associated with the occasional returned trike.
For the consumer's benefit, we would rather defray the expense in this manner
instead of raising the price of the TerraTrike to cover it. This way, we can keep our
retail price as low as possible. So if you order a TerraTrike and wish to return it for any
reason at all, you will only sacrifice your shipping charges to and from our factory and
a modest "restocking fee" of $100.
3.21 Specifications
Frame
Tig Welded 4130 Chromoly Steel
Steering
Tig Welded 4130 Chromoly Steel
Finish (powder coat)
Safety Yellow, Sports car Red
Seat Type
Heat Treated, T6 Aluminum
Breathable nylon mesh back
- Adjust
Sliding seat
- Height
9 inches (0.25m)
- Recline Adjust
40 - 55 degrees
Drivetrain
Shimano 18-speed
- Cassette
Shimano 11-32, 9-Speed
Gear inch range:
22 - 92
Crankset
FSA Gossamer 170mm
Rear Derailleur
Shimano lX
Chain
Sachs PC-59 9sp
Shifters
Shimano Dura-Ace Bar end
Brake levers
Alloy Silver/Black
Brakes
WizWheelz alloy drum
Rear Wheel
20 inch (406)
- Hub
Shimano LX 9sp
- Rim
Sun ZJ-18 Silver, 36 hole
Front Wheels
20 inch (406)
- Hubs
WizWheelz alloy drum
- Rims
Sun ZJ-18 Silver
Tires
IRC Metro 20 x 1.25(406)
Spokes
DT Stainless
Wheelbase
40 inches (1.07m)
Gross length (medium)
71 inches (1.80m)
Track Width
31 inches (0.79m)
Gross Width
34 inches (0.86m)
Turning Radius
95 inches (2.41 m)
Bottom Bracket - Height (medium)
13 inches (0.33m)
Rider Height Range (approximate)
5'2" to 6'6"
(X-seam: 37 -50")
1.52 to 1.98 m (x-seam: 0.94- 1.27 m)
Weight Distribution
33% each wheel
Total Weight
34lb (15.4 kg)
Specifications subject to change without notice
Contact Information:
WizWheelz Inc., 529 W. Clinton, Hastings, MI 49058
Phone (616) 940-1909 Fax (616) 945-4020 EMail [email protected]
  • Page 1 1
  • Page 2 2
  • Page 3 3
  • Page 4 4
  • Page 5 5
  • Page 6 6
  • Page 7 7
  • Page 8 8
  • Page 9 9
  • Page 10 10
  • Page 11 11
  • Page 12 12
  • Page 13 13
  • Page 14 14
  • Page 15 15
  • Page 16 16
  • Page 17 17
  • Page 18 18

WizWheelz TerraTrike 3.21 Owner's manual

Category
Bicycles
Type
Owner's manual

WizWheelz TerraTrike 3.21 is a versatile recumbent tricycle designed for comfortable and stable riding on various terrains. With its three wheels, it offers increased stability and balance, making it suitable for riders of all skill levels. The TerraTrike 3.21 features adjustable handlebars and seat for a customized riding position, ensuring comfort during long rides. It also boasts a rear derailleur and front brakes for precise shifting and controlled stopping. Additionally, the included parking brake provides added safety when stationary.

Ask a question and I''ll find the answer in the document

Finding information in a document is now easier with AI