AzureWave Technologies AW-GA800BT User manual
- Category
- Networking
- Type
- User manual
This manual is also suitable for

AW-GA800BT 802.11 b/g USB Wireless Module
User Guide

ii
COPYRIGHT
AzureWave Technologies, Inc. All rights reserved. No part of this document may be reproduced,
transmitted, transcribed, stored in a retrieval system, or translated into any language in any
form or by any means without the written permission of AzureWave Technologies, Inc.
DISCLAIMER
AzureWave provides this document “as is”, without warranty of any kind, neither expressed nor
implied, including, but not limited to, the particular purpose. AzureWave may make
improvements and/or changes in this document or in the product described in this document at
any time. This document could include technical inaccuracies or typographical errors.
TRADEMARKS
AzureWave is a trademark of AzureWave Technologies, Inc. Other names mentioned in this
document are trademarks/registered trademarks of their respective owners.
USING THIS DOCUMENT
This document provides detailed user guidelines to provide AzureWave 802.11 b/g USB WLAN
Module operation and setting-up. Though every effort has been made to assure that this
document is current and accurate, more information may have become available subsequent to
the production of this guide. In that event, please contact your AzureWave representative for
additional information that may help in the development process.

iii
Contents
Safety statements...........................................................................................................2-1
About this guide..............................................................................................................2-1
AW-GA800BT 802.11 b/g USB WLAN Module specification summary..................................2-2
Chapter 1 Product Information.......................................................................................2-2
1.1 Product overview................................................................................................2-2
1.2 Features.............................................................................................................2-2
1.3 LED and antenna port............................................................. 錯誤! 尚未定義書籤。
1.4 Supported network setup....................................................................................2-3
1.4.1 Ad-Hoc mode............................................................................................2-3
1.4.2 Infrastructure mode..................................................................................2-4
1.4.3 Software access point (Soft AP).................................................................2-5
Chapter 2 Installation....................................................................................................2-1
2.1 System requirements..........................................................................................2-1
2.2 Hardware Installation..........................................................................................2-1
Chapter 3 Wi-Set Wizard...............................................................................................3-2
3.1 Launch Wi-Set Wizard.........................................................................................3-2
3.2 Wi-Setup Wizard Steps........................................................................................3-4
3.3 Station Mode Configuration.................................................................................3-4
3.3.1 Configure Infrastructure type network........................................................3-5
3.3.2 Build Ad-Hoc networking mode network.....................................................3-6
3.4 Build Soft AP network.........................................................................................3-8
3.4.1 Normal User..............................................................................................3-8
3.4.2 Advanced User.........................................................................................3-11
Chapter 4 RtWLAN: Wireless LAN Management GUI........................................................4-1
4.1 How to Launch RtWLAN......................................................................................4-2
4.2 Introduction of Main Window...............................................................................4-2
4.3 Station mode......................................................................................................4-6
4.3.1 Infrastructure and Ad-Hoc.........................................................................4-6
4.4 AP mode...........................................................................................................4-11
4.5 Windows Zero Configuration...............................................................................4-14
4.5.1 Swap from RtWLAN to Windows Zero Configuration...................................4-14
4.5.2 Rollback from Windows Zero Configuration to RtWLAN...............................4-15
Appendix A:
Mapping of country and channel plan........................................................4-1
Appendix B: Q&A........................................................................................................4-4
Appendix C:
Release History........................................................................................4-5

2-
1
Safety statements
FCC Radiation Exposure Statement:
This equipment complies with FCC radiation exposure limits set forth for an uncontrolled
environment. This transmitter must not be co-located or operating in conjunction with any other
antenna or transmitter.
About this guide
The user guide contains the information you need to install and configure your AzureWave
802.11 b/g USB WLAN Module.
Guide organization
This guide contains the following chapters:
l Chapter 1: Product Information
This chapter describes the general functionality, features and configuration modes of
AzureWave 802.11 b/g USB WLAN Module.
l Chapter 2: Installation
It is recommended that users should read this chapter before installing both AzureWave
802.11 b/g USB WLAN Module hardware and software. This chapter presents the
systematic installation of AzureWave 802.11 b/g USB WLAN Module and antenna, utilities
and driver on the support CD.
l Chapter 3: W-Set Wizard
This chapter shows you the setup of wireless network in your office or home. Follow The
step-by-step direction, provided by Wi-Set wizard, you can have your own wireless local
area network up and running very quickly.
l Chapter 4: Management GUI
This chapter teaches you the proper operations of selected mode from W-Set Wizard. The
GUI display network status, connection profiles and network traffic to help you monitor and
manage the network configuration.

2-
2
AzureWave 802.11 b/g USB WLAN Module specification summary
Host system connections
Interface Fully complies with USB 2.0 or 1.1
USB date transfer rate USB high speed (480Mbps), and full speed (12Mbps)
Chapter 1 Product Information
1.1 Product overview
Thank you for choosing AzureWave 802.11 b/g USB WLAN Module.
The AzureWave 802.11 b/g USB WLAN Module is an easy-to-use wireless local area network
(WLAN) adapter which is designed for home or office use. Direct Sequence Spread Spectrum
(DSSS), Complementary Code Keying (CCK), and Orthogonal Frequency Division Multiplexing
(OFDM) base band processing are implemented to support all IEEE 802.11b, and 802.11g data
rates. Differential phase shift keying modulation schemes, DBPSK and DQPSK with data
scrambling capability, are available, along with complementary code keying to provide data
rates of 1, 2, 5.5, and 11Mbps, with long or short preamble. A high-speed Fast Fourier
Transform (FFT)/Inverse Fast Fourier Transform (IFFT) combined with BPSK, QPSK, 16QAM
and 64QAM modulation of the individual sub-carriers provides data rates of 6, 9, 12, 18, 24, 36,
48 and 54Mbps, with rate-compatible punctured convolution coding with a coding rate of 1/2,
2/3, and 3/4.
The AzureWave 802.11 b/g USB WLAN Module also supports Wake-On-LAN (WOL) function
and remote wake-up giving you the convenience to remote log in from other places to this
system.
To provide efficient security to your wireless communication, the hardware-based IEEE 802.11i
encryption/decryption engine, including 64-bit/128-bit WEP, TKIP, and AES,
supports Wi-Fi
alliance WPA and WPA2 security.
With these features and many more, AzureWave 802.11 b/g USB WLAN Module is ready to
connect you to the world of wireless communication.
1.2 Features
System requirements

2-
3
The AzureWave 802.11 b/g USB WLAN Module is an on-board component on ASUS
motherboard requiring manual installation. Make sure that your system meets the following
requirements.
l ASUS motherboard with AzureWave 802.11 b/g USB WLAN Module on-board solution
l Minimum 64MB system memory
l Operating system
Station mode : Windows® 2000/XP/Server 2003, Windows XP/Server 2003 x64
AP/wireless bridge mode : Windows® 2000/XP/Server 2003
l Optical drive for utilities and driver installation
Easy hardware installation
Because the AzureWave 802.11 b/g USB WLAN Module comes embedded in motherboard,
no hardware installation is necessary. Just connect the antenna, install the driver and utilities
from the motherboard support CD and start wireless communication immediately.
54Mbps speed wireless travel
The AzureWave 802.11 b/g USB WLAN Module provides up to five times more data
transmission than IEEE 802.11b standards, and breaks the wireless transmission barrier to
speed up the internet connection.
Wi-Set Wizard
Easy-use wireless LAN setup wizard helps you to connect with present wireless network. The
step-by-step wizard provides a convenient way to facilitate the complex wireless LAN setup
process.
Automatic wireless establishment
The utility application of AzureWaveRTL8187 Wireless LAN USB 2.0 Adapter automatically
searches and reports the hot spots around it and the wireless signal quality and WEP capability
associated with each hot spot. Then you could connect to the most suitable wireless node
1.3 Supported network setup
You can use AzureWave 802.11 b/g USB WLAN Module in various wireless network
configurations. We recommend you to select the most appropriate configuration for your home
or office network before setting it up.
1.3.1 Ad-Hoc mode

2-
4
Ad-Hoc wireless networks bring together
workstations and computers to act as
servers to all other users on the network
without complex infrastructure, setup or
administration. Users on the network can
share files, printers. When in ad hoc mode,
the AzureWave 802.11 b/g USB WLAN
Module connects to another wireless
device within its effective range and
communicates with each other in the same
LAN workgroup. Select this configuration
when no access point is present in your
wireless network.
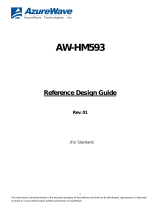
1.3.2
Infrastructure mode
The biggest difference between
infrastructure mode and ad-hoc mode is
that it includes an access point. In
infrastructure mode, an access point
establishes the network that provides
wireless links in the validating range for
clients to communicate with each other or
with a wired network to the internet. On an
infrastructure network, the access point
may manage the bandwidth to maximize utilization. Infrastructure networking has the following
advantages over ad-hoc networking:
l Range Extension
Each wireless LAN enabled computer within the range of the access point can communicate
with other wireless LAN enabled computers within the valid range of signal from the access
point.
l Roaming
A wireless LAN enabled computer can physically move from the operating range of one
access point to another without losing connection to the LAN. A quick association
“hand-shake” is made between the new access point and the wireless device as the
computer traverses from the coverage of one access point to another.
l Wired to wireless LAN connectivity
RealTek RTL8187L
Mobil station 1
Mobil station 2
ADSL Modem
RealTek RTL8187L
Access Point
ADSL Modem
Mobil station 1

2-
5
Access point establishes the bridge between wireless LAN and other wired counterparts.
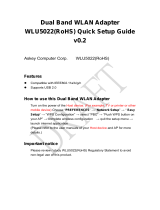
1.3.3 Software access point (Soft AP)
You could configure AzureWave 802.11
b/g USB WLAN Module as a software
access point (soft AP). In this mode, the
AzureWave 802.11 b/g USB WLAN
Module acts as the access point that
provides wireless links in the validating
range to client stations to the internet.
Your system should satisfy the following
two requirements to apply this mode:
l The system you use already connects
to the internet or intranet through another one Ethernet adapter.
l You are using Windows® 2000, XP or Server2003 operation system
Notice: Windows XP/Server2003 x64 platforms are not supported to have software access point
capability.
RealTek RTL8187L
Mobil station 2Access Point
ADSL Modem
Mobil station 1

2-
1
Chapter 2 Installation
2.1 System requirements
Before installing the AzureWave 802.11 b/g USB WLAN Module, driver and utilities, make sure
your system satisfy the following requirements
l ASUS motherboard with AzureWave 802.11 b/g USB WLAN Module specific slot
l Intel® Pentium™ 4
l Minimum 64MB system memory
l Windows® Operation System
Ad-Hoc and infrastructure mode: Windows® 2000, XP and Server 2003
Software AP and Wireless Bridge: Windows® XP and Server 2003
l Optical drive for driver and utilities installation
2.2
Hardware Installation
To complete the hardware installation of AzureWave 802.11 b/g USB WLAN Module, you only
need to install the moveable dipolar antenna at the rear of
motherboard.
Installing the antenna:
l Locate the wireless LAN antenna port on the motherboard
rear panel.
l Connect the antenna twist-on connector (female) to the
wireless LAN antenna port (male)
l Place the antenna at an elevated location to enhance your
wireless LAN valid coverage.

3-
2
Chapter 3 Wi-Set Wizard
3.1 Launch Wi-Set Wizard
In this section, you will obtain detail instruction in setting wireless configuration by following
Wi-Set Wizard. Please refer to Chapter 1.4 to understand the network types the AzureWave
802.11 b/g USB WLAN Module supports.
In the first time installation, Wi-Set Wizard is executed immediately after installation to help you
set the proper wireless configuration.
In addition, you could launch it from either program menu
or Wireless LAN Management GUI.
In the following sections, we represent the steps, the convenient and easy wireless set up, in

3-
3
Wi-Set Wizard.

3-
4
3.2 Wi-Setup Wizard Steps
Whatever which wireless configuration
you would set up, the first scene of
Wi-Set Wizard is “Select Operation
Mode” dialog that shows as right picture.
You could select either station or AP
mode from the first step.
For Ad-hoc and infrastructure type
configuration, you should select Station
mode. The software access point
configuration could be archived by select
AP mode.
l Station
Set the operation mode to be “Station”. Follow steps in section 4.3.
l AP
Set the operation mode to be “Access Point”. Follow steps in section 4.4.
l Next
Go to next step of selected mode.
l Cancel
Give up Wi-Set Wizard. The default wireless configuration will be automatically applied as
“Infrastructure” type of Station mode if user won’t set it up here.
3.3 Station Mode Configuration
Two types, infrastructure and ad-hoc types,
of station mode are provided here.
l Infrastructure
Configure the wireless as infrastructure
type network. Follow steps in 4.3.1
Build Infrastructure type network.
l Ad-Hoc

3-
5
Configure the wireless as Ad-Hoc type network. Follow steps in 4.3.2 Build Ad-Hoc
networking mode network
l Back
Go back to previous step – Select Operation Mode.
l Next
Go to next steps of selected type.
l Cancel
Give up Wi-Set Wizard and keep the last configuration.
3.3.1 Configure Infrastructure type network
It is easy to build up infrastructure type network with Wi-Set Wizard. The next step after select
infrastructure type network is to select the desired connection.
Select the BSS connection list
Select valid wireless BSS, Infrastructure
Basic Service Set, connection nearby
your system for connecting. The listed
BSS are touchable access point around
you. You have to pick one from the list
and go to next.
l SSID list box
Four fields are shown in the list box
to provide access point status.
n SSID: the name of access point
n Security: the security status of access point. None means security/password is not necessary. WEP
means the access point acquire security/password to log in.
n Channel: the channel this access point applies.
n Signal: The signal strength; higher mean better.
l Refresh
Rescan the IBSS list.
l Back
Go back to previous step ~ Select Station Type.

3-
6
l Next
Go to next step of infrastructure type configuration. It is relative the security status of
selected access point.
n None: Setup TCP/IP.
n WEP: A WEP dialog is pope dup before Setup TCP/IP as below picture. You have to input the
password/network key to join this access point before setup TCP/IP. The password/network key is
defined by the administrator of access point. The invalid network key will stop going to next step.
l Cancel
Give up Wi-Set Wizard and keep the last configuration.
Setup TCP/IP
You have to setup the TCP/IP by
following the configuration of connect
access point. The following setting
should match the configuration of access
point you join. Please check the setting
of it.
l Back
Go back to previous step ~ Select the IBSS connection list
l Finish
All settings of infrastructure are finished.
3.3.2
Build Ad-Hoc networking mode network
It is easy to build up Ad-Hoc type network with Wi-Set Wizard. The next step after select
Ad-Hoc type network is to select the desired connection.

3-
7
Select The IBSS Connection List
In this step, you could select the present
Ad-Hoc station to join. In addition, you
could create another Ad-Hoc station by
press “New IBSS” button.
l SSID list box
Display all present Ad-Hoc station
around this system.
l New IBSS
Create a new Ad-Hoc station by the shown-up
dialog instead of joining with a present Ad-Hoc
node. In this dialog, you could configure network
name, applied channel, authentication and
encryption rule on this Ad-Hoc node. After
creating a new Ad-Hoc node, the steps of build
Ad-Hoc network connection is finished.
l Refresh
Rescan the Ad-Hoc stations nearby this system.
l Back
Go back to previous step ~ Select Station Type.
l Next
The wizard will show up the contents of profile. You should set it up to match the security
configuration with selected Ad-Hoc station. Then the steps are finished.
l Cancel
Give up Wi-Set Wizard and keep the last configuration.

3-
8
3.4 Build Soft AP network
Setup a Wireless Network
The setting of Soft AP could settle done
by either convenient “Normal User” or
complex “Advanced User” operation.
l Normal User
Only basic settings are included in following steps. Less-experience users could apply this
kind setup to archive access point setup. Fundamental security setting is included.
l Advanced User
You need more security knowledge on wireless network to help you go through following
steps. Experienced user could select this kind setup. Advanced security settings are
included.
l Back
Go back to previous step ~ Select Operation Mode
l Next
The next step is dependant on the option user select:
n Normal User: Please follow steps in 4.4.1 Normal User
n Advanced User: Please follow steps in 4.4.2 Advanced User
l Cancel
Give up current Wi-Set Wizard setup and roll back to previous configuration.
3.4.1 Normal User
For normal user mode, the basic security function only request two types network/password key
to provide WEP encryption.
Wireless Network Properties

3-
9
l Network Name (SSID)
The service serve identify of this
access point. The length of the
self-naming does not exceed 32
characters.
l WEP Encryption
n Enable: The joined wireless station
should have same
network/password key with this
access point.
n Disable: no network/password key
is required for joined wireless station.
l Back
Back to previous step ~ Setup a Wireless Network
l Next
The next step is dependant on the decision of WEP to be either Enable or Disable.
n WEP Enable: You should prepare network/password key for WEP. Go to Wireless Network Security.
n WEP Disable: The access point is set as an opened hot-spot. Anyone could join this access point
and connect to internet.
l Cancel
Give up current Wi-Set Wizard setup and roll back to previous configuration.
Wireless Network Security
Two types pass key, ASCII and
Passphrase, perform security with different
level.
l ASCII
You should provide either 5 or 8 ASCII
characters on
Network key
edit box.
l PASSPHRASE
You could input words on Network Key
edit box.

3-
10
n 64 bits: The generated pass key is 64-bits to be company with data packets.
n 128 bits: The generated pass key is 128-bits to be company with data packets.
l Back
Go back to previous step ~ Wireless Network Properties
l Next
Go to next step ~ Show Setting Information
l Cancel
Give up current Wi-Set Wizard setup and roll back to previous configuration.
Show Setting Information
l Back
If you do not satisfy with current
setting, you could go back to previous
step ~ Wireless Network Security
l Next
Confirm the current setting and go to
next step ~ Finish.
l Cancel
Give up current Wi-Set Wizard setup and roll back to previous configuration.
Select the Internet Connection List
This step only shows with multiple network
connection system. If there is only one
internet connection available, this step is
discarded. In this step, you have to select
one network connection from the list box.
This network connection should be
configured to connect internet.
l Network List Box
In the list box, you could see all

3-
11
network connection this system provides. You have to pick one from the list.
l Back
Go back to previous step ~ Show Setting Information.
l Next
Go to next step, Finish, while the internet connection is selected.
If the status of selected network connection is disconnected, a warning dialog will pop up
to inform you that.
l Cancel
Give up current Wi-Set Wizard setup and roll back to previous configuration.
Finish
l Finish
Press finish button to close Wi-Set
wizard. The wireless configuration is
going to be applied within few seconds.
3.4.2 Advanced User
The steps of advanced user provide more detail configuration including channel and
authentication
Wireless Network Properties
In this step, you could assign the
channel number and authentication
mode for the access point.
If the setting of WEP to be “Disable” and

3-
12
Authentication to be “Open system”, then this access point is opened for free join.
l Network Name (SSID)
The service serve identify of this access point. The length of the self-naming does not
exceed 32 characters.
l Channel select
You could pick one channel from 1 to 11.
l WEP Encryption
An encryption system prevents eavesdropping on wireless network traffic.
n Enable: The joined wireless station should have same network/password key with this access
point.
n Disable: no network/password key is required for joined wireless station.
l Authentication
The next generation of Wi-Fi security, Wi-Fi Protected Access, or WPA, will use
authentication to verify whether users have access to a particular wireless network.
n Open system: This access point is without authentication protection with user.
n Share key: Any station would join this access point should pass with key same as the setting on
access point.
l Back
Go back to previous step ~ Setup a Wireless Network.
l Next
Go to next step. It depends on the setting of WEP and Authentication.
Authentication
Encryption
Open system Shared key WPA-PSK
WEP WLAN Security
WEP(Disable) Show Network Setting
n/a
l Cancel
Give up current Wi-Set Wizard setup and roll back to previous configuration.
Wireless Network Security
Two types pass key, ASCII and Passphrase, perform security with different level.
l ASCII
Page is loading ...
Page is loading ...
Page is loading ...
Page is loading ...
Page is loading ...
Page is loading ...
Page is loading ...
Page is loading ...
Page is loading ...
Page is loading ...
Page is loading ...
Page is loading ...
Page is loading ...
Page is loading ...
Page is loading ...
Page is loading ...
Page is loading ...
Page is loading ...
Page is loading ...
Page is loading ...
Page is loading ...
Page is loading ...
Page is loading ...
Page is loading ...
Page is loading ...
Page is loading ...
Page is loading ...
Page is loading ...
-
 1
1
-
 2
2
-
 3
3
-
 4
4
-
 5
5
-
 6
6
-
 7
7
-
 8
8
-
 9
9
-
 10
10
-
 11
11
-
 12
12
-
 13
13
-
 14
14
-
 15
15
-
 16
16
-
 17
17
-
 18
18
-
 19
19
-
 20
20
-
 21
21
-
 22
22
-
 23
23
-
 24
24
-
 25
25
-
 26
26
-
 27
27
-
 28
28
-
 29
29
-
 30
30
-
 31
31
-
 32
32
-
 33
33
-
 34
34
-
 35
35
-
 36
36
-
 37
37
-
 38
38
-
 39
39
-
 40
40
-
 41
41
-
 42
42
-
 43
43
-
 44
44
-
 45
45
-
 46
46
-
 47
47
-
 48
48


AzureWave Technologies AW-GA800BT User manual
- Category
- Networking
- Type
- User manual
- This manual is also suitable for
Ask a question and I''ll find the answer in the document
Finding information in a document is now easier with AI
Related papers

Other documents
-
Edimax 802.11b-g-n User manual
-
JOOM AJ-4510AC User guide
-
Allnet ALL0263P Owner's manual
-
Advantek Networks AWN-11N-USB User manual
-
 AzureWave AW-HM593 Wireless Module User guide
-
Asus WL-130N User manual
-
 Askey H8N-WLU5022 User manual
-
Gigabyte GN-WLMS502 User manual
-
Loopcomm Technology W6RRNX-G1-G1W User manual
-

