

I
This manual is designed to help you to install, operate and maintain the PC-P430
Paper Cutter. Please read and understand this manual, and keep it in a safe and
convenient place.
Do not operate the PC-P430 until you read and understand the instructions in this
manual.
Horizon International Inc. shall not be liable for incidental consequential damages
resulting from: improper or inadequate maintenance by the customer, unauthorized
modification or misuse, or operation outside of the environmental specifications for
the product.
Horizon International Inc. pursues a policy of continuing improvement in design
and performance of the product. Therefore, the product design and specifications
are subject to change without prior notice and without our legal obligation.
All rights are reserved. No part of this manual may be photocopied, reproduced or
translated to another language without the prior written consent of Horizon
International Inc.
Important Information
PAPER CUTTER
PC-P430
1412224/PCP430/00E/HN/MT/F7/ICS5.5/PXI
UM204044-
00(003)
*UM204044*

II
Safety Precautions
Safety precautions are indicated in this manual as follows:
The term WARNING indicates a potentially hazardous situation which, if
not avoided, could result in death or serious injury.
The term CAUTION indicates a potentially hazardous situation which, if not
avoided, may result in serious injury, or damage to the machine.
This symbol indicates a note which includes important information. Follow
the note to operate the machine safely.
This symbol indicates a prohibited action. Do not perform any prohibited
action.
This symbol indicates an essential procedure. Follow the procedure to
operate the machine safely.
Important
This will help you to avoid an incorrect operation which may
cause problems with the machine, or make it necessary to go
back to a previous step.
Attention
This explains functional limitations and restrictions on the
operation of the machine.
Note
This indicates a helpful hint.
Additional
Information
This indicates additional information which will help you to
operate the machine efficiently.

III
Operating Safety Precautions
WARNINGS for Operation
The machine is protected by safety covers, and while the covers are open the
machine will not run. Do not operate the machine when the safety features are dis-
abled or a cover is removed. This can cause a severe accident.
The machine must be operated by just one person at a time.
Do not place your hands or fingers under the knife or the clamp.
Select one person to supervise use of the machine. Only that person should have
access to the key.
When you lift or lower the backgauge, do not place your hands or fingers between
the back-gauge and the table.
Do not operate the machine with any of the covers removed. There are rotating
mechanical parts and electrical parts with extremely high voltage inside the
machine. These can cause severe personal injury or an electrical shock.
Each operator should be familiar with the safety instructions, be aware of the poten-
tial dangers, and have sufficient knowledge of how to manage an accident. Anyone
who does not have this training should not operate the machine.
Perform the safety checks listed in “Checks Before Operating” before you do the
first operation of each day. Do not place your hands or fingers under the knife or the
clamp.
CAUTIONS for Operation
Do not cut anything besides paper. This may damage the machine.
Do not cut staples or paper clips, because this will damage the knife. This may also
damage the rest of the machine.
If you turn off the key switch, wait about ten seconds before turning it on again.

IV
WARNINGS for Installation
Do not overload the electrical outlet. This can cause a fire or an electrical shock.
Do not install the machine on an unstable floor surface. This may allow the machine
to fall over, and this can cause severe personal injury. If the floor is not level, this
can affect the performance of the machine.
CAUTIONS for Installation
Do not install the machine in a location where it will be exposed to direct sunlight,
high temperature or humidity.
Do not install the machine near any device which produces strong magnetic fields.
Do not install the machine in a location which is dusty. This can cause a fire or dam-
age the machine.

V
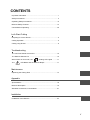
CONTENTS
Important Information........................................................................... I
Safety Precautions.............................................................................. II
Operating Safety Precautions ............................................................ III
Machine Safety Features ....................................................................VI
Checks Before Operating ..................................................................VII
Let's Start Cutting
Preparing to Cut the Sheets ................................................................ 2
Cutting Operation ................................................................................ 5
Cutting Long Sheets ........................................................................... 6
Troubleshooting
The Last Few Sheets Are Not Cut .................................................... 10
The Machine Will Not Cut ................................................................. 10
When Power is Turned On, the
"Cutting" LED Lights .......... 11
The
LED Blinks and the Machine Beeps ............................. 11
Maintenance
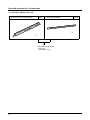
Replacing the Cutting Stick ............................................................... 14
Appendix
Specifications .................................................................................... 18
Machine Description ......................................................................... 19
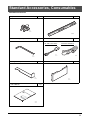
Standard Accessories, Consumables ............................................... 21
Installation
Installation of the Machine ................................................................ 24

VI
Machine Safety Features
This machine has been designed with safety in mind. Please understand
these features, and use them when operating the machine.
The machine is protected by
covers which prevent your
hands from reaching any dan-
gerous parts during operation.
The machine includes a key
switch. Only an authorized per-
son should have access to the
key.
When this door is open, the
machine will not run.
When the safety cover is open,
the knife is locked and the
machine will not run.
The machine will only start cut-
ting the sheets when both Cut-
ting buttons are pressed at the
same time.
If one of the Cutting buttons is
released while the machine is
cutting the sheets, the knife
automatically returns to the
starting position.
The machine is equipped with a
lever which moves the cut
sheets forward.
Cutting
Knife is
Locked
.
Cutting

VII
This machine has been designed to be as safe as possible. However, if an accident occurs, it can
cause severe personal injury. Before using the machine, always perform the safety checks listed in
this section.
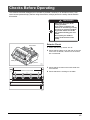
Exterior Check
1 Check that the key switch are off.
2 Check that the safety cover and both of the rear
covers are not broken, removed or the screws
are not loosened.
3 Check that the screws on the knife holder are
not loosened.
4 Check that there is nothing on the table.
Checks Before Operating
- Work alone when you do the
cutting operation.
- If you notice a problem or the
machine is not workinig correctly,
do not try to correct the problem
by yourself. Please turn off the
key switch and notify your local
dealer.
- Do not place your hands or
fingers under the knife or the
clamp.
WARNINGS
104062
10101A1
Rear Covers
Safety Cover
Key Switch
14044
10301B1
Screws on Knife Holder

VIII
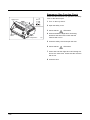
Emergency Stop Function Check
Check that the knife does not operate if the safety
cover or the door is open.
1 Turn on the key switch.
2 Open the safety cover.
3 Check that the LED blinks.
4 Press and hold the Right and Left Cutting
buttons at the same time. Check that the
machine will not run.
5 Close the safety cover and open the door.
6 Check that the LED blinks.
7 Press and hold the Right and Left Cutting but-
tons at the same time. Check that the machine
will not run.
8 Close the door.
14044
10301C1
Left Cutting
Button
Safety Cover
Door
Right Cutting Button

IX
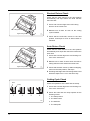
Non-Operation Check When One
Cutting Button is Pressed
Check that the knife does not operate if either
Cutting button is pressed.
1 Check that the Power switch and the key
switch are both turned on.
2 Check that the safety cover and door are closed.
3 Check that LED on the monitor lights.
4 Press and hold the Left Cutting button. Check
that the machine will not run.
5 Keep pressing the Left Cutting button, and then
press the Right Cutting button. Check that the
machine will not run.
6 Release the both Cutting buttons.
7 Exchange the Right and Left Cutting buttons,
and follow the Steps 1 to 6 in the same way.
14044
10301D1
Key Switch
Left Cutting
Button
Right Cutting Button
The machine will run only when both Cutting
buttons are pressed at the same time (within
0.5 seconds).

X
Shortest Return Check
Check that the knife returns to the start position
automatically and stops before the knife reaches
the lower limit.
1 Press and hold the Right and Left Cutting
buttons at the same time.
2 Release one of them as soon as the cutting
cycle is started.
3 Check that the knife lifts, returns to the start
position, and stops as soon as either button is
released.
Auto-Return Check
Check that the knife returns to the start position
automatically and stops after the knife reaches the
lower limit.
1 Press and hold the Right and Left Cutting but-
tons at the same time.
2 Release one or both of them when the knife is
raising after the knife reaches the lower limit.
3 Check that the knife moves up without stopping,
returns to the start position, and stops.
4 Exchange the Right and Left Cutting buttons and
follow the steps from 1 to 3 in the same way.
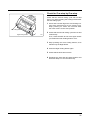
Cutting Cycle Check
Check the operations of the knife and the clamp.
1 Press and hold the Right and Left Cutting but-
tons at the same time.
2 Check the knife and the clamp operate as the
following orders.
1. The clamp lowers.
2. The knife lowers.
3. The knife lifts.
4. The clamp lifts.
14044
10301D1
Left Cutting Button
Right Cutting Button
14044
10301D1
Left Cutting Button
Right Cutting Button
14044
10301F1
1234
Knife
Clamp

XI
Check for One-stop by One-step
Check that the second cutting cycle will not start
even if you keep pressing the Cutting buttons after
the first cutting cycle.
1 Press and hold the Right and Left Cutting but-
tons at the same time to do one cutting cycle.
Keep pressing for about five seconds after
the knife returns to the start position.
2 Check that the second cutting cycle will not start
continuously.
Then, check the knife do not move again unless
you release the both Cutting buttons once.
3 Keep pressing the both Cutting bottons, then
release only the Right button.
4 Press the Right Cutting button again.
5 Check that the knife will not move.
6 Exchange the right and left cutting buttons and
follow the Steps 1 to 5 in the same way.
14044
10301D1
Left Cutting Button
Right Cutting Button

XII
This page is intentionally left blank.

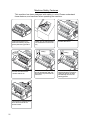
Let's Start Cutting
This section explains how to prepare the cutter
and do some basic operations.

2
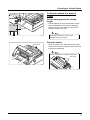
This section explains how to prepare the cutter before beginning the cutting operation.
Turn on the key switch.
- Insert the key and turn it clockwise.
LED on the monitor lights.
Preparing to Cut the Sheets
- Work alone when you do the
cutting operation.
- Do not open the safety cover or
the door while the machine is
operating.
- Do not place your hands or
fingers under the knife or the
clamp.
WARNINGS
14044
10101B1
Monitor
Key
Ready
0: Key Switch Off
I
: Key Switch On
The key can only be inserted in one position.

3
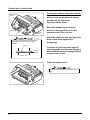
Preparing to Cut the Sheets
Cutting the sheets to a desired
length
Set the backgauge to the cutting
length.
- The backgauge can be moved forward or back
using the adjusting knob. Set the backgauge
using the scale. In the drawing to the left, the
indicator indicates 210 mm.
Place the sheets.
- Open the safety cover. Stack the sheets evenly,
and place the sheets so that the back of the stack
touches the backgauge.
14044
10101C1
21
A3
2
A3
Adjusting Knob
Indicator
Match the indicator to the scale on the
operator side of the machine.
14044
10101D1
Safety Cover
Use the side guides to square the sheets up.
14044
10101E1
Side Guides

4
Preparing to Cut the Sheets
Cutting the sheets using the cut line
Make a mark on the desired cutting
position on the top sheet.
Open the safety cover.
Move the backgauge so that the
desired cutting position is on the
operator side of the cut line.
Stack the sheets evenly, and push the
back of the stack against the
backgauge.
Continue to push the stack against
the backgauge, and turn the adjusting
knob until the desired cutting position
matches the cut line.
Close the safety cover.
14044
10101F1
Cut Line
Desired Cutting
Position
The cut line has a thickness. The operator
side of the cut line is the actual cutting
position.
14044
10101G1
Cutting
Position
Cut Line
Sheet
Operator Side
Adjusting
Knob
14044
10101H1
If the cover remains open, the machine will not
run.

5
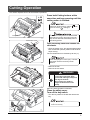
This section explains how to do some basic operations.
Press both Cutting buttons at the
same time and keep pressing until the
cutting action is finished.
Open the safety cover and remove the
cut sheets.
- Open the safety cover, and pull the sheet pusher
lever toward the operator position until the lever
stops moving.
The cut sheets will move forward by 25 mm (1”).
- Remove the trim.
- Remove the cut sheets.
After the cutting operation is finished,
Close the safety cover.
Turn off the key switch.
- Turn the key switch to the left and remove the
key.
Cutting Operation
14044
10201A1
Cutting Buttons
Press both Cutting buttons until the LED
goes out and the LED lights.
If one of the Cutting buttons is released while
the machine is cutting, the cutting action will
stop and the knife will automatically return to
the starting position.
14044
10201B1
Sheet Pusher Lever
14044
10201C1
If the cutting length is 70 mm (2.8”) or shorter,
the sheets will move forward by shorter
distance.
- Use a brush to remove any trim
on the edge of the knife. Keep
your hands and fingers away from
the edge of the knife.
- Do not place your hands or
fingers under the knife or the
clamp.
WARNINGS
14044
10201D1
- Only the authorized person should have
access to the key.

6
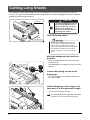
The maximum cutting length (distance from the backgauge to the knife) on this machine is 320 mm
(12.6”). If you want to cut the sheets which are longer than this, lift the backgauge and allow the sheets to
extend out the back of the machine.
Turn off the key switch.
Move the backgauge back as far as
possible.
- Move the backgauge to the rear by turning the
adjusting knob.
- The backgauge can be lifted only if it is in the rear
position.
Loosen the locking screws on the
backgauge.
- Turn the locking screws counterclockwise until
they can be lifted.
Lift the backgauge until it stops, and
then move it to the right until it stops.
- Lower the backgauge slowly.
The backgauge will be supported in the lifted
position. It is not necessary to hold it up.
Cutting Long Sheets
14044
20501A1
Backgauge
Backgauge
Adjusting Knob
Key Switch
If you lift the backgauge, be sure to
lower the backgauge back to the
original position after the cutting
operation. If the backgauge is
moved while it remains lifted, this
may damage the machine.
- Because the backgauge is lifted, you
cannot use it to align the back of the
stack. Align the edges of the sheets
before you place the sheets on the table.
- The maximum thickness of the stack
which can be cut in this way is 15 mm
(0.6”).
CAUTION
14044
20501B1
14044
20501C1

7
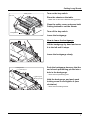
Cutting Long Sheets
Turn on the key switch.
Place the sheets on the table.
- Match the cut line to the desired cutting position.
Close the safety cover, and press both
Cutting buttons to cut the sheets.
Turn off the key switch.
Lower the backgauge.
How to lower the backgauge
Lift the backgauge by hand and move
it to the left until it stops.
Lower the backgauge slowly.
Push the backgauge down so that the
end of each positioning pin fits into a
hole in the backgauge.
- There are two positioning pins.
Hold the backgauge, and push each
locking screw in and tighten it (turn
clockwise).
- There are two locking screws.
14044
20501D1
Safety Cover
Cut Line
Cutting Buttons
Key Switch
14044
20501E1
14044
20501F1
Locking Screw
Positioning Pin
Locking Screw
Positioning Pin
Page is loading ...
Page is loading ...
Page is loading ...
Page is loading ...
Page is loading ...
Page is loading ...
Page is loading ...
Page is loading ...
Page is loading ...
Page is loading ...
Page is loading ...
Page is loading ...
Page is loading ...
Page is loading ...
Page is loading ...
Page is loading ...
Page is loading ...
-
 1
1
-
 2
2
-
 3
3
-
 4
4
-
 5
5
-
 6
6
-
 7
7
-
 8
8
-
 9
9
-
 10
10
-
 11
11
-
 12
12
-
 13
13
-
 14
14
-
 15
15
-
 16
16
-
 17
17
-
 18
18
-
 19
19
-
 20
20
-
 21
21
-
 22
22
-
 23
23
-
 24
24
-
 25
25
-
 26
26
-
 27
27
-
 28
28
-
 29
29
-
 30
30
-
 31
31
-
 32
32
-
 33
33
-
 34
34
-
 35
35
-
 36
36
-
 37
37


Standard Standard PC-P430 Electric 17" Desktop Paper Cutter User manual
- Type
- User manual
- This manual is also suitable for
Ask a question and I''ll find the answer in the document
Finding information in a document is now easier with AI
Other documents
-
 My Binding Standard PC-64 II User manual
-
 My Binding Horizon PC-45 User manual
-
 My Binding Standard APC45 Programmable User manual
-
Challenge Titan 265 XG, XT, TC 2013 User manual
-
-
-
-
MyBinding Challenge Titan 200 User manual
-
-


