Page is loading ...

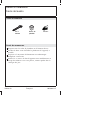
Tools and Materials
Before You Begin
Observe all local plumbing and building codes.
If possible, install the drain before installing the plumbing fixture.
Inspect the supply tubing for damage. Replace as necessary.
Kohler Co. reserves the right to make revisions in the design of
faucets without notice, as specified in the Price Book.
Adjustable
Wrench
Plumbers
Putty
Rags
1052943-2-C 2 Kohler Co.

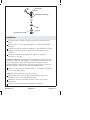
Installation
If present, remove and discard the protective plastic cap from
flange.
Remove the nut, friction washer, and seal from the drain body.
Apply a bead of plumbers putty or other sealant around the
underside of the flange according to the sealant manufacturer’s
instructions.
Insert the drain assembly into the drain hole and press into place.
NOTE: For K-7127: A thin seal and a thick seal are provided with
your drain. Use the thin seal when installing the drain to lavatories
with a thick wall, such as vitreous china or cast iron. Use the thick
seal when installing the drain to lavatories with a thin wall, such as
stainless steel or copper.
Slide the seal (tapered side up) and the friction washer onto the
drain body.
NOTE: Do not to rotate the drain while tightening the nut.
Thread the nut up the drain body until snug against the
underside of the lavatory.
Using an adjustable wrench, tighten the nut. Do not overtighten.
Remove any excess putty or sealant.
Connect the P-trap (not provided) to the drain body.
Friction
Washer
Flange
Stopper
Drain
Body
Nut
Seal
Kohler Co. 3 1052943-2-C
Page is loading ...
Page is loading ...
Page is loading ...
Page is loading ...
Page is loading ...
Page is loading ...
Page is loading ...
Page is loading ...
Page is loading ...
-
 1
1
-
 2
2
-
 3
3
-
 4
4
-
 5
5
-
 6
6
-
 7
7
-
 8
8
-
 9
9
-
 10
10
-
 11
11
-
 12
12


Ask a question and I''ll find the answer in the document
Finding information in a document is now easier with AI
in other languages
- français: Kohler K-7127-A-SN Guide d'installation
- español: Kohler K-7127-A-SN Guía de instalación
Related papers
-
Kohler K-7127-BN Installation guide
-
Kohler K-7127-A-2BZ Installation guide
-
-
Kohler 7114-2BZ Installation guide
-
-
-
-
-
-