Page is loading ...

Benchy – Carbon 12V/24V Instruction Manual
Page 1 of 13 www.KegLand.com.au Last Updated 13/12/2021 4:54 PM
KL18210
Instruction Manual
KegLand Distribution PTY LTD

Benchy – Carbon 12V/24V Instruction Manual
Page 2 of 13 www.KegLand.com.au Last Updated 13/12/2021 4:54 PM
www.KegLand.com.au
WARNING
ENSURE THAT THERE IS ALWAYS ATLEAST 100mm OF CLEARANCE ON EACH
SIDE OF THE BENCHY TO ALLOW ADEQUATE AIRFLOW.
WARNING
AVOID EXTERNAL HEAT SOURCES SUCH AS DIRECT SUNLIGHT, GAS STOVES
OR OTHER HEAT GENERATING APPLIANCES.
WARNING
ONLY USE KEGLAND APPROVED CLEANERS AND SANITISERS TO CLEAN THE
PRODUCT LINES.
WARNING
DO NOT SET THE TEMPERATURE BELOW 0°C OR YOU RISK FREEZING THE
BEVERAGE YOU ARE DISPENSING.
WARNING
ONLY USE ON A FLAT SURFACE OR AT A MAXIMUM ANGLE OF 20 DEGREES
OFF LEVEL

Benchy – Carbon 12V/24V Instruction Manual
Page 3 of 13 www.KegLand.com.au Last Updated 13/12/2021 4:54 PM
WARNING
NEVER USE A BATTERY CHARGER, TRANSFORMER/RECTIFIER, BATTERY
ELIMINATOR OR AC/DC CONVERTER TO POWER THE PRODUCT UNLESS
SUPPLIED BY KEGLAND
SETTING THE TEMPERATURE (ESC-961neo)
1. Press and release the “set” to enter into the user menu.
2. Press “set” will display the value of the target temperature setting.
3. Press the up and down arror to adjust the value of the set temperature.
4. Press button or wait 30 seconds and the setting will be saved and return back to the
home screen
WARNING: Do not set the temperature below 0°C or you risk freezing the beer or beverage that you
are dispensing. For a more detailed instruction manual for the controller download this from the
kegland website or go to the link below.
ESC-961neo temperature controller user manual
INSTALLATION REQUIREMENTS
ONLY USE ON FLAT SURFACE
The Benchy Carbon should only be used on a flat surface or at a maximum angle of 20 degrees off
level. DO NOT operate this unit on its side or at angles greater than 20 degrees or permanent
damage to the compressor will occur
PROVIDE ADEQUATE VENTILATION AND AVOID EXTERNAL HEAT SOURCES
In order to achieve the best possible performance from the Benchy Carbon we recommend 100mm
clearance around air vents. External heat sources such as direct sunlight, gas stoves or other heat
generating appliances should be avoided.
DO NOT USE BATTERY CHARGERS OR DC GENERATORS
Never use a battery charger, transformer/rectifier, battery eliminator or AC/DC converter to power
the product (unless supplied by KegLand). Such equipment can, under certain circumstances,
delivery current at a voltage which may damage the inverter. In order to use these devices always
ensure that a battery is connected in parallel between the charging equipment and the product

Benchy – Carbon 12V/24V Instruction Manual
Page 4 of 13 www.KegLand.com.au Last Updated 13/12/2021 4:54 PM
DC CABLE REQUIREMENTS
DC cable gauge and length requirements
DC power systems have significantly higher losses over cable and this can be exacerbated by
insufficient cable or bad cable joins. When running the Benchy Carbon off battery power it’s
important to understand that longer cable requires thicker cable to avoid excessive power loss. We
recommend pure copper cable (not aluminium or copper plated). The table below shows the
necessary minimum gauge required. It’s ok to use smaller cable but do not use larger cable than this.
AW
Gauge
Cross section
(mm2)
Max Length 12V
DC (feet)
Max Length 12V
DC (meters)
Max Length 24V
DC (feet)
Max Length 24V
DC (meters)
13
2.5
8
2.5
16
5
12
4
13
4
26
8
10
6
20
6
39
12
8
10
33
10
66
20
DC Voltage requirements
The voltages in the table below specify the voltage required to the compressor. This does not take
into account voltage loss in fittings such as cigarette lighter sockets, cable joins or the cable itself
that you might have in your system. For best performance use quality fittings, thick cable and firm
fitting Anderson sockets to ensure your DC cabling losses are kept to a minimum.
DC power systems can operate between 9.6V DC and up to 18V DC or alternatively from 21.3V DC
and up to 31.5V DC.
NOTE: If you would like to run this unit on DC Voltages between 18V and 21.3V you will need to
purchase a step down power module (DC to DC converter). This ca be handy if you want to run the
Benchy Carbon off commonly available 18V Drill Batteries.
12V Cut-Out
12V Cut-In
12V-Max
24V Cut-Out
24Cut-In
24V-Max
9.6V
10.9V
18.00V
21.3V
22.7V
31.5V

Benchy – Carbon 12V/24V Instruction Manual
Page 5 of 13 www.KegLand.com.au Last Updated 13/12/2021 4:54 PM
DISPENSING FROM THE BENCHY GLYCOL
Before attaching the Benchy Carbon to your keg first screw your taps onto the two shanks on the
front of the Benchy and tighten the shank collar using a 7 in 1 Facet Tap Wrench/Spanner Tool.
After tightening your taps onto the shanks, you can then plumb your kegs in to the Benchy Carbon.
On the back of the Benchy you will find two 8mm push in bulkhead fittings. Simply push 8mm OD
EVABarrier tubing from your liquid ball lock disconnect or keg coupler into the bulkhead fitting. Then
attach the ball lock disconnect or keg coupler onto your liquid keg post or spear respectively.
Ensure that the EVABarrier hose is cut straight and cleanly with a Stanley knife or 2 in 1 tube cutter
(KL07689). Then firmly push the EVABarrier hose into the opening of the bulkhead. Make sure that
the hose is pushed in to its full depth. Then check for a good connection by gently pulling bank on
the hose. If the hose comes out of the push in fitting, reinsert ensuring the hosing is pushed far
enough into the fitting.
To remove EVABarrier hose from the push in fitting, simultaneously push the collet in while pulling
the EVABarrier hose out of the push in fitting. Once the hose is removed cut the burred end off with
a 2 in 1 tube cutter or Stanley knife to produce a clean straight cut.
A 7 in 1 spanner tool (KL07672) can also be used to remove hosing from the push in fitting. Insert the
hose into the groove in the centre of the spanner and use the spanner to press in on the collet while
pulling on the hose.
After your taps are attached and your kegs are plumbed into your Benchy Carbon you can then hook
CO2 up to your keg and set the pressure based on your desired carbonation level and the ambient
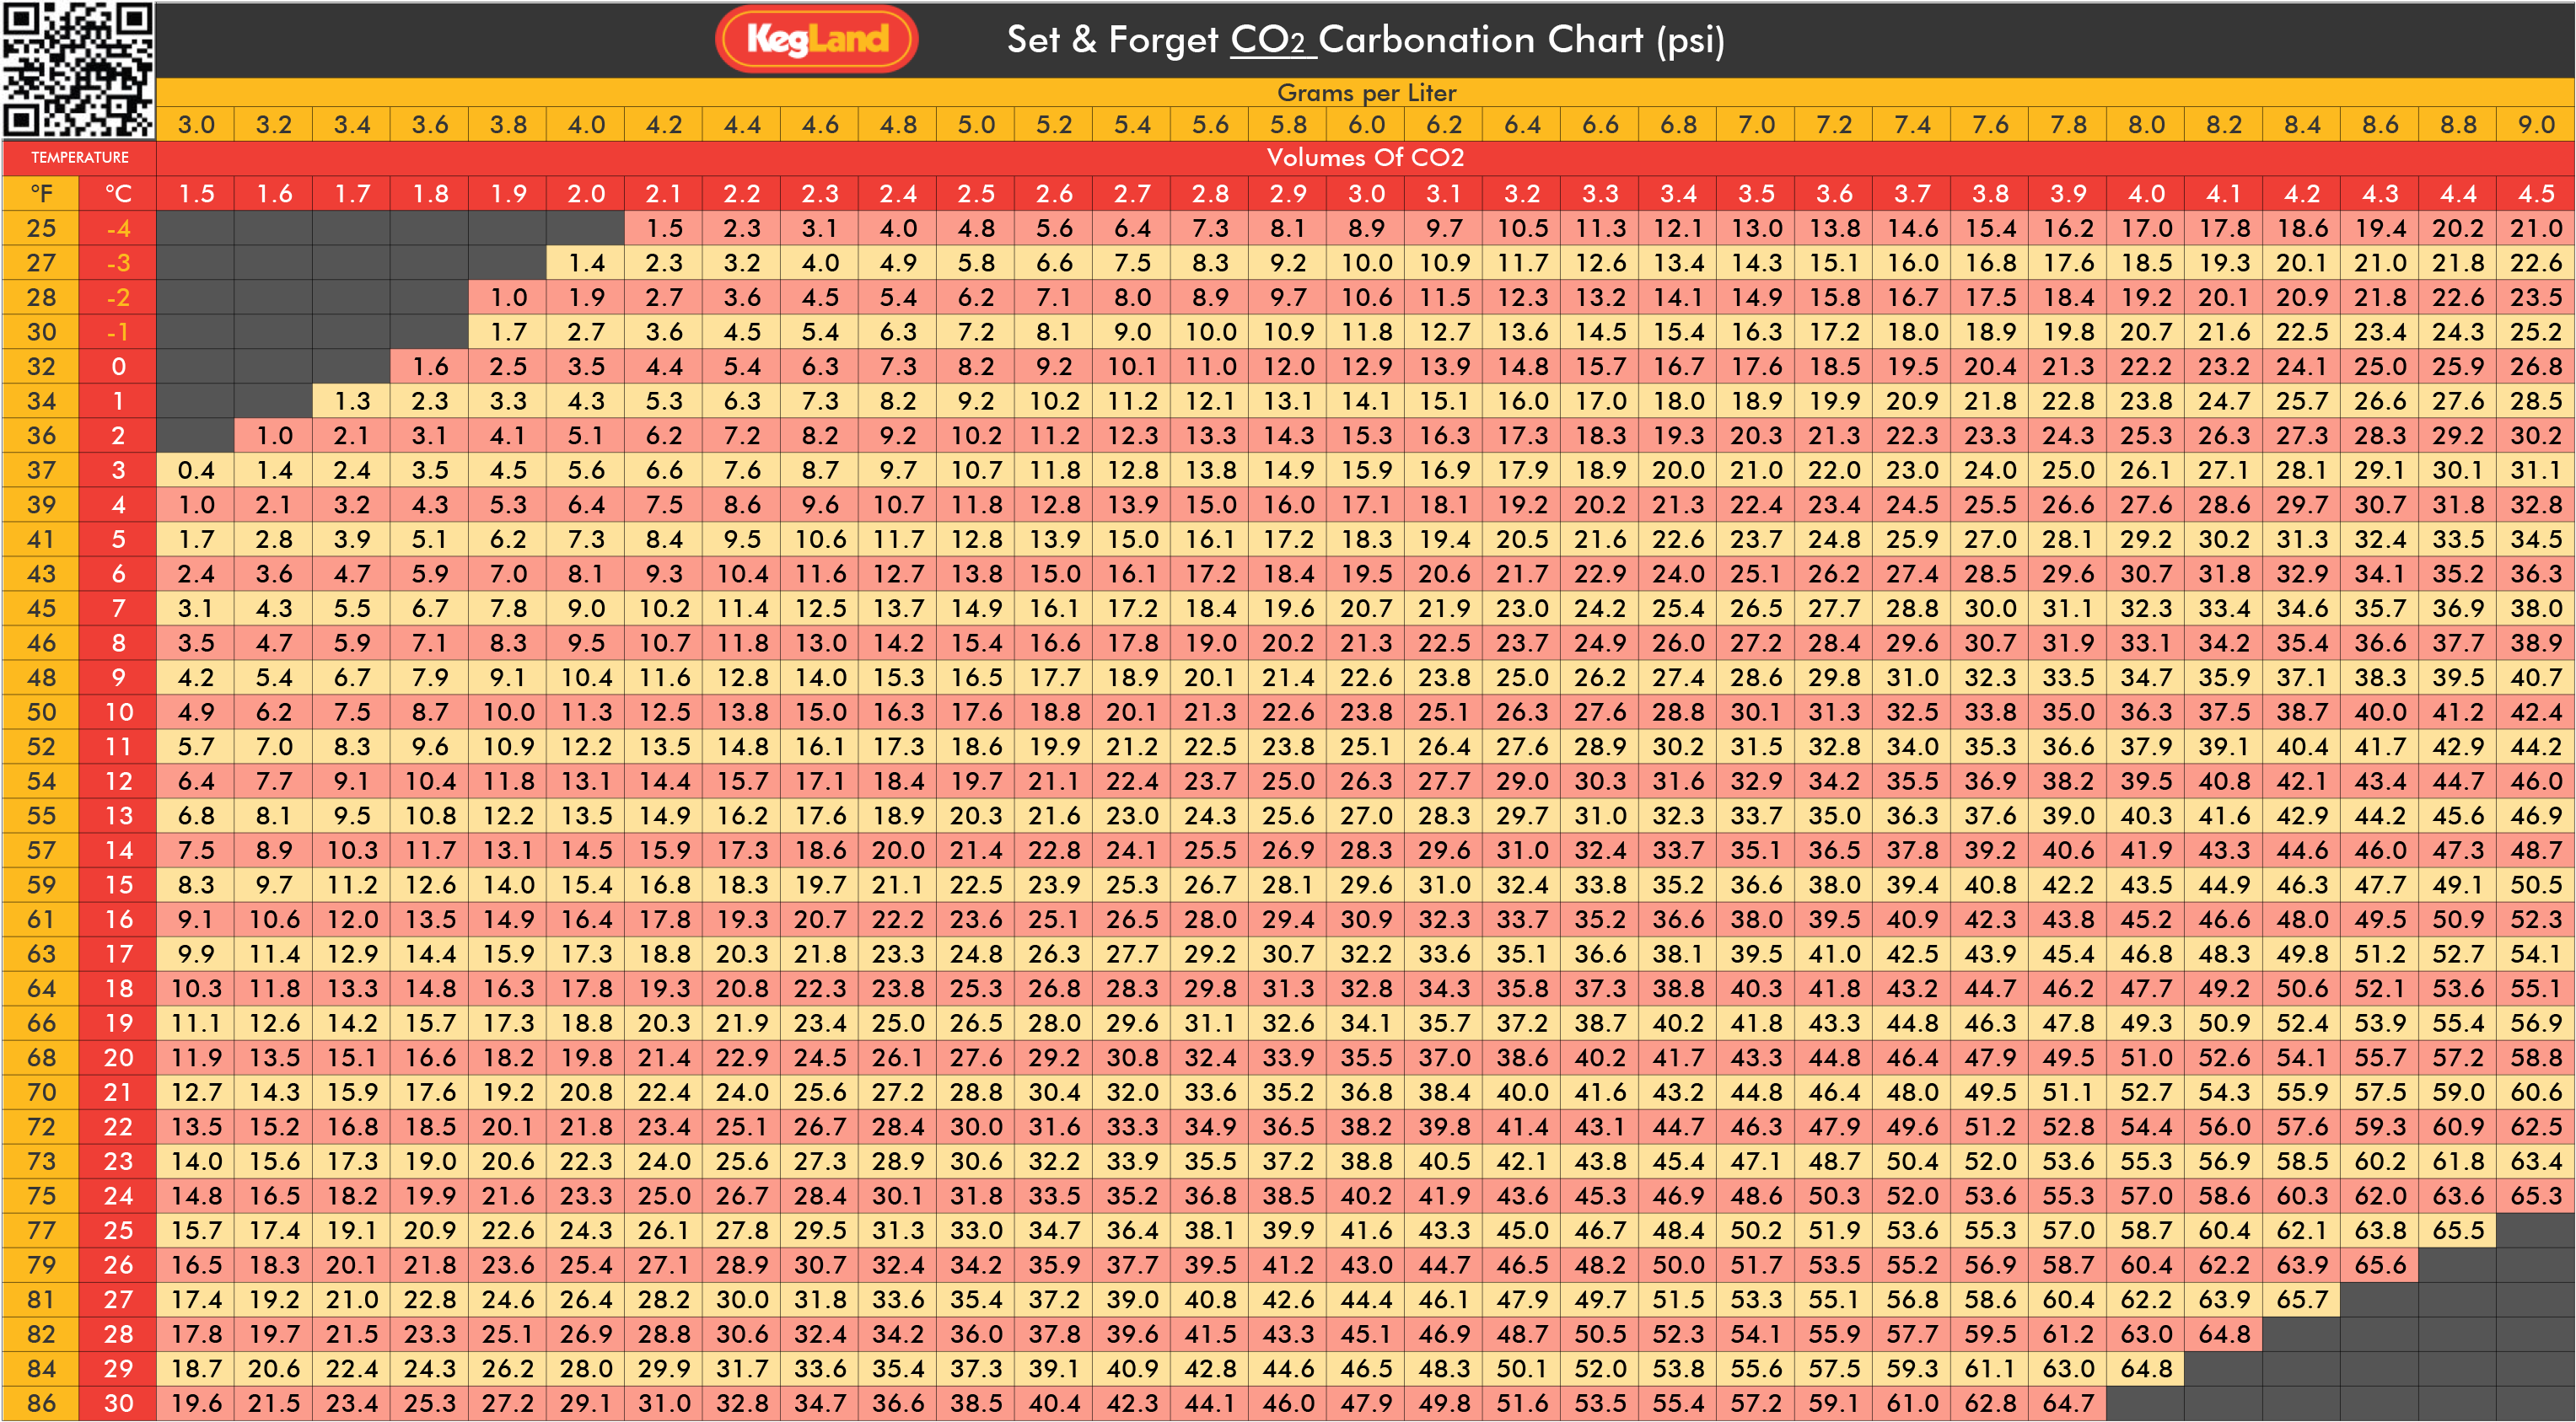
temperature according to a carbonation chart.
KegLand Carbonation Chart
Further tips on how to balance your Benchy dispensing system with CO2 are described later in this
instruction manual

Benchy – Carbon 12V/24V Instruction Manual
Benchy Carbon – Dispensing from Cornelius Ball Lock Kegs


Benchy Carbon – Dispensing from Commercial Kegs


Benchy – Glycol Instruction Manual
Balancing Your Benchy Dispensing System with CO2
The pressure to be set on your regulator differs according to the temperature that the keg is stored
at. If the product is stored at a higher temperature it will require a higher pressure to maintain the
desired level of carbonation. Refer to a carbonation chart to determine what pressure you should be
setting your regulator at to reach your desired level of carbonation based on the ambient
temperature the keg is stored in.
For most styles of beer, you should be aiming for a carbonation level of between 2.3-2.8 volumes of
carbonation with the average carbonation level being 2.6 volumes (if you are unsure of the
carbonation level of the beer i.e. if it is a commercial keg then assume it is at 2.6 volumes of
carbonation). To achieve a specific carbonation level during carbonation or priming refer to the table
in the link below and correlate the temperature of the keg with the desired carbonation level.
KegLand Carbonation Chart
NOTE: Do not try to fix a slow or fast pour rate by adjusting the dispensing pressure. This will result
in your beer either going flat or over carbonated. It is best to adjust the beverage line length and
diameter. If the pour is too fast and is producing a lot of froth then increase the length of the
beverage line between the Benchy and the keg. Alternatively, if the pour is too slow then decrease
the length of the beverage line between the Benchy and the keg.
When adjusting your beverage line length to achieve the perfect pour it is always best to start with a
longer length of beverage line as you can always trim a longer length of hose.
CLEANING/MAINTENANCE
Only use KegLand approved cleaners such as StellarOxy and StellarClean and sanitisers such as
Phosphoric acid and StellarSan to clean and sanitise your product lines.
An easy way to clean your product lines with a gas source is to use a Gas Free Ball Lock Line Cleaning
Kit. Simply fill a PET bottle with correctly diluted Stellarclean or Stellaroxy solution. Hook up your
liquid ball lock disconnect on your product line to the carbonation cap, pump the line cleaning kit

and open your tap to clean your tap and product line. Then rinse with water and repeat with
correctly diluted Stellarsan solution.
Use Homebright streak free stainless steal cleaner and polish spray to clean the outside of the
Benchy Carbon to leave it looking shiny and new.
Page 8 of 9 www.KegLand.com.au Last Updated
13/12/2021 4:54 PM
Benchy – Glycol Instruction Manual
FAULT CODES
The power button is a multi-purpose button both turning on the main power to the compressor but
also the illumination on the button will flash to indicate fault codes if an error has been triggered.
Number of Flashes
Fault Type
1
Voltage Fault (The input voltage is beyond the setting range)
2
Fan Fault Current (The fan’s output current is more than 1A peak)
3
Compressor Start Fault (The rotor is blocked or the system pressure is too
high (above 6 bar)
4
Minimum Motor Speed Fault (If the compressor is too highly loaded and
cannot maintain minimum rotor speed this will be triggered, also if the
controller cannot sense rotor speed this will also trigger this fault code)

5
Thermal Fault of Electronic Unit (If the load on the compressor is too high
or if the ambient temperature is too high the controller will not run until it
cools down)
6
Controller Hardware Fault (Controller detects abnormal parameters)
WARRANTY AND SUPPORT (AUSTRALIA)
The Benchy Carbon comes with a 12-month warranty when sold in Australia.
To lodge a warranty claim in Australia please forward as many visual pieces of supporting
information and a detailed description of your issue to
If you purchased your unit from a distributor in Australia or internationally, you will be required to
go through their warranty claims process.
For a full terms and conditions, please visit our website here -> Terms & Conditions
For technical support with the Label Applicator Machine please email

/


