Page is loading ...

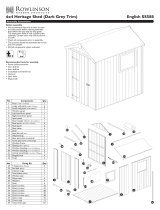
Tenbury Arbour
Assembly Instructions English SS068E
No. Components Qty.
1 Back Panel 1
2 Seat 1
3 Uprights 2
4 FR/BL* roof rafters 2
5 FL/BR* roof rafters 2
6 Roof slat sections 2
7 Roof coverstrip 1
8 Finials 2
Before assembly
•We recommend that time is taken to
read the instructions before starting
assembly,then follow the easy step by
step guide.The instruction sheet is only
a guide to the assembly.
Certain items may not be shown
to scale.
•Check all components prior to assembly
•This product should be assembled
by no less than 2 people
•Drill all components where indicated
No. Fixing kit Qty.
9 40mm screws 68
10 Flat brackets 2
11 L-brackets 8
Recommended tools for assembly
•Cross head screw driver
•Drill with 4mm diameter
•Step ladder
2006 © Rowlinson Garden Products Ltd
If in doubt of any aspect regarding the assembly,use or safety of your arbour please contact us :
Help Line (Normal Office Hours) 01829 261 121
ROWLINSON GARDEN PRODUCTS LIMITED
Unit 2 Green Lane
Wardle Nr. Nantwich
Cheshire
CW5 6BN
Tel :01829 262 080
Fax :01829 262 089
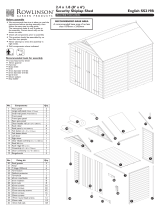
5. Roof assembly to uprights
Fix the L-brackets to the uprights using 2 x 40mm screws per bracket.Lift roof onto uprights so that rebates in the roof
rafters rest on the uprights. Secure roof to L-bracket using 2 x 40mm screws.
We constantly improve the quality of our products, occasionally the
components may differ from the components shown and are only
correct at time of printing. We reserve the right to change the
specification of our products without prior notice.
x 2 Drill
*FR/BL = Front right/back left
FL/BR = Front left/back right
1
2 3
4
5
6
7
8
40mm
40mm
Rebates
6. Securing the posts
Place the arbour in the desired location.For a more permanent base fixture use a metal base fixing to secure the bottom
of the upright posts into the ground (1 & 2).If securing to decking or concrete base use metal L-brackets (3).
(1) (2) (3) (1) Stake
(2) Flatbed
(3) L-Bracket

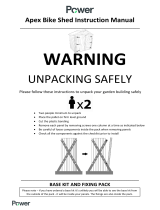
3. Roof section assembly
Bend a roof slat section and fit it into the rebates of 2 bearers as shown below.Secure using 4 x 40mm screws per bearer,
screw through the top of the bearer into the slats.Create a second roof section in the same way.
4. Roof assembly
On a roof section attach an L-bracket to the underside of each roof bearer at the apex end using 2 x 40mm screws per
bracket.Evenly rest the second roof section against the first and attach using 2 x 40mm screws through the L-brackets.
drill 4 holes in each finial. Centre finial so it overlaps both roof rafters and secure using 4 x 40mm screws per finial.
Drill 2 holes at each end of the roof coverstrip and secure on the roof ridge using 4 x 40mm screws.
40mm
40mm
Flat brackets
L-brackets
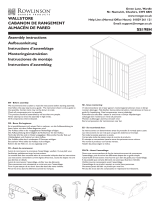
Ensure seat
supports are
facing inwards
40mm
Ensure seat is set
as far back as
possible
Drill Drill
40mm
DDrriillll
40mm
40mm
Plywood strips underneath
Fit the L-brackets to the bearer
ends that do not have rebates.
Roof rebates a the bottom
Apex end
of bearers
1. Back panel to uprights
Position the back panel between the 2 uprights.Align the top of the back with the tops of the uprights and secure using
the flat brackets with 4 x 40mm screws per bracket.To fix the bottom corners of the back panel to the uprights use
L-brackets and 4 x 40mm screws per bracket.
2.Attaching the seat
Place seat between the uprights so that it rests on the seat supports,make sure the shaped edge is at the front and the
seat is to the very back of the support. Drill 4 holes in each of the upright as shown. Using 4 x 40mm screws, screw
through the drilled holes into the ends of the seat bearers.
40mm
DDrriillll
40mm
/