Page is loading ...


IMPORTANT SAFETY INSTRUCTIONS
1. Please read these instructions carefully before using the product and keep them
safe for later reference.
2. Follow all warnings and instructions marked on the product.
3. Unplug this product from the wall outlet (power socket) before cleaning. Clean
the product with a damp soft cloth. Do not use liquid or aerosol cleaners as it may
cause permanent damage to the screen.
4. Caution of use varies from model to model; please observe appropriate
operation as per model in use.
5. Do not place this product on an unstable cart, stand, or surface which may
cause damage or harm to the product or individual.
6. Slots and openings on the cabinet, in the back cover or in the bottom, are for
ventilation; to ensure reliable operation and to prevent from overheating, these
openings must not be blocked or covered at any time. The openings should never
be placed near or over a radiator, heat source, or placed in a built-in installation
unless proper ventilation space (min. 2 inches/5cm of gap) is provided.
Section 1
IMPORTANT SAFETY INSTRUCTIONS
Please read these instructions carefully before
using the product and keep them safe for
future reference.
Safety Instructions
2

7. This product should be operated from the type of power
indicated on the marking label. If you are not sure of the type of
power available, consult your dealer or local service company.
8. This product is equipped with a 3-wire grounding type power
plug, a plug having a third (grounding) pin. This plug will only fit
into a grounding-type power outlet. This is a safety feature. If you
do not have proper outlet to insert the plug, contact your
electrician to replace your obsolete outlet. Do not break the
ground pin and circumvent the grounding.
9. Do not allow anything to rest, or persons to walk on the power
cord.
10. If an extension cord is used with this product, make sure that
the total ampere rating plugged into the extension cord does not
exceed the maximum ampere rating of the extension cord.
11. Never insert any object/tool of any kind through housing slots
of this product as they may touch dangerous voltage points or
short out components that could result in risk of fire or electric
shock. Never spill liquid of any kind on the product (except IP-
rated models).
12. Do not attempt to service this product yourself, always refer
to qualified or authorized person for the servicing of this product.
13. Unplug this product from the wall outlet and contact a
qualified service provider in the following circumstances:
When the power cord or plug is damaged, frayed or broken.
In the event that liquid has been spilled into the product (except
IP-rated models).
3

2-1!About the Product
The TouchIT Fusion is made of TFT LCD panel and microprocessor-controlled
main board. It is designed to meet the demanding performance requirements of
education/schools, public premises, corporate, and industrial applications.
2-2!Notice
1.!Do not use any sharp object on the original LCD panel surface if the model is
supplied without protective glass.
2.!Do not use corrosive or abrasive detergents, waxes or solvents for cleaning.
Use only a dry or damp cloth and use with clean water when cleaning.
3.!Use qualified and safety-approved AC power cord only.
2-3!Check List
When opening the carton, please make sure that all the items listed below are
present:
Section 2
CHAPTER CONTENTS
2-1!About the Product
2-2!Notice
2-3!Check List
Introduction
4

1.!TouchIT Fusion ×1
2.!TouchIT Fusion Stand ×1
3.!Screw M6*L10mm ×6
4.!Audio cable×1(already plugged in TouchIT Fusion)
5.!DVI cable×1(already plugged in TouchIT Fusion)
6.!VGA cable (male-to-male) ×1
7.!Power cord(male-to-female) ×1(already plugged in TouchIT
Fusion)
8.!Power cord ×1
9.!USB cable ×1 (already plugged in TouchIT Fusion)
10. Remote control ×1, battery included
If any items are missing or damaged, please contact your dealer
immediately.
The following items are optional:
1.!VGA cable (male-to-female) (optional) for VGA out
application
2.!RS232 to RS485 adapter (optional)
3.!HDMI-to-DVI adapter (optional)
5

3-1 Installing the TouchIT Fusion
The TouchIT Fusion comes with the Operating System, and the software pre-
installed. The LCD Monitor needs to be attached to the motorized trolley. This is a
simple and straight forward process.
3-1-1. Lock the wheels in place by pressing down on the break.
Section 3
POWER AND SIGNAL CONNECTIONS
3-1-1. Lock the wheels in place
3-1-2. Connecting the power cord to the AC
inlet.
3-1-3. Attaching the LCD Monitor
3-1-4. Securing the LCD Monitor in position.
3-1-5. Connecting the TouchIT Fusion to an
AC Outlet
Installing the TouchIT Fusion
6

3-1-2. Connecting the power cord to the AC inlet.
7

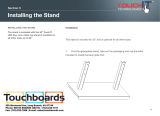
3-1-3. Slowly lower the LCD Monitor onto the hanging brackets that are on the motorized trolley. See diagram below.
8

3-1-4. Secure the LCD in position with the 6 fastening bolts (M6*L10mm), see hole locations on the diagram below.
9

3-1-5. Connecting the power cord with TouchIT Fusion to the AC outlet.
10

4-1 Get to know the monitor
The Monitor connectors are located on the rear side. They are shown in the
physical monitor as per the figure below and described in the following
paragraphs. Please note that connectors may vary in some derivative models,
please refer to individual model for special instructions.
Section 4
USING THE LCD
4-1 Get to know the LCD
4-2 Connector ports
4-3 Remote Control
4-4 Understanding the OSD Menu (with
Remote control)
Using the TouchIT Fusion
11

4-2 Connector ports
The Figure below depicts the signal connectors on the main
board.
The Figure below depicts the IPC box on the TouchIT Fusion.
4-3 Remote Control
The remote control is shown in the drawing below.
Size: 110 x 44 x 22mm
Operation distance: > 10 meter
Working angle: not more then +/- 40 degree
12

4-4 Understanding the OSD Menu (with Remote control)
a. Power on/off
Press the power button to turn on/off the monitor.
b. Auto
Press this button to auto-adjust and optimize picture screen of
the monitor.
c. Brightness button
Press this button to quick-access brightness control only to turn
brightness up or down.
d. Menu
Press the Menu button to go into OSD menu.
e. Exit function
Press Exit button to exit setting, or, exit OSD menu. Alternatively,
press “Menu” button to exit OSD Menu instantly at any time.
f. Select function for adjustment
Press the ( /▼) button to scroll up and down the intended
function items for adjustment, and then press the Enter button to
activate that function item.
g. Adjust the function item setting
Press the Enter button to enter the sub-menu and press the ( /
▼) button to adjust the value of setting. Once you adjust the
value of setting, the value will be memorized instantly.
h. DVI
Press this button to enter DVI signal source.
i. VGA
Press this button to enter VGA signal source. Source default is at
VGA source.
j. Aux
Reserved for alternative use.(HDMI 1 / HDMI 2 /YPBPR)
k. Mute
Press this button to mute or un-mute.
l. Info
13

Press to show timing and resolution
4-4 Content of OSD Menu
Press " " to increase or "▼" to select.
Press “↵“ to enter
Color
Press " " to increase or "▼" to select.
Press “↵“ to enter
CONTRAST: Use to adjust the screen’s contrast
14

BRIGHTNESS: Use to adjust the screen’s brightness
Color Adjust
Press “↵“ to enter sub menu
Adjust: Use to set the RGB gain
Color Temp
9300K: Use to set value of monitor for the CIE coordinate 9300
color temp.
6500K: Use to set value of monitor for the CIE coordinate 6500
color temp.
5800K: Use to set value of monitor for the CIE coordinate 5800
color temp.
sRGB: Standard RGB color space created by Microsoft and HP
USER: Color temperature created by user.
Image Setting
15

Press " " to increase or "▼" to select.
Press “↵“ to enter
Clock
Press " " to increase or "▼" to decrease.
Use to adjust timing of signal to best adapt to LCD panel pixel
rate
Phase
Press " " to increase or "▼" to decrease.
Use to fine-tune video noise to achieve a clearer picture
Sharpness
Press " " or "▼" to select
Use to fine-tune the legibility of fine graphic/word .
Position
Use to set the Image’s position.
16

Press “enter” to select and " " to increase or "▼" to decrease.
H-POSITION: Use to adjust the image to the left or right on the
screen
V-POSITION: Use to adjust the image to the up or down on the
screen
OSD Menu
Use to set the OSD at your preference.
Press “enter” and " " or "▼" to select, and to move the OSD
position in horizontal, or, vertical direction.
OSD H.Pos. OSD V.Pos
OSD Timer
Use to set the time of OSD on screen. Value 0 the OSD will
always display.
Language
Use to select different languages (max. 7 languages) for OSD
Menu.
17

Misc.
Light Sensor ON/ OFF: to switch ambient light sensor on or off
Signal source: Choose input source of VGA / DVI / HDMI 1 /
HDMI 2 /YPbpr
Auto Color: to Auto adjust Color (under source D-Sub only)
Reset: to go back to previous setting.
FW VERSION: to check F/W version of Monitor
18

Cleaning the LCD Monitor
1. Make sure the monitor is turned off.
2. Never spray or pour any liquid directly onto the screen or casing
3. Do not use chemical solvents or alcohol to clean the unit or screen. It may
cause permanent damage to the device.
4. Use a clean, soft, lint-free cloth, or apply a small amount of non-ammonia, non-
alcohol based glass cleaner to achieve the best results.
Disclaimer
The manufacturer assumes no responsibility, and will not be liable of any damage
resulting from non-conforming safety actions, operation, or cleaning of this
product.
Section 5
CARE AND MAINTENANCE
Cleaning the LCD Monitor
Disclaimer
Troubleshooting
Care and Maintenance
19
/