Page is loading ...

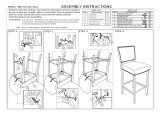
ASSEMBLY INSTRUCTIONS HARDWARE LIST
ITEM DESCRIPTION QTY
1 JCBC Bolt M6 x 50mm 4pcs
2 JCBC Bolt M8 x 45mm 4pcs
3 M8 FLAT WASHER 4pcs
4 M6 SPRING WASHER 4pcs
5 M8 SPRING WASHER 4pcs
6 WOOD SCREW M4 x 38 6PCS
7 M4 ALLEN KEY (BALL SHAPE) 1PC
8 M5 ALLEN KEY (BALL SHAPE) 1PC
9 WOOD DOWEL M8 x 30mm 8PCS
Read this instruction carefully. See hardware and furniture part list for guidance.
Be sure all parts are complete, before you assemble. Place all wooden furniture
parts on a clean and flat soft surface to prevent from being scratched.
Follow the figure to start assembling.
CAUTIONS : 1. Do not FULLY - TIGHTEN the nut or nut bolt until all nut or bolt is ready assembed.
2. Do not OVER - TIGHTEN the nut or bolt to avoid causing damages to the thread.
3. Keep all hardware parts out of reach of children.
NOTE : THE LIST AND QUANTITY SHOWN ARE FOR 1 UNIT ASSEMBLY.
Tool needed : Screwdriver & Rubber Mallet (not provider).
PART LIST
ITEM DESCRIPTION QTY
A CUSHION BACK 1 PC
B CUSHION SEAT 1 PC
C LEG SUPPORT FRONT 1 PC
D LEG SUPPORT BACK 1 PC
E LEG LEFT 1 PC
F LEG RIGHT 1 PC
STEP 1 STEP 2
1 OF 2
C
CE
417
A
B
A
8
2
5
3
D
D
FL
R
9
1.1 Open the zip at the bottom of
cushion seat and take out all part
hardware.
FRONT
BACK

ASSEMBLY INSTRUCTIONS
STEP 3 STEP 4
2 OF 2
9
C
D
E
FL
R
L
R
3.1 Follow marking line assemble leg.
/