Page is loading ...

*706HULHV
2[&DUW12cu ft +<'5$8/,&-ASSIST/,)7 POLY DUMP CART
OxCart Products LLC,Wichita, KS 67206 U.S.A.
REV-001A
Watch our assembly video:
www.oxcart.com

2
Safety Rules
Read and understand all safety rules and operating instructions before using
this tractor attachment (Dump Cart).
Follow all safety rules and operating instructions provided by your tow
vehicles manufacturer when using the Dump Cart.
Never allow children or untrained persons to operate the vehicle or
Dump Cart.
Do not exceed the vehicle manufacturer’s tow weight limit.
Reduce the vehicle speed and allow extra stopping distance when towing
heavy, unpredictable loads.
Reduce vehicle speed and towed weight when operating on slopes.
Operate up and down slopes, never across the face of slopes.
Do not carry passengers on the tow vehicle or the Dump Cart.
Avoid sudden turns or maneuvers.
Do not tow the Dump Cart on public roadways.
Do not remove warning decals from the Dump Cart.
Check the Dump Cart for worn, loose, or damaged parts before each use. If
any damage is present, repair the Dump Cart before using.
Check the Dump Cart for loose or missing fasteners before each use.
Tighten or replace fasteners as needed before using.
Do not exceed 8 miles per hour when towing the Dump Cart.
Do not exceed maximum towing capacity of your towing vechile's
owner manual.

3
Carton Contents
TOOLS REQUIRED FOR ASSEMBLY:
• 5/16” Wrench
• Phillips Head Screwdriver
• Pliers
2 (x2)
3 (x1)
5 (x1)
4 (x1)
8 (x1)
11 (x4)
7 (x1)
18 (x2)
19 (x1)
6 (x2)
13mm Wrench (x1)
29 (x8)
17 (x3)
16 (x3)
22 (x4)
24 (x1)
23 (x1)
21 (x2)
1 (x1)
13 (x1)

4
Assembly Instructions
Slide the tow bar onto the axle frame and align with the pivot hole. Secure with the
provided hardware as shown. Use pliers to bend the cotter pin ends.
8
19
1617
4
2
Align the bed frame with the bottom side of the bed. Loosely bolt the frame to the bed
using the hardware shown. Once the frame is completely attached and aligned, tighten the
frame mounting bolts with a 5/16” Wrench and Phillips Head Screwdriver.
1
5
11
29
11
29
29
22
5
1
Align the axle frame with the bed frame pivot holes.
85
3
1

5
Assembly Instructions
Before installing the gas spring, remove the quick connection clip/pin or the nut/washer
as provided.
3
5
Insert the hinge pin through each pivot bracket and secure each with a hairpin cotter.
4
21
18
21
18
First, align the barrel end of the gas spring with the bed frame mount hole. Secure the barrel
end with the quick connect clip/pin or the nut/washer provided.
3
27
6
NOTICE
The two ends of the gas spring must
be oriented in the same direction for
installation. Twist the gas spring until the
bolts/pin are aligned with gas spring bracket
and bed frame mounting holes.
Barrel End
Rod End
Barrel End
Rod End
See step 7 to align and
secure rod end of gas spring.
Ensure seam of gas spring
is aligned as pictured.
Seam

6
Assembly Instructions
Second, align the rod end with gas spring bracket mounting hole. To aid in alignment, raise
and lower tow bar. Secure using the 13mm wrench provided with this installation kit.
7
13
3
5
Carefully align and lower the tow bar into the receiver until the bar is latched and secured
to the bed frame.
Press To Latch
7
Insert the axles through the axle bushings. Secure each wheel with a washer and cotter
pin. Use pliers to bend cotter pins end to secure wheel.
22
6
16
17
17
16
Barrel End
Rod End
8
9

7
Assembly Instructions
Insert the tow pin and secure with the hairpin cotter.
24
23
10
Check out www.OxCart.com to watch the assembly video, see new accessories and to order replacement
parts or upgrades. Replacement parts numbers can be found on page 10.
12 cu ft FarmCart/Wheelbarrow
Conversion Accessory
OxCart Universal
Zero-Turn Hitch Kit
OxCart 2 in 1 Cargo
Cover/Gear Bag

8
Operating Instructions
Before Using The Dump Cart:
• Read and fully understand the tow vehicle operator’s manual.
•
Read all Safety Rules found on page 2.
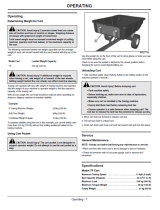
How to Use Dump Cart:
• Tow the Cart at a low speed when traveling on uneven grading and
unpredictable surface materials.
• Do not tow the Cart with the bed in the raised position.
• Verify, and never exceed tow vehicles’ towing capacity. Heavy loads
may cause the tow vehicle’s brakes to fail.
• Carts are not DOT approved and should not be used on public roads or
highways.
• Maximum towing speed should NOT exceed 8 mph.
• Do not exceed the recommended Cart capacity rate of 1000 lb.
(340.0 kg)
• Only use the Cart while it is attached to a tow vehicle or with OxCart
Conversion Kit (not included).
•
Do not overll the Cart bed, contents shift during transportation and
could become unstable.
•
Do not make sharp turns causing contact between the tow vehicle rear
wheels and the Dump Cart tow bar.
•
Maintain safe travel distances from steep hills, holes, and ditches.
How to Empty Dump Cart - Rear Dump Function:
1. Always ensure the dump area and Dump Cart are clear of obstructions
and personnel, during the dumping process.
2. To release the bed latch, apply constant downward pressure to the top
edge of the bed with one hand.
3. While applying downward pressure to the bed, move the bed latch
handle towards the tow vehicle until the bed latch releases.
4. Once the bed latch releases, use both hands to maintain control while
slowly dumping the bed contents.
•
Do not exceed tow vehicles maximum towing capacity found it vehicles manual.

9
Operating Instructions
How to Empty The Dump Cart - Side Dump Function:
1. Always ensure the dump area and Dump Cart are clear of obstructions
and personnel during the dumping process.
2. Face the bed latch handle in the same direction as proposed dump area.
3. Release the bed latch by applying downward pressure on the bed with
one hand, while moving the bed latch handle toward the tow vehicle
until the bed releases from the tow bar.
4. Once the bed latch releases, use both hands to maintain control and
rotate the bed towards the dump area.
5. Slowly dump-out bed contents.
Bed Latch:
1. Travel with the bed in the latched position. Always secure the bed onto
the Cart frame before moving the Cart.
2. After unloading bed contents; inspect the area under the bed and
around the Cart frame area, remove any obstructions.
3. With two hands, rotate the bed to center on the Cart.
4. With two hands, grip the top edge of the bed and with constant
downward force, push the bed down until it latches to tow-bar.
Maintenance:
• Check and lubricate wheel hubs as needed. Grease ttings are located
on each wheel hub.
• If rust becomes apparent, sand lightly and touch-up with enamel paint.
• Check all welds. If a cracked weld is found, do not operate the Cart until
the damage is repaired by qualied personnel.
• Check and tighten any loose bolts.
• Check tire pressure regularly. Proper ination prolongs tire life. Refer to
the tire sidewall for manufacturer’s ination recommendation.

10
Repair Parts
8
11
12
9
7
10
12
13
12
12
6
5
12
12
12
12
12
2
12
4
3
1
12
12
12
ITEM PART NUMBER DESCRIPTION
1 GTM2067 Lift Assist Bracket
2 GTM2051 Latch
3 GTM2052 Handle, Latch
4 GTM2071 Bed Bumper
5 GTM2002 Axle Support Frame In Box
6 GTM2006 Tow Bar Frame
7 GTM2009 Bed Frame
8 GTM2045 Spring, Latch
9 GTM2070 Plug, 1 Inch Tube
10 GTM2029 Hydraulic Lift Assist Strut
11 GTM2020 with P2000-456 Tub With Warning Labels
12 27108500 Hardware Package
13 GTM2001 Wheel Assembly
To order replacement parts contact us at [email protected] or call 844-269-2278

11
ITEM PART NUMBER DESCRIPTION QTY
1 P2000-123 CAUTION - Tow Warning 1
2 P2000-456 WARNING - Bed Warning 1
3 P2000-789 WARNING - Dump Instruction 1
4 P2000-101112 WARNING - Pinch Warning 1
5 P2000-9 DECAL - OxCart, Left and Right Side 2
6 P2000-OC DECAL - OxCart, Front 1
3
Safety & Warning Placard Diagram
1
2
4
NOTICE
Replace any missing or damaged
warning placards by calling
1-844-269-2278
5
5
5
6

13
For ONE YEAR from the date of sale, this product is warranted against
defects in material or workmanship when it is operated and maintained
according to all supplied instructions.
This warranty does not cover tires, wheels or paint loss, which are
expendable parts or nishes that can wear from normal use within the
warranty period.
This warranty does not apply to a product that is damaged or altered
through misuse, abuse, corrosion, accident, modication or mishandling.
This warranty is void if this product is used for providing commercial
services or if used as rented/leased equipment.
With PROOF OF SALE, a defective part will be replaced free of charge.
Warranty provisions for this cart are handled through the retailer or OxCart.
To register your cart for warranty, all information below must be complete
and mailed with a copy of your purchase receipt to the address below within
thirty (30) days of purchase.
---------------------Cut along line and mail to the address below---------------------
Please take a moment to complete your warranty registration, include a
copy of your purchase receipt and mail to:
OxCart Products, P.O. Box 782167, Wichita, KS 67278
Name:_______________________________________________________
Address:____________________________________________________
City:_________ State:_________ Zip:___________ Phone(___)________
Purchase Date:_________Model Number:_____ Retailer Name:_______
Thank you very much for your business!
OxCart One Year Warranty
Or e-mail a copy of your purchase receipt and the information above to
[email protected]. You may also register your warranty at oxcart.com.
/