Page is loading ...

Installation, operation and service instructions
120v Manual
Waste Oil Fired Boiler 280-480

2MorrHeat - Most Heat In The Industry - Rev 3/18/2019
Table of Contents
Table of Contents Page 2
Important Information Page 3
Notice Page 4
Burner & Pump Specications Page 5
Product Description Page 7
Inspect Shipment Page 8
Before Install Page 9
Boiler Room Air Requirment Page 10
Venting Installation Page 13
Fuel Supply Lines Page 14
Boiler Assembly & Wiring Page 16
Boiler Assembly & Installation Page 22
Oil Burner Technology Page 23
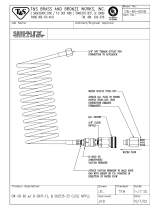
Oil Burner Components Page 24
References (Nozzle|Electrode|Burner & Pump) Page 26
Boiler Start-up & Adustments Page 27
Filling Boiler Page 28
Burner Startup - All Fuels Page 29
Prevention Page 30
Initial Start Procedure Page 31
Maintenance Page 32
Attention Page 34
Troubleshooting Page 35
Jacket Attachment Page 38
Parts List Page 40
Exploded View Page 41
Warranty Information - 10 Year Page 42

3MorrHeat - Most Heat In The Industry - Rev 3/18/2019
Important Information
Taking Delivery of Equipment:
When taking delivery of your equipment, please be sure to check the shipment for any
potential damages (MorrHeat is not responsible for any damaged shipments if signed for
non-damaged). If any damage is identied upon delivery, either sign for as damaged goods
specically noting in detail the apparent damage / or / refuse the shipment completely and
be sure to le a claim with the shipping company immediately regardless of the damage.
Waste oil contains various unknown materials and may also contain random amounts
of gasoline or other volatile fuels. Specic safety and handling precautions should be
considered when cleaning, maintaining and operating waste oil boilers.
It is recommended to use a lter or some kind of strainer when pouring waste oils into the storage tank(s).
This will increase chances of catching any particulates prior to the pump lter(s) to insure a cleaner fuel
source.
WARNING:
Waste oil boilers should not be used in any hazardous areas that may contain ammable or
volatile vapors or even combustible dusts. It is not recommended to use a waste oil boilers in
any areas that may have chlorinated or similar chemical vapors. This will cause deterioration
& corrosion of the metals the equipment is constructed of (this would void the warranty).
Antifreeze does not burn and will interrupt the performance of the unit and potentially shut
down completely until re-primed and restarted. If too much antifreeze is present just like
water, the unit will not re. Do not expose units to water, moisture or rain. This is an inside
unit, not designed for outdoor use.
Oils and different Viscosities that can be burnt, but not limited to:
*Used Motor Oils *Transmission Fluid *Hydraulic Fluids *Diesel Fuels
Do not use old contaminated oils or fuels and keep in mind underground tanks and outdoor
oil storage could have unknown amounts of water and moisture, outside barrels will leak
water and moistures through the bunghole.
IMPORTANT:
The instructions and information within this manual are provided to remind you of any
warnings and to assure you have properly and successfully setup the equipment purchased.
The information is also intended to help the end user/installer be aware of the operations
and service required for optimal performance. These boilers are recommended for primary
or an auxiliary source of heat but are not recommended for use as the sole source of heat
in case of any expected or unexpected downtime with the unit. If a steady supply of fuel is
not present or interrupted at the burner unit, the burner unit will shut down. Be prepared
with an alternate source of heat to insure the building and all pipes are not at risk of freezing
temperatures.

4MorrHeat - Most Heat In The Industry - Rev 3/18/2019
To insure the best performance, optimal efciencies and heat output of the heating unit, it is
recommended and necessary to become familiar with your unit and the procedures needed
with initially starting, running, cleaning and maintaining the heating unit.
It is important to remember when burning used or dirty oils that contaminants could be
present. Because of various contaminates, be aware of needing to change lters when
needed. Keep the chamber and heat exchanger(s) passageways clean. Make sure the fuel
pump is primed and lines are free of any debris, air bubbles or interuptions.
Draft is just as important as the rest; bad draft can cause serious problems and not allow the
gasses within the unit to correctly leave the heating unit. Correct draft is needed for optimal
performance. Bad draft will cause over-re or overheating due to bottling up the heat or
creating back pressure back in to the heating unit. If black smoke is present, bad draft, bad
combustion or both is occuring.
Notice

5MorrHeat - Most Heat In The Industry - Rev 3/18/2019
Voltage - 120 v
Cycles - 60Hz
Total Operating Amperage (Burner Only) Amp 8.4
Total Operating Amperage (Burner & Oil Pump) Amp 10.5
Electrical Operating Consumption (Burner Only) Watts 970
Electrical Operating Consumption (Burner & Oil Pump) Watts 1,212
Weight Lbs 36.5
Oil Primary Amp 0.2
Oil Valve Amp 0.075
Pre-Heater Block Amp 4.2
Pre-Heater Controller Board Amp 0 . 011
Igniter Transformer Amp 0.3
Burner Motor Amp 3.6
Voltage - 120 v
Cycles - 60Hz
Total Operating Amperage (Pump Assy Only) Amps 2.1
Electrical Operating Consumption (Pump Assy Only) Watts 241.5
Weight Lbs 16
Oil Valve Amps 0.075
Pump Motor Amps 2.0
BURNER ASSEMBLY
PUMP ASSEMBLY
Performance Ratings
Performance Ratings
Burner & Pump Specifications

6MorrHeat - Most Heat In The Industry - Rev 3/18/2019
SPECIFICATIONS - DIMENSIONS TABLE 1
Boiler
Model
OIL
GPH
APPROX.
DRY
WEIGHT
LBS.
Vent
Connect
DIA"
I-B-R
VENT
DIA"
DIM"
WATER
CONTENT
GAL.
MHB280
2.0 1301 10 8 42 22.2
MHB360
2.5 1654 10 10 52 28.5
MHB480
3.0 1831 10 10 57 31.7
Note: All dimensions are inches
* Gross I-B-R rating has been determined under the I-B-R provisions governing forced draft conditions (0.10 inch W.C
positive pressure at the boiler ue gas outlet.
** Net ratings are based on piping and pickup allowance 1.15.
*** I-B-R Vent Diameter size is the pipe size used from boiler vent connector F to Termination of stub stack: Max Height
15' (For forced draft ring only). For chimney venting consult National Fuel Gas Code.
CENTERLINE OF
BURNING PLATE
OBSERVATION
PORT
FRONT
RIGHT
REAR
2 - 1/2" M.P.T SUPPLY CONNECTION
2 - 1/2" F.P.T RETURN
CONNECTION
29- 1/2"
20"
4"
C. O. PORTS
F
L
9 - 3/8"
36"
17"
33"
F
L

7MorrHeat - Most Heat In The Industry - Rev 3/18/2019
The MHB Series boilers are a three pass Scotch Marine design, with fully water backed heat
transfer surfaces. Boilers are designed for use in forced hot water heating systems up to 75
PSI water working pressure. They may be used with burners ring gas or oil. Boiler-Burner
units operate with a positive pressure overre and may be vented using a conventional
chimney with a balanced draft or pressurized vent systems.
The boiler block (heat exchanger) is factory assembled using cast iron push nipples. This
heat exchanger has horizontal ue passages through which the products of combustion
make three distinct passes to maximize the heat transfer process.
Product Description

8MorrHeat - Most Heat In The Industry - Rev 3/18/2019
Inspect Shipment
Any claims for damage or shortage must be led immediately against the carrier by the
consignee. No claims for variances from, or shortage in orders, will be considered unless
presented within 7 days after receipt of goods. Boiler shipment comes on two separate
pallets.
NOTE : Burner, when ordered, is shipped separately
1. Wood pallet with:
A. Boiler block with bafes installed in ue passages.
2. Wood pallet with shrink wrapped boxes:
A. Box of jacket parts.
B. Box marked #1 (Manifold Box)
a. Supply and return manifold with gaskets, mounting studs, nuts and
and washers.
b. Return diffuser and gaskets.
c. (2) 3/4" Make x Female extensions coupling for optional controls.
C. Box marked #2 (Control Box)
a. L4008A Hi-Limit with 3/4" well and capalary clip.
b. Tridicator Gauge
c. Relief Valve
d. Bag of refractory mix to insulate burner blast tube in front door.
e. Instruction manual
f. Boiler rating tag and A.S.M.E. Tag
g. Flame Sight Assembly
h. (4) Spacers to secure back jacket panel.
D. Box marked #3
a. Quadrant locking damper

9MorrHeat - Most Heat In The Industry - Rev 3/18/2019
Before Install
CODE REQUIREMENTS:
Installation must comply with all state, local and utility codes. When required, the installation
must conform to A.S.M.E. safety code for controls and safety devices for automatically red
boilers No. CSD-1.
RULES FOR SAFE INSTALLATION AND OPERATION:
1. Read this owner's manual and the rules for safe operation carefully. Failure to follow the
rules for safe operation and the instructions could cause a malfunction of the boiler and
result in depth, serious bodily injury, and/or property damage.
2. Be certain burner is designed for the type of fuel to be used. Overring will result in
premature failure of the boiler sections and cause dangerous operation.
3. Locate the boiler as close to the chimney as practical (See Fig. 1,2,3)
Observe the minimum clearances outlined in (Fig. 1). Remember to allow room for the boiler
door to open with the burner mounted.
4. Make sure that the surface on which the boiler is to be installed is capable of supporting
the weight of the boiler, burner, and all other equipment supported by the surface.
5. A boiler pad is strongly recommended (see Fig. 1). This pad is to be made of poured
concrete. It should be at least 4 inches thick and should cover the entire area under the
boiler (not just under the legs).
6. Make sure that the location chosen for the boiler will provide adequate air for combustion
and ventilation (See Fig. 2). Also make sure that fuel and electrical requirements can be
satised at the boiler location chosen.
7. For typical boiler/heating system piping which incorporates a blending pump, or for
primary secondary pumped system See Fig. 4, 5, 6.
8. The heating system design shall not permit the boiler's return water temperature to be
lower than 130℉ for a signicant period of time. This will prevent reside corrosion and

10MorrHeat - Most Heat In The Industry - Rev 3/18/2019
Boiler Room Air Requirment
WARNING
Failure to provide an adequate supply of fresh air for combustion will result in
hazardous operating conditions. Do not use an exhaust fan in the boiler room.
1. To ensure safe, efcient operation, the boiler system must be supplied with sufcient air for
combustion and ventilation. (See Fig. 2)
2. Unless properly controlled, avoid the use of forced ventilation, since it can create an undesirable
pressure differential between boiler room and air source.
3. All boilers located in conned rooms should have free access to ventilation and combustion air
from two permanent opening. One opening should terminate within 12" of the ceiling , the other 12"
of the oor. Each opening shall have at least 1 sq. inch free area per 1,000 btn/hr. of burner input.
Opening should freely connect with areas having adequate inltration of outside air.
When air comes directly from outdoors, again use two openings as explained above, except:
• Direct connection or vertical ducting allow 1 sq. inch per 4,000 btu/hr.
• Direct connection through horizontal ducting allow 1 sq. inch per 2,000 btu/hr.
• All ducting shall be the same size as opening but no less than 3 x 3 or 9 sq. inches.
Remember to compensate for louver blockage when calculating free air. Refer to the manufacturer's
instructions or use the general guild:
WOOD LOUVERS allow 20-25% free air, METAL LOUVERS or GRILLES allow 60%-70% free air. Any
louvers dampers should lock open or interlock with the burner to open autiomatically when the
boiler operates.
FIG. 2 | RECOMMENDED BOILER ROOM VENTILATION & COMBUSTION AIR
Chimney
Boiler
12"
12"
Louvered Openings
For Ventilation &
Combustion Air

11MorrHeat - Most Heat In The Industry - Rev 3/18/2019
FIG. 1 | TYPICAL BOILER ROOM LAYOUT
F
F
CL
CL
L
4 - 1/2"
33"
4 - 1/2"
33"
2
B
As Required
2 - 1/2 Boiler
Supply Connection
Boiler Vent
Connection
BOILER MODEL
VENT CONNECTION
DIA"
DIMENSIONS"
MHB280 10 42
MHB360 10 52
MHB480 10 57
Notes:
1. Dimensions as per job specs, and applicable codes.
2. Dimensions of burners other than shown, consult crown.
CL
B
F L

12MorrHeat - Most Heat In The Industry - Rev 3/18/2019
The MorrHeat boilers operates with positive pressure throughout the boiler furnace and
ue passages. The over-re pressure will vary according to boiler size. Consult local
building codes for proper installation of vent system relative to the fuel being burned.
See burner manufactures draft recomendation.
Boiler breech & stub vent operate at positive
pressure. Entire system must be gas tight .
Stub vent height must be limited to prevent
negative draft. Should negative draft occur
install a barometric draft regulator.
Boiler operates with positive pressure overre.
Chimney provides negative pressure that is
balanced with a barometric draft control.
Boiler, breech & stub ven operate a positive
pressure: entire system must be gas tight:
Stub vent height must be limited to prevent
negative draft: should negative draft occur,
install a barometric draft regulator.
EACH BOILER MUST HAVE A STUB VENT.
Conventional chimney with multiple boiler
balanced draft.
MULTIPLE BOILERS
BALANCED DRAFTFORCED DRAFT
MULTIPLE BOILERS
FIG. 3 | CHIMNEY OR VENT SYSTEM
15' T Y P
15' T Y P
F
F
F
F F
STACK SUPPORT
QUAD LOCKING
DAMPERING
QUAD LOCKING
DAMPERING
QUAD LOCKING
DAMPERING
QUAD LOCKING
DAMPERING
BAROMETRIC DRAFT
REGULATOR

13MorrHeat - Most Heat In The Industry - Rev 3/18/2019
Venting Installation
1. When installing the vent pipe, be sure all connections are fastened correctly to insure no
leaks and proper draft is achieved. Minimum draft through the unit is, -.02- with draft
meter. Draft up the stack must be -.04 to -.06 inches of water column when checking a
draft meter for proper draft readings.
2. If proper or desired draft isn’t easily achieved, a third party draft inducer or power vent
may be needed to prevent back draft from occurring (not provided).
3. Install a barometric damper (NOT included) in the stack only if the draft up the stack
exceeds -.08. Draft up the stack must be -.04 to -.06 inches of water column. Check with
draft meter between the top of the boiler and damper. The draft should be a minimum of
-.02- checked through ame inspection port.
4. Keep the draft moving. If draft is too slow or bottles up, this could create a back draft and
over-re or over heat the unit. If a damper is present, losing the damper will increase draft
make sure passageways are clean and clear.

14MorrHeat - Most Heat In The Industry - Rev 3/18/2019
• Be sure when priming or bleeding the fuel pump that you allow enough time to completely
burp any and all air within the system out of the fuel pump and fuel lines. If any skips or
slight interruptions are still present in the system, it is likely the unit will not properly ignite
or run without a steady and consistent fuel supply. The ame sensor needs to recognize
ame in the chamber or it will not ignite.
• It is necessary to connect the 3/8” ID copper fuel line from the storage tank to the lter
housing, to the fuel pump inlet that is located on the same side as the bleeder valve. Once
connections are secure, continue the fuel line from the fuel pump assembly to the burner
assemble.
Fuel Supply Lines
• Use only 3/8” ID copper tubing with are ttings from the tank to the fuel pump assembly
and the fuel pump assembly to the heating unit. Ferrule ttings are not recommended
and Teon tape is not needed. Using a Teon tape or liquids that dry on the threads in-
creases the potential of creating a piece or ake of the material that could block passage-
ways.
• Always keep the fuel suction line at least six to eight inches (6” - 8”) from the bottom of
the oil storage tank to prevent sucking water and sludge from the bottom of the tank.
Drain water and sludge from the bottom of the storage tank when needed.
• It is recommended to use an inside supply tank vs. an outside or underground tank. If
pulling from an underground tank it is possible a secondary transfer pump would be
needed (Not Provided). Outside storage tanks or barrels can have water mixed in with the
fuel supply. This will create issues (Not Recommended).
• The fuel pump assembly that comes standard with every unit needs to be mounted at
tank level or below. Setting the fuel pump assembly at ground level will function proper-
ly. The fuel pump will push oil up to 100ft horizontal & up to 25 ft vertical.

15MorrHeat - Most Heat In The Industry - Rev 3/18/2019
FIG. 13 | BOILER CONTROLS AND ACCESSORY LOCATION
1. Install relief valve, tridicator and L4008A operating high limit as shown in Fig 13.
2. Connect feed water and piping system to boiler. Perform appropriate Hydrostatic test
in accordance with A.S.M.E. cod and authorities jurisdiction.
3. Attach quadrant locking damper and seal with High Temperature silicone sealant.
SUPPLY MANIFOLD KEY
1. Probe Type LWCO
2. Modulating Aquastat tapping
3. Press Temp/Gauge
4. Manual Reset Limit
1
2
3
4
Burner Service Switch
"MH" Boiler
1
2
3
4
Supply Manifold
Supply Manifold
Return Flow
Transition Piece with
Quadrant Locking Damper
L400BA Hi-Limit In
Top of Rear Section
Relief Valve in Top of
Rear Section

16MorrHeat - Most Heat In The Industry - Rev 3/18/2019
ATTENTION - Disconnect source before installing burner or servicing, can cause severe injury or death.
All wiring should be done in accordance with rules of the National Electrical Code ANSI/NFPA - 70 latest
edition and any State or Local codes having jurisdiction.
1. Before Any Wiring Is Done - Check burner voltage/cycle/phase. It must be compatible with the electricity
furnished at job site.
2. Wiring diagram is found in burner instruction manual. Follow diagram for proper wiring of burner and
controls.
3. Where burner motor voltage differs form control voltage, supply proper voltage to each.
4. Use properly sized fused disconnect and conductors for burner motor and control circuit.
Boiler Assembly & Wiring
NOTICE:
When the burner is eld installed the installer must l in the space between the burner
blast tube and the insulation black o the inside of the burner door with refractory mix
provided.
Burner Mounting

17MorrHeat - Most Heat In The Industry - Rev 3/18/2019
Single Zone Wiring
1. 120 Volt Wiring - The boiler should be provided with its own 20A branch circuit with fused disconnect. All 120 volt
connections are made inside teh L8148A aquastat relay as follows (also see Fig. 31 or 32):
• Hot ("black") - Terminal "L1"
• Neutral ("white") - Terminal "L2"
• Ground ("Green" or bare) - Ground screw on case of L8148A
2. Thermostat Wiring - Follow thermostat manufacturer instructions. To ensure proper thermostat operation, avoid
installation in areas of poor air circulation, hot spots (near any heat source or in direct sunlight), cold spots (outside walls,
walls adjacent to unheated areas, locations subject to drafts). Provide Class 2 circuit between thermostat and boiler.
Connect thermostat wire leads to terminals "T" and "T" inside L8148A aquastat relay.
1. Multiple Circulator Zones - Figure 35 shows wiring for two or more circuator zones using Honeywell R845A's. One
R845A is required for each circulator zone. Circulator terminals "C1" and "C2" on the L8148A are not used. A DPST
Honeywell RA832A may be substituted in place of the R845A using the "X" and "X" terminals in place of the "5" and "6"
terminals on R845A. When this relay is energized, electrical continuity is created between terminals 3 and 4, energizing
the circulator for that zone. At the same time, electrical continuity is created between terminals 5 and 6 on the R845A,
creating a current path from terminal "T" to "T" on the L8148A. Assuming that the supply water temperature is below the
high limit setting, the normal ignition sequence will be initiated.
2. Multiple Zones using Zone Valves - Figure 34 shows wiring for multiple zones using Honeywell V8043F zone valves.
This wiring diagram may be used for other 24-volt zone valves as long as they are equipped with end switches. Do not
attempt to use the transformer on the L8148A to power the zone valves: use a separate transformer. Up to ve V8043Fs
may be powered by one 48V A transformer, such as the Honeywell AT87A. A call for heat from a given thermostat will
result in the application of 24 volts across the TH and TR terminals on the corresponding zone valve, energizing the
zone valve motor. The zone valve opens and the end switch contacts are then made. The end switches are connected in
parallel with each other and to the "T" and "T" thermostat connections so that any zone valve that opens will also start the
circulator and re the boiler (assuming the high limit is not open). Zone valve terminal TH/TR has no internal connection
on the zone valve, it is merely a "binding post" used to connect two or more wires.

18MorrHeat - Most Heat In The Industry - Rev 3/18/2019
Example 1.
Example 2.

19MorrHeat - Most Heat In The Industry - Rev 3/18/2019

20MorrHeat - Most Heat In The Industry - Rev 3/18/2019
Fig. 35 Wiring Diagram,
Zone Wiring Using Honeywell V8043F Valves
(Factory Boiler Wiring Not Shown - Fig 33 | Fig 34)
Fig. 36 Wiring Diagram,
Circulator Zone Wiring Using Honeywell R845A's
(Factory Diagram Wiring Not Shown - See Fig 33 | 34)
/