Pex Cautions:
1.
Examine each circuit after it has been stapled in place. The PEX staple gun
is designed to leave a 1/8" gap between the top of the tubing and the staple.
This is to make sure that the tubing is not fractured by the impact of the
staple and to assure that no abrasion is possible between the staple
and the tubing. If the staple is closer than 1/16" of the tubing, then it
should be removed and replaced with a new staple. Please see the
illustration for tolerances.
1. As with any floor heating application, do not install PEX over floors
with asphalt paper “slip joint” in the flooring, as an unpleasant odor
may result. Rosin paper (pink colored) is generally acceptable.
PEX Staple Intervals: The PEX staple gun should only be used for
thin-slab applications and not “staple-up” or “sandwich” applications. For
thin-slab applications, staples should be placed every 12" to 15" along
the length of the tubing. Stapling the PEX at wider intervals can result in
the tubing being too close to the surface of the thin slab. (Watts Radiant
recommends a minimum 3/4" between the top of the tubing and the
surface of the concrete.)
Onix Staple Intervals: You must use one staple every 6" when
the Onix is installed under a wood frame floor. This ensures good thermal
contact between the Onix and the floor, which is essential for the Onix
to deliver its specified heat output. Spacing the staples too far apart
can cause as much as a 20% loss of peak heat output. For initial Onix
placement, or where there is insufficient clearance for the gun to be
used, we suggest the use of Watts Radiant NailTites to hold the Onix
in place. Although not essential, it can be very helpful for an assistant
to hold the Onix in place while the installer is stapling. This assistant
must wear all appropriate safety equipment. When stapling Onix on top
of a floor, in preparation for installing an elevated thin slab, you may
increase the staple intervals to 12" or 18". Always maintain the Onix
spacing as indicated on the plans or in associated design information.
Using The Staple Gun For Pex
A steel guide plate marked "PEX" is included with the staple gun. It is
designed to be secured to the underside of the gun using the bolts provided.
If stapling 3/8" PEX, make sure the smaller 3/8" opening is at the front of
the gun. You should see “3/8" PEX” stamped on the guide plate at the front
of the gun. If stapling 1/2" PEX, unbolt the guide plate and turn it around
so the larger 1/2" opening is at the front of the staple gun. You should see
“1/2" PEX” stamped on the plate at the front of the gun.
1. When stapling PEX, position the guide plate over the tubing.
2.
Make sure the guide plate, at both front and back, is placed firmly
against the plywood.
3.
Before pulling the trigger, make sure that the tail end of the guide plate
is also centered over the PEX.
4.
If the tail of the guide plate is not centered over the tubing, some of the
staples may puncture the PEX. When the guide plate has completely
contacted the plywood and is centered over the PEX tubing, pull the
trigger and fire the staple.
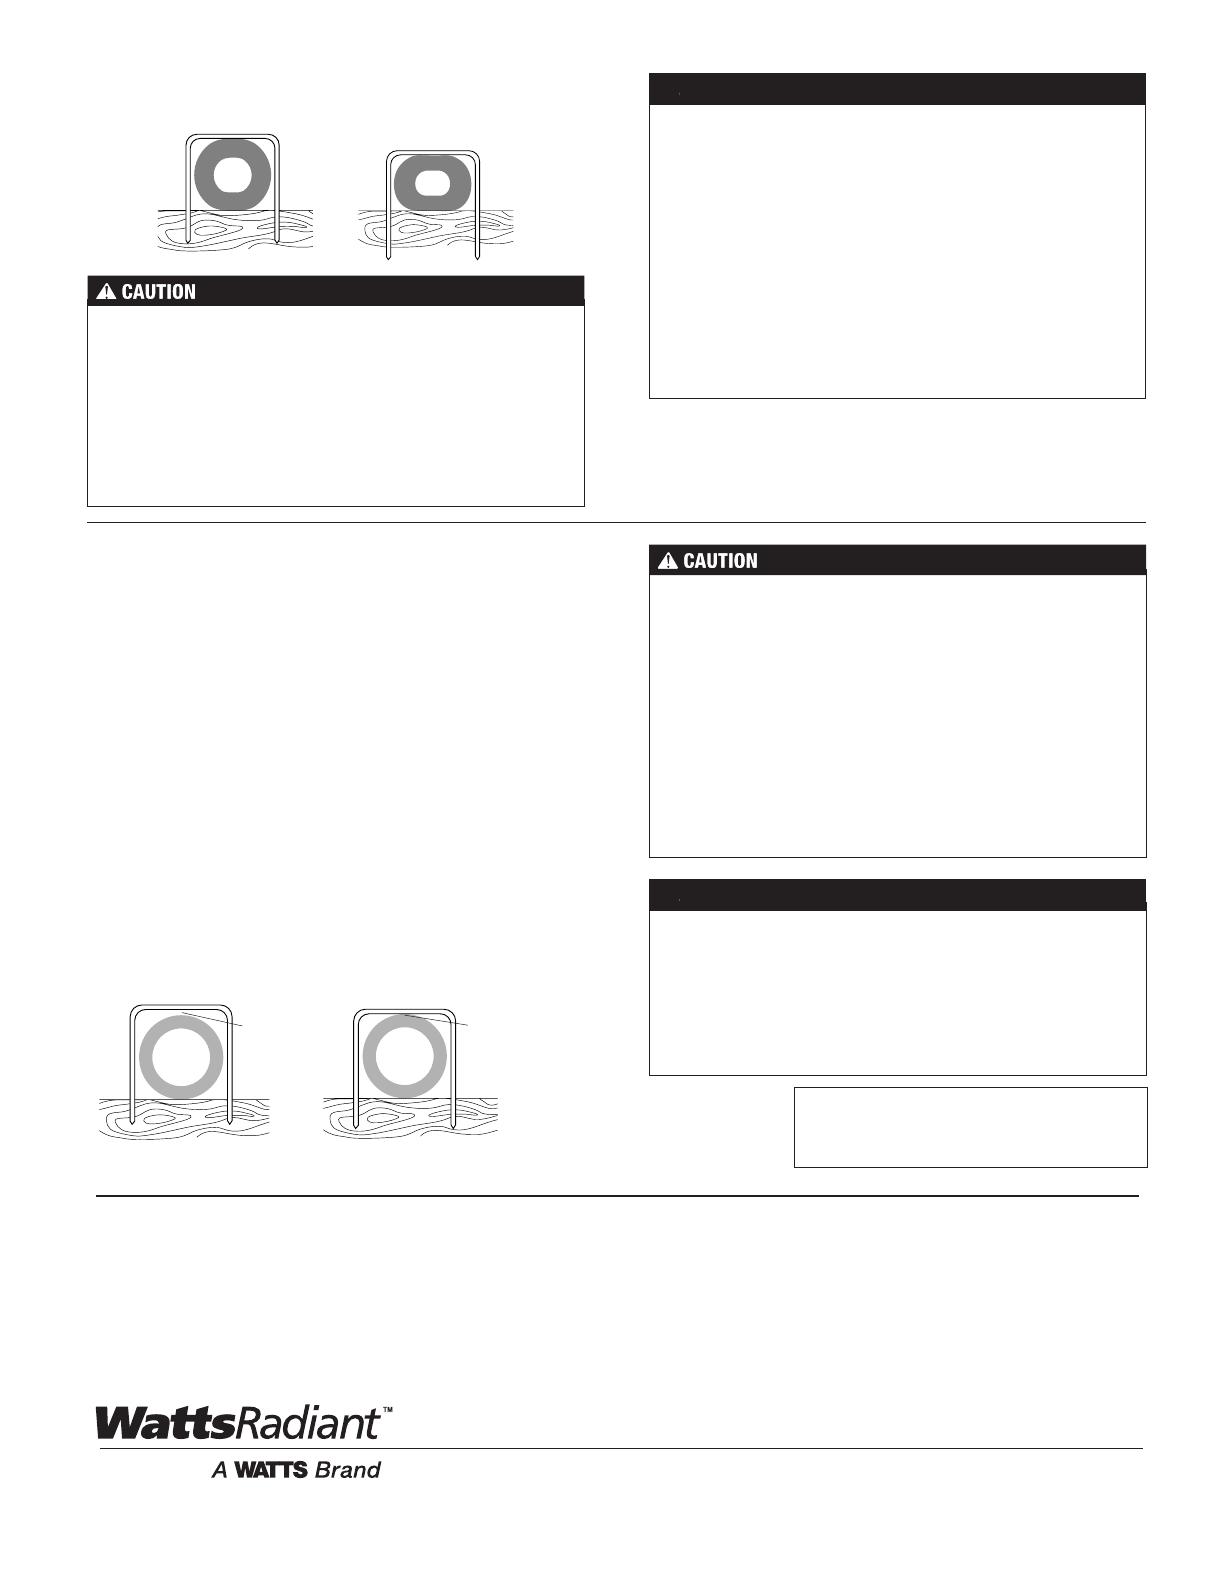
1/8" gap;
correct
spacing
incorrect
spacing-
tight
UnacceptableAcceptable
Acceptable
Deformation
Unacceptable
Deformation
1.
Examine each Onix circuit after it has been stapled in place. If you
see that the Onix has been partially compressed by a staple, you must
remove that staple and put in a new one. The staple can acceptably
deform the Onix slightly, 1/16" or less, without causing any difficulties.
See the illustration for deformation tolerances when stapling hose.
2.
Do not install Onix under floors containing an asphalt paper “slip
joint” between the subfloor and finish floor, as an unpleasant smell
may result. Rosin paper (pink colored) is generally acceptable.
IS-WR-StapleGun 1730 EDP#2915166 © 2017 Watts Radiant
USA: T: (800) 276-2419 • F: (417) 864-8161 • WattsRadiant.com
Canada: T: (905) 332-4090 • F: (905) 332-7068 • Watts.ca
Latin America: T: (52) 81-1001-8600 • WattsRadiant.com
Onix Cautions:
WARNING: This product contains chemicals known to the
State of California to cause cancer and birth defects or other
reproductive harm.
For more information: Watts.com/prop65
NOTICE
NOTICE
Limited Warranty: Watts Radiant (the “Company”) warrants each product to be free from defects in material and workmanship under normal usage for a period of one year from the date of original shipment. In
the event of such defects within the warranty period, the Company will, at its option, replace or recondition the product without charge.
THE WARRANTY SET FORTH HEREIN IS GIVEN EXPRESSLY AND IS THE ONLY WARRANTY GIVEN BY THE COMPANY WITH RESPECT TO THE PRODUCT. THE COMPANY MAKES NO OTHER WARRANTIES,
EXPRESS OR IMPLIED. THE COMPANY HEREBY SPECIFICALLY DISCLAIMS ALL OTHER WARRANTIES, EXPRESS OR IMPLIED, INCLUDING BUT NOT LIMITED TO THE IMPLIED WARRANTIES OF
MERCHANTABILITY AND FITNESS FOR A PARTICULAR PURPOSE.
The remedy described in the first paragraph of this warranty shall constitute the sole and exclusive remedy for breach of warranty, and the Company shall not be responsible for any incidental, special or consequen-
tial damages, including without limitation, lost profits or the cost of repairing or replacing other property which is damaged if this product does not work properly, other costs resulting from labor charges, delays,
vandalism, negligence, fouling caused by foreign material, damage from adverse water conditions, chemical, or any other circumstances over which the Company has no control. This warranty shall be invalidated
by any abuse, misuse, misapplication, improper installation or improper maintenance or alteration of the product.
Some States do not allow limitations on how long an implied warranty lasts, and some States do not allow the exclusion or limitation of incidental or consequential damages. Therefore the above limitations may not
apply to you. This Limited Warranty gives you specific legal rights, and you may have other rights that vary from State to State. You should consult applicable state laws to determine your rights. SO FAR AS IS
CONSISTENT WITH APPLICABLE STATE LAW, ANY IMPLIED WARRANTIES THAT MAY NOT BE DISCLAIMED, INCLUDING THE IMPLIED WARRANTIES OF MERCHANTABILITY AND FITNESS FOR A PARTICULAR
PURPOSE, ARE LIMITED IN DURATION TO ONE YEAR FROM THE DATE OF ORIGINAL SHIPMENT.


