Page is loading ...

DIN Radio Mounting Adapter for
Replacement of M99XX series radios
with a single DIN radio
Installation Manual
7 83855 98776 3
M99XXSDKIT
Radio and radio components not included.

Installation of M99XXSDKIT
2
STEP 1
Insert the DIN tools into the two holes on
each side of the radio.
(Installer’s Note: It is recommended the
battery be disconected before starting the
replacement process.)
Tools you’ll need
Wire cutters, flat blade, strippers, screw driver,
crimp tool
Installation Kit
*Radio and radio components are not included.
STEP 2
Once inserted, firmly push the DIN tools away
from each other, one towards the driver side,
the other towards the passenger side.
STEP 3
Keeping them in this position, begin to pull
them back out slowly until you feel them lock
into place. Once in place, continue to push
the tools away from each other and begin
pulling the radio out of the dash.

Installation of M99XXSDKIT (cont.)
3
STEP 4
Unplug the harness and AV cables from the
back of the radio.
(Installer’s Note: Be careful not to let the
cables fall back inside the dash.)
STEP 5
Using a small screwdriver or similar tool,
bend the mounting tabs that hold the radio
collar in place up and out of the way.
STEP 6
Remove the collar from the dash.
STEP 7
Replace the power harness. Begin by stripping
the ends of the new radio harness.
(Installer’s Note: It is recommended that you
crimp the harness wires together one at a time
to avoid a short.)

4
Installation of M99XXSDKIT (cont.)
STEP 8
Cut and strip the old radio’s power wires
starting with yellow constant hot, then black
chassis ground, then red ignition.
(Installer’s Note: Once the power wires are
finished, the speaker wires can be replaced in
any order. See pages 6-7 for wirring diagram
for original radio removed.)
STEP 9
When you have two of the same color wires
stripped, twist them together tightly.
STEP 10
Insert the twisted wires into one of the pro-
vided crimp end connectors.
(Installer’s Note: Make sure that none of the
wire is exposed below the bottom of the end
connector or you could get a short. Trim if
necessary.)
STEP 11
Use a crimp tool to firmly squeeze the two
wires together.
(Installer’s Note: Pliers can be used if a crimp
tool isn’t available.)

5
Installation of M99XXSDKIT (cont.)
STEP 12
Prepare the new radio collar by sliding the
black trim around it.
(Installer’s Note: Large area is the top of the
bracket.)
STEP 13
Installer’s Note: Black sharpie can be used to
blacken the edge of the collar for aesthetics.
STEP 14
Pull the cables through the new collar and
insert the collar into the dash.
STEP 15
Bend down the mounting tabs to hold the
collar firmly in place.

Installation of M99XXSDKIT
6
STEP 16
Plug the harness and AV cables into the back
of the new radio.
STEP 17
Insert the radio into the dash.
(Installer’s Note: After checking all
connections re-connect the vehicle’s battery.)
Left
Front Speaker
Left
Rear Speaker
+
-
+
-
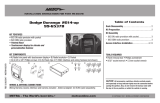
Blue Wire: Power Antenna
Yellow Wire: 12 VDC Constant
Black Wire: Ground
Green Wire: Rear Left Speaker (+)
Green/Black Wire: Rear Left Speaker (-)
Right
Rear Speaker
Right
Front Speaker
+
-
+
-
White Wire: Front Left Speaker (+)
Gray/Black Wire: Front Right Speaker (-)
White/Black Wire: Front Left Speaker (-)
Gray Wire: Front Right Speaker (+)
Orange Wire: Dimmer
Red Wire: Switched
Purple/Black Wire: Rear Right Speaker (-)
Purple Wire: Rear Right Speaker (+)
13
12
11
10
9
8
7
6
5
4
3
2
1
15A
Speaker Connection
Reference to Radios:
M9900CDS, M9900DVDS, M1-CD

7
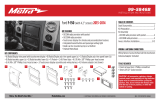
Speaker Connection
Left
Front Speaker
Left
Rear Speaker
+
-
+
-
Blue Wire: Power Antenna
Yellow Wire: 12 VDC Constant
Black Wire: Ground
Green Wire: Rear Left Speaker (+)
Green/Black Wire: Rear Left Speaker (-)
Right
Rear Speaker
Right
Front Speaker
+
-
+
-
White Wire: Front Left Speaker (+)
Gray/Black Wire: Front Right Speaker (-)
White/Black Wire: Front Left Speaker (-)
Gray Wire: Front Right Speaker (+)
Red Wire: Ignition Switched 12 VDC
Purple/Black Wire: Rear Right Speaker (-)
Purple Wire: Rear Right Speaker (+)
1 AMP
Audio Amplifier
See Amplifier Instructions
for Proper Connections
Reference to Radios:
M9900, M9900-1, M9900CD, M9999, M9999-2

© Copyright 2013 Magnadyne Corporation
M99XXSDKIT-INS Rev. A 3-28-13
/