Page is loading ...

SPECIFICATION SHEET
Broan-NuTone LLC Hartford, Wisconsin www.broan.com 800-558-1711
REFERENCE QTY. REMARKS Project
Location
Architect
Engineer
Contractor
Submitted by Date
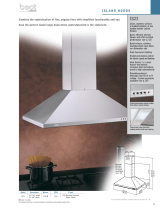
B53 SERIES
RANGE HOOD
Clean lines and contemporary style make this
wall-mounted, stainless steel hood a popular
choice.
FEATURES
•
Wall mount
•
Finish: 430 Stainless Steel #4 Brushed
•
Widths: 29-1/2”, 35-1/4”
•
Telescopic flue accommodates 8’ to 9’ ceilings
•
6” round duct connector/backdraft damper
•
Convertible to non-ducted operation (requires Model No.
RK56 sold separately)
•
Halogen lighting (2 Type JC, 12V, 20W, G-4 Base - bulbs
included)
•
5 push-button controls: blower on-off, blower low speed,
blower medium speed, blower high speed, light on-off
•
Single centrifugal blower
•
Dishwasher-safe filters feature a quick-release latch
•
Cord-connected
OPTIONS
•
Flue extension for 10’ ceiling (Model No. FXN53SS)
(32-1/2” long) (ducted or non-ducted)
•
Non-duct recirculation kit (Model No. RK56)
•
Replacement non-ducted recirculating filter (Model No.
ROUNDFILTER)
•
Replacement grease filters available (97018027 for
Model B5330SS) (97018028 for Model B5336SS)
•
Make-up air dampers (Models MD6TU & MD8TU)
31E 99045126A
Mount range hood so bottom of hood is
30” minimum above cooking surface.
SPECIFICATIONS
VOLTS AMPS CFM SONES DUCT
120 3.3
450 (high) 8.5 (high)
6” round
190 (low) 2.5 (low)
HVI-2100 CERTIFIED RATINGS comply with new testing
technologies and procedures prescribed by the Home
Ventilating Institute, for off-the-shelf products, as they are
available to consumers. Product performance is rated
at 0.1 in. static pressure, based on tests conducted in
a state-of-the-art test laboratory. Sones are a measure
of humanly-perceived loudness, based on laboratory
measurements.
19-5/8”
29-1/2”, 35-1/4”
10-7/8
”
11
-15/16”
3-1/8”
Min. 23-5/8” Ducted
Min. 27-3/4” Non-Ducted
Max. 43-1/8” Ducted or Non-Ducted

Broan-NuTone LLC Hartford, Wisconsin www.broan.com 800-558-1711
30" 31" 32" 33" 34" 35" 36"
8 Feet
43-9/16" 44-9/16" 45-9/16" 46-9/16" 47-9/16" 48-9/16" 49-9/16"
Desired Hood Distance Above 36" High Cooktop (see note 1)
Mounting Bracket Mounting Holes Location Above 36" High Cooktop
10 Feet
(see note 2)
Duct
Method
Ducted
Non-Ducted
Ducted
Non-Ducted
9 Feet
Ducted
Non-Ducted
43-9/16" 44-9/16" 45-9/16"
43-9/16" 44-9/16" 45-9/16" 46-9/16" 47-9/16" 48-9/16" 49-9/16"
43-9/16" 44-9/16" 45-9/16" 46-9/16" 47-9/16" 48-9/16" 49-9/16"
43-9/16" 44-9/16" 45-9/16" 46-9/16" 47-9/16" 48-9/16" 49-9/16"
43-9/16" 44-9/16" 45-9/16" 46-9/16" 47-9/16" 48-9/16" 49-9/16"
Notes:
1 A maximum height of 36” above the cooktop is recommended for best capture of cooking impurities. The
bottom of the hood MUST NOT BE LESS than 30” above the cooktop. Distances over 36” above the cooktop
are at the installer’s and user’s discretion - providing that the ceiling height and flue length permit.
2 Requires 10-ft. flue extension accessory - Model Number FXN53SS.
Ceiling
Height
CENTER
LINE
5¼”
16”
22”
LOCATE
ELECTRICAL
OUTLET
WITHIN THESE
AREAS.
(Verify location
will not interfere
with duct,
mounting
brackets
and flue.)
B53 SERIES WIRING
B53 SERIES MOUNTING
C
L
1. GROUNDING INSTRUCTIONS
This appliance must be grounded. In the event of an electrical short
circuit, grounding reduces the risk of electric shock by providing an
escape wire for the electric current. This appliance is equipped with a
cord having a grounding wire with a grounding plug. The plug must be
plugged into an outlet that is properly installed and grounded.
NOTE:
A recessed “clock” outlet is recommended.
2. Position the electrical outlet within the space covered by the decorative
flue and where it will not interfere with the round duct. Make sure the
outlet is no further than 14” from where the cord exits from the hood
and that the outlet does not
interfere with a mounting bracket fastening area or where the decora-
tive flue touches the wall.
1. Construct wood wall framing that is flush with interior
surface of wall studs.
Make sure:
a) the framing is centered over installation location.
b) the height of the framing will allow the mounting bracket
to be secured to the framing within the dimensions
shown.
2. After wall surface is finished, carefully center and level
the hood mounting bracket and secure it to wall framing
with (3) #8 x 1-1/2” mounting screws. Tighten the screws
completely.
9”
43-9⁄16” = bottom of hood 30” above cooktop
49-9⁄16” = bottom of hood 36” above cooktop
4½”
FRAMING BEHIND
DRYWALL
1
9
⁄16”
WALL STUDS
/