
User Manual
Welcome
Important Safeguards
Getting Started
Product, Parts and
Accessories
Control Panel
Smart Programmes
Cooking Tips
Care and Cleaning
Troubleshooting
Warranty
Contact Information
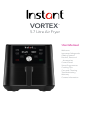
VORTEX
TM
5.7 Litre Air Fryer

Welcome to the world of Instant cooking.
Thank you for welcoming us into your kitchen.
Having families ourselves, we developed the Instant
™
Vortex
™
air fryers to allow
busy families and professionals alike to cook healthy, delicious meals more easily
and in less time.
We have partnered with chefs, authors and bloggers to compile a collection of
recipes that we hope you enjoy!
Happy cooking,
Robert J. Wang
Founder and Chief Innovation Ofcer
Find helpful how-to-videos, download the app, or visit our recipes site.
Download the Instant Pot App
• Original Recipes
• New User Tips
• Getting Started Videos

3
Table of Contents
IMPORTANT SAFEGUARDS ....................................................................................4
Special Lead Set Instructions .............................................................................6
Product Specications .........................................................................................6
Initial Set Up ..............................................................................................................7
Product, Parts and Accessories .............................................................................8
Air Fryer ..................................................................................................................8
Air Fryer Accessories ...........................................................................................9
Control Panel ..........................................................................................................10
Smart Program Settings ....................................................................................... 11
Status Messages .....................................................................................................12
Status Indicators .................................................................................................13
Getting Started .......................................................................................................14
Initial Test Run .....................................................................................................14
Smart Programs ..................................................................................................... 20
Cooking Tips .......................................................................................................20
Cooking Timetable ............................................................................................... 21
Care and Cleaning ................................................................................................ 22
Troubleshooting .................................................................................................... 23
Warranty ................................................................................................................. 24

4
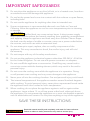
IMPORTANT SAFEGUARDS
When using electrical appliances, basic safety precautions should always
be followed:
1. READ THE GETTING STARTED GUIDE AND ALL INSTRUCTIONS,
SAFEGUARDS AND WARNINGS BEFORE OPERATING THE APPLIANCE.
FAILURE TO FOLLOW THESE SAFEGUARDS AND INSTRUCTIONS MAY
RESULT IN INJURY AND/OR PROPERTY DAMAGE.
2. Always operate the appliance on a stable, non-combustible, heat resistant,
level surface.
3. The appliance’s outer surfaces may become hot during use. Do not touch
hot surfaces. Wear oven mitts when opening the Air Fryer and handling hot
components. Extreme caution must be used when moving the appliance. Allow
the Allow the appliance to cool to room temperature before handling or moving.
4.
CAUTION
To protect against the risk of electric shock, do not immerse
the power lead, plug or appliance in water or other liquid.
5. Do not rinse the appliance under the tap.
6. The cooking chamber contains electrical components. To avoid electric shock,
do not put liquid of any kind into the cooking chamber.
7. This appliance is NOT to be used by children or by persons with reduced
physical, sensory or mental capabilities. Close supervision is necessary when
this appliance is used near children and these individuals. Children should
not use or play with this appliance.
8. Unplug from the socket when not in use, as well as before adding or removing
parts or accessories, and before cleaning. To unplug, take hold of the plug
and pull it from the socket. Never pull from the power lead.
9. Avoid contact with moving parts.
10. Regularly inspect the appliance and power lead. Do not operate any
appliance with a damaged lead or plug or after the appliance malfunctions,
or is dropped or damaged in any manner. Contact Customer Care at
11. Do not use any accessories or attachments not authorised by Instant Brands
™
Inc. The use of attachments not recommended by the manufacturer, such as
frying baskets, may cause a risk of injury, re or electric shock.
12. For household countertop use only. Do not use outdoors. Not for commercial
use. Not for use in staff kitchen areas in shops, ofces and other working
environments, in farmhouses, or by clients in hotels, motels and other
residential type environments such as bed and breakfasts.
Read this manual carefully and completely, and retain for future reference.
Failure to adhere to safety instructions may result in serious injury.
WARNING

5
IMPORTANT SAFEGUARDS
13. Do not place the appliance on any kind of hob, or in a heated oven; heat from
an external source will damage the appliance.
14. Do not let the power lead come into contact with hot surfaces or open ames,
including hobs.
15. Do not use the appliance for anything other than its intended use.
16. Proper maintenance is recommended after each use. Refer to Care and
Cleaning. Allow the appliance to cool to room temperature prior to cleaning
or storage.
17.
CAUTION
Spilled food can cause serious burns. A short power-supply
lead is provided to reduce the hazards resulting from grabbing, entanglement
and tripping. Keep the appliance and lead away from children. Never drape
the lead over the edge of a table or counter, never use a power outlet below
the counter, and never use with an extension lead.
18. Do not attempt to repair, replace, alter or modify components of the
appliance. This may cause electric shock, re and/or injury, and will void
the warranty.
19. Do not tamper with any of the safety mechanisms.
20. Do not use the appliance in electrical systems other than 220-240 V ~50-60Hz
for the United Kingdom. Do not use with power converters or adapters.
21. Do not overll the appliance or accessories. Overlling may cause food to
come into contact with the heating element, which may result in re and/or
personal injury.
22. Do not cover the cooling vents while the appliance is in operation. Doing
so will prevent even cooking and may cause damage to the appliance.
23. Never pour oil into the cooking chamber. Fire and personal injury could result.
24. The internal temperature of the appliance reaches several hundred degrees
while cooking. To avoid personal injury, never place unprotected hands inside
the appliance until it has cooled to room temperature.
25. When cooking, do not place the appliance against a wall or against other
appliances. Leave at least 13 cm of free space at the back, sides and above
the appliance. Do not operate the appliance on or near combustible materials
such as tablecloths and curtains. Do not place anything on top of the appliance.
SAVE THESE INSTRUCTIONS
Read this manual carefully and completely, and retain for future reference.
Failure to adhere to safety instructions may result in serious injury.
WARNING

6
IMPORTANT SAFEGUARDS
Special Lead Set Instructions
As per safety requirements, a xed short power supply lead is provided to reduce
the hazards resulting from grabbing, entanglement and tripping. To reduce the
risk of electric shock, plug the power lead into an earthed and easily accessible
electric socket.
Product Specications
Model: Vortex 6 1700 W 120 V ~ 60 Hz 5.7 Litres 5.48 kg 31.4 cm x 37.9 cm x 32.6 cm
The model listed may not represent all models in the Vortex series.
Visit instantappliances.com for details.
Read this manual carefully and completely, and retain for future reference.
Failure to adhere to safety instructions may result in serious injury.
WARNING
WARNING
FAILURE TO FOLLOW ANY OF THE IMPORTANT SAFEGUARDS AND IMPORTANT INSTRUCTIONS
FOR SAFE USE IS A MISUSE OF YOUR APPLIANCE THAT CAN VOID YOUR WARRANTY AND
CREATE THE RISK OF SERIOUS INJURY.
WARNING
Electric shock hazard. Use an earthed outlet only. DO NOT remove earthing. DO NOT use an adapter.
DO NOT use an extension lead. Failure to follow instructions can cause electric shock and/or death.
WARNING
To avoid injury, read and understand the instruction manual before using this appliance.

7
Initial Set Up
• Read the Important Safeguards in this User Manual before using the
appliance. Failure to read and follow Important Safeguards may result in
damage to the appliance, property damage or personal injury.
• Remove all packaging material and accessories from within and around the
appliance.
• Place the appliance on a stable, level surface, away from combustible material
and external heat sources.
• Leave at least 13 cm of space above and around all sides of the appliance.
• Do not place anything on top of the oven and do not block the air vents.
• Remove the air fryer basket and check the cooking chamber for loose packing
material before rst use.
• Follow Care and Cleaning instructions in this manual to clean the appliance
before rst use.
CAUTION
Do not place the appliance on a hob. Heat from an external source will damage the
appliance. Do not place anything on top of the appliance, and do not block the air vents.

8
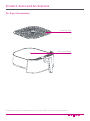
Product, Parts and Accessories
Before using the air fryer, verify that all parts and accessories are accounted for.
Air Fryer
Illustrations are for reference only and may differ from the actual product.
Air Vents
(Rear)
Dial
Cooking Chamber
(Interior)
Power Lead
(Rear)
Control
Panel
Air Fryer
Basket Handle
Air Fryer
Basket Handle


10
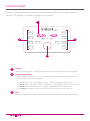
Control Panel
Instant air fryers feature an intuitive control panel with touch screen controls
and an LED display to make cooking fast and easy.
1 Display
Shows cooking time, cooking temperature, reminders and error messages.
2 Smart Programmes
Smart Programs have pre-set cooking times and temperatures but can be
customized to your own settings.
• Air Fry for chips, cauliower wings, chicken nuggets and more.
• Bake Light and uffy cakes and pastries, scalloped potatoes and more.
• Roast for beef, lamb, pork, poultry, vegetable dishes and more.
• Reheat to prepare leftovers without overcooking or drying out.
3 Dial
Rotate to adjust cooking times and temperatures. Press to wake the display.
3
2 2
1
AirFry
Roast
Broil
Cancel
Bake
Reheat
Dehy-
drate
Start
Time Temp

11
Smart Program Settings
Setting Description
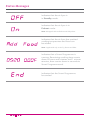
Standby Mode When the air fryer is in Standby mode, the display reads OFF.
Cancel Key
Touch Cancel at any time to end a Smart Programme and return to
Standby mode.
Turn Sounds
On or Off
When in Standby mode, touch and hold both the Time and Temp keys
for 5 seconds.
Note: Error alerts cannot be silenced.
Change Temperature
Scale (°F or °C)
Start any Smart Programme, then touch and hold the Temp key for
5 seconds to toggle between °F or °C.
Adjust Cooking Time
• When in Standby mode, touch the Smart Programmeme key you wish
to select.
• Touch the Time key and turn the dial to adjust the cooking time.
• Press the dial to conrm the change.
• Touch Start to save the change in the air fryer’s memory.
To adjust the cooking time after cooking has started, simply follow steps 2
and 3 listed above. Cooking will continue with the adjusted time; however,
adjustments made after cooking has started are not saved to memory.
Adjust Cooking
Temperature
• When in Standby mode, touch the Smart Programme key you wish
to select.
• Touch the Temp key and turn the dial to adjust the cooking temperature.
• Press the dial to conrm the change.
• Touch Start to save the change in the air fryer’s memory.
To adjust the cooking temperature after cooking has started, simply
follow steps 2 and 3 listed above. Cooking will continue with the adjusted
temperature; however, adjustments made after cooking has started are not
saved to memory.
Reset Individual
Smart Programme
When in Standby mode, press and hold the Smart Programme key you
wish to reset for 5 seconds. The cooking time and temperature for that
Smart Programme are restored to the factory default settings.
Reset All
Smart Programmes
When in Standby mode, press and hold the dial for 5 seconds. The
cooking times and temperatures for all Smart Programmes are restored
to the factory default settings.

12
Status Messages
Indicates that the air fryer is
in Standby mode.
Indicates that the air fryer is in
Preheat mode.
Note: Not applicable to Reheat and Dehydrate.
Indicates that the air fryer has reached
cooking temperature and food can
be added.
Note: Applicable only to Air Fry, Roast and Bake.
Indicates that a Smart Programme is
running. Remaining cooking time counts
down in hours and minutes until 1 minute
remains, then counts down in seconds to
Smart Programme end.
Indicates that the Smart Programme
has ended.

13
Status Messages
Status Indicators
21 3
1 Preheat
Indicates that the air fryer is preheating. The display
reads On during preheating.
2 Cook
Indicates that cooking is in progress. The display
shows the remaining cooking time and temperature
during cooking.
3 Turn
Indicates that food may be turned or shaken as
required by your recipe. The air fryer will beep for
ten seconds, then resume cooking.
Note: Applicable only to Air Fry and Roast.
AirFry
Roast
Broil
Cancel
Bake
Reheat
Dehy-
drate
Start
Time
Temp

14
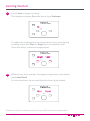
Getting Started
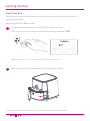
Remove the air fryer basket from the cooking chamber.
Note: To wake the air fryer, press the dial button or touch the screen.
2
Connect the power lead to a 220-240 V power source.
The air fryer is in Standby mode and the display indicates OFF.
1
Initial Test Run
Follow these steps to familiarize yourself with your air fryer and to ensure it is
operating properly.
Approximate time: 25 minutes
Illustrations are for reference only and may differ from the actual product.
AirFry
Roast
Broil
Cancel
Bake
Reheat
Dehy-
drate
Start
Time Temp

15
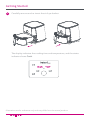
Getting Started
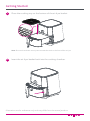
Place the cooking tray on the bottom of the air fryer basket.
Note: Ensure the indicator arrows point towards the back or the front of the air fryer.
Insert the air fryer basket back into the cooking chamber.
3
4
Illustrations are for reference only and may differ from the actual product.

16
Getting Started
Select Smart Program: Air Fry.
AirFry
Roast
Broil
Cancel
Bake
Reheat
Dehy-
drate
Start
Time
Temp
Touch Temp, then use the dial to adjust the cooking temperature
to 205ºC/400ºF.
Touch Time, then use the dial to adjust the cook time to 20 minutes.
*Note: Smart Programmes automatically save your last temperature and time settings when
you touch Start.
AirFry
Roast
Broil
Cancel
Bake
Reheat
Dehy-
drate
Start
Time Temp
6
5
Illustrations are for reference only and may differ from the actual product.

17
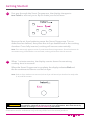
Getting Started
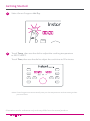
Touch Start to begin cooking.
The display indicates On while the air fryer Preheats.
To adjust the cooking time or temperature at any time during
cooking, touch the Time or Temp key and rotate the dial.
Press the dial to conrm the adjustment.
AirFry
Cancel
Time Temp
AirFry
Cancel
Time Temp
When the air fryer reaches the target temperature, the display
reads Add Food.
For this initial test, do not add food to the air fryer basket.
AirFry
Cancel
Time Temp
7
8
Illustrations are for reference only and may differ from the actual product.


19
Getting Started
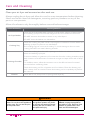
CAUTION
The air fryer and air fryer basket will be hot during and after cooking. Do not touch
hot surfaces. Allow the air fryer to cool to room temperature, then clean the air fry
basket according to Care and Cleaning instructions.
When 1 minute remains, the display counts down the remaining
cooking time in seconds.
When the Smart Programme is complete, the display indicates End and
the fan continues to blow to cool the air fryer.
Note: If the air fryer basket is not removed, the air fryer will remind you that food is ready after
5, 30, and 60 minutes.
11
Illustrations are for reference only and may differ from the actual product.
Part way through the Smart Programme, the display changes to
turn Food to remind you to ip or shake your food items.
Remove the air fryer basket to pause the Smart Programme. Turn or
shake food as desired, then place the air fryer basket back in the cooking
chamber. Once fully inserted, cooking will resume automatically.
Note: Turn notice only appears on Air Fry and Roast Smart Programmes. Some food items do
not need turning. If the basket is not removed, cooking will resume after 10 seconds.
AirFry
Cancel
Time Temp
10

20
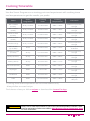
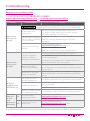
Smart Programs
Instant air fryers use rapid air circulation to cook food, giving your meals all the
crispy rich avour of deep frying with little to no oil.
Smart
Programme
Default Time
Adjustment
Range
Default
Temperature
Adjustment Range
AirFry 15 minutes 1–60 minutes 385°F / 196°C 180–400°F / 82–205°C
Roast 18 minutes 1–60 minutes 380°F / 193°C 180–400°F / 82–205°C
Bake 30 minutes 1–60 minutes 365°F / 185°C 180–400°F / 82–205°C
Reheat 10 minutes 1–60 minutes 280°F / 138°C 120–360°F / 49–183°C
CAUTION
Do not spray cooking oil into the cooking chamber.
Cooking Tips
• Preheating the air fryer is an important step. Wait for the display to read
Add Food before inserting food into the cooking chamber.
• When baking cakes, pies, quiches and other similar foods, use an oven-safe
baking dish covered with foil or an oven-safe lid to prevent the top of foods
from overcooking.
• When cooking coated food, use an egg wash with breadcrumbs rather
than liquid-based batters to ensure that batter sticks to the food.
• Spray food items with cooking oil before seasoning to ensure the
seasoning sticks.
• Soak fresh potato sticks in iced water for 15 minutes, then pat dry and spray
lightly with cooking oil before placing in the oven.
• Pat dry moist food items before cooking to prevent excess steam and splatter.
• Air frying can cause oil and fat to drip from foods. To prevent excess smoke,
carefully remove and drain the air fryer basket.
Page is loading ...
Page is loading ...
Page is loading ...
Page is loading ...
Page is loading ...
Page is loading ...
-
 1
1
-
 2
2
-
 3
3
-
 4
4
-
 5
5
-
 6
6
-
 7
7
-
 8
8
-
 9
9
-
 10
10
-
 11
11
-
 12
12
-
 13
13
-
 14
14
-
 15
15
-
 16
16
-
 17
17
-
 18
18
-
 19
19
-
 20
20
-
 21
21
-
 22
22
-
 23
23
-
 24
24
-
 25
25
-
 26
26


Ask a question and I''ll find the answer in the document
Finding information in a document is now easier with AI
Related papers
-
Instant 140-3015-01 Vortex Plus 5.7L Air Fryer User guide
-
Instant VORTEX PLUS User manual
-
Instant VORTEX Plus 5.7 User manual
-
Instant DAF8132BK User guide
-
Instant Vortex Series 6 Quart Air Fryer User manual
-
-
-
-
-
Other documents
-
 PowerXL AF3052 User guide
-
INNOTECK DS-S894 User manual
-
Dash 6Qt Family Air Fryer Quick start guide
-
Frigidaire EAF703 8Q, 7.5L Dual Zone Air Fryer User manual
-
Instant Pot Duo Crisp + Air Fryer AF 8 Safety, Maintenance & Warranty
-
 Germanica GAF90LDual User manual
-
Germanica GAF8LDUAL User manual
-
Hamilton Beach 31220 User guide
-
Cosori Premium CP358-AF User manual
-

