Monster CLASSIC FLOOR STEAMER (EZ1) User manual
- Category
- Steam cleaners
- Type
- User manual

EZ1 Floor Monster
EZ1 MONSTER
FLOOR STEAMER
Manuale d’istruzioni
Instruction Manual
Bedienungsanleitung
Notice d’utilisation
Manual de Instrucciones
Handleiding
Page is loading ...
Page is loading ...
Page is loading ...
Page is loading ...
Page is loading ...
Page is loading ...
Page is loading ...
Page is loading ...
Page is loading ...
Page is loading ...
Page is loading ...
Page is loading ...
Page is loading ...

15
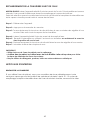
For your safety please read the following information.
Warning: This appliance must be earthed.
The appliance must be connected to a 220-240 volts 50 cycle AC supply by means of a three
pin socket, suitably earthed and should be protected by a 13 amp fuse in the plug.
The appliance is supplied with a rewireable 13 amp 3 pin plug tted with a 13 amp fuse. Should
the fuse require replacement, it must be replaced with a fuse rated at 13 amp and approved
to BS1362.
If the mains plug is unsuitable for the socket outlet in your home or is removed for any other reason,
then the cut off plug should be disposed of safely to prevent the hazard of electric shock.
There is a danger of electric shock if the cut off plug is inserted into any 13 amp socket outlet.
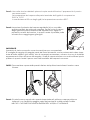
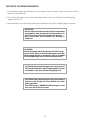
How to wire a 13 amp plug.
Important
The wires in the mains lead on this appliance are coloured in accordance with the following
code:
Green and Yellow - Earth
Blue – Neutral
Brown – Live
The green and yellow wire must be connected to
the terminal in the plug which is marked with the
letter E or with the earth symbol .
The blue wire must be connected to the terminal marked N.
The brown wire must be connected to the terminal marked L.
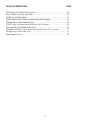
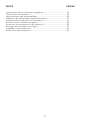
TABLE OF CONTENTS PAGE
Important safety instruction ................................................................. 16
Description of the appliance............................................................... 18
Assembling instruction .......................................................................... 19
Using your oor steamer ....................................................................... 21
Microbre pad care ............................................................................. 21
Filling the boiler with water................................................................... 22
Starting the appliance ......................................................................... 22
Relling the boiler with water ............................................................... 25
Trouble shooting .................................................................................... 26
ELECTRICAL CONNECTION (UK ONLY)

16
1.
Read all instructions before using your EZ1Floor
.
2. Use the steamer only for its intended use.
3. To protect against a risk of electric shock,
do not immerse any part of the system in
water or other liquids.
4. Do not unplug by pulling on cord.
To unplug grasp the plug, not the cord.
5. Do not allow cord to touch hot surfaces;
before opening the water tank let the
appliance cool completely. Do not wrap
the cord too tightly around the appliance.
6. Before lling with water or emptying
always disconnect the appliance. Always
turn the safety cap slowly to open the
water tank. This will allow any remainin
steam to escape gradually.
7. Do not operate the system with a
damaged cord or plug, or if the applian
or any other part of the system has been
dropped or damaged. To avoid the risk
of electric shock, do not disassemble or
attempt to repair the EZ1 Floor. Return the
system to EUROFLEX (see warranty) for
examination and repair. Incorrect
re-assembly or repair can cause a risk of
electrical shock or injury to persons when
the EZ1 Floor is used.
8. Do not leave the system in use without
surveillance and presence of children.
9. The contact with hot water or steam may
cause burns, use caution while emptying
the appliance from the remaining water.
10. Do not operate in the presence of explosive
and/or ammable fumes.
11. This appliance is intended only for home
use. Follow all user instructions in this
manual.
12. Never use any chemicals or substance
other than tap water in the machine. Use
of chemicals may damage the machine.
Use of chemicals will automatically void
your warranty.
13. The liquid or steam must not be directed
towards equipment containing electri-
cal components, such as the interior of
ovens.
14. The lling aperture must not be opened
during use.
15. Danger of scalding.
To reduce the risk of re, electric shock,
or injury:
• Do not leave the EZ1 Floor plugged in
when unattended. Unplug the electrical
cord when not in use and before servicing
or relling water tank.
• Use only as described in this manual.
Use only manufacturer’s recommended
accessories.
• Connect the appliance only after ensuring
that the voltage on the rating plate
corresponds to the voltage in your home.
• Do not pull or handle the cord carelessly,
do not close a door on cord or pull cord
around sharp edges or corners; keep it
away from heated surfaces.
• Do not use extension cords or outlets with
inadequate current carrying capacity.
• Turn off all controls as applicable before
unplugging from electrical outlet.
• Do not unplug by pulling on cord.
To unplug, grasp the plug, not the cord.
• Do not handle plug or steam cleaner with
wet hands or operate without shoes.
• Do not put any objects into openings.
Do not use with any opening blocked.
• Store your appliance indoors in a cool,
dry area.
• Keep your work area well lit.
• When in use, never turn the appliance over
or on its side. Never direct steam towards
people, animals or plants.
• Do not immerse the steam cleaner into
water or other liquids. Always unplug the
power cord from the electrical socket
when lling the steam cleaner.
• Do NOT add cleaning solutions, scented
perfumes, oils or any other chemicals to
the water used in this appliance as this
may damage the unit or make it unsafe
for use. Use tap water or distilled/puried
water if the tap water in your area is
very hard.
SAVE THESE INSTRUCTIONS
For Household Use Only
When using your EZ1 Floor steamer, basic safety precautions should always be ob-
served, including the following:
IMPORTANT SAFETY INSTRUCTIONS

17
1. To avoid circuit overload, do not operate another appliance on the same socket (circuit)
2.
Do not leave steamer unattended when plugged in.
3.
Use only heavy duty, high rated extension cords.
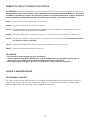
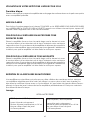
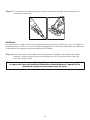
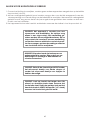
ATTENTION: this appliance is equipped with a 3
prong grounded power cord. Insert the 3 prong
grounded plug only into a 3 prong grounded
power outlet. Do not try to remove the contacts
of the grounded connection.
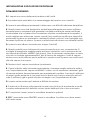
IMPORTANT SAFETY INSTRUCTIONS
CAUTION: This product is NOT designed to be di-
sassembled. Any attempt to take apart your oor
steamer after assembly will cause damage.
Do not leave the oor steamer unattended.
CAUTION: Do not use your oor steamer without
a hard surface pad or carpet glide pad attached
to the system.
CAUTION: Do not leave the oor steamer in one
place while in the ON position for over one minute.
Always move the handle assembly to the full UP
POSITION when not in use.

18
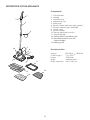
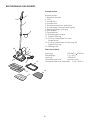
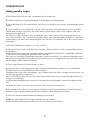
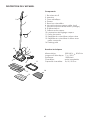
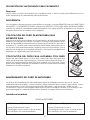
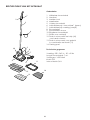
DESCRIPTION OF THE APPLIANCE
8
9
10
4
2
1
3
7
6
5
12
11
13
PARKING PAD
14
Components
1. Cord-winder
2. Handle
3. Metallic tube
4. Measuring cup
5. Boiler cap
6. Ready steam indicator light (green)
7. Power indicator light (orange)
8. Power cord
9. Steam nozzles
10. Steam adjustment switch
11. Carpet sledge
12. Hard surface microber pad
13. Microber pad for use with
carpet sledge
14. Parking pad
Thechnical data
Supply: 220-240 V 50-60 Hz
Cord Lenght: 7 m / 23 ft
Power: 1000 Watt
Boiler: stainless steel
Boiler capacity: 0,6 lt / 20.3 oz

19
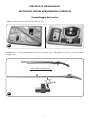
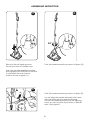
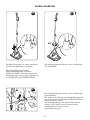
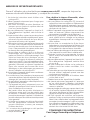
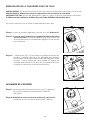
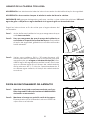
ASSEMBLING INSTRUCTIONS
IMPORTANT TO FOLLOW THESE INSTRUCTION VERY CAREFULLY
Handle assembly
Remove the handle assembly from the carton. (A)
Place on a at surface as shown below. Spread the handle out as shown in gure (B).
A
!KCILC
B
Max extension

20
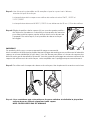
ASSEMBLING INSTRUCTION
H
90°
l o c k
u n l o c k
l o c k
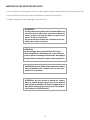
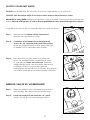
Remove the self tapping screw
from the bottom of handle tube.
Insert the handle assembly into the
oor steamer with SPECIAL ATTENTION
to ALIGNING the lock/unlock
position shown in gure (C).
Twist the handle assembly as shown in gure (E).
You will align the handle assembly screw hole
with the opening in the steamer housing.
Secure the handle assembly with self tapping
screw you remove from the bottom of handle
tube. (See gure E)
I
C
Twist the handle assembly as shown in gure (D).
D
E

21
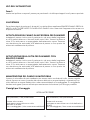
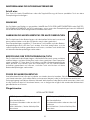
WARNING
To prevent oor damage, ALWAYS attach either the HARD SURFACE FLOOR PAD or the CARPET
SLEDGE ACCESSORY W/PAD when using your oor steamer. NEVER use without either of these
attachments afxed to the machine.
USING YOUR FLOOR STEAMER
Washcare
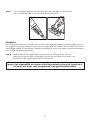
ATTACHING THE HARD SURFACE MICRO FIBER PAD
Place the pad face down on the oor, wide side front and with the
white hook and loop strips facing up. Hold your oor steamer about 2”
above the pad and gently drop the oor steamer onto the pad. Firmly
press down briey to assure full adhesion and your pad will be securely
fastened to the oor steamer.
ATTACHING THE CARPET GLIDE W/PAD
Place the pad face down on the oor, wide side front and with the
white hook and loop strips facing up. Hold your oor steamer about 2”
above the pad and gently drop the oor steamer onto the pad. Firmly
press down briey to assure full adhesion and your pad will be securely
fastened to the oor steamer.
MICROFIBER PAD CARE
Your micro ber pads are designed to be used for hundreds of times. Regularly clean your
pads either by hand (using mild soap and warm water) or in your clothes washer on a deli-
cate cycle, cool water. Never use fabric softener or bleach. Best to let the pads air dry to
maintain maximum long term effectiveness.
Step one:
Afx either your hard surface cleaning pad or carpet sledge with its special pad to your oor
steamer
ULTRA MICROFIBRE
90% Polyester / 10% Polyamide
Hand wash only
Tumble dry low or air dry
No bleach / No fabric softener
80% Polyester / 20% Polyamide
Hand wash only
Tumble dry low or air dry
No bleach / No fabric softener

22
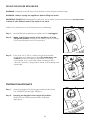
FILLING THE BOILER WITH WATER
WARNING: carefully read all instructions before unscrewing the safety cap.
WARNING: always unplug the appliance before lling the boiler.
IMPORTANT: DO NOT add detergents, perfumes, oils or other chemical substances. Use tap water
or dilute it with distilled water if tap water is too hard.
Follow the instructions to avoid water from overowing.
Step 1: before lling the appliance make sure it is unplugged.
Step 2: Make sure that the handle of the appliance is in the
upright off-position. Unscrew the safety cap by turning
it counterclockwise until it is removed.
Step 3: Pour max. 0.6 l / 20 oz water using the provided
measuring cup making sure that the water does not
overow. Screw the safety cap back on turning
it clockwise. If you use cold water, heating time is
abou3-5 minutes. Using warm water, the heating time
is reduced.
Step 1: Insert the plug into a 3 prong grounded wall socket.
The ORANGE power light will glow.
Step 2: Keeping the handle in the upright off-position.
Wait until the GREEN ready steam indicator
light glows.
orange
green
STARTING THE APPLIANCE

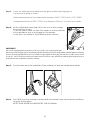
23
Step 3: Once the boiler has been lled and the green ready steam light glows,
the Monster is ready to clean.
Steam temperature at the nozzle end is between 104°C / 219°F and 115°C / 239°F.
Temperature lowers to 38°C / 100° F at a distance of 25cm / 10 in from the nozzles.
Step 4: Set the adjustable steam slide (A) to any one of four settings
from minimum to high.
To let the steam come out from the nozzles on the frontal part
of the appliance, act on the trigger on the handle.
In this way it is possible to clean hard to reach corners.
IMPORTANT
We have designed this product as a tool worthy of commercial use.
We recommend that most household jobs be rst done with the adjustable steam feature placed
at the (lowest) MINIMUM level. You need not go higher unless the job seems to call for the need
to do so. You’ll nd the minimum steam levels to be a very effective cleaning setting and your
pad will not be soaked by excess steam.
Step 5: To emit steam from the underside of the steamer just pull the handle downwards.
Step 6: You’ll nd your oor steamer to easily clean and refresh most hard surfaces and oors
using this setting alone.
NOTE: SOME WATER MAY BE EMITTED. THIS IS NORMAL
A

24
Step 7: To emit steam from the frontal steam ports simply pull the trigger on the handle
IMPORTANT
The frontal steam ports are intended to be used in steam “bursts” and should never be engaged
on a sustained basis. The frontal bursts will loosen especially difcult debris and will also assist in
treating hard to reach areas.
Step 8: Depending on the steam setting and frequency of use of the frontal steam ports,
your steamer will not need to be relled with water for up to 30 minutes.
The oor steamer will discontinue producing steam when the water tank is empty.
Immediately unplug and proceed to store or rell with water per direction.

WARNING: Let the appliance cool down 5 minutes before opening it. If the boiler is still warm,
the water may spurt out during the relling operation causing burns. Pay attention when relling
and unscrewing the safety cap since it may be hot and steam may come out causing burns.
Step 1: Unplug the appliance.
Step 2: Press the trigger on the handle.
Step 3: Slowly turn the safety cap counterclockwise. Let all remaining steam escape.
Step 4: Let the appliance cool down 5 minutes before relling it with water.
Step 5: Fill the boiler using the provided funnel keeping the handle in the upright off-position.
Step 6: Firmly screw the safety cap back on by turning it clockwise.
Step 7: Insert the plug into the wall socket.
IMPORTANT
• Always use tap water to clean.
• Use tap water or dilute it with distilled water if tap water is too hard. to avoid the risk of
staining pale coloured fabrics.
• Do not add detergents, perfumes, oils or other chemical substances.
REFILLING THE BOILER WITH WATER
If distilled or demineralized water is regularly used there is no need to clean the boiler.
RINSING THE STEAMER
If you use tap water we reccomend you periodically rinse the oor steamer to prevent
the accumulation of calcium and scales. After 10 - 15 relling cycles, ll the boiler with
hot tap water, shake and empty
CLEANING AND MAINTENANCE
25

TROUBLE SHOOTING
FAQ
Q: Steam isn’t coming out of the front of the unit.
A: The likely problem is improper handle assembly. Please call Monster Customer Service
at 888-896-8786 to promptly receive specic instructions to correct this problem.
Q: The hard oor micro ber pads don’t easily afx to the base of my oor steamer.
A: These pads are especially designed and engineered to be thick and absorbent enough
to assure maximum effectiveness without sacricing the sturdy (coarse) texture neede to
properly clean. The best way to afx the regular (not the carpet pad/sledge components)
is to place the pad on the oor, position the steamer about afx the regular (not the
carpet pad/sledge components) is to place the pad on the oor, position the steamer
about 2” above it, and rmly “bump” the steamer down on the pad. You will nd the pad
will mount the base very easily.
Q: My micro beer cleaning pads are getting “too wet”. Why?
A: We have designed this product as a tool worthy of commercial use.
We reccomend that most all household jobs be rst done with the adjustable steam
feature placed at the (lowest) MINIMUM level. You need not go higher unless the
job seems to call for the need to do so. You’ll nd the minimum steam levels to be a
very effective cleaning setting and your pad will not be soaked by excess steam.
Q: The steam seems to be making my oor to wet.
A: As pointed out in the previous question, it is always best to start all cleaning jobs with the
steam setting in the MINIMUM position. In addition, it is not necessary to engage the frontal
steam jets on a sustained basis to maximize cleaning. The most effective way to use the
frontal steam jet is in short bursts that are aimed only at the tougher stains, Your oor
steamer is already capable of picking up the tough stuff.
Q: The green “go” light seems to be a little “dull” and hard to see.
A: It’s really an optical illusion in that the dominant red (stop) color naturally overpowers the
subtle green color it’s positioned directly next to.
Q: Do I need to use my micro ber pads when cleaning?
A: YES!! It,s critically important to ALWAYS use your micro ber pads. The oor steamer
should NEVER used without pads.
26
Page is loading ...
Page is loading ...
Page is loading ...
Page is loading ...
Page is loading ...
Page is loading ...
Page is loading ...
Page is loading ...
Page is loading ...
Page is loading ...
Page is loading ...
Page is loading ...
Page is loading ...
Page is loading ...
Page is loading ...
Page is loading ...
Page is loading ...
Page is loading ...
Page is loading ...
Page is loading ...
Page is loading ...
Page is loading ...
Page is loading ...
Page is loading ...
Page is loading ...
Page is loading ...
Page is loading ...
Page is loading ...
Page is loading ...
Page is loading ...
Page is loading ...
Page is loading ...
Page is loading ...
Page is loading ...
Page is loading ...
Page is loading ...
Page is loading ...
Page is loading ...
Page is loading ...
Page is loading ...
Page is loading ...
Page is loading ...
Page is loading ...
Page is loading ...
Page is loading ...
Page is loading ...
Page is loading ...
Page is loading ...
Page is loading ...

Cod. 6809002.1 07/09
EUROFLEX srl
via dei Colli, 153
31058 Susegana (TV) Italy
Tel. ++39.0438.661711 ++39.0438.661712
http: www.euroex.tv
E-mail: euroex@euroex.tv
-
 1
1
-
 2
2
-
 3
3
-
 4
4
-
 5
5
-
 6
6
-
 7
7
-
 8
8
-
 9
9
-
 10
10
-
 11
11
-
 12
12
-
 13
13
-
 14
14
-
 15
15
-
 16
16
-
 17
17
-
 18
18
-
 19
19
-
 20
20
-
 21
21
-
 22
22
-
 23
23
-
 24
24
-
 25
25
-
 26
26
-
 27
27
-
 28
28
-
 29
29
-
 30
30
-
 31
31
-
 32
32
-
 33
33
-
 34
34
-
 35
35
-
 36
36
-
 37
37
-
 38
38
-
 39
39
-
 40
40
-
 41
41
-
 42
42
-
 43
43
-
 44
44
-
 45
45
-
 46
46
-
 47
47
-
 48
48
-
 49
49
-
 50
50
-
 51
51
-
 52
52
-
 53
53
-
 54
54
-
 55
55
-
 56
56
-
 57
57
-
 58
58
-
 59
59
-
 60
60
-
 61
61
-
 62
62
-
 63
63
-
 64
64
-
 65
65
-
 66
66
-
 67
67
-
 68
68
-
 69
69
-
 70
70
-
 71
71
-
 72
72
-
 73
73
-
 74
74
-
 75
75
-
 76
76


Monster CLASSIC FLOOR STEAMER (EZ1) User manual
- Category
- Steam cleaners
- Type
- User manual
Ask a question and I''ll find the answer in the document
Finding information in a document is now easier with AI
in other languages
- italiano: Monster CLASSIC FLOOR STEAMER (EZ1) Manuale utente
- français: Monster CLASSIC FLOOR STEAMER (EZ1) Manuel utilisateur
- español: Monster CLASSIC FLOOR STEAMER (EZ1) Manual de usuario
- Deutsch: Monster CLASSIC FLOOR STEAMER (EZ1) Benutzerhandbuch
- Nederlands: Monster CLASSIC FLOOR STEAMER (EZ1) Handleiding
Related papers
-
Monster EZ1-R User manual
-
-
-
-
-
-
-
-
-
Other documents
-
Defort DSC-1400-VC Owner's manual
-
Defort DSC-1300-MOP Owner's manual
-
Hendi 270141 User manual
-
Euroflex EZ 2 SUPERCLEAN Owner's manual
-
Bestron ASS1000 Owner's manual
-
Bestron AZQ016 User manual
-
-
Hendi 211403 User manual
-
 Black and Decker Appliances HGS011 Series User guide
-
Princess 332733 Vertical Steamer Owner's manual
