Page is loading ...

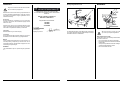
Ferm 43
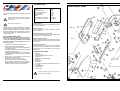
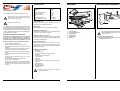
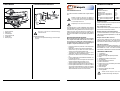
EXPLODED VIEW
FFZ-400N SCROLL SAW MACHINE
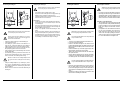
The following warning symbols are used in this operating
manual:
Danger of fatal injury and possible damage to
the machine if the instructions in this manual are
not observed.
An electric current is present.
Carefully read this operating manual before commissio-
ning the machine. Acquaint yourself with its function and
operation. Maintain the machine in accordance with the
instructions so that it will always work faultlessly. This ma-
nual and the accompanying documentation must be sto-
red near the machine.
SPECIAL SAFETY REGULATIONS
When using an electric machine, always observe the
local safety regulations with regard to the risk of fire,
electric shock and injury. In addition to the following
instructions, read the safety regulations in the rele-
vant special section.
• Always wear safety glasses and a dust mask.
• Use this scroll saw machine only indoors.
• Ensure that the teeth of the saw point downwards be-
fore using the machine.
• If any of the saw blade's teeth are missing or damaged,
immediately replace the blade.
• Instal the scroll saw machine on a level, stable surface.
• To avoid breaking the saw blade, never exert lateral
pressure on it.
• Before cutting, check wooden work pieces for protru-
ding nails etc.; remove any found.
• Do not touch the surface area to be sawed.
• Do not allow the saw machine to run unattended.
•When the machine is operational, wood remnants etc.
near the saw blade must not be removed by hand. De-
activate the machine before removing remnants.
TECHNICAL DATA
Voltage 230 V~
Frequency 50 Hz
Power consumption 90 W
Speed count w/o load/min 1440
Max saw depth 90° 50 mm
Max saw depth 45° 15 mm
Weight 15 kg
L
pa
(sound pressure) w/load 62.6 dB(A)
L
pa
(sound pressure) w/o load 66.4 dB(A)
Electrical safety
Check that the mains voltage corresponds to the voltage
listed on the rating plate.
Mains connection
Only use earthed sockets with earthing wire connected
per the regulations.
Replacing the mains connection cable
The mains connection cable may only be replaced by a
special cable in a specialised workshop.
Replacing cables or plugs
Dispose of old cables or plugs immediately after replacing
them. It is dangerous to connect the plug of a loose cable to
a wall socket.
Using extension cables
Only use an approved extension cable, corresponding to
the machine power use. The wires must have a minimum
cross section of 1.5 mm
2
. If the cable is on a reel, it must be
fully paid out.
CONTENT OF THE PACKING
1 scroll saw
1 protective cover
1 screw for installing the protective cover
2 saw blades
2 adapters for universal saw blades
2Allen key
1 dust blow pipe
3 rubber feet
3 screws with nuts and rings for installing the rubber feet
1cross guide
1 operating manual
1 safety manual
1 warranty card
Check the machine, loose parts and acces-
sories for transport damage.
UK
English
2 Ferm

42 Ferm
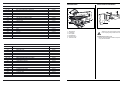
SPARE PARTS
REF.NR. DESCRIPTION FERM NR.
015 - 020 BOLSTER THREADED COMPLETE 209860
023 PRESSING PLATE 209861
024 SPRING 209862
025 BUSHING 209863
026 UPPER ARM 209864
028 SAW BLADE HOLDER (UPPER) 209865
033 + 034 CONNECTION PLATE + BEARING 209866
039 LOWER ARM 209867
041 SAW BLADE HOLDER (LOWER) 209868
042 - 044 AIR HOSE + PLASTIC PLATE 209869
047 TRANSPARENT GUARD 209870
049 GAS BAG 209871
052 CAM 209872
055 TABLE INSERT 209873
056 MOTOR 209874
065 SUPPORT FRAME 209875
069 - 072 MITRE GUIDE COMPLETE 209876
SWITCH 209877
ERSATZTEILVERZEICHNIS
REF.NR. BEZEICHNUNG FERM NR.
015 - 020 STIFT KOMPLETT 209860
023 DRUCKPLATTE 209861
024 FEDER 209862
025 BÜCHSE 209863
026 OBEN ARM 209864
028 SÄGEANGEL (OBEN) 209865
033 + 034 ÜBERTRAGUNG INKLUSIVE LAGER 209866
039 UNTERARM 209867
041 SÄGEANGEL (UNTER) 209868
042 - 044 SCHLAUCHANSCHLUß + SCHLAUCH 209869
047 SCHUTZGEHAUSE 209870
049 STAUBBLASVORRICHTUNG 209871
052 EXZENTER 209872
055 TISCHEINSATZSTÜCK 209873
056 MOTOR 209874
065 TISCHHALTER 209875
069 - 072 GRADBOGEN KOMPLETT 209876
SCHALTER 209877
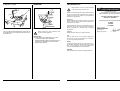
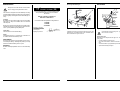
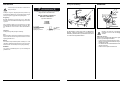
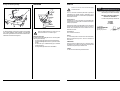
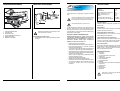
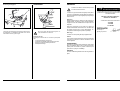
DESIGNATIONS
Fig. A.
1. On/off switch
2. Locking arm
3. Cross guide
4. Dust blow pipe
5. Protective cover
6. Tensioner head
INSTALLING ACCESSORIES
Fig. B.
Always disconnect the machine from the mains
before carrying out any maintenance work
Installing the protective cover
• Before commissioning the machine, the protective co-
ver (5) must be installed.
5
A
1
2
6
4
3
5
Ferm 3

VEDLIGEHOLDELSE
Afbryd maskinen fra nettet, når du skal udføre
servicearbejde på de mekaniske dele.
Maskinen er udviklet til at kunne fungere problemfrit i lang
tid og med et minimum af vedligeholdelse. Du forlænger
maskinens levetid ved at rengøre den regelmæssigt og
behandle den fagligt korrekt.
Rengøring
Rengør regelmæssigt maskinens kabinet med en blød
klud, og helst hver gang du har brugt den. Hold blæseråb-
ningen fri for støv og snavs.
Fjern fastsiddende snavs med en blød klud fugtet med
sæbevand. Anvend ikke opløsningsmidler som benzin,
alkohol, ammoniak, osv. Sådanne midler beskadiger
kunststofdele.
Smøring
Maskinen behøver ikke nogen yderligere smøring.
Fejl
Hvis der opstår en fejl, f. eks. på grund af slitage på en
komponent, bedes du henvende dig på den serviceadres-
se, som er angivet på garantibeviset.
MILJØ
For at forhindre transportskader leveres maskinen i en so-
lid emballage. Emballagen består i vidt omfang af mate-
riale, som kan genbruges. Udnyt derfor muligheden for
indlevering af emballagen til en genbrugsstation.
GARANTI
Læs garantibetingelserne på det vedlagte garantibevis.
ClEl
■
OVERENSSTEMMELSESERKLÆRING
(
DK
)
Vi erklærer hermed, at
dette produkt er i overensstemmelse med
følgende standarder eller normative dokumenter:
EN61029-1, EN55014-1, EN55014-2,
EN61000-3-2, EN61000-3-3
i henhold til bestemmelserne i følgende direktiver:
98/37/EØF
73/23/EØF
89/336/EØF
Fra
01-12-2002
GENEMUIDEN NL
W. Kamphof
Quality department
Ferm 41
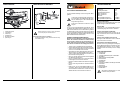
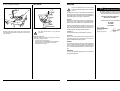
Installing the cross guide
Fig. C.
The cross guide (3) allows material to be bevelled, and can
be simultaneously used to support the material as it is fed
through the saw.
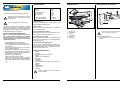
OPERATION
Fig. D.
Always observe the safety instructions and
obey the relevant regulations.
Tilting the table.
The scroll saw table can be tilted through 45°. To do so:
• Lock the locking arm underneath the table.
•Manually tilt the table until the desired angle has been
reached (see the graduated scale on the machine).
• Retighten the locking arm.
45°
3
4 Ferm

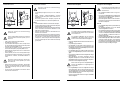
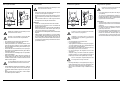
Montering af savklingen
Fig. E.
Afbryd maskinen fra elnettet, når du skal udføre
servicearbejde på de mekaniske dele.
Du kan få de anvendte savklinger som univer-
salsavklinger i ethvert velassorteret byggemar-
ked eller en maskinhandel.
•Ă Vælg den rigtige savklinge i henhold til trætypen.
• Løsn spændegrebet (6).
• Før savklingen gennem slidsen med tænderne ne-
dad. Sørg for, at bolten til savklingen (eller savklinge-
adapteren) glider ind i den nederste savklingeholder.
• Træk savklingen opad, så den øverste bolt (eller sav-
klingeadapter) glider ind i den øverste holder.
•Spænd spændegrebet, indtil savklingen har den nød-
vendige spænding.
• Fjern værktøj og andre genstande fra savbordet. Slå
strømmen til og lad savklingen rotere, før du begynder
at save. Kontrollér, om savklingen løber roligt.
Med de to medleverede savklingeadaptere kan
der også anvendes savklinger til løvsavsarbej-
de.
• Fastgør savklingeadapteren på savklingen (til løv-
sav). Sørg for, at unbrakoboltene er skruet lige meget
i, så savklingen ikke bliver sat skævt på og dermed ik-
ke saver præcist.
• Montér det hele i holderen i henhold til "Montering af
savklingen".
Udtagning af savklingen
Afbryd maskinen fra nettet, når du skal udføre
servicearbejde på de mekaniske dele.
• Løsn spændegrebet, indtil fjederen er slap.
• Tryk den øverste savklingeholder forsigtigt nedad, og
løft klingen lidt, så udtagningen bliver lettere.
• Lad klingen falde lidt ned, og skub den fremad, så den
kommer fri af den nederste holder.
Anvendelse
• Savklingen saver kun i den nedadgående bevægelse.
• Før langsomt og med et minimum af tryk emnet ind
mod savklingen.
• Hold emnet fast mod bordet med begge hænder, og
før det langsomt frem til savklingen, så det undgås, at
klingen knækker eller vrider sig.
• For at få et optimalt resultat skal savklingen være
skarp.
• Anvend den rigtige savklinge. Valget af savklinge af-
hænger af træets tykkelse og det ønskede snit. Gene-
relt gælder følgende: Jo tyndere og jo hårdere træet er,
desto finere skal savklingens tænder være. Anvend
en smal klinge, når du skal save skarpe rundinger.
+
—
6
40 Ferm
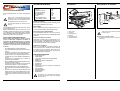
Installing the saw blade
Fig. E.
Always disconnect the machine from the mains
before carrying out any maintenance work.
Use universal saw blades from any better DIY
shop or machine shop.
• Select the correct blade for the kind of wood to be cut.
• Loosen the tensioner button (6).
• Push the saw blade through the slot, with the teeth
pointing downwards. Make sure that the bolt of the saw
blade (or saw-blade adapter) slides into the lower saw-
blade holder.
• Pull the saw blade up, so that the upper bolt (or saw-
blade adapter) slides into the upper holder.
• Tighten the tensioner button until the saw blade has
the required tension.
• Remove all tools and other objects from the saw table.
Activate the current and allow the saw blade to run be-
fore starting to saw. The saw blade should run quietly.
Use the saw-blade adapters included in the deli-
very to install saw blades for the compass saw.
• Fasten the saw-blade adapter (for compass saws) to
the saw blade. Make sure that the Allen bolts have
been sufficiently tightened to prevent the saw blade fr-
om being fastened obliquely and thus sawing inaccu-
rately.
• Install the assembly in the holder in accordance with
the instruction 'Installing the saw blade'.
Removing the saw blade
Always disconnect the machine from the mains
before carrying out any maintenance work.
• Loosen the tensioner head until the spring is slack.
•Carefully push down the upper saw-blade holder and
slightly lift the blade in order to facilitate its removal.
• Allow the blade to drop down slightly and push it for-
ward, in order to loosen it from the lower holder.
Using the scroll saw machine
• The saw blade saws only during the downward stroke.
• Using both hands, slowly and with minimum pressure
push the workpiece across the table towards the saw
blade. This will prevent the blade from breaking or
twisting.
• For optimal results, the saw blade must be sharp.
• Use the correct saw blade. The selection of the saw
blade depends on the thickness of the wood and the
desired cut. Generally speaking, the thinner and har-
der the wood, the finer the teeth of the saw blade must
be. Use a narrow blade to saw tight bends.
+
—
6
Ferm 5

Montering af tværføringen
Fig. C.
Tværføringen (3) bruges til at save materiale i gering, idet
tværføringen (3) samtidig kan anvendes til at støtte mate-
rialet, når du fører det gennem saven.
BETJENING
Fig. D.
Følg altid sikkerhedsanvisningerne, og hold dig
til de relevante forskrifter.
Vipning af bordet
Bordet på denne dekupørsav kan vippes 45°. Det gøres
på flg. måde:
• Løsn låsehåndtaget under bordet
• Vip bordet med hånden, indtil den ønskede vinkel er
nået.
•Vinklen kan aflæses på gradskalaen på maskinen.
• Spænd låsehåndtaget fast igen.
45°
3
Ferm 39
MAINTENANCE
Always disconnect the machine from the mains
before carrying out any maintenance work.
The machine is designed to function faultlessly for a long
period and with a minimum of maintenance. Extend its life-
span by regularly cleaning the machine and treating it cor-
rectly.
Cleaning
Regularly clean the machine with a soft cloth, preferably
after each use. Keep the ventilator slot free of dust and
other deposits.
Remove any tenacious deposits with a soft cloth moiste-
ned with soap. Do not use solvents (petrol, alcohol, ammo-
nia, etc.) as they will damage the plastic parts.
Lubrication
The machine does not need lubricating.
Faults
If a fault arises (due to e.g. element wear), contact the ser-
vice address listed on the warranty card.
ENVIRONMENT
We deliver the machine in sturdy packing in order to pre-
vent transport damage. Although the packing is mostly
made of reusable materials, please recycle it.
WARRANTY
Read the warranty stipulations on the enclosed warranty
card.
ClEl
■
CONFORMITY STATEMENT
(
GB
)
As sole responsible party, we declare that this product
corresponds to the following norms or normative
documents:
EN61029-1, EN55014-1, EN55014-2,
EN61000-3-2, EN61000-3-3
in accordance with the stipulations of the guidelines:
98/37/EEC
73/23/EEC
89/336/EEC
as from
01-12-2002
GENEMUIDEN NL
W. Kamphof
Quality department
6 Ferm
Page is loading ...
Page is loading ...
Page is loading ...
Page is loading ...
Page is loading ...
Page is loading ...
Page is loading ...
Page is loading ...
Page is loading ...
Page is loading ...
Page is loading ...
Page is loading ...
Page is loading ...
Page is loading ...
Page is loading ...
Page is loading ...
-
 1
1
-
 2
2
-
 3
3
-
 4
4
-
 5
5
-
 6
6
-
 7
7
-
 8
8
-
 9
9
-
 10
10
-
 11
11
-
 12
12
-
 13
13
-
 14
14
-
 15
15
-
 16
16
-
 17
17
-
 18
18
-
 19
19
-
 20
20
-
 21
21
-
 22
22


Ferm SSM1001 - FFZ-400N Owner's manual
- Type
- Owner's manual
Ask a question and I''ll find the answer in the document
Finding information in a document is now easier with AI
in other languages
- français: Ferm SSM1001 - FFZ-400N Le manuel du propriétaire
- Deutsch: Ferm SSM1001 - FFZ-400N Bedienungsanleitung
- Nederlands: Ferm SSM1001 - FFZ-400N de handleiding
- dansk: Ferm SSM1001 - FFZ-400N Brugervejledning
- svenska: Ferm SSM1001 - FFZ-400N Bruksanvisning
- suomi: Ferm SSM1001 - FFZ-400N Omistajan opas
Related papers
Other documents
-
 Meec tools 249036 Operating Instructions Manual
-
Parkside PHKS 1450 LASER - 2 Datasheet
-
-
ATIKA BMS 250 Operating instructions
-
-
-
Parkside PDKS 120 A1 Operation and Safety Notes
-
CORNILLEAU PRO 140 INDOOR Owner's manual
-
-
