Sony GTK-PG10 Owner's manual

Category
Bluetooth music receivers
Type
Owner's manual
GTK-PG10 AU1 (GB) 5-003-382-11(1)
GTK-PG10
Wireless Speaker
Getting Started
USB Device
Tuner
BLUETOOTH connection
Sound Adjustment
Other Operations
Additional Information
Operating Instructions
2
GB
GTK-PG10 AU1 (GB) 5-003-382-11(1)
WARNING
Do not expose the appliance to naked
flame sources (for example, lighted
candles).
As the main plug is used to disconnect
the unit from the mains, connect the unit
to an easily accessible AC outlet. Should
you notice an abnormality in the unit,
disconnect the main plug from the AC
outlet immediately.
The unit is not disconnected from the
mains as long as it is connected to the
AC outlet, even if the unit itself has been
turned off.
Do not install the appliance in a confined
space, such as a bookcase or built-in
cabinet.
Do not expose the batteries (battery
pack or batteries installed) to excessive
heat such as sunshine, fire or the like for
a long time.
Do not subject the batteries to extreme
low temperature conditions that may
result in overheating and thermal
runaway.
Do not dismantle, open or shred
secondary cells or batteries.
In the event of a cell leaking, do not
allow the liquid to come in contact with
the skin or eyes. If contact has been
made, wash the affected area with
copious amounts of water and seek
medical advice.
Secondary cells and batteries need to
be charged before use. Always refer
to the manufacturer’s instructions or
equipment manual for proper charging
instructions.
After extended periods of storage, it may
be necessary to charge and discharge
the cells or batteries several times to
obtain maximum performance.
Dispose of properly.
This equipment has been tested and
found to comply with the limits set out
in the EMC Directive using a connection
cable shorter than 3 meters.
For customers in Australia
Disposal of Old Electrical
& Electronic Equipment
(Applicable in the
European Union and
other European countries
with separate collection
systems)
To use the unit for a long time in a
good condition
Avoid using or storing the unit with its
side turned down.
If the unit gets wet, do not leave it as it
is for a long time. Wipe it off with a dry
cloth immediately.
3
GB
GTK-PG10 AU1 (GB) 5-003-382-11(1)
Notes on water resistant
feature
(Read before using the unit)
Water resistant performance of the
unit
The top panel of the unit has a water
resistant specification*
1
of IPX4*
2
as
specified in “Degrees of protection
against splashing water” of the IEC60529
“Ingress Protection Rating (IP Code).
However, this unit is not completely
water-tight.
Do not drop the unit into hot water in a
bathtub or purposely use it in water.
Liquids that the water resistant
performance specifications apply to
Applicable : fresh water, tap
water
Not applicable : liquids other than
the above (soapy
water, water with
detergent or bath
agents, shampoo,
hot spring water,
pool water,
seawater, etc.)
*
1
Any part of the unit other than the top
panel is not water resistant.
*
2
IPX4 (degree of protection against
splashing water): Protected against water
splashing from any direction.
The water resistant performance of the
unit is based on our measurements
under the conditions herein described.
Note that malfunctions as a result of
water immersion caused by misuse by
the customer are not covered by the
warranty.
To avoid the deterioration of the
water resistant performance
Check the following and use the unit
correctly.
Be careful not to drop the unit or
subject it to mechanical shock.
Deformation or damage may cause
deterioration of the water resistant
performance.
Do not use the unit in a location where
large amount of water or hot water
may splash on it. The unit does not
have a design that is resistant to water
pressure. Use of the unit in the above
location may cause a malfunction.
Do not pour high-temperature water
or blow hot air from a hair dryer
or any other appliance on the unit
directly. Also, never use the unit in
high temperature locations, such as in
saunas or near a stove.
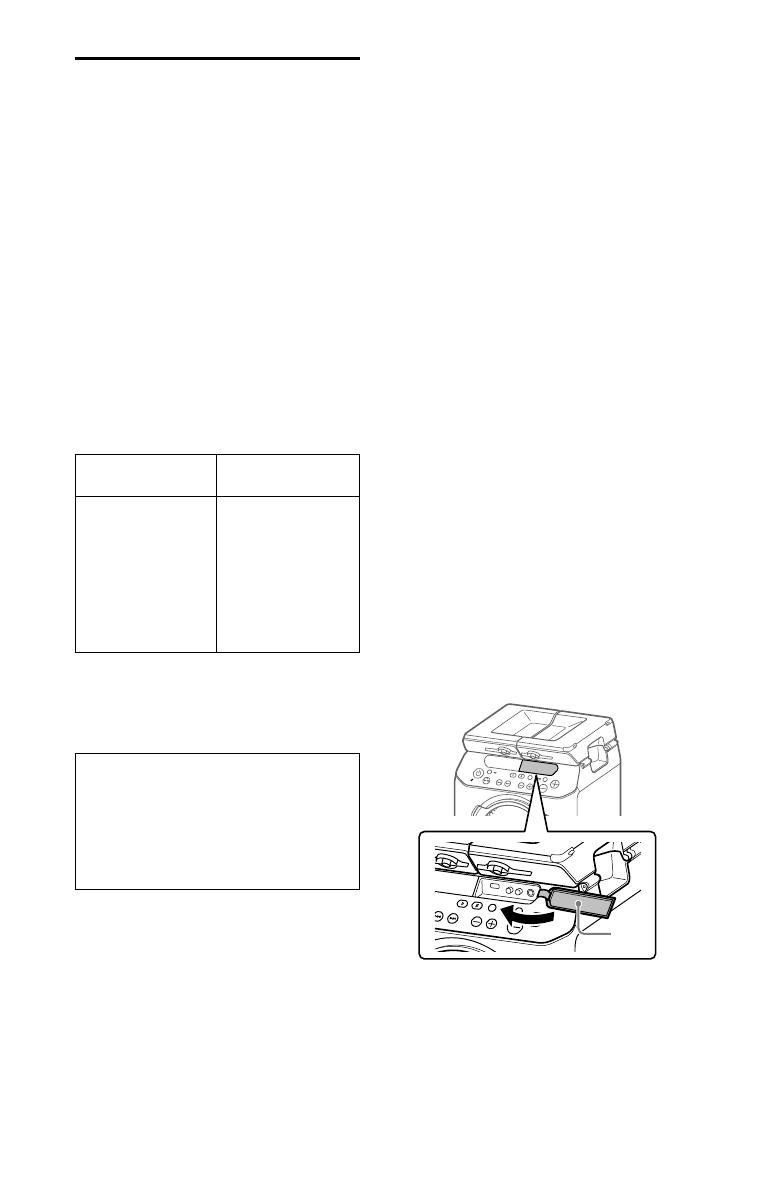
Handle the covers () with care. The
covers play a very important role in
maintenance of the water resistant
performance. When using the system,
make sure that the covers are closed
completely. When closing the covers,
be careful not to allow foreign
objects inside. If the covers are not
closed completely the water resistant
performance may deteriorate and may
cause a malfunction of the system as a
result of water entering the system.
Front
4
GB
GTK-PG10 AU1 (GB) 5-003-382-11(1)
Rear
How to care for the system when
wet
If the system gets wet, first remove
the water from the system, and then
wipe off the moisture on the system
using a soft, dry cloth. Especially in cold
regions, leaving moisture on its surface
may cause the system to freeze and
malfunction.
Be sure to wipe off the moisture after
using the system.
Put the system on towel or dry cloth.
Then leave it at room temperature
and dry the system until no moisture
remains.
5
GB
GTK-PG10 AU1 (GB) 5-003-382-11(1)
Table of Contents
Notes on water resistant feature
(Read before using the unit) ........... 3
Guide to parts and controls ......6
Getting Started
Charging the battery .................9
Turning on the system ..............9
Carrying the system ................ 10
Unfolding the top panel .......... 10
About the power management
... 11
Installing the speaker system on
a tripod .....................................12
USB Device
Before using the USB device ....13
Playing a file .............................13
Tuner
Listening to the radio ...............15
Presetting radio stations ..........15
Setting monaural/stereo ..........15
BLUETOOTH connection
Pairing this system with a
BLUETOOTH device .................. 16
Listening to music on a
BLUETOOTH device .................. 18
About the BLUETOOTH wireless
technology ............................... 19
Playing back with high quality
sound codec (AAC/LDAC™) .... 19
Setting the BLUETOOTH standby
mode ........................................20
Turning on or off the BLUETOOTH
signal ........................................21
Using “Sony | Music Center”
and “Fiestable” via BLUETOOTH
connection ................................21
Sound Adjustment
Adjusting the sound ................ 23
Other Operations
Using an optional equipment
... 24
Using an optional microphone
... 24
Deactivating the buttons on the
unit (Child Lock) ....................... 25
Setting the automatic standby
function .................................... 25
Saving the battery power ........ 26
Checking the software version
... 26
Additional Information
Information about compatible
devices ..................................... 27
Troubleshooting ...................... 27
Precautions ..............................30
Specifications ........................... 32
License and Trademark Notice
... 33
6
GB
GTK-PG10 AU1 (GB) 5-003-382-11(1)
Guide to parts and controls

Front
Rear
7
GB
GTK-PG10 AU1 (GB) 5-003-382-11(1)
(power) button
Press to turn on or off the system.
CHARGE indicator
Lights up in amber while the
battery is charging.
Flashes when the system is used
with the built-in battery and the
remaining battery level is low (less
than 10%).
Turns off when the system is used
with the AC power cord connected
to a wall outlet and the battery is
fully charged, or when the system
is used with the built-in battery
and the remaining battery level is
10% and over.
 (play/pause)* button
Press to play/pause music.
Hold down the button for
about 3 seconds, the built-in
sound demonstration will be
played back.
/ (go backward/go
forward) buttons
Press to select a track or file.
TUNING –/+ buttons
Press to tune to an FM station.
KEY CONTROL/ buttons
MIC –/+ buttons
Press to reduce the microphone
volume level.
MIC ECHO button (page9)
Hold down to stop the built-in
sound demonstration.

MEGA BASS BATTERY button
Press to reinforce bass sound
and create more powerful sound
(page23).
Hold down to check the
remaining battery level
(page11).
MEGA BASS indicator
Lights up when the MEGA BASS
function is turned on.
VOLUME –/+* buttons
Press to adjust the volume.

MIC jack
Use to connect the microphone.
AUDIO IN L/R jacks
Connect to the audio output
jacks of a TV or an audio/video
equipment. The sound is output
through this system.
(USB) port
Use to connect a USB device.
Display
(BLUETOOTH) indicator
FUNCTION PAIRING button
Press repeatedly to select the
BLUETOOTH, USB or AUDIO IN
function.
When the BLUETOOTH function
is selected, hold down to
activate BLUETOOTH pairing
(page16).
Hole for tripod attachment (on
the bottom surface)
Use a tripod (commercially
available) that can withstand the
weight of 5 kg or more.
Depending on the tripod
specifications, the speaker
attached on the tripod may not
face in an adequate direction.
FM radio antenna
AC IN jack
* The (play/pause) button and the
VOLUME + button have a tactile dot.
Use the tactile dot as a reference when
operating the system.
8
GB
GTK-PG10 AU1 (GB) 5-003-382-11(1)
Indicator statuses
The statuses of the indicators on the
unit are shown in the illustrations as
follows.
Indicator status Illustration
Flashing
Lit up
Turned off
9
GB
GTK-PG10 AU1 (GB) 5-003-382-11(1)
Getting Started
Getting Started
Charging the battery
The system can be used with the
built-in battery (rechargeable) instead
of connecting the AC power cord to
a wall outlet if the battery has been
sufficiently charged.
Connect the AC power cord
(supplied) to the AC IN jack on
the rear of the unit, and then to
the wall outlet.
AC power cord (supplied)
To wall outlet
The CHARGE indicator will light up in
amber. Charging will be completed in
about 8 hours and the indicator will turn
off.
Note
It may take longer to charge the battery
depending on the conditions of use.
Even if you do not intend to use the
system for a long time, charge the battery
to its full capacity once every six months
to maintain its performance.
In an extremely cold or hot environment,
charging stops for safety.
If charging is taking a long time, this also
stops the system from charging.
To resolve these issues, disconnect the
AC power cord and connect it again in an
operating temperature between 5 °C and
30 °C.
Hint
You can operate the system while it is
charging.
Turning on the system
Press the button to turn on the
system.
Hint
The system can be used with the built-in
battery instead of connecting the AC power
cord (supplied) to a wall outlet if you have
charged the battery before use. For details,
see “Charging the battery.”
Deactivating the demonstration
Hold down the MIC ECHO button
for more than 3 seconds with
the system turned on to set the
demonstration mode to off.
“DEMO OFF” appears on the display.
To perform the demonstration, with
the demonstration mode set to on,
connect the system to a wall outlet
and turn it on.
When the system is used with the
built-in battery, the demonstration is
not performed.
10
GB
GTK-PG10 AU1 (GB) 5-003-382-11(1)
Carrying the system
Before carrying the system, disconnect
all the cords.
In addition, if the top panel of the unit
is unfolded, fold the top panel securely
when carrying the unit around.
Note
Correct hand placement while carrying the
system is very important to avoid personal
injury and/or property damage.
Unfolding the top panel
You can use the system as a table by
unfolding the top panel. To unfold the
top panel, push up the pawl () at the
rear side of the unit and then unfold
the folded top panel.
Keeping beverage in the drink holder
is also available.
Moreover, using with the top panel
unfolded gives spatial impression to
the sound.
Be careful not to catch
your finger in the top
panel when unfolding or
folding it.
Note
Do not sit on the unit.
Withstand load is 10kg at the maximum.
Do not place a hot iron plate or other hot
objects onto the top panel.
Note that applying a load to one side of
the unfolded top panel may cause the unit
to tip over.
Do not leave any objects susceptible to
magnetism (cash cards, credit cards with
magnetic coding, etc.) near on the top
panel.
11
GB
GTK-PG10 AU1 (GB) 5-003-382-11(1)
Getting Started
About the power
management
By default, this system is set to turn
off automatically in about 15minutes
when there is no operation, and no
audio signal is detected. For details,
see “Setting the automatic standby
function” (page25).
You can reduce the power
consumption using the no display
mode (Power Saving mode). For
details, see “Saving the battery
power” (page26).
Checking the battery level of the
rechargeable battery
You can check the remaining battery
level via voice guidance and by a
message on the display.
You can also check the battery
level using “Sony | Music Center”
(page21).
1
Press the button to turn on
the system.
2
Hold down the MEGA BASS
BATTERY button for more
than 3 seconds.
3
The voice guidance message
is heard and one of the
following messages appears
on the display according to
the remaining battery level.
Voice guidance
message (battery
level)
Message
on the
display
“Fully charged”
(80% – 100%)
FULLY
CHARGED
“Battery About 70%”
(60% – 79%)
BATT 70%
“Battery About 50%”
(30% – 59%)
BATT 50%
“Battery About 20%”
(11% – 29%)
BATT 20%
“Please charge”
(less than 10%)
PLEASE
CHARGE
Hint
“Please charge” is output automatically
when the system is used with the built-
in battery and the remaining battery
level is less than 10%.
12
GB
GTK-PG10 AU1 (GB) 5-003-382-11(1)
Installing the speaker
system on a tripod
Match the hole on the speaker system
() to the tripod (not supplied) (),
then gently push it downward until it
is inserted completely to the tripod.
Be sure to use the tripod of
approximately 35mm in diameter and
that weighs 2.8 kg or more and can
withstand the weight of 10 kg or more.
Depending on the tripod
specifications, the speaker system
installed on the tripod may not face in
an adequate direction.
Less than
1.2m
35mm
More than 0.55m*
* We recommend you to expand the tripod
legs to maximum.
Note
Take the following precautions when
installing the speaker system on the tripod
to avoid personal injury or damaging the
speaker system.
Set up the tripod completely before you
install the speaker system. Be sure to read
the operating instructions of your tripod.
Do not install the speaker system on
the tripod placed on unstable surface,
walkway or any other unsuitable locations.
Make sure the speaker system is attached
on the tripod securely.
Do not push the speaker system or place
any objects on the speaker system when it
is installed on the tripod.
Do not rotate or lift the speaker system
when it is installed on the tripod.
Do not walk over the tripod legs to avoid
from tripping.
Disconnect the AC power cord (mains
lead) and all cables, and detach the
speaker system from the tripod when you
want to move the tripod, speaker system
or the subwoofer.
Be careful not to trip over the speaker
cable, tripod legs or the AC power cord
(mains lead).
Keep children away from the speaker
system installed on the tripod.
Take other precautions to prevent the
speaker system installed on the tripod
from falling.
13
GB
GTK-PG10 AU1 (GB) 5-003-382-11(1)
USB Device
USB Device
Before using the USB
device
For compatible USB devices, see
“Information about compatible
devices” (page27).
When using Apple devices with
this system, connect them via a
BLUETOOTH connection (page16).
Using Apple devices via a USB
connection is not supported.
Note
When USB cable connection is necessary,
use the USB cable supplied with the USB
device. See the operating instructions
supplied with the USB device for details
on the operation method.
Do not connect the system and the USB
device through a USB hub.
When the USB device is connected, the
system reads all the files on the USB
device. If there are many folders or files on
the USB device, it may take a long time to
finish reading the USB device.
With some connected USB devices, there
may be a delay before an operation is
performed by this system.
Compatibility with all encoding/writing
software cannot be guaranteed. If audio
files on the USB device were originally
encoded with incompatible software,
those files may produce noise or
interrupted audio, or may not play at all.
This system does not necessarily support
all the functions provided in a connected
USB device.
To use the system as a battery
charger
You can use the system as a battery
charger for USB devices when;
the USB devices have a rechargeable
function,
the system is turned on, and
any function except the USB function
is selected.
Connect the USB device to the
(USB) port.
The charging begins when the USB
device is connected to the
(USB)
port. For details, refer to the operating
instructions of your USB device.
Playing a file
The following audio file formats are
supported:
MP3: file extension .mp3”
WMA: file extension .wma”
1
Press the FUNCTION
PAIRING button to select
“USB.
2
Connect the USB device to the
(USB) port.
3
Press the button to start
playback.
You can control playback
operations and select music easily
from a list of music on the USB
device using “Sony | Music Center”
(page21).
4
Press the VOLUME -/+ buttons
to adjust the volume.
Other operations
To Do this
Pause
playback
Press the button.
To resume play,
press the button
again.
Play back the
next song
Press the button.
Play back the
previous song
Press the button.
Fast forward Hold down the
button for more than
3 seconds.
Fast reverse Hold down the
button for more than
3 seconds.
14
GB
GTK-PG10 AU1 (GB) 5-003-382-11(1)
Note
This system cannot play audio files on the
USB device in the following cases;
when the total number of audio files on
a USB device exceeds 5,000.
when the number of folders on a USB
device exceeds 999 (including the
“ROOT” folder and empty folders).
These numbers may vary depending on
the file and folder structure. Do not save
other types of files or unnecessary folders
on a USB device that has audio files.
The system can play back to a depth of 8
folders only.
Folders that have no audio files are
skipped.
Note that even when the file name has
the correct file extension, if the actual
file differs, the system may emit noise or
malfunction.
15
GB
GTK-PG10 AU1 (GB) 5-003-382-11(1)
Tuner
Tuner
Listening to the radio
1
Adjust the antenna for
optimum reception.
Extend the FM antenna and adjust
its length and angle for optimum
reception. See “Handling the FM
antenna” (page31).
2
Press the FUNCTION PAIRING
button repeatedly to select
“TUNER FM.
3
Tune to a station.
For automatic scanning:
Hold down the TUNING –/+ buttons
until the frequency begins to
change on the display.
Scanning stops automatically when
a station is tuned in. “ST” (for FM
stereo programs only) lights up on
the display.
If scanning does not stop, press
the TUNING – or + button to stop
scanning. Then, perform manual
tuning (below).
For manual tuning:
Press the TUNING –/+ buttons
repeatedly to tune to the station
you want.
Hint
To reduce static noise on a weak FM
stereo station, hold down the FUNCTION
PAIRING button and the MEGA
BASS button for about 3 seconds. “ST”
disappears and “MONO” lights up on the
display. You will lose the stereo effect,
but reception will improve.
Presetting radio stations
You can store up to 20 FM stations as
your favorite stations.
To preset FM stations, use “Sony |
Music Center” on your smartphone/
iPhone. For details on “Sony | Music
Center,” see “Using “Sony | Music
Center” and “Fiestable” via BLUETOOTH
connection” (page21).
Setting monaural/stereo
If noise occurs during FM reception,
set “MONO/ST” to “MONO. If you set it
to “ST”, stereo or monaural is selected
automatically, depending on reception
conditions.
1
Hold down the FUNCTION
PAIRING button and the
MEGA BASS button for about
3 seconds.
16
GB
GTK-PG10 AU1 (GB) 5-003-382-11(1)
BLUETOOTH connection
Pairing this system with
a BLUETOOTH device
Pairing is an operation in which
BLUETOOTH devices register each
other beforehand. Once the pairing
operation has been performed, it does
not need to be performed again for
those devices.
1
Place the BLUETOOTH device
within 1m from the system.
2
Select the BLUETOOTH
function.
Press the button to turn on
the system.
Press the FUNCTION
PAIRING
button repeatedly until the
(BLUETOOTH) indicator on
the unit flashes slowly.
Hint
When there is no pairing information
on the system (for example, when
you use the BLUETOOTH function
for the first time after purchase), the
(BLUETOOTH) indicator flashes quickly
and the system enters the pairing mode
automatically. In this case, proceed to
step 4.
3
Hold down the FUNCTION
PAIRING button for more than
3seconds.
Voice guidance (“Bluetooth
pairing”) will be output and the
(BLUETOOTH) indicator will flash
quickly.
Bluetooth
pairing
4
Turn on the BLUETOOTH
function on the BLUETOOTH
device.
For details, refer to the operating
instructions of your BLUETOOTH
device.
5
Select “GTK-PG10” on the
display of the BLUETOOTH
device.
GTK-PG10
BLUETOOTH
Note
If passkey is required on the BLUETOOTH
device, enter “0000.” “Passkey” may
be called “Passcode, “PIN code, “PIN
number,” or “Password.
17
GB
GTK-PG10 AU1 (GB) 5-003-382-11(1)
BLUETOOTH connection
6
Make sure that a BLUETOOTH
connection has been
established.
Once a BLUETOOTH connection
is established, the system will
emit a notification sound, and the
(BLUETOOTH) indicator on the
unit will stop flashing and remain
lit up.
Depending on the BLUETOOTH
device, connection may start
automatically after pairing is
completed.
Note
You can pair up to 8 BLUETOOTH devices.
If the 9th BLUETOOTH device is paired, the
oldest paired device will be deleted.
If you want to pair with another
BLUETOOTH device, repeat steps 1 to 6.
If the last connected BLUETOOTH device
is nearby, a BLUETOOTH connection will
be established automatically and the
BLUETOOTH indicator will light up.
To cancel the pairing operation
Press the FUNCTION PAIRING button.
To terminate the BLUETOOTH
connection
Turn off the BLUETOOTH function on
the connected device.
Note
Depending on the BLUETOOTH device, the
BLUETOOTH connection may be terminated
automatically when you stop playback.
Erasing all the pairing
registration information
To erase all of the pairing registration
information, the system needs to
be restored to the factory default
settings. See “Restoring the system
to the factory default settings”
(page30).
Note
Once all the pairing information on the
system has been erased, iPhone/iPod touch
may not be able to connect to the system.
In this case, delete the pairing information
for the system from iPhone/iPod touch, and
then perform the pairing procedure again.
18
GB
GTK-PG10 AU1 (GB) 5-003-382-11(1)
Listening to music on a
BLUETOOTH device
You can enjoy listening to music on a
connected BLUETOOTH device.
Check the following before playing
music:
The BLUETOOTH function of the
BLUETOOTH device is turned on.
Pairing has been completed
(page16).
1
Press the FUNCTION
PAIRING button repeatedly
until the
(BLUETOOTH)
indicator on the unit lights up.
The last connected BLUETOOTH
device will be connected
automatically.
Note
If the (BLUETOOTH) indicator flashes,
the BLUETOOTH connection hasn’t
been established. In this case, complete
the pairing procedure and establish a
BLUETOOTH connection.
2
Start playback of an audio
source on the BLUETOOTH
device.
For details, refer to the operating
instructions of your BLUETOOTH
device.
You can also use the button on
the system to play back/pause the
music.
3
Adjust the volume.
Adjust the volume of the
BLUETOOTH device first. If the
volume level is still too low, adjust
the volume level on the system
using the VOLUME –/+ buttons.
BLUETOOTH
device
19
GB
GTK-PG10 AU1 (GB) 5-003-382-11(1)
BLUETOOTH connection
Switching between BLUETOOTH
devices connected to the system
at the same time (Multi-device
Connection)
Up to 3 BLUETOOTH devices can be
connected to the system at the same
time.
While playing back an audio source
from one of the connected devices,
you can switch the BLUETOOTH
input device by operating another
connected device to start playback.
Note
Depending on the BLUETOOTH devices,
you may not be able to make 3 BLUETOOTH
connections at the same time.
About the BLUETOOTH
wireless technology
BLUETOOTH wireless technology is a
short-range wireless technology that
enables wireless data communication
between digital devices. BLUETOOTH
wireless technology operates within a
range of about 10m.
Supported BLUETOOTH version,
profiles and codecs
For details, see “BLUETOOTH section”
(page32).
(BLUETOOTH) indicator
The (BLUETOOTH) indicator on the
unit lights up or flashes in blue to
show the BLUETOOTH status.
System status Indicator status
BLUETOOTH
standby
Flashing slowly
BLUETOOTH
pairing
Flashing quickly
BLUETOOTH
connection is
established
Lit up
Playing back with high
quality sound codec
(AAC/LDAC™)
This system can receive data in the
AAC or LDAC codec format from a
BLUETOOTH device. It provides a
playback with higher sound quality.
You can select an audio codec option
from the following two settings
by using “Sony | Music Center”
(page21). The default setting of
this system is AUTO.
AUTO: The system detects the codec
used on the source device and
automatically selects the optimal
codec from “SBC,” “AAC*” or “LDAC*.
SBC: “SBC” is always applied
regardless of the codec used on the
source device.
* Available only when the codec is
supported by your BLUETOOTH device.
To apply the changes of the setting,
you need to terminate the BLUETOOTH
connection (page17), and then
perform the BLUETOOTH connection
again.
Note
You can enjoy higher sound quality
when the source device is compatible
with AAC/LDAC and this function is set
to AUTO.” However, the sound may be
interrupted depending on the conditions
of the BLUETOOTH communication. If this
happens, set the function to “SBC.
20
GB
GTK-PG10 AU1 (GB) 5-003-382-11(1)
LDAC is an audio coding
technology developed by Sony,
that enables the transmission
of High-Resolution (Hi-Res)
Audio content, even over a
BLUETOOTH connection. Unlike
other BLUETOOTH compatible
coding technologies, such as
SBC, it operates without any
down-conversion of the Hi-Res
Audio content
1)
. It also allows
approximately three times more
data
2)
than the other technologies,
for transmitting over a
BLUETOOTH wireless network with
unprecedented sound quality using
efficient coding and optimized data
bundling.
1)
Excluding DSD format contents.
2)
In comparison with SBC (Sub Band
Codec), when the bit rate of 990 kbps
(96/48 kHz) or 909 kbps (88.2/44.1 kHz)
is selected.
Setting the BLUETOOTH
standby mode
The BLUETOOTH standby mode
enables the system to turn on
automatically when you establish
the BLUETOOTH connection with a
BLUETOOTH device. This setting is
turned off by default.
This setting can only be configured by
using “Sony | Music Center. For details
on “Sony | Music Center, see “Using
“Sony | Music Center” and “Fiestable
via BLUETOOTH connection”
(page21).
Note
The BLUETOOTH standby mode can only
be set to on while the AC power cord is
connected.
Hint
Disable the BLUETOOTH standby mode to
reduce the power consumption in standby
mode (eco mode).
  • Page 1 1
  • Page 2 2
  • Page 3 3
  • Page 4 4
  • Page 5 5
  • Page 6 6
  • Page 7 7
  • Page 8 8
  • Page 9 9
  • Page 10 10
  • Page 11 11
  • Page 12 12
  • Page 13 13
  • Page 14 14
  • Page 15 15
  • Page 16 16
  • Page 17 17
  • Page 18 18
  • Page 19 19
  • Page 20 20
  • Page 21 21
  • Page 22 22
  • Page 23 23
  • Page 24 24
  • Page 25 25
  • Page 26 26
  • Page 27 27
  • Page 28 28
  • Page 29 29
  • Page 30 30
  • Page 31 31
  • Page 32 32
  • Page 33 33
  • Page 34 34
  • Page 35 35
  • Page 36 36

Sony GTK-PG10 Owner's manual

Category
Bluetooth music receivers
Type
Owner's manual

Ask a question and I''ll find the answer in the document

Finding information in a document is now easier with AI