
40” HD Ready 1080p
Digital LCD TV
Instruction Manual
L40DIGB20


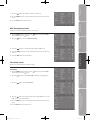
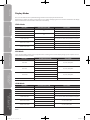
Contents
Preparation ............................................................................................................................................................................... 5
Unpacking the TV ...................................................................................................................................................................................................5
Installing / Removing the Base Stand .............................................................................................................................................................6
Front / Side View and Controls ..........................................................................................................................................................................7
Rear View and Sockets ..........................................................................................................................................................................................8
Installing Batteries in the Remote Control ....................................................................................................................................................9
Remote Control Operation Range ....................................................................................................................................................................9
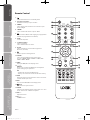
Remote Control .................................................................................................................................................................................................... 10
Connections ............................................................................................................................................................................ 12
Making Video and Audio Connections ........................................................................................................................................................ 12
Connecting an AV Device with an HDMI Cable ........................................................................................................................................ 12
Connecting a Computer with a VGA Cable ................................................................................................................................................ 13
Connecting an AV Device with a Component (YPBPR) Cable ............................................................................................................. 13
Connecting an AV Device with a SCART Cable ......................................................................................................................................... 14
Connecting an AV Device with a S-Video Cable ...................................................................................................................................... 14
Connecting an AV Device with a Composite Cable ................................................................................................................................ 15
Connecting a Coaxial Audio Receiver .......................................................................................................................................................... 15
Connecting a USB Storage Device ................................................................................................................................................................. 16
Connecting the Aerial ........................................................................................................................................................................................ 16
Initial Setup ............................................................................................................................................................................ 17
Turning the TV On for the First Time ............................................................................................................................................................ 17
− Selecting the Input Source................................................................................................................................................................... 18
− Channel Selection ................................................................................................................................................................................... 18
− Volume Adjustment ................................................................................................................................................................................ 18
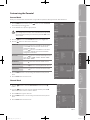
Using the Features ................................................................................................................................................................. 19
Customising the Video Setting ....................................................................................................................................................................... 19
− Video Mode................................................................................................................................................................................................ 19
Customising the Audio Setting ...................................................................................................................................................................... 20
− Audio Mode ............................................................................................................................................................................................... 20
− Stereo / Dual Sound Reception (TV Mode) .................................................................................................................................... 20
Customising the TV Setting ............................................................................................................................................................................. 21
− Country ........................................................................................................................................................................................................ 21
− Audio Channel .......................................................................................................................................................................................... 21
− Channels .....................................................................................................................................................................................................22
• Channel Scan .......................................................................................................................................................................................22
• Update Scan ........................................................................................................................................................................................23
• Manual Scan ........................................................................................................................................................................................23
• Channel Skip ........................................................................................................................................................................................ 25
• Channel Sort ........................................................................................................................................................................................25
• Channel Edit ........................................................................................................................................................................................ 27
• Channel Decode ................................................................................................................................................................................28
• Analogue Channel Fine Tune ........................................................................................................................................................ 29
− CI (Common Interface) (TV Mode with DTV signal) .................................................................................................................... 30
− To View the CI Information ................................................................................................................................................................... 30
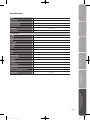
Over Air Download function ........................................................................................................................................................................... 31
Contents updated

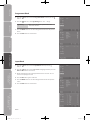
Customising the Setup Setting ....................................................................................................................................................................... 32
− Video Size (Aspect Ratio) ...................................................................................................................................................................... 32
− EPG (Electronic Programme Guide) .................................................................................................................................................. 33
− OSD Language ..........................................................................................................................................................................................34
− Screen Mode..............................................................................................................................................................................................34
− OSD Timeout mode ................................................................................................................................................................................ 34
− OSD Transparency mode ...................................................................................................................................................................... 35
− Time Setup mode .................................................................................................................................................................................... 35
− Subtitle ........................................................................................................................................................................................................36
− Teletext ........................................................................................................................................................................................................ 37
− Blue Mute .................................................................................................................................................................................................... 37
− No User Input Timer ...............................................................................................................................................................................38
− Reset Default ............................................................................................................................................................................................. 38
Customising the Parental ...................................................................................................................................................... 39
Parental Mode .......................................................................................................................................................................................................39
Channel Block........................................................................................................................................................................................................ 39
Programme Block ................................................................................................................................................................................................40
Input Block .............................................................................................................................................................................................................40
Change Password ................................................................................................................................................................................................ 41
Clean All ................................................................................................................................................................................................................... 41
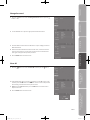
Using the Features via USB port ........................................................................................................................................... 42
USB Multimedia operation ............................................................................................................................................................................... 42
Multimedia Operation ....................................................................................................................................................................................... 42
− Picture Mode ............................................................................................................................................................................................. 42
− Music Mode................................................................................................................................................................................................ 43
− Picture and Music Mode ....................................................................................................................................................................... 43
− Video Mode................................................................................................................................................................................................ 43
Maintenance ...........................................................................................................................................................................44
Hints and Tips .........................................................................................................................................................................44
Display Modes ........................................................................................................................................................................46
YPbPr Mode ...........................................................................................................................................................................................................46
VGA Mode ...............................................................................................................................................................................................................46
HDMI Mode ........................................................................................................................................................................................................... 46
Specification ........................................................................................................................................................................... 47
Safety Warnings .....................................................................................................................................................................48

GB-5
PreparationConnectionsInitial SetupUsing the FeaturesHints and Tips, Specification
and Safety Warnings
Using the Features
via USB port
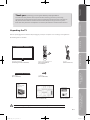
If items are missing, or damaged please contact Partmaster (UK only). Tel: 0844 800 3456 for assistance.
TV with TV Stand Support
(TV Stand Support’s P.N.: I.01.540693238)
TV Base Stand
(P.N.: I.01.540406903)
Remote Control / AAA Batteries x 2
(P.N.: I.14.000000684 and
E.17.101570001)
Screws A x 6
(P.N.: I.03.TW4016A01)
AV Cable
(P.N.: E.14.113150013)
Instruction Manual
(P.N.: I.08.995406910-V2)
Quick Start Guide
(P.N.: I.08.015406919-V2)
VOL CH
MUTE
INFO EXIT
ASPECT
SOURCE MENU
P.MODE S.MODE SLEEP
Thank you for purchasing your new Logik 40” HD Ready 1080p Digital LCD TV.
Your new TV has many features and incorporates the latest technology to enhance your viewing
experience. We recommend that you spend some time reading this instruction manual in order that you
fully understand these features. You will also find some hints and tips to help you resolve any issues.
Read all the safety instructions carefully before use and keep this instruction manual for future reference.
Unpacking the TV
Remove all packaging from the TV. Retain the packaging. If you dispose of it please do so according to local regulations.
The following items are included:
Digital TV Switchover Addendum
(P.N.: I.08.035197804)

GB-6
Preparation Connections Initial Setup Using the Features Hints and Tips, Specification
and Safety Warnings
Using the Features
via USB port
6. To re-install the base stand reattach the base stand
with the 6 screws
Installing / Removing the Base Stand
Remove the base stand before mounting the TV onto the wall.
The LCD display is very fragile, and must be protected at all times when installing and removing the base stand. Be sure
that no hard or sharp object, or anything that could scratch or damage the LCD display, comes into contact with it. DO
NOT exert pressure on the front of the TV at any time because the screen could crack.
1. Disconnect all cables connected to the TV.
2. Lay the TV down on a flat surface with the back side
facing up. Please make sure to place a soft cushioned
material (such as a pillow or thick piece of foam)
beneath the screen.
4. To remove the base stand, the 6 screws that hold the
base stand to the rear of the TV.
Keep all the spare screws should you want to use
the base stand option.
3. To install the base stand, attach the base stand with
the supplied screws.
5. Mounting on the wall. This TV is designed to be wall-
mounted with a standard 400 mm x 200 mm mounting
kit designed for flat-panel TVs (sold separately).
Mount this TV according to the instructions included
in the mounting kit. Due to the space restriction, we
recommend that you make all connections before
mounting on the wall (refer to page 12-16 for details).
400 mm
200 mm
Four mounting holes
(size M5 screw)
Screw
Screws A x 6
(P.N. I.03.TW4016A01)
Screws A x 2
(P.N. I.03.TW4016A01)
Screws B x 4
(P.N. I.03.MW4012001)
Please read this instruction manual carefully while setting up your TV.
If you require additional assistance please call our Customer Technical Services Centre.
Tel: 0844 800 6020 (UK only)
If items are missing, or damaged please contact Partmaster
(UK only). Tel: 0844 800 3456 for assistance.

GB-7
PreparationConnectionsInitial SetupUsing the FeaturesHints and Tips, Specification
and Safety Warnings
Using the Features
via USB port
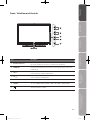
Front / Side View and Controls
3
4
5
6
7
1 2
Item Description
1 IR (Infrared Receiver)
Receives IR signals from the remote control.
Do not put anything near the sensor, as its function may be affected.
2 POWER LED
Illuminates blue when the TV is turned on. Illuminates red when the TV is in standby
mode. The LED will illuminate blue when the timer programming has started in the
standby mode.
3 VOL +/–
Adjust the volume.
Select and adjust a setting in the OSD menus.
4 CH
/
Select a channel.
Select a sub-menu of the OSD menu.
5 MENU Displays the OSD (on screen display) menu.
6 SOURCE
Select an input signal source:
TV / AV / S-VIDEO / SCART1 / SCART2 / YPBPR / VGA / HDMI1 / HDMI2 / MEDIA
7
/
Switch the TV on from standby.
Switch the TV back to standby.

GB-8
Preparation Connections Initial Setup Using the Features Hints and Tips, Specification
and Safety Warnings
Using the Features
via USB port
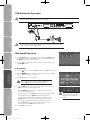
Rear View and Sockets
CARD FACE FRONT
42 8 10
51 6 63 7 9 11 12
Item Description
1 POWER ON/OFF Power switch
2 AC~ Mains cable
3 HDMI 1 / HDMI 2
HDMI (High-Definition Multimedia Interface) provides an uncompressed, all digital audio/
video interface between this TV and any HDMI-device, such as a set-top box, Blu-ray
player, and AV receiver.
4 Media USB port Allows the insertion of a USB storage device. (MEDIA Mode)
5 VGA / PC AUDIO Connect to a computer or other devices with a VGA interface.
6 SCART1 / SCART2 Connect to a VCR, DVD Player, or other AV devices with SCART1/ SCART2 output socket.
7 Y, PB, PR, L, R
Connect to a DVD player, Digital Set-Top-Box, or other AV devices with component
(YPbPr) video and audio output sockets.
8 COAXIAL Connect to the audio socket on the digital/standard 5.1 audio system.
9 VIDEO / AUDIO (L/R)
Connect to the Composite VIDEO and AUDIO (L/R) output sockets on external video
devices.
10 CI (Common Interface) Slot Allows the insertion of a Common Access Module. (Refer to page 30 for details.)
11 S-VIDEO Connect to a VCR, DVD Player, or other AV devices with S-Video output sockets.
12 RF (75 ) Connect to the aerial socket on the wall with the RF coaxial cable.

GB-9
PreparationConnectionsInitial SetupUsing the FeaturesHints and Tips, Specification
and Safety Warnings
Using the Features
via USB port
Remote Control Operation Range
Point the remote control at the TV no more than 5 metres from the
remote control sensor on the TV and within 60° in front of the TV.
The operating distance may vary depending on the brightness of the
room.
Installing Batteries in the Remote Control
1. Press and lift the back cover up to open the battery compartment of the
remote control.
2. Insert two AAA size batteries. Make sure to match the (+) and (–) ends
of the batteries with the (+) and (–) ends indicated in the battery
compartment.
Handling the Batteries
• Improper or incorrect use of batteries may cause
corrosion or battery leakage, which could cause
fire, personal injury or damage to property.
• Only use the battery type indicated in this manual.
• When the batteries are exhausted, the remote will
not function. Replace both batteries at the same
time with new ones.
• Do not install new batteries with used ones and
do not mix different types of batteries.
• Do not dispose of used batteries as domestic
waste. Dispose of them in accordance with local
regulations.
Handling the Remote Control
• Take care of your fingernails when you press and
hold the battery release tab.
• Do not drop or cause impact to the remote
control.
• Do not spill water or any liquid on the remote
control.
• Do not place the remote control on a wet object.
• Do not place the remote control under direct
sunlight or near sources of excessive heat.
• Remove the battery from the remote control
when not in use for a long period of time, as it
could cause corrosion or battery leakage and may
result in physical injury and/or property damage
including fire.
3. Close the battery compartment cover.
VOL CH
MUTE
INFO EXIT
ASPECT
SOURCE MENU
P.MODE S.MODE SLEEP
30° 30°
5 m

GB-10
Preparation Connections Initial Setup Using the Features Hints and Tips, Specification
and Safety Warnings
Using the Features
via USB port
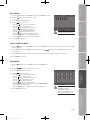
1.
Switch the TV between on and standby mode.
2. Transmission Indicator
Illuminates red when you press a button.
3. P.MODE
Selects picture mode: Standard / User / Cinema / Sport /
Vivid / Hi-Bright.
4. S.MODE
Selects sound mode: Normal / Speech / Music.
5.
Switch between different audio languages (only applicable
when the TV programme has this feature).
6. SLEEP
Set the TV sleep timer.
7. 0-9 Number Button
Select a programme.
Select numbered items in a menu.
8. CH.LIST
Select and switch to a channel that is higher than
Channel 9. (TV mode)
9.
Return to previous viewing channel.
10. SOURCE
Select among the different input signal sources:
TV / AV / S-VIDEO / SCART1 / SCART2 / YPBPR / VGA /
HDMI1 / HDMI2 / MEDIA.
11. MENU
Display the OSD (On Screen Display) menu.
12.
Allows you to navigate the OSD menus and adjust the
system settings to your preference.
OK
• Confirm the selection in the OSD menus.
• Display a list of channels saved in the TV tuner memory.
13. INFO
Display the present screen information such as the current
channel and the input source.
14. EXIT
Press to exit the OSD (On Screen Display) menu.
15.
MUTE
Mute and restore your TV sound.
16. ASPECT
Select from the following modes settings: Auto / 4:3 / 16:9 /
Zoom / Smart zoom / Subtitle / Dot by Dot.
17. VOL +/–
Adjust the volume.
18. CH
/
Select a channel.
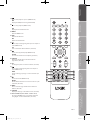
Remote Control
VOL CH
MUTE
INFO EXIT
ASPECT
SOURCE MENU
P.MODE S.MODE SLEEP
1
8
10
13
15
17
12
3
4
7
2
9
11
14
16
18
6
5

GB-11
PreparationConnectionsInitial SetupUsing the FeaturesHints and Tips, Specification
and Safety Warnings
Using the Features
via USB port
19.
Press to start playback or pause. (MEDIA mode)
EPG
Display the EPG. (Electronic Programme Guide)
20.
Press to stop playback. (MEDIA mode)
FAV
Display the Favourite Channel List.
21. MEDIA
Enter the MEDIA mode.
22. ADD
Add Favourite Channel.
DEL
Delete Favourite Channel.
23.
Press to skip to the beginning of the previous chapter or
track. (MEDIA mode)
TTX
Turn on and off the Teletext function. (TV mode)
24.
Use to reverse playback rapidly. (MEDIA mode)
CANCEL
To cancel the teletext mode completely. (TV mode)
25. SUBTITLE
Display the subtitle which is broadcast with the
programme. (TV mode)
26. Size
To enlarge the picture on the TV in teletext. (TV mode)
27.
Press to skip to the beginning of the next chapter or
track. (MEDIA mode)
HOLD
Freeze a multi-page passage on screen in Teletext. (TV
mode)
28.
Use to fast forward. (MEDIA mode)
REVEAL
Reveal hidden information such as the answer to a quiz
in Teletext. (TV mode)
29. INDEX
Press to select the page number of the Index from
Teletext. (TV mode)
30. SUBPAGE
Display the subpage on the Teletext screen. (TV mode)
31. Coloured buttons (RED / GREEN / YELLOW / BLUE)
Access the TELETEXT items or programme edit when
using Digital / Freeview TV Channels. (TV mode)
VOL CH
MUTE
INFO EXIT
ASPECT
SOURCE MENU
P.MODE S.MODE SLEEP
19
23
27
31
20
24
28
21
25
29
22
26
30

GB-12
Preparation Connections Initial Setup Using the Features Hints and Tips, Specification
and Safety Warnings
Using the Features
via USB port
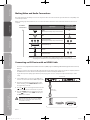
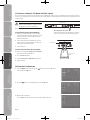
Making Video and Audio Connections
Not all AV devices have the ability to connect to a TV, please refer to the owner’s manual of your AV device for compatibility and
connection procedures.
When connecting any external AV device, do not connect the mains cable to the mains socket until all other connections are
complete.
Best Video
Performance
Signal Type
Separate audio
connection required
HDMI
(480i/480p/576i/576p/720p/1080i/1080p*)
No
VGA
Yes
Component Video
(480i/480p/576i/576p/720p/1080i/1080p*)
Yes
SCART (RGB Input) No
S-Video
Yes
Composite Video
Connections
* 1080p: Although this TV is compatible with a 1080p input, the screen is not capable of
displaying this resolution and consequently the image will be scaled to suit the screen.
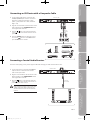
Connecting an AV Device with an HDMI Cable
• This TV can accept High-Definition Multimedia Interface (HDMI) supports HDCP (High-Bandwidth Digital Content Protection)
Protocol.
• When you connect to the output of an HD ready player (blu-ray disc player, game console, set-top box or computer) switch to
the HDMI function and the TV will automatically detect the resolution used by the HDMI source.
• To get the best picture quality, adjust the blu-ray disc player, game console or set-top box output resolution up to 1920 x
1080p.
1. Use an HDMI cable to connect the TV’s HDMI input
socket to an external AV device’s HDMI output socket.
2. Plug the connected devices into the mains socket
before switching on the POWER ON/OFF switch at
the right bottom of the TV.
3. Press the
/ button on the right side of the TV or the
button on the remote control to turn on your TV.
4. Press the SOURCE button to display the Source List.
Use the
buttons to select HDMI and then press
the OK button to confirm.
Although this TV is able to connect to HDMI
device, it is possible that some devices may
not operate correctly.
Rear View of TV
CARD FACE FRONT
HDMI Cable
(not included)
Blu-ray Player / DVD Player /
Recorder
Set-top BoxGame Console

GB-13
PreparationConnectionsInitial SetupUsing the FeaturesHints and Tips, Specification
and Safety Warnings
Using the Features
via USB port
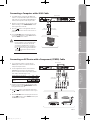
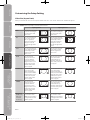
Connecting an AV Device with a Component (YPBPR) Cable
1. Use a component cable to connect the TV’s
YPBPR input sockets to an external AV device’s
component output sockets.
2. Use the supplied AV cable to connect the TV’s
AUDIO(L/R) input sockets to the external AV
device’s component audio output sockets. (Audio
Left = white, and Audio Right = red)
Component port on the TV Y PB PR
Video output ports on DVD
player
Y PB PR
Y CB CR
3. Plug the connected devices into the mains socket
before switching on the POWER ON/OFF switch at
the right bottom of the TV.
4. Press the
/ button on the right side of the TV or
the
button on the remote control to turn on your
TV.
5. Press the SOURCE button to display the Source List.
Use the
buttons to select YPBPR and then press
the OK button to confirm.
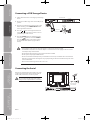
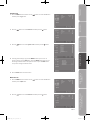
Connecting a Computer with a VGA Cable
1. Use a VGA cable to connect the TV’s VGA input
socket to a computer’s VGA output socket. Use an
audio cable to connect the TV’s PC AUDIO input
socket to the computer’s audio output socket.
2. Plug the connected devices into the mains socket
before switching on the POWER ON/OFF switch
at the right bottom of the TV.
3. Press the
/ button on the right side of the TV
or the
button on the remote control to turn on
your TV.
4. Press the SOURCE button to display the Source
List. Use the
buttons to select VGA and then
press the OK button to confirm.
• The best resolution is 1920 x 1080.
• If your computer is set to shut down after
a few minutes of idle mode, the TV will
also switch to standby due to no signal
being received, this is to save energy. Press
the
/ button on the right side of the TV
or the
button on the remote control to
restart the TV.
VGA Cable
(not included)
Audio Cable
(not included)
Rear View of TV
CARD FACE FRONT
Computer
AV Cable
(included
CARD FACE FRONT
Rear View of TV
Component Cable
(not included)
L
R
COMPONENT
OUT
Y
Pr
Pb
Pb/Cb
Pb/Cb
Pr/Cr
Pr/Cr
Y
Y
Satellite Receiver
Video Camera
Blu-ray Player / DVD Player /
Recorder
Set-top Box
Game Console
Yellow (Video)
Red (R)
White (L)
Yellow (Video)
Red (R)
White (L)

GB-14
Preparation Connections Initial Setup Using the Features Hints and Tips, Specification
and Safety Warnings
Using the Features
via USB port
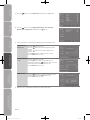
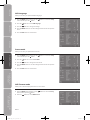
Connecting an AV Device with a SCART Cable
1. Use a SCART cable to connect the TV’s SCART input
socket to an external AV device’s SCART output
socket.
2. Plug the connected devices into the mains socket
before switching on the POWER ON/OFF switch at
the right bottom of the TV.
3. Press the
/ button on the right side of the TV or the
button on the remote control to turn on your TV.
4. Press the SOURCE button to display the Source
List. Use the
buttons to select SCART 1/2
corresponding SCART input socket.
Rear View of TV
CARD FACE FRONT
SCART Cable
(not included)
Satellite Receiver
VCR
DVD Player / Recorder
Set-top Box
Connecting an AV Device with a S-Video Cable
1. Use a S-Video cable to connect the TV’s S-VIDEO
input socket to an external AV device’s S-VIDEO
output socket.
2. Use the supplied AV cable to connect the TV’s
AUDIO(L/R) input sockets to the external AV
device’s audio output sockets. (Audio Left = white,
and Audio Right = red)
3. Plug the connected devices into the mains socket
before switching on the POWER ON/OFF switch
at the right bottom of the TV.
4. Press the
/ button on the right side of the TV
or the
button on the remote control to turn on
your TV.
5. Press the SOURCE button to display the Source
List. Use the
buttons to select S-VIDEO and
then press the OK button to confirm.
Rear View of TV
CARD FACE FRONT
S-Video Cable
(not included)
Satellite Receiver
Video Camera
VCR
DVD Player
Set-top Box
Game Console
AV Cable
(included)
Yellow (Video)
Yellow (Video)
Red (R)
Red (R)
White (L)
White (L)

GB-15
PreparationConnectionsInitial SetupUsing the FeaturesHints and Tips, Specification
and Safety Warnings
Using the Features
via USB port
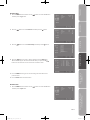
Connecting a Coaxial Audio Receiver
For better sound quality, you may want to play the DVD audio through your multi-channel audio receiver.
1. Use an audio cable to connect the TV’s COAXIAL
output socket to an external audio receiver’s
audio coaxial input socket.
2. Plug the connected devices into the mains socket
before switching on the POWER ON/OFF switch
at the right bottom of the TV.
3. Press the
/ button on the right side of the TV
or the
button on the remote control to turn on
your TV and your audio receiver.
Both of our TV and audio receiver have audio
output, please turn off the volume of your
TV and control the audio level via the audio
receiver.
Connecting an AV Device with a Composite Cable
1. Use the supplied AV cable to connect the TV’s
AUDIO(L/R)/VIDEO input sockets to an external
AV device’s composite audio/video sockets.
(Video = yellow, Audio Left = white, and Audio
Right = red)
2. Plug the connected devices into the mains socket
before switching on the POWER ON/OFF switch
at the right bottom of the TV.
3. Press the
/ button on the right side of the TV
or the
button on the remote control to turn on
your TV.
4. Press the SOURCE button to display the Source
List. Use the
buttons to select AV and then
press the OK button to confirm.
CARD FACE FRONT
Satellite Receiver
Rear View of TV
CARD FACE FRONT
AV Cable
(included)
Video Camera
VCR
DVD Player / Recorder
Set-top Box
Game Console
Yellow (VIDEO)
Yellow (VIDEO)
Red (R)
Red (R)
White (L)
White (L)
Rear View of TV
Audio Cable
(not included)
Audio Receiver

GB-16
Preparation Connections Initial Setup Using the Features Hints and Tips, Specification
and Safety Warnings
Using the Features
via USB port
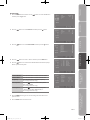
Connecting the Aerial
Connect one end of the RF coaxial cable to the aerial
socket on the wall and the other end of the cable to
the RF (75Ω) socket at the rear side of your TV.
Do not connect the TV to the mains supply
until you have completed all the connections.
OR
RF coaxial cable
(not included)
Connecting a USB Storage Device
1. Switch off the TV before connecting any USB storage
device.
2. Connect your USB storage device to the USB port of
your TV.
3. Plug the connected devices into the mains socket
before switching on the POWER ON/OFF switch
at the right bottom of the TV.
4. Press the
/ button on the right side of the TV
or the
button on the remote control to turn on
your TV and your audio receiver.
5. Press the SOURCE button to display the Source
List. Use the
buttons to select the MEDIA or
press the MEDIA button on the remote control
to enter Media Mode. (Refer to page 42-43 for
details.)
• If a hard disk is used, make sure its mains adapter is connected to the mains supply.
• If a USB hub is used, make sure its mains adapter is connected to the mains supply as the total current
consumption may exceed 500mA.
• The maximum supported storage space of the hard disk is 160 GB.
• The file system only supports FAT32 format.
• The TV screen will be blank temporarily as it will take time to start up and stabilise the connected hard
disk. This is normal and the starting time may vary depending on the brand and the memory size of the
connected hard disk.
• Disconnect the USB storage device if it is not in use.
CARD FACE FRONT
Rear View of TV
USB Cable
Adapter
Portable
hard DiskUSB Hub
USB

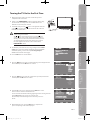
GB-17
PreparationConnectionsInitial SetupUsing the FeaturesHints and Tips, Specification
and Safety Warnings
Using the Features
via USB port
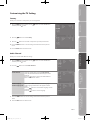
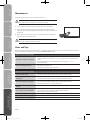
6. Press the buttons to select your desired language to be displayed on the
menu and then press the OK button to confirm.
8. Select “Scan” on the screen and then press the OK button on the
remote control to start the First Channel Scan.
You can select the desired broadcasting signal region after scanning channels.
Select “Skip Scan” on the screen can cancel the Scan.
An initial Setup reminder will appear the next time you turn on
the TV.
Turning the TV On for the First Time
1. Connect the mains cable to the mains socket after you have
completed all the connections.
2. Switch on the POWER ON/OFF at the rear of the TV. At this stage,
the TV switches to standby mode. The red LED indicator will
illuminate on the front panel of the TV.
3. In standby mode, press the
/ button on the right side of the TV
or the
button on the remote control to turn the TV on. The red
LED indicator will turn blue.
Always disconnect the TV from the mains socket when not in
use for a long period of time.
The
/ button on the right side of the TV or the button
on the remote control is only used for switching the TV into
standby, it does not disconnect the TV from the mains power.
To completely disconnect the mains power, please remove
the mains plug from the mains socket or switch off the
POWER ON/OFF switch.
4. The first time you turn the TV on, it will go straight into the Initial
Setup menu. (If you have already installed the TV using the Quick
Start Guide, please go to the next step “Selecting the Input
Source” at the bottom of next page.)
5. Press the OK button to start the wizard.
To the mains socket
Please select your country:
Country
United Kingdom
Austria
Belgium
Croatia
Czech Republic
Denmark
Finland
aerial
7. Press the buttons to select the country where you will operate the TV
and then press the OK button to confirm.
9. After finishing the Scan, press the OK button to complete the
process. An opening screen will be displayed.

GB-18
Preparation Connections Initial Setup Using the Features Hints and Tips, Specification
and Safety Warnings
Using the Features
via USB port
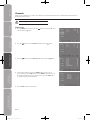
Selecting the Input Source
1. Press the SOURCE button to display the input source list.
2. Press the
buttons to select the input source that you want:
TV / AV / S-VIDEO / SCART1 /SCART2 / YPBPR / VGA / HDMI1 /
HDMI2 / MEDIA.
3. Press the OK button to confirm your selection.
Channel Selection
• Press the CH / buttons repeatedly or the 0-9 buttons to select the channel.
Alternative
In TV mode, press the OK button to enter the Channel List. Then use
the
buttons to highlight and select the channel. Press the OK
button to view the selected channel.
If a blocked channel is selected, the Channel Locked! message will pop
up. Press the OK button on the remote control to display the password
screen. Press the 0-9 buttons to enter the password, the channel will
then be unlocked (refer to page 39 for details on Channel Block).
• Press the FAV button repeatedly to select the favourite channel if you have previously preset your favourite channels.
Alternative
Press the FAV button to view the Favourite List. Then use the
buttons to highlight and select the channel. Press the OK button to
view the selected channel.
• Press the
button to return to the previously viewed channel.
Volume Adjustment
• Press the VOL +/– buttons to adjust the volume.
• If you wish to switch the sound off, press the
button, press the button again or the VOL +/– buttons to resume audio
listening.

GB-19
PreparationConnectionsInitial SetupUsing the FeaturesHints and Tips, Specification
and Safety Warnings
Using the Features
via USB port
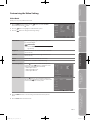
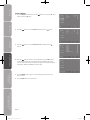
Customising the Video Setting
Video Mode
Allows you to set your preferred video mode.
1. Press the MENU button and then use the
buttons to select the Video
menu and then press the
button.
2. Press the
buttons to highlight an individual Video option.
3. Press the
buttons to change the following settings.
Colour
Picture Mode Cycles among display types: Standard/User/Cinema/
Sport/Vivid/Hi-Bright.
Alternative
Press the P.MODE button to select the display
type directly.
Brightness Increase or decrease the amount of white in the Video.
(for User mode)
Contrast Adjusts the difference between light and dark levels.
(for User mode)
Colour Adjusts the richness of colour. (for User mode)
DNR Reduce noise: Auto/Off/Low/Medium/Strong.
Colour Temperature
Press the
button to select the Colour Temperature
and then press the
buttons to adjust the colour
temperature (Warm/User/Cool/Standard).
• R Gain: Adjust red tint
• G Gain: Adjust Green tint
• B Gain: Adjust Blue tint
Colour Temperature
Colour Temperature
Advanced Video
Press the
button to select the Advance Video and
then press the
buttons to increase or decrease the
amount of backlight to save the power.
4. Press the MENU button to save the settings and return back to the previous
menu.
5. Press the EXIT button to exit the menu.
Advanced Video
AdjustOK

GB-20
Preparation Connections Initial Setup Using the Features Hints and Tips, Specification
and Safety Warnings
Using the Features
via USB port
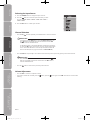
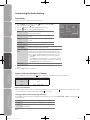
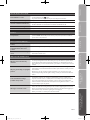
Customising the Audio Setting
Audio Mode
Allows you to select an audio-enhancement technique.
1. Press the MENU button and then use the
buttons to select the Audio
menu and then press the
button.
2. Press the
buttons to highlight an individual Audio option.
3. Press the
buttons to change the following settings.
Balance Adjusts the relative volume of the speakers in a
multiple speaker system.
Bass Controls the relative intensity of lower-pitched
sounds.
Treble Controls the relative intensity of higher pitched
sounds.
Equalizer Select Equalizer mode: Normal / Speech / Music.
Sound Surround Select to on/off Sound Surround.
Auto Volume
Control (AVC)
Volume levels are automatically controlled. (e.g. advertisements
tend to be louder than the programmes)
Audio Description
(AD)
Audio Description is an auxiliary audio function that provides
an additional audio track for visually challenged persons. This
function handles the Audio Stream for the AD (Audio Description),
when it is sent along with the Main audio from the broadcaster.
• Set to “Off” for normal broadcasting sound coming out from
speakers.
• Set to “Auto” to activate the description sound track if available.
The availability of Audio Description sound track is indicated by
“eye impaired icon” in the information banner.
AD Volume Adjust the Audio Description (AD) volume when AD is activated.
4. Press the MENU button to save the settings and return back to the previous
menu.
5. Press the EXIT button to exit the menu.
Stereo / Dual Sound Reception (TV Mode)
When a programme is selected, press the button to display the sound information for the selected station.
Broadcast On Screen Display
Mono
Stereo
Dual
Mono
Stereo
Dual1, Dual2, Mono
Mono sound selection
If the stereo signal is weak in stereo reception, you can switch to mono by pressing the button. In mono reception, the clarity
of sound is improved. To switch back to stereo, press the
button again.
Language selection for dual language broadcast
If a programme can be received in two languages (dual language), you can switch to Dual1, Dual2, or Mono by pressing the
button repeatedly.
Dual1 Sends the primary broadcast language to the loudspeakers
Dual2 Sends the secondary broadcast language to the loudspeakers
Mono Sends the primary and secondary broadcast languages to the
loudspeakers
Audio Description
(
AD
)
AD Volume 15
Sound Surround
Equalizer
Off
Normal
Off
Page is loading ...
Page is loading ...
Page is loading ...
Page is loading ...
Page is loading ...
Page is loading ...
Page is loading ...
Page is loading ...
Page is loading ...
Page is loading ...
Page is loading ...
Page is loading ...
Page is loading ...
Page is loading ...
Page is loading ...
Page is loading ...
Page is loading ...
Page is loading ...
Page is loading ...
Page is loading ...
Page is loading ...
Page is loading ...
Page is loading ...
Page is loading ...
Page is loading ...
Page is loading ...
Page is loading ...
Page is loading ...
Page is loading ...
Page is loading ...
Page is loading ...
Page is loading ...
-
 1
1
-
 2
2
-
 3
3
-
 4
4
-
 5
5
-
 6
6
-
 7
7
-
 8
8
-
 9
9
-
 10
10
-
 11
11
-
 12
12
-
 13
13
-
 14
14
-
 15
15
-
 16
16
-
 17
17
-
 18
18
-
 19
19
-
 20
20
-
 21
21
-
 22
22
-
 23
23
-
 24
24
-
 25
25
-
 26
26
-
 27
27
-
 28
28
-
 29
29
-
 30
30
-
 31
31
-
 32
32
-
 33
33
-
 34
34
-
 35
35
-
 36
36
-
 37
37
-
 38
38
-
 39
39
-
 40
40
-
 41
41
-
 42
42
-
 43
43
-
 44
44
-
 45
45
-
 46
46
-
 47
47
-
 48
48
-
 49
49
-
 50
50
-
 51
51
-
 52
52


Ask a question and I''ll find the answer in the document
Finding information in a document is now easier with AI
Related papers
Other documents
-
Currys Essentials C15DVDB10 Quick start guide
-
-
-
-
Goodmans GDR11 Quick start guide
-
-
Haier LE32F600C Owner's manual
-
-
Sandstrom S24FED12 User manual
-