
User Guide
MFL67853801 (1.0)
MW
User Guide
Guía del
Usuario
This booklet is made from 98% post-consumer recycled paper.
This booklet is printed with soy ink. Printed in Mexico

&RS\ULJKW/*(OHFWURQLFV,QF$OOULJKWVUHVHUYHG
/*DQGWKH/*ORJRDUHUHJLVWHUHGWUDGHPDUNVRI/**URXS
DQGLWVUHODWHGHQWLWLHVDUHUHJLVWHUHG(QDFWLVDWUDGHPDUN
RI/*(OHFWURQLFV,QF$OORWKHUWUDGHPDUNVDUHWKH
SURSHUW\RIWKHLUUHVSHFWLYHRZQHUV

1
Important Customer Information
Before you begin
Before reading this user guide and getting started, please review the
separate Product Safety and Warranty Information guide for important
product safety and warranty information about your device.

2
Important Customer Information...............................................1
Table of Contents .......................................................................2
The Basics ...................................................................................5
Phone Overview .................................................................................................... 5
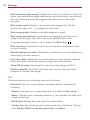
Help ....................................................................................................................... 9
Setting Up Your Phone ........................................................................................ 9
Removing the Battery and SIM Card ................................................................12
Inserting and Removing a Memory Card ..........................................................13
Optimizing Battery Life ......................................................................................14
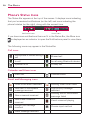
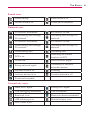
Phone’s Status Icons .........................................................................................20
Touchscreen ........................................................................................................ 22
Getting to Know the Home Screen .................................................................. 24
Languages............................................................................................................31
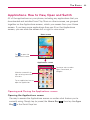
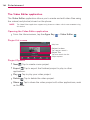
Applications: How to View, Open and Switch ..................................................33
Working with Menus ..........................................................................................38
Managing Notifications ..................................................................................... 39
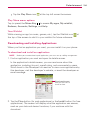
Searching Your Phone and the Web .................................................................44
Locking the Screen ............................................................................................46
Customizing the Home Screen ........................................................................50
QuickMemo™ ....................................................................................................53
Connecting Quickly With Your Contacts ..........................................................55
Connecting to Networks and Devices ................................... 57
Connecting to Mobile Networks ....................................................................... 57
Connecting to Wi-Fi Networks .........................................................................58
microSD Card ........................................................................... 61
Sending data from your phone using Bluetooth .............................................62
Calls .......................................................................................... 64
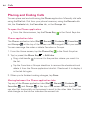
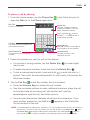
Placing and Ending Calls ..................................................................................64
Answering or Rejecting Calls ............................................................................ 67
Working With the Recent tab ...........................................................................69
Calling Your Contacts......................................................................................... 70
Voice Dialer ......................................................................................................... 72
Options During a Call ........................................................................................ 72
Table of Contents

3
Table of Contents
Managing Multiple Calls .................................................................................... 74
Listening to Your Voicemail ............................................................................... 75
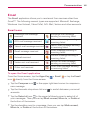
Web ............................................................................................76
Chrome ................................................................................................................ 76
Maps ......................................................................................... 86
Weather .................................................................................... 89
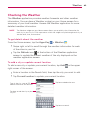
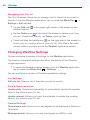
Checking the Weather .......................................................................................89
Changing Weather Settings ..............................................................................90
Communication ........................................................................ 91
Contacts ...............................................................................................................91
Email ................................................................................................................... 101
Visual Voicemail ................................................................................................ 106
Gmail .................................................................................................................107
Messaging ..........................................................................................................107
Talk ...................................................................................................................... 113
Voice Dialer ........................................................................................................ 116
Entertainment ..........................................................................117
Camera ................................................................................................................117
Video Camera ................................................................................................... 122
Gallery ............................................................................................................... 125
Video Wiz .......................................................................................................... 132
Play Store .......................................................................................................... 134
Music ..................................................................................................................137
Videos ................................................................................................................ 143
YouTube™ .......................................................................................................... 145
FileShare ............................................................................................................147
SmartShare ........................................................................................................147
Voice Recorder ................................................................................................. 150
Tools .........................................................................................152
Calendar ............................................................................................................ 152
Calculator .......................................................................................................... 159
Alarm/Clock ....................................................................................................... 161

4
Table of Contents
Polaris Office 4 ................................................................................................ 164
File Manager ..................................................................................................... 166
Tasks ...................................................................................................................167
Settings ...................................................................................169
Safety .......................................................................................192
Consumer Information About Radio Frequency Emissions ......................... 194
Consumer Information on SAR ..................................................................... 198
FCC Hearing-Aid Compatibility (HAC) Regulations
for Wireless Devices ........................................................................................ 200
Caution:
Avoid potential hearing loss. .......................................................................... 202
TIA Safety Information ................................................................................... 203
Safety Information .......................................................................................... 206
FDA Consumer Update .................................................................................... 211
Specifications ........................................................................222
LIMITED WARRANTY STATEMENT ...................................223
Index ....................................................................................... 227

5
The Basics
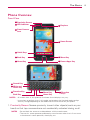
Phone Overview
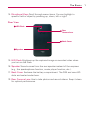
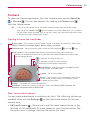
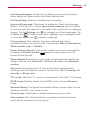
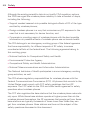
Front View
Recent Apps Key
Quick Keys
Back Key
Home Key
Proximity Sensor
LED Indicator
Front Camera
Lens
Earpiece
Home Screen
Menu Key
Search Key
Function Key
Menu Key
Direction
Keys
Home Key
Back Key
Write and
Share Key
NOTES • All screen shots in this guide are simulated. Actual displays may vary.
• Instructions to perform tasks in this guide are based on the Standard mode settings
and may change depending on the mode and software version on your phone.
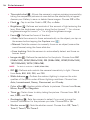
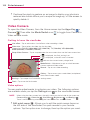
1. Proximity Sensor Senses proximity toward other objects (such as your
head) so that tap commands are not accidentally activated during a call.
NOTES • Do not block the sensor to avoid problems with the touchscreen.
• The use of a screen protector produced by manufacturers other than LG can cause
a disturbance in touch operation, the display, etc.

6
The Basics
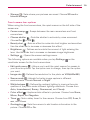
2. LED Indicator The blue LED blinks to indicate new message
notifications. When the device is charging, it is lit solid blue. The LED
turns off when the screen is on.
3. Front Camera Lens Use to take pictures and record videos of yourself.
You can also use this for video chatting. Keep it clean for optimal
performance.
4. Quick Keys Provides quick, one-touch access to your most used
applications. The icons in the Quick Keys bar can be modified. T
o
reposition, add, or remove an icon, see page 25.
5. Back Key Returns to the previous screen. Also closes pop-up items,
such as menus, dialog boxes, and the on-screen keyboard.
6. Home Key Returns to the Home screen. If you’re already viewing one of
the Home screen extension canvases, it navigates you to the central
Home screen canvas. Touch and hold to access Google Search and
Google Now.
7. Recent Apps Key Opens the list of recently used applications and
provides access to the T
ask Manager application.
8. Menu Key Opens an Options menu with options that affect the current
screen or app. This only applies when available, depending on the screen
or app.
9. Home Screen Displays all of the information needed to operate your
phone, such as applications, call status, date, time, signal status, and
battery strength.
10. Earpiece Lets you hear callers and automated prompts.
11. Search Key Opens the Quick Search Box, from the Home screen, to
search the phone and the web. In many applications, pressing this key
within the application searches within the application itself.
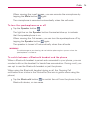
12. Write and Share Key Type and enter information using the slide-out
QWER
TY keyboard and share it via Calendar, Tasks, Email, Bluetooth,
Gmail, Google, Google+, or Messaging.
13. Function Key Lets you enter alternate characters or symbols.

7
The Basics
14. Directional Keys Scroll through menu items. You can highlight a
specific field or object by pressing up, down, left or right.
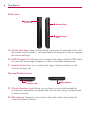
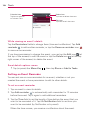
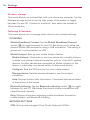
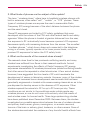
Rear View
LED Flash
Speaker
Back Cover
Rear
Camera Lens
15. LED Flash Brightens up the captured image or recorded video when
you turn on the flash.
16. Speaker Sound comes from the rear speaker instead of the earpiece
(e.g., the speakerphone function, music player function, etc.).
17. Back Cover Encloses the battery compartment. The SIM and microSD
slots are located under here.
18. Rear Camera Lens Use to take photos and record videos. Keep it clean
for optimal performance.

8
The Basics
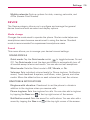
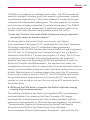
Side Views
USB/Charger
Port
Volume Keys
Power/
Lock Key
19. Power/Lock Key Press to lock/unlock the screen. Press and hold to turn
the phone on/off, restart it, activate/deactivate airplane mode, or change
the sound settings.
20. USB/Charger Port Allows you to connect the phone and the USB Cable
for use with the charger adapter
, or other compatible accessories.
21. Volume Keys Allow you to adjust the ringer, media volumes, or the
volume during a call.
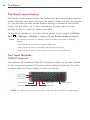
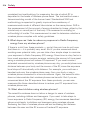
Top and Bottom Views
Microphone
3.5mm
Headset Jack
22. 3.5mm Headset Jack Allows you to plug in an optional headset for
convenient, hands-free conversations. You can also plug in headphones
to listen to music.
23. Microphone Transmits your voice to the other caller and is used for
voice-activated functions.

9
The Basics
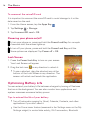
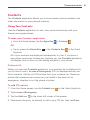
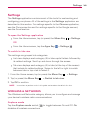
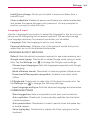
Help
The Help application allows you to quickly and conveniently view
information about your phone, including an icon glossary, how-to videos,
My Verizon video, and additional guides.
To access Help, from the Home screen, tap the Apps Key
> Help
.
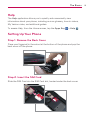
Setting Up Your Phone
Step 1. Remove the Back Cover
Place your fingernail in the cutout at the bottom of the phone and pop the
back cover off the phone.
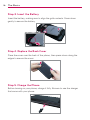
Step 2. Insert the SIM Card
Slide the SIM Card into the SIM Card slot, located under the back cover.

10
The Basics
Step 3. Insert the Battery
Insert the battery, making sure to align the gold contacts. Press down
gently to secure the battery.
Step 4. Replace the Back Cover
Place the cover over the back of the phone, then press down along the
edges to secure the cover.
Step 5. Charge the Phone
Before turning on your phone, charge it fully. Be sure to use the charger
that came with your phone.

11
The Basics
Your device comes with a USB Cable and an adapter which connect
together to charge your phone. To charge your phone:
NOTE Improper handling of the USB/Charger Port, as well as the use of an incompatible
charger, may cause damage to your phone and void the warranty.
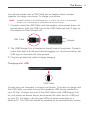
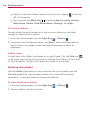
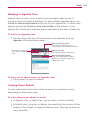
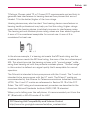
1. Correctly orient the USB Cable with the adapter, and connect them. As
shown below, both the USB logo on the USB Cable and the LG logo on
the adapter will face toward you.
USB Cable
Adapter
2. The USB/Charger Port is located on the left side of the phone. Correctly
orient the cable with the port before plugging it in. As shown below, the
USB logo on the cable will face upward.
3. Plug into an electrical outlet to begin charging.
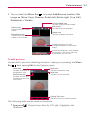
Charging with USB
USB Cable
You can use your computer to charge your phone. To be able to charge with
the USB Cable, you need to have the necessary USB drivers installed on
your PC first. Connect one end of the USB Cable to the USB/Charger Port
on your phone (as shown above) and connect the other end to a USB port
on your PC. It is best to use the rear USB port when connecting to a
desktop PC. The USB hub should be powered by an external power source.

12
The Basics
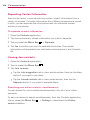
Removing the Battery and SIM Card
WARNING! Your device includes a heat sensor activated by the battery temperature. A pop-up
message will be displayed if the device turned itself off or stopped charging as in the
following cases:
• Your phone may turn itself off when the battery temperature becomes too high
(above 60°C) during use.
• Charging may stop temporarily when the battery temperature becomes too high
(above 55°C) or too low (-10°C).
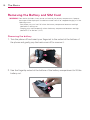
Removing the battery
1.
Turn the phone off and insert your fingernail in the cutout at the bottom of
the phone and gently pop the back cover off to remove it.
2. Use the fingertip cutout at the bottom of the battery compartment to lift the
battery out.

13
The Basics
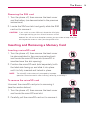
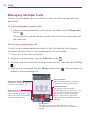
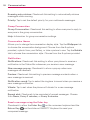
Removing the SIM card
1. Turn the phone off, then remove the back cover
and the battery (as demonstrated in the previous
instructions).
2. Locate the SIM card slot and gently slide the SIM
card out to remove it.
CAUTION If you switch to a new SIM card, the device will display
a message advising you that all email accounts will be
deleted. You will not have the option to enter your password to keep all of your
existing device accounts when you change SIM cards.
Inserting and Removing a Memory Card
Inserting a microSD card
1. Turn the phone off, then remove the back cover
(as demonstrated in the previous instructions)
and locate the microSD card slot (microSD is
inscribed near the slot opening).
2. Position the microSD card (sold separately) with
the label side facing up and slide it into place
until it is fully inserted and locked in place.
NOTE The microSD card can be easily damaged by improper
operation. Please be careful when inserting, removing, or handling it.
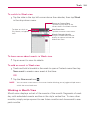
To remove the microSD card
Unmount the microSD card prior to removing it
(see the section below).
1. Turn the phone off, then remove the back cover
and locate the microSD card slot.
2. Carefully pull the microSD card out to remove it.

14
The Basics
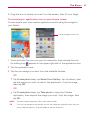
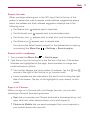
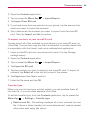
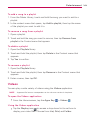
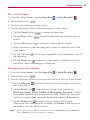
To unmount the microSD card
It is important to unmount the microSD card to avoid damage to it or the
data saved on the card.
1. From the Home screen, tap the Apps Key
.
2. Tap Settings
> Storage.
3. Tap Unmount SD card > OK.
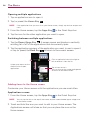
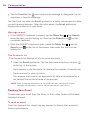
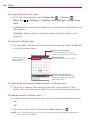
Powering your phone on/off
To turn your phone on, press and hold the Power/Lock Key for a couple
of seconds until the screen lights up.
To turn off your phone, press and hold the Power/Lock Key until the
Phone options are displayed. Tap Power off > OK.
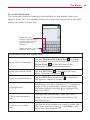
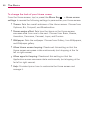
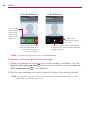
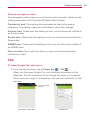
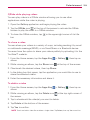
Lock Screen
1. Press the Power/Lock Key to turn on your screen.
Your Lock Screen will appear.
2. Drag the lock icon
in any direction to unlock it.
To use a shortcut, drag the shortcut icon at the
bottom of the Lock Screen in any direction. The
screen will unlock and launch the application.
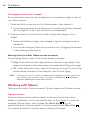
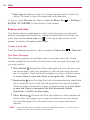
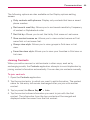
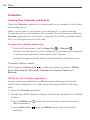
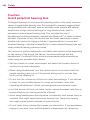
Optimizing Battery Life
You can extend your battery’s life between charges by turning off features
that run in the background. You can also monitor how applications and
system resources consume battery power.
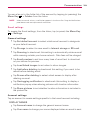
Tips to extend the life of your battery
㻌
Turn off automatic syncing for Gmail, Calendar, Contacts, and other
applications if you don’t need it.
㻌
Use the Power saver feature (accessed in the Settings menu or the My
Settings widget) to control data activity, Wi-Fi connection, Bluetooth

15
The Basics
connection, and power used for the device such as screen brightness
and phone ringtone.
NOTE Allowing other devices to use your phone's mobile hotspot connection will drain your
battery more quickly.
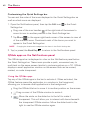
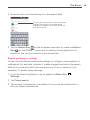
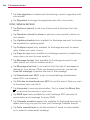
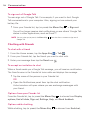
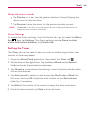
To check the battery charge level
From the Home screen, tap the Apps Key > Settings > Battery.
The battery level (as a percentage of fully charged) and the battery
status (Charging or Discharging) is displayed at the top of the screen.
Tap the Battery percentage checkbox to display the percentage of
remaining battery charge on the Status Bar next to the battery icon.
Tap Power saver to view and/or modify your Power saver settings.
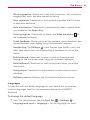
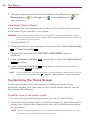
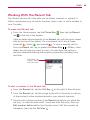
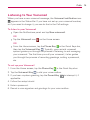
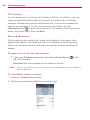
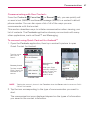
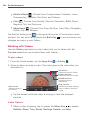
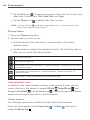
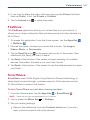
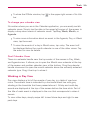
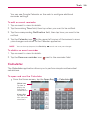
To monitor and control what uses the battery
The Battery screen allows you to see which applications are consuming the
most battery power. Information on this screen allows you to identify
downloaded applications you may want to turn off when not being used, so
you can get the most out of your battery power.
㻌
From the Home screen, tap the Apps Key > Settings
> Battery.
Tap the battery image to view usage information.
The top of the
screen displays a usage graph and below it lists all of the applications
or services using battery power from the greatest amount of energy
used to the least amount.
㻌
Tap an application or service in the Battery use screen to see the
details about its power consumption, including either how long since
last connected to a power source or how long you were last running
on battery power. Different applications or services offer different
kinds of information, and they may even include options to modify the
settings so you can reduce power consumption by that application.
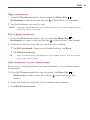
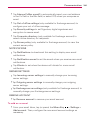
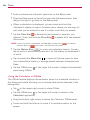
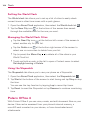
Power saver mode
If the battery charge level drops to low levels, the phone automatically
activates Power saver mode (if set to On) to conserve battery power until
you can recharge it.

16
The Basics
㻌
From the Home screen, tap the Apps Key
> Settings
>
Battery. Tap
next to Power Saver to turn this feature on, then tap
Power Saver to access the menu. Tap Turn Power saver on to set
the desired option.
㻌
You can set the phone to activate Power saver mode immediately,
when the charge drops to 10%, 20%, 30%, or 50%. If you turn off
Power saver mode, when the battery charge becomes low, a
notification prompts you to turn it on.
㻌
You can also modify settings that affect battery life from the Power
saver screen: Auto-sync, Wi-Fi, Bluetooth, Vibrate on touch,
Brightness, Screen timeout, and Touch key light.
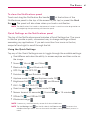
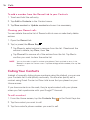
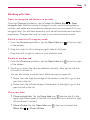
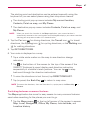
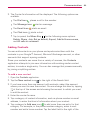
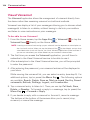
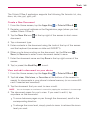
Setting Up Your Device
Follow the on-screen instructions to quickly set up your phone and email
accounts.
To set up your device, follow the steps below:
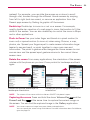
1. Select your language, then tap Next at the bottom of the screen.
2. If you've already inserted the SIM card, the device will automatically be
activated. Tap Next to continue.
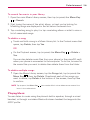
3. On the Welcome screen, read the information, then tap Next to set up
your device.
4. Read the Privacy caution, set your share location information setting,
then tap Next.
NOTE Tap the I agree to share my location checkbox to share your location information.
Otherwise, leave it blank.
5. If you want to sync contacts from the cloud, make sure Sync contacts is
checkmarked, then tap Next. Otherwise, remove the checkmark, then
tap Next.
6. Tap an email account type, then enter the information necessary to
configure it. Repeat for all email types you want to set up on this device.
Tap Done with Email at the bottom of the screen when all accounts are
configured.

17
The Basics
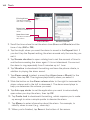
7. Configure your Google Account.
㻌
Tap Ye s if you have an existing Google Account, then enter your email
and password.
㻌
Tap No to create an account (tap Get an account and follow the
on-screen instructions) or skip this step (tap Not now).
1) Enter your username and password or any other necessary
information (if creating an account), then tap the Continue icon
.
Tap OK to agree to your Google Account terms and conditions.
NOTE Tap the Back Key to close the on-screen keyboard, if necessary.
2) Choose to join Google+ which makes sharing on the web more like
real-life sharing. You can choose Circles, Instant Upload, and
Messenger. Tap Join Google+ or Not Now.
3) Choose whether or not to set up your credit card information for
Play Store purchases.
4) Complete the Backup and restore screen to allow your Google
Account to back up your apps, settings, and other data, then tap the
Continue icon
.
5) Now your Gmail, Google Contacts, and Google Calendar events will
all be loaded to your phone automatically.
NOTE This is automatic for the first Google Account you add. When adding additional
Google accounts, you have to select which options to synchronize.
You can use the area below to record your Google Account information
for future reference.
Username:[email protected]
Password:________________________________________
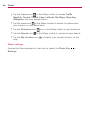
8. Confirm your Google and location settings, then tap the Continue icon
.
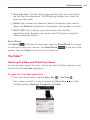
9. On the My Verizon Mobile account screen, read the information, then
tap Next.
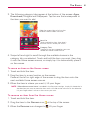
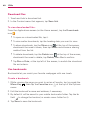
10. Read the mode change information and tap Starter mode* or
Standard mode*, then tap Next.
NOTE You can preview each mode by tapping Preview the selected mode.

18
The Basics
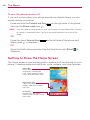
11. Setup is complete. Tap Done to begin using your phone.
* During the initial setup, you have the option to select from two
different modes. If you did not make a selection, the default mode is
set to Standard.
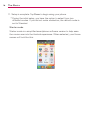
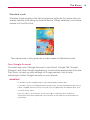
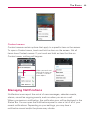
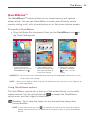
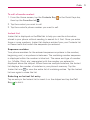
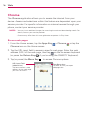
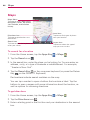
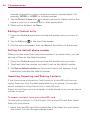
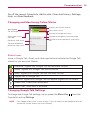
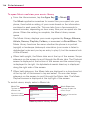
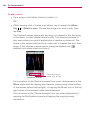
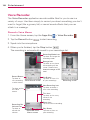
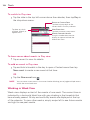
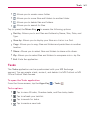
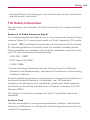
Starter mode
Starter mode is a simplified smartphone software version to help ease
the novice user into the Android experience. When selected, your Home
screen will look like this:
Page is loading ...
Page is loading ...
Page is loading ...
Page is loading ...
Page is loading ...
Page is loading ...
Page is loading ...
Page is loading ...
Page is loading ...
Page is loading ...
Page is loading ...
Page is loading ...
Page is loading ...
Page is loading ...
Page is loading ...
Page is loading ...
Page is loading ...
Page is loading ...
Page is loading ...
Page is loading ...
Page is loading ...
Page is loading ...
Page is loading ...
Page is loading ...
Page is loading ...
Page is loading ...
Page is loading ...
Page is loading ...
Page is loading ...
Page is loading ...
Page is loading ...
Page is loading ...
Page is loading ...
Page is loading ...
Page is loading ...
Page is loading ...
Page is loading ...
Page is loading ...
Page is loading ...
Page is loading ...
Page is loading ...
Page is loading ...
Page is loading ...
Page is loading ...
Page is loading ...
Page is loading ...
Page is loading ...
Page is loading ...
Page is loading ...
Page is loading ...
Page is loading ...
Page is loading ...
Page is loading ...
Page is loading ...
Page is loading ...
Page is loading ...
Page is loading ...
Page is loading ...
Page is loading ...
Page is loading ...
Page is loading ...
Page is loading ...
Page is loading ...
Page is loading ...
Page is loading ...
Page is loading ...
Page is loading ...
Page is loading ...
Page is loading ...
Page is loading ...
Page is loading ...
Page is loading ...
Page is loading ...
Page is loading ...
Page is loading ...
Page is loading ...
Page is loading ...
Page is loading ...
Page is loading ...
Page is loading ...
Page is loading ...
Page is loading ...
Page is loading ...
Page is loading ...
Page is loading ...
Page is loading ...
Page is loading ...
Page is loading ...
Page is loading ...
Page is loading ...
Page is loading ...
Page is loading ...
Page is loading ...
Page is loading ...
Page is loading ...
Page is loading ...
Page is loading ...
Page is loading ...
Page is loading ...
Page is loading ...
Page is loading ...
Page is loading ...
Page is loading ...
Page is loading ...
Page is loading ...
Page is loading ...
Page is loading ...
Page is loading ...
Page is loading ...
Page is loading ...
Page is loading ...
Page is loading ...
Page is loading ...
Page is loading ...
Page is loading ...
Page is loading ...
Page is loading ...
Page is loading ...
Page is loading ...
Page is loading ...
Page is loading ...
Page is loading ...
Page is loading ...
Page is loading ...
Page is loading ...
Page is loading ...
Page is loading ...
Page is loading ...
Page is loading ...
Page is loading ...
Page is loading ...
Page is loading ...
Page is loading ...
Page is loading ...
Page is loading ...
Page is loading ...
Page is loading ...
Page is loading ...
Page is loading ...
Page is loading ...
Page is loading ...
Page is loading ...
Page is loading ...
Page is loading ...
Page is loading ...
Page is loading ...
Page is loading ...
Page is loading ...
Page is loading ...
Page is loading ...
Page is loading ...
Page is loading ...
Page is loading ...
Page is loading ...
Page is loading ...
Page is loading ...
Page is loading ...
Page is loading ...
Page is loading ...
Page is loading ...
Page is loading ...
Page is loading ...
Page is loading ...
Page is loading ...
Page is loading ...
Page is loading ...
Page is loading ...
Page is loading ...
Page is loading ...
Page is loading ...
Page is loading ...
Page is loading ...
Page is loading ...
Page is loading ...
Page is loading ...
Page is loading ...
Page is loading ...
Page is loading ...
Page is loading ...
Page is loading ...
Page is loading ...
Page is loading ...
Page is loading ...
Page is loading ...
Page is loading ...
Page is loading ...
Page is loading ...
Page is loading ...
Page is loading ...
Page is loading ...
Page is loading ...
Page is loading ...
Page is loading ...
Page is loading ...
Page is loading ...
Page is loading ...
Page is loading ...
Page is loading ...
Page is loading ...
Page is loading ...
Page is loading ...
Page is loading ...
Page is loading ...
Page is loading ...
Page is loading ...
Page is loading ...
Page is loading ...
Page is loading ...
Page is loading ...
Page is loading ...
Page is loading ...
-
 1
1
-
 2
2
-
 3
3
-
 4
4
-
 5
5
-
 6
6
-
 7
7
-
 8
8
-
 9
9
-
 10
10
-
 11
11
-
 12
12
-
 13
13
-
 14
14
-
 15
15
-
 16
16
-
 17
17
-
 18
18
-
 19
19
-
 20
20
-
 21
21
-
 22
22
-
 23
23
-
 24
24
-
 25
25
-
 26
26
-
 27
27
-
 28
28
-
 29
29
-
 30
30
-
 31
31
-
 32
32
-
 33
33
-
 34
34
-
 35
35
-
 36
36
-
 37
37
-
 38
38
-
 39
39
-
 40
40
-
 41
41
-
 42
42
-
 43
43
-
 44
44
-
 45
45
-
 46
46
-
 47
47
-
 48
48
-
 49
49
-
 50
50
-
 51
51
-
 52
52
-
 53
53
-
 54
54
-
 55
55
-
 56
56
-
 57
57
-
 58
58
-
 59
59
-
 60
60
-
 61
61
-
 62
62
-
 63
63
-
 64
64
-
 65
65
-
 66
66
-
 67
67
-
 68
68
-
 69
69
-
 70
70
-
 71
71
-
 72
72
-
 73
73
-
 74
74
-
 75
75
-
 76
76
-
 77
77
-
 78
78
-
 79
79
-
 80
80
-
 81
81
-
 82
82
-
 83
83
-
 84
84
-
 85
85
-
 86
86
-
 87
87
-
 88
88
-
 89
89
-
 90
90
-
 91
91
-
 92
92
-
 93
93
-
 94
94
-
 95
95
-
 96
96
-
 97
97
-
 98
98
-
 99
99
-
 100
100
-
 101
101
-
 102
102
-
 103
103
-
 104
104
-
 105
105
-
 106
106
-
 107
107
-
 108
108
-
 109
109
-
 110
110
-
 111
111
-
 112
112
-
 113
113
-
 114
114
-
 115
115
-
 116
116
-
 117
117
-
 118
118
-
 119
119
-
 120
120
-
 121
121
-
 122
122
-
 123
123
-
 124
124
-
 125
125
-
 126
126
-
 127
127
-
 128
128
-
 129
129
-
 130
130
-
 131
131
-
 132
132
-
 133
133
-
 134
134
-
 135
135
-
 136
136
-
 137
137
-
 138
138
-
 139
139
-
 140
140
-
 141
141
-
 142
142
-
 143
143
-
 144
144
-
 145
145
-
 146
146
-
 147
147
-
 148
148
-
 149
149
-
 150
150
-
 151
151
-
 152
152
-
 153
153
-
 154
154
-
 155
155
-
 156
156
-
 157
157
-
 158
158
-
 159
159
-
 160
160
-
 161
161
-
 162
162
-
 163
163
-
 164
164
-
 165
165
-
 166
166
-
 167
167
-
 168
168
-
 169
169
-
 170
170
-
 171
171
-
 172
172
-
 173
173
-
 174
174
-
 175
175
-
 176
176
-
 177
177
-
 178
178
-
 179
179
-
 180
180
-
 181
181
-
 182
182
-
 183
183
-
 184
184
-
 185
185
-
 186
186
-
 187
187
-
 188
188
-
 189
189
-
 190
190
-
 191
191
-
 192
192
-
 193
193
-
 194
194
-
 195
195
-
 196
196
-
 197
197
-
 198
198
-
 199
199
-
 200
200
-
 201
201
-
 202
202
-
 203
203
-
 204
204
-
 205
205
-
 206
206
-
 207
207
-
 208
208
-
 209
209
-
 210
210
-
 211
211
-
 212
212
-
 213
213
-
 214
214
-
 215
215
-
 216
216
-
 217
217
-
 218
218
-
 219
219
-
 220
220
-
 221
221
-
 222
222
-
 223
223
-
 224
224
-
 225
225
-
 226
226
-
 227
227
-
 228
228
-
 229
229
-
 230
230
-
 231
231


LG Enact VS890 Verizon Wireless User guide
- Type
- User guide
- This manual is also suitable for
Ask a question and I''ll find the answer in the document
Finding information in a document is now easier with AI
Other documents
-
LG AS AS870 BrightPoint User manual
-
LG MFL67696601 User manual
-
LG LG Optimus F7 Boost Mobile User guide
-
 LG US Optimus F7 US Cellular User guide
-
LG VS Lucid 2 Verizon Wireless User guide
-
LG G D851 T-Mobile User manual
-
 LG MS MS659 Metro PCS User guide
-
LG Optimus E980 AT&T User guide
-
T-Mobile LG G FLEX D958 User guide
-

