Page is loading ...

VL-AH50H/hyou; 00/8/28/18:00
Printed in Malaysia
TINSE0379TAZZ
T2449-A
0P06-M-G
LIQUID CRYSTAL DISPLAY CAMCORDER
OPERATION MANUAL
MODEL
VL
-
AH50H
SHARP CORPORATION
SHARP ELECTRONICS (U.K.) LTD.
Sharp House, Thorp Road, Newton Heath
Manchester M40 5BE
PAL
References
Preparation
Basic Operations
Playback
Useful Features
Operation Summary
Basic Operations
Camera Recording
Advanced Features
Please read this operation manual
carefully before using the VIEWCAM.
If you require any advice or assistance
regarding your Sharp product, please
visit our web-site www.sharp.co.uk/
support. Customers without Internet
access may telephone 08705 274277
during office hours (or (01)676 0648
if telephoning from Ireland) .

This equipment complies with the requirements of Directives 89/336/EEC and 73/23/EEC as
amended by 93/68/EEC.
Dieses Gerät entspricht den Anforderungen der EG-Richtlinien 89/336/EWG und 73/23/EWG
mit Änderung 93/68/EWG.
Ce matériel répond aux exigences contenues dans les directives 89/336/CEE et 73/23/CEE
modifiées par la directive 93/68/CEE.
Dit apparaat voldoet aan de eisen van de richtlijnen 89/336/EEG en 73/23/EEG, gewijzigd
door 93/68/EEG.
Dette udstyr overholder kravene i direktiv nr. 89/336/EEC og 73/23/EEC med tillæg nr. 93/68/
EEC.
Quest’ apparecchio è conforme ai requisiti delle direttive 89/336/EEC e 73/23/EEC, come
emendata dalla direttiva 93/68/EEC.
« „ͷًÛÙ·ÛÁ ·ıÙfi ·ÌÙ·ÔÍÒflÌÂÙ·È ÛÙÈÚ ··ÈÙfiÛÂÈÚ Ù˘Ì Ô‰Á„È˛Ì ÙÁÚ EıÒ˘·˙ÍfiÚ
EÌ˘ÛÁÚ 89/336/EOK Í·È 73/23/EOK, ¸˘Ú ÔÈ Í·ÌÔÌÈÛÏÔfl ·ıÙÔfl ÛıÏÎÁÒ˛ËÁÍ·Ì ·¸
ÙÁÌ Ô‰Á„fl· 93/68/EOK.
Este equipamento obedece às exigências das directivas 89/336/CEE e 73/23/CEE, na sua
versão corrigida pela directiva 93/68/CEE.
Este aparato satisface las exigencias de las Directivas 89/336/CEE y 73/23/CEE, modificadas
por medio de la 93/68/CEE.
Denna utrustning uppfyller kraven enligt riktlinjerna 89/336/EEC och 73/23/EEC så som
kompletteras av 93/68/EEC.
Dette produktet oppfyller betingelsene i direktivene 89/336/EEC og 73/23/EEC i endringen 93/
68/EEC.
Tämä laite täyttää direktiivien 89/336/EEC ja 73/23/EEC vaatimukset, joita on muutettu
direktiivillä 93/68/EEC.
VL-AH50H/tobira 1 00/2/14/18:00 PageMaker 5.0J
WARNING
TO PREVENT SHOCK HAZARD, DO
NOT EXPOSE THIS APPLIANCE TO
RAIN OR MOISTURE.
This equipment should be used with the
recommended AC adapter or battery pack.
CAUTION
To prevent electric shocks and fire hazards,
do NOT use any other power source.
CAUTION
To prevent shock, do not open the cabinet.
No user serviceable parts inside. Refer
servicing to a qualified dealer or service
centre.
Important:
Recording and playback of any material may
require consent. Please refer particularly to the
provisions of the Copyright Act 1956, the
Dramatic and Musical Performers Protection
Act 1958, the Performers Protection Acts 1963
and 1972 and to any subsequent statutory
enactments and orders.
Power supply:
WARNING: THIS AC ADAPTER IS NOT
FOR USE WITH TOYS. THIS AC ADAPTER
IS FOR USE WITH SHARP VIEWCAM
MODEL VL-AH50H ONLY.
This unit can be operated by connecting it
to either the AC adapter or battery pack.
The AC adapter incorporates the AUTO
VOLTAGE (AC 110–240 V, 50/60 Hz)
function.

VL-AH50H/tobira 2; 00/2/14/18:00
G. K. Associates, Tokyo
SPECIAL NOTE FOR USERS IN THE U.K.
The mains lead of this product is fitted with a non-rewireable (moulded) plug incorporating a
3A fuse. Should the fuse need to be replaced, a BSI or ASTA approved BS 1362 fuse marked
or and of the same rating as above, which is also indicated on the pin face of the plug,
must be used.
Always refit the fuse cover after replacing the fuse. Never use the plug without the fuse cover
fitted.
In the unlikely event of the socket outlet in your home not being compatible with the plug
supplied, cut-off the mains plug and fit an appropriate type.
DANGER: The fuse from the cut-off plug should be removed and the cut-off plug destroyed
immediately and disposed of in a safe manner.
Under no circumstances should the cut-off plug be inserted elsewhere into a 13A
socket outlet, as a serious electric shock may occur.
To fit an appropriate plug to the mains lead, follow the instructions below:
IMPORTANT: The wires in the mains lead are coloured in accordance with the following code:
Blue: Neutral
Brown: Live
As the colours of the wires in the mains lead of this product may not correspond with the
coloured markings identifying the terminals in your plug, proceed as follows:
— The wire which is coloured blue must be connected to the plug terminal which is marked N
or coloured black.
— The wire which is coloured brown must be connected to the plug terminal which is marked
L or coloured red.
Ensure that neither the brown nor the blue wire is connected to the earth terminal in your three-
pin plug.
Before replacing the plug cover make sure that:
— If the new fitted plug contains a fuse, its value is the same as that removed from the cut-off
plug.
— The cord grip is clamped over the sheath of the mains lead and not simply over the lead
wires.
IF YOU HAVE ANY DOUBT, CONSULT A QUALIFIED ELECTRICIAN.
This VIEWCAM does not have a PCM recording or playback function. PCM recordings made
using other VCRs or audio dubbing cannot be played back on this unit.
NOTE:
The VIEWCAM’s LCD panel is a very high technology product with close to 90,000 thin-film
transistors*, giving you fine picture detail. Occasionally, a pixel may appear on the screen as a
fixed point of blue, green, red, or black. Please note that this does not affect your VIEWCAM’s
performance.
If you record on a tape on which PCM sound has already been recorded, the audio track of the
new VIEWCAM recording may not come out if the tape is played back on a PCM-capable VCR.
If this occurs, set the VCR’s audio monitor select switch to the “Standard” position.
*Specifications are subject to change without notice.
Your VIEWCAM is designed to record in SP mode only. It will not perform normal playback for
programmes prerecorded in LP mode.

VL-AH50H/pp. i-iv; 00/3/24/18:00
G. K. Associates, Tokyo
i
Precautions
• When the VIEWCAM is not in use,
remember to remove the cassette tape,
turn off the power, and disconnect the
VIEWCAM from the power source.
• Do not aim the lens at the sun.
Do not allow direct sunlight to strike the
VIEWCAM lens or LCD monitor screen,
whether or not recording is in progress, as it
may damage the CCD sensor or LCD screen
surface. Be particularly careful when
recording outside.
• When shooting in dark places, avoid sudden
brightly lit objects or light sources, such as
the sun. Otherwise, the image may white out.
Should this happen, point the lens in a
different direction until the picture returns to
normal.
• Avoid magnetic
sources.
Using the VIEWCAM
near strong fluorescent
lights, motors,
televisions, or other
magnetic sources may adversely affect
recorded images.
• Using the VIEWCAM near a broadcasting
station or other powerful transmission
source may cause buzzing or picture
deterioration.
• Avoid shocks and
dropping.
Do not drop or otherwise
subject the VIEWCAM to hard
shocks or strong vibrations.
Bumping or striking the unit
during recording will
generate noise in the
recorded image.
• Avoid placing the
VIEWCAM in close
proximity to lighting
equipment.
The heat from
incandescent lights
may deform the
VIEWCAM, or cause it
to malfunction.
• Always respect prohibitions or restrictions
on the use of electronic equipment on
commercial flights or in other sensitive
areas.
• Be aware of the temperature and humidity.
You can use your VIEWCAM at 0⬚C to
Ⳮ40⬚ C, and at 30% to 80% relative humidity.
Do not store the unit in an unventilated car in
the summer, in direct
sunlight, or near strong
heat sources; this can
result in severe damage
to the unit casing and
circuitry.
• Avoid situations where water, sand, dust or
other foreign matter could get on or inside
the VIEWCAM, and do not use or leave
your VIEWCAM in areas with excessive
smoke, steam or moisture.
Such environments can
cause malfunctions or
cause mildew to form
on the lenses. Be sure
to keep the unit in a
well-ventilated location.
• Some small, portable
tripods may be difficult to
attach and may not be
sturdy enough to support
your VIEWCAM. Be sure to
use only a strong, stable
tripod.
• When using your VIEWCAM in a cold
environment, the LCD monitor screen often
appears less bright immediately after the
power is turned on. This is not a
malfunction. To prevent the VIEWCAM from
becoming too cold, wrap it in a thick cloth
(a blanket, etc.).

VL-AH50H/pp. i-iv; 00/3/24/18:00
G. K. Associates, Tokyo
ii
About Your VIEWCAM
Recording Format
Hi8 is a high-performance extension of the
ordinary 8 mm format. It uses advanced
technology to achieve even higher resolution
and picture quality. Use a video cassette with
the mark for high-quality recording and
playback, or with the mark to enjoy ordinary
8 mm recording and playback.
• When you load a Hi8 tape, recording is in Hi8
format. (The indicator appears on the
LCD screen.) When you load a normal 8 mm
tape, recording is in ordinary 8 mm format.
(The indicator does not appear.)
• During playback, the recorded format is
automatically detected.
• Video equipment not for use with Hi8 is
unable to play back a tape recorded in Hi8
format.
• If you want to record with a Hi8 tape in normal
8 mm format, set the menu item to
“OFF” on the (MENU 2) screen (Camera
mode) before recording. (See page 23 for
operation of the menu screen.)
LCD Monitor Screen
The VIEWCAM is equipped with a large LCD
monitor screen that allows you to record
scenes while comfortably holding the
camcorder. The LCD monitor screen can be
rotated for easy recording at high or low
angles. It also functions as a handy playback
monitor so you can enjoy what you have just
recorded.
Cautions:
• Do not apply pressure to the screen.
• Do not expose the screen to shocks, as it may
break.
• Do not place the VIEWCAM with the screen
facing down.
Note:
• Use a soft cloth to clean the screen.

VL-AH50H/pp. i-iv; 00/3/24/18:00
G. K. Associates, Tokyo
iii
Supplied Accessories
Battery pack
BT-H22 AC adapter Infrared remote control
CR2025 type
lithium battery Shoulder strap Lens cap
AA battery for
remote control ⳯ 2
Audio/video cable
Power cord
Sun hood

VL-AH50H/pp. i-iv; 00/3/24/18:00
G. K. Associates, Tokyo
iv
Optional Accessories
Extended type
battery pack
BT-H32
Standard type
battery pack
BT-H22
Accessory
shoe adapter
VR-30AD
Soft case
Tripod adapter
for 180° recording
VR-33FA

VL-AH50H/pp. 001-004; 00/2/14/18:00
G. K. Associates, Tokyo
1
Contents
Preparation
Basic Operations
Operation Summary Part Names .......................................................... 3
On-screen Display Index ..................................... 5
Quick Reference Index ........................................ 6
Warning Indicators ............................................... 7
Inserting and Removing the Battery Pack ........... 8
Charging the Battery Pack ................................... 9
Powering the VIEWCAM from an AC Outlet......... 10
Inserting and Removing a Cassette .................. 11
Installing the Lithium Memory Battery ................ 12
Setting the Date and Time ................................. 13
Using the Hand Strap and the Lens Cap........... 14
Attaching the Shoulder Strap ............................. 14
Using the Sun Hood ........................................... 15
Camera Recording
Easy Camera Recording with Full Auto Mode ... 16
Zooming ............................................................. 17
Tips on Recording Positions .............................. 17
Remaining Recording Time Display .................. 18
Remaining Battery Power Display ..................... 18
Playback
Playback ............................................................ 19
Volume Control ................................................... 19
Watching the Playback on a TV ......................... 20
Video Search ...................................................... 21
Still...................................................................... 21
Slow.................................................................... 21

VL-AH50H/pp. 001-004; 00/2/14/18:00
G. K. Associates, Tokyo
2
Operations of the On-screen Controls
Using the Control Buttons............................... 22
Selecting the Mode/Menu Screens ................ 22
Adjusting the Menu Settings........................... 23
Recording the Date and Time ............................ 24
Setting the Digital Zoom..................................... 25
Digital Quick Zoom (Extend Zoom).................... 26
Still Recording .................................................... 27
Strobe Recording ............................................... 28
Digital Image Stabilization (DIS) ........................ 28
Fade In and Fade Out ........................................ 29
Quick Review ..................................................... 30
Quick Return ...................................................... 31
Edit Search......................................................... 31
Gamma Brightness Compensation .................... 32
Gain-up (Cat’s Eye) ............................................ 33
Wide Screen (16:9) ........................................... 34
Macro Shots ....................................................... 34
Removing the Lens Hood .................................. 34
Self Recording ................................................... 35
Setting the VIEWCAM to Full Auto Mode ........... 37
Program Search ................................................. 38
Tape Counter Feature ........................................ 39
Using the Remote Control .................................. 41
Useful Features
References
Preparation
Basic Operations
Playback
Useful Features
Basic Operations
Camera Recording
Advanced Features
Operation Summary
Advanced Features
Digital Picture Effects ......................................... 42
Scene Menu (Program AE) ................................ 43
Superimposing a Title ........................................ 44
Changing the Preset Titles ................................. 45
Auto/Manual Focus ............................................ 46
White Balance Lock ........................................... 47
Manual Exposure ............................................... 48
Digital Dual Picture ............................................ 49
Picture/Backlight Adjustments ........................... 51
Gamma Playback............................................... 52
Turning Off the LCD Monitor Backlight .............. 52
Editing ................................................................ 53
References Useful Information .............................................. 54
Demonstration Mode.......................................... 58
Before Requesting Service ................................ 59
Specifications..................................................... 61

VL-AH50H/pp. 001-004; 00/2/14/18:00
G. K. Associates, Tokyo
3
Part Names
For details on the use of each part, refer to the page number indicated in the
brackets.
Front view
When the cassette compartment door is open
Operation Summary
Terminal cover
Microphone
Zoom lens
Speaker
VIDEO jack [pp. 20, 53]
DC IN jack [pp. 9, 10]
Shoulder strap loop
[p. 14]
Lithium battery holder
[p. 12]
Cassette holder [p. 11]
Lens hood [p. 34]
Cassette compartment door
release [p. 11]
Cassette compartment door
[p. 11]
Operation Summary
AUDIO jack [pp. 20, 53]

VL-AH50H/pp. 001-004; 00/2/14/18:00
G. K. Associates, Tokyo
4
Rear view
Bottom view
Battery compartment door
[p. 8]
Operation Summary
Power Zoom Wide angle/
Telephoto control [p. 17]
VOLume control [p. 19]
DISPLAY button [p. 22]
Operation buttons [p. 22]
CHARGE indicator
[p. 9]
MENU button
[p. 22]
Remote sensor
[p. 41]
LCD monitor screen
RECord START/STOP button [p. 16]
Shoulder strap
loop [p. 14]
DUAL/SNAP button
[pp. 27, 49, 50]
Hand strap [p. 14]
Tripod socket
Battery compartment door release
[p. 8]
Power switch (CAMERA/VCR
select switch) [pp. 16, 19]

VL-AH50H/pp. 005-007; 00/3/24/18:00
G. K. Associates, Tokyo
Operation Summary
Operation Summary
5
REW PLAY STOP ST I LLFF
NTER
COU
-
EFF.
GAMA
ARCH
SE
-
GAMA
REW
QK
EFF
PIC
TEND FADE
EX
-
EFF
SUREFOCUS
BAL.
WHI TE EXPO
TLE
TI
-
TURN
RE
-
16 9
MENU
SCENE
COU
-
NTER
ST
-
ROBE
MENU
TURE
PIC
-
SET
ED I T
REMOTE
OFF
ON
AUTO
MENU
DATE
DI SPLAY OFF
SETT ING
12H 24H
SELECT DATE TIME
+
TIME/
/
3
MENU 2
MENU
DIS
DUAL / SNAP
OFF
DGTL ZOOM OFF
EXTEND 2X
DUAL
1
PAGETURE
PIC
-
SET
FADE
REMOTE
NORMAL
ON
DEMO MODE OFF
AUTO
24H
1
000
1 2000
On-screen Display Index
For details on the use of each function, refer to the page number indicated.
p. 42
p. 44
p. 46
p. 31
p. 38
p. 21
VCR Mode
Camera Mode
Note: See pages 22 and 23 for the procedure to display the desired screen.
p. 26
p. 28
p. 29
p. 30
p. 39
p. 48
p. 47
p. 43
p. 34
p. 26
pp. 27, 49
p. 13
p. 24
p. 25
p. 28
p. 51
p. 41
p. ii
p. 53
p. 39
p. 52
p. 19
pp. 32, 33
p. 51
p. 41
p. ii
p. 29
p. 58

VL-AH50H/pp. 005-007; 00/3/24/18:00
G. K. Associates, Tokyo
Operation Summary
6
Quick Reference Index
This index lists some example uses of the VIEWCAM’s features.
• To record with a Hi8 tape in normal 8 mm format.
—See page ii ( Recording Format)
• To record powerful close-up images.
—See page 25 (Setting the Digital Zoom)
• To instantly zoom in on a subject.
—See page 26 (Digital Quick Zoom)
• To quickly check what you have just recorded.
—See page 30 (Quick Review)
• To quickly return the tape to the end of the last recorded scene after playback.
—See page 31 (Quick Return)
• To locate the point on the tape where to begin recording while in Camera mode.
—See page 31 (Edit Search)
• To record a backlit subject.
—See page 32 (Gamma Brightness Compensation) or page 48 (Manual
Exposure)
• To record in a dark or poorly-illuminated location.
—See page 33 (Gain-up)
• To record yourself while monitoring the shot.
—See page 35 (Self Recording)
• To record a short video message for somebody.
—See page 36 (Self-recording Message)
• To find the beginning of a recorded scene to be played back.
—See page 38 (Program Search)
• To display the elapsed recording or playback time.
—See page 39 (Tape Counter Feature)
• To focus on an off-centred subject.
—See page 46 (Manual Focus)
• To record an inset picture within the main picture.
—See page 49 (Digital Dual Picture)
• To increase the brightness of the subject during playback.
—See page 52 (Gamma Playback)
Operation Summary

VL-AH50H/pp. 005-007; 00/3/24/18:00
G. K. Associates, Tokyo
Operation Summary
Operation Summary
7
Warning Indicators
The video cassette is defective and should be
removed (see page 11).
Dew has formed inside the VIEWCAM. Wait for a few
hours until the dew disappears (see page 55).
About 10 seconds after this warning appears, the
VIEWCAM automatically turns off.
The battery is almost depleted. Replace it with a
fully charged battery pack (see page 8).
The video heads are clogged and should be
cleaned (see page 55).
There is no video cassette in the VIEWCAM. Insert a
cassette (see page 11).
The erasure protect tab on the video cassette has
been slid to the record-protect position, preventing
recording (see page 57).
The tape is about to end. Prepare a new cassette
(see page 11).
The tape has reached the end. Replace it with a
new cassette (see page 11).
In Self Recording mode, all warnings will be
indicated by displayed in the centre of the
monitor. To check the type of warning, rotate the
monitor back to the normal position.
Displayed for the first
3 seconds
Displayed after
3 seconds
Description of warning
Note: indicates a flashing display.

VL-AH50H/pp. 008-015; 00/4/6/18:00
G. K. Associates, Tokyo
Preparation
8
Inserting and Removing the
Battery Pack
Inserting the Battery Pack
1 Make sure that the Power switch is set
to OFF.
2 Slide the battery compartment door
release on the bottom of the VIEWCAM
in the direction of the arrow to open the
battery compartment door.
3 Insert the battery pack into the com-
partment as shown, and push it in com-
pletely until it locks into place.
Caution:
• Do not force the battery pack into the
battery compartment if it does not go in
easily.
Removing the Battery Pack
1 Perform steps 1 and 2 above.
2 Press the battery release as shown to
remove the battery pack.
Preparation
Preparation
Cautions:
• BEFORE REMOVING THE BATTERY PACK,
ALWAYS STOP THE TAPE AND TURN THE
POWER OFF. If you remove the battery pack
during recording or playback, the tape will
remain wound around the video head drum,
potentially causing damage to the tape.
• Make sure the battery compartment door is
closed firmly during operation. If it is not, the
battery pack may fall out or VIEWCAM operation
may fail because of the poor contact pressure.
• Remove the battery pack from the VIEWCAM if
the VIEWCAM will not be used for a long period
of time.
• When removing the battery pack, do not tilt
the VIEWCAM so that the battery compart-
ment faces down. The battery pack may fall
out.
• Do not expose the battery compartment door to
strong force, as it may come off.
• Use only SHARP model BT-H22 or BT-H32
battery packs with this VIEWCAM. Use of other
batteries may present a risk of fire or explosion.
Power switch
4 Close the door, pressing it firmly in the
centre until it clicks.
Battery release
Battery
compartment
door release

VL-AH50H/pp. 008-015; 00/4/6/18:00
G. K. Associates, Tokyo
Preparation
Preparation
9
Charging the Battery Pack
1 Insert the battery pack into the VIEWCAM
(see page 8). Make sure that the Power
switch is set to OFF.
• The battery pack will not charge when the
Power switch is set to CAMERA or VCR.
2 Connect the power cord to the AC adapter,
then insert the AC plug into a power outlet.
3 Open the terminal cover on the VIEWCAM
and insert the DC plug of the AC adapter
into the DC IN jack on the VIEWCAM.
• The CHARGE indicator will light up in red.
4 When the battery is fully charged, the
CHARGE indicator will light up in green.
Remove the DC plug from the VIEWCAM,
and close the terminal cover.
Caution:
• When removing the plugs, grasp the plug, not the
cable.
Charging time and maximum continuous
recording and playback times
Power switch
Terminal cover
Charging
time
Max.
continuous
recording
time
Max.
continuous
playback
time
Battery
pack
DC IN jack
CHARGE indicator
Notes:
• Using the zoom (see page 17) and other
functions or turning the power on and off
frequently will increase power consumption.
This may result in a decrease of more than 50%
in the actual recording time compared to the
maximum continuous recording time listed
above.
• The charging time and recording time may vary
depending on the ambient temperature and the
condition of the battery pack.
• It is recommended that you have enough battery
packs on hand to provide two to three times your
estimated recording time.
• See page 56 for more information on using the
battery pack.
Caution:
• Charge only SHARP model BT-H22 or BT-H32
battery packs. Other types of battery packs may
burst, causing personal injury and damage.
BT-H22
BT-H32
approx.
3 hr.
approx.
6 hr.
approx.
1 hr. 35 min.
approx.
3 hr. 10 min.
approx.
1 hr. 35 min.
approx.
3 hr. 10 min.
To power
outlet

VL-AH50H/pp. 008-015; 00/4/6/18:00
G. K. Associates, Tokyo
Preparation
10
Powering the VIEWCAM from
an AC Outlet
Caution:
• The supplied AC adapter is specially designed
for use with this VIEWCAM, and should not be
used as a power supply for other camcorders.
1 Connect the power cord to the AC
adapter, then insert the AC plug into a
power outlet.
2 Make sure that the Power switch is set
to OFF.
3 Open the terminal cover and insert the
DC plug of the AC adapter into the DC
IN jack on the VIEWCAM.
Cautions:
• BEFORE REMOVING THE DC PLUG, ALWAYS
STOP THE TAPE AND TURN THE POWER OFF.
If you remove the DC plug during recording or
playback, the tape will remain wound around the
video head drum, potentially causing damage to
the tape.
• Remove the DC plug from the VIEWCAM if you
will not use the VIEWCAM for a long period of
time.
• When removing the plugs, grasp the plug, not
the cable.
Note:
• Close the terminal cover after use.
Terminal cover
Power switch
DC IN jack
To power
outlet
4 Hold down the Lock
button and slide the
Power switch to
CAMERA or VCR.
Lock button

VL-AH50H/pp. 008-015; 00/4/6/18:00
G. K. Associates, Tokyo
Preparation
Preparation
11
4 Wait for the cassette holder to fully
retract. Close the compartment door by
pressing the centre until it clicks into
place.
Removing a Cassette
Perform step 1 above, then take out the
cassette.
Cautions:
• Do not try to close the cassette compartment
door while the cassette holder is extending or
retracting.
• Be careful not to get your fingers caught in the
cassette holder.
• Do not apply force to the cassette holder except
when pressing the PUSH mark to close it.
• Do not tilt the VIEWCAM or hold it upside down
when you are inserting or removing a cassette. It
may damage the tape.
• Remove the cassette if you will not use the
VIEWCAM for a long period of time.
• If you do not correctly close the cassette holder
in step 3, the VIEWCAM’s cassette protection
mechanism might eject the cassette. If this
happens, repeat the insertion procedure.
• Do not attempt to pick up the VIEWCAM by the
cassette compartment door.
Notes:
• If the battery power is too low, you may not be
able to eject the cassette. Replace the battery
pack with a fully charged one.
• See page 57 for more information on the video
cassette tapes for use with this VIEWCAM.
Inserting and Removing a
Cassette
Inserting a Cassette
1 Supply power to the VIEWCAM, then
slide the release and open the cassette
compartment door.
• The cassette holder extends and opens
automatically.
2 Insert the cassette fully with the window
facing outwards, and with the erasure
protect tab facing upwards.
3 Press the PUSH mark gently until the
cassette holder clicks into place.
• The cassette holder retracts
automatically.
PUSH mark
Erasure protect tab
Cassette compartment
door release

VL-AH50H/pp. 008-015; 00/4/6/18:00
G. K. Associates, Tokyo
Preparation
12
Installing the Lithium
Memory Battery
The supplied lithium battery is used to store the
memory of the date and time settings.
1 Slide the cassette compartment door
release and open the cassette
compartment door.
Note: The cassette holder will extend and
open when the VIEWCAM is connected to a
power source. Be sure to close the cassette
holder before proceeding to the next step
(see page 11).
2 Pull out the lithium battery holder using
a pointed object such as the tip of a
ballpoint pen.
3 Insert the lithium battery
into the battery holder with
the ` side of the battery
facing the j side of the
holder.
4 Push the battery holder back
into position.
5 Close the cassette compartment door by
pressing the centre until it clicks into
place.
Removing the Lithium Battery
Perform steps 1 and 2 above, then lift out the
battery from the battery holder.
Note:
• Replace the battery with a new CR2025 battery
when the date and time indicator starts to fall
behind the correct time.
Notes on the Use of the Lithium
Battery
Cassette compartment
door release
Lithium battery holder
j mark
CAUTION: Danger of explosion if battery is
incorrectly replaced. Replace only with the
same or equivalent type CR2025 recommended
by the equipment manufacturer.
WARNING KEEP THIS BATTERY AWAY FROM
CHILDREN. IF SWALLOWED, CONSULT A
PHYSICIAN IMMEDIATELY FOR EMERGENCY
TREATMENT.
CAUTION BATTERY MAY EXPLODE IF MIS-
USED OR INSTALLED WITH POLARITY
REVERSED. DO NOT RECHARGE, DISAS-
SEMBLE OR DISPOSE OF IN FIRE.
• Do not short-circuit, recharge, disassemble,
or heat the lithium battery.
• Should the lithium battery leak, wipe the
battery compartment and holder clean, and
then insert a new battery.
• The lithium battery will last about one year of
normal usage.

VL-AH50H/pp. 008-015; 00/4/6/18:00
G. K. Associates, Tokyo
Preparation
Preparation
13
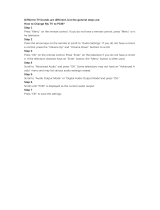
Setting the Date and Time
Example: Setting the date to 2 June 2001 (2. 6.
2001) and the time to 10:30 am (10:30).
Note:
• Check that the lithium memory battery has been
installed before setting the date and time.
4 Press the 쑽 or 쒀 button (C or D) to
select “2” (day), and press the SET
button.
5 Press the 쑽 or 쒀 button to select “6”
(month), and press the SET button.
6 Press the 쑽 or 쒀 button to select
“2001” (year), and press the SET button.
7 Press the 쑽 or 쒀 button to select “10”
(hour), and press the SET button.
8 Press the 쑽 or 쒀 button to select “30”
(minute), and press the SET button.
• The internal clock now starts operating.
9 Press the DISPLAY button to turn off the
menu screen
.
Changing to the 12-hour Time Mode
After performing step 8 above, press the 쑽 or
쒀 button (Q) to select “12H/24H”, then press
the SET button (B) (W) to select “12H”.
Notes:
• The date and time, once set, are stored in
memory.
• The menu screen automatically turns off if no
settings are made within 5 minutes.
Power switch
1 Hold down the Lock
button and slide the
Power switch to
CAMERA.
2 Press the MENU button until
(MENU 3) appears.
• If MENU 1 appears on the screen,
press the PAGE button ( ) until MENU 3
appears.
3 Press the SET button (B).
• When changing the date and time settings,
press the 쑽 or 쒀 button (C or D) to
select “SETTING”, then press the SET
button.
Lock button
MENU
DATE
DI SPLAY OFF
SETTING
12H 24H
SELECT DATE TIME
+
TIME/
/
3
PAGETURE
PIC
-
SET
1
000
1 2000
24H
SET
2
10 30 AM
6 2001
MENU
12H
DATE
DI SPLAY OFF
SETTING
12H 24H
SELECT DATE TIME
+
TIME/
/
3
PAGETURE
PIC
-
SET
MENU
DATE
DI SPLAY OFF
SETTING
12H 24H
SELECT DATE TIME
+
TIME/
/
3
PAGETURE
PIC
-
SET
SET
1
000
1 2000
24H
MENU button
DISPLAY button
2
000
1 2000
SETTING
2
000
6 2000
SETTING
2
000
6 2001
SETTING
2
10 00
6 2001
SETTING
2
10 30
6 2001
SETTING
/